For most people, a 3D printer brings to mind phone stands, replacement knobs, tabletop miniatures, and that one tiny boat everyone prints to prove their machine is not possessed. But every so often, a maker project comes along that nudges desktop 3D printing into a more surprising corner of the house. In this case, that corner might be a backsplash, accent shelf, craft wall, or decorative panel inspired by Portuguese azulejo tiles.
The wonderfully cheeky idea behind “Forget The Kiln, These Tiles Were Made On A Prusa” is simple: instead of firing clay in a kiln, a maker can use a Prusa i3-style FDM printer to create a raised plastic tile pattern, fill the recessed areas, sand the surface smooth, and seal the finished piece until it has the glossy charm of decorative ceramic. It is not a replacement for true fired ceramic tile, and nobody should tile a shower floor with spackle and optimism. But as a creative home decor experiment, it is clever, affordable, customizable, and very much in the spirit of modern DIY.
This project sits at the sweet spot where digital fabrication meets old-world design. Azulejo tilework has centuries of cultural history, while a Prusa printer represents the accessible, open-ended maker movement. Put them together, and you get a project that feels like a Renaissance artisan wandered into a garage workshop, saw a spool of PLA, and said, “Sure, let’s make that blue-and-white masterpiece with melted corn plastic.”
What Makes These Prusa-Made Tiles So Interesting?
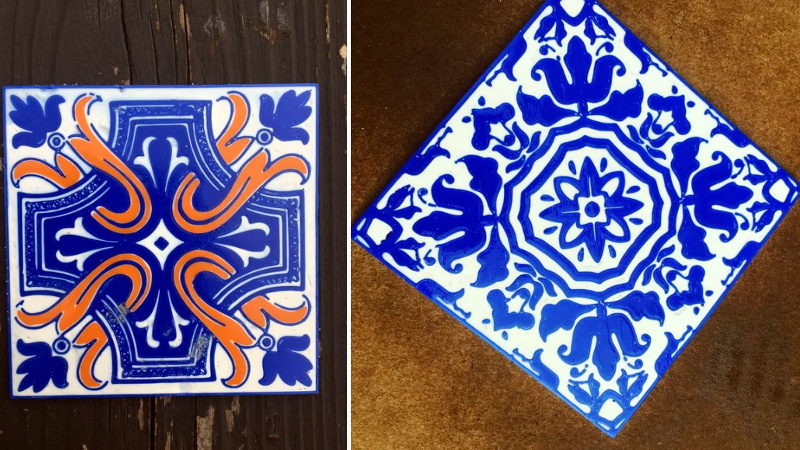
The original concept gained attention because the tiles looked like they belonged in a traditional decorative setting, yet they were made using a standard desktop printer. The process began with a digital design based on the raised pattern of Portuguese azulejo tiles. The Prusa printed the base and raised decorative ridges, leaving open recessed spaces between them. Those recesses were then filled with premixed spackling paste, leveled, dried, sanded, and sealed with a semi-gloss clear coat.
That workflow matters because it uses the printer for what it does best: producing repeatable geometry. Instead of printing a completely solid tile, the printer creates the structure and ornament. The filler provides contrast and surface mass. Sanding brings the plastic ridges and filled areas into the same plane. The clear coat adds protection and shine. The result is a decorative object that looks far more polished than a raw 3D print.
It is also a smart use of material. Printing only the base and raised elements saves filament and reduces print time. Anyone who has watched a printer slowly draw infill for hours knows that saving material is not just economical; it is emotionally healing.
The Old Inspiration: Portuguese Azulejo Tilework
Azulejos are decorative glazed tiles strongly associated with Portuguese and Spanish architecture. They often feature geometric, floral, historical, or narrative scenes, and their famous blue-and-white style has become a visual shorthand for Portugal’s tiled facades, churches, train stations, palaces, and interiors. Traditionally, these tiles are ceramic, glazed, and kiln-fired, which gives them durability, moisture resistance, and that luminous surface people love.
The Prusa-made version borrows the visual language without copying the traditional manufacturing method. It does not try to be a ceramic artifact. Instead, it behaves more like a decorative relief panel inspired by tile. That distinction is important. A 3D printed tile made with PLA, filler, and clear coat can be beautiful, but it is best suited for accent areas, wall art, craft projects, display shelves, studio decor, or low-contact surfaces.
In other words, this is not the tile you choose when your contractor asks what should go behind the stove in a high-heat commercial kitchen. This is the tile you make when you want a custom decorative piece and enjoy the faintly heroic sound of a printer moving back and forth for several hours.
The New Tool: Why A Prusa Works So Well
Prusa printers became popular in the maker community because they are reliable, well-supported FDM machines capable of accurate, repeatable prints. FDM, or fused deposition modeling, builds objects layer by layer by extruding melted filament through a nozzle. For decorative tiles, that layer-by-layer approach is useful because it can create crisp raised borders, repeated motifs, and shallow relief patterns without requiring expensive tooling.
PLA is a practical filament choice for this kind of indoor decorative project. It prints at relatively low temperatures, is beginner-friendly, and is known for low warping compared with trickier materials. PLA can capture fine detail well, making it suitable for raised ornament, linework, borders, and repeating geometric patterns. The trade-off is that PLA is not heat-proof, not ideal for constant outdoor UV exposure, and not as tough as materials designed for demanding mechanical use.
That is why the project works best as decorative interior tile art rather than structural tile. A Prusa can create the pattern, but the final object still depends on smart finishing, careful sealing, and realistic expectations.
How The Prusa Tile Process Works
1. Start With A Strong Pattern
The most successful designs use bold shapes, raised lines, and clear contrast. Traditional azulejo patterns are a great starting point because they already rely on symmetry, repetition, borders, and decorative rhythm. A maker can trace a historical motif, design an original geometric pattern, or use vector artwork to create a raised relief model.
For best results, avoid ultra-thin details that may break, clog visually after filling, or disappear during sanding. Raised ridges should be tall enough to survive finishing but not so tall that the tile looks like a topographical map of an enthusiastic mountain range.
2. Model The Tile As A Relief Panel
The printable model usually includes a flat base and raised decorative elements. The empty spaces between the raised lines are intentional because they will be filled later. This approach saves filament and creates a two-material look without needing a multi-material printer.
A typical workflow might involve drawing the pattern in vector software, importing it into CAD, extruding the shapes, and exporting an STL file. The file can then be prepared in slicer software such as PrusaSlicer, where layer height, infill, perimeter count, and print settings are adjusted.
3. Print With Detail In Mind
A smaller layer height can improve the look of raised details, though it increases print time. More perimeters can make the ridges stronger. A flat, well-leveled first layer helps the tile sit nicely against a wall or backing board. If the tile is large, consider printing a test corner first. A small test can reveal whether details are too fragile, gaps are too narrow, or the design looks muddy once filled.
Color choice also matters. Blue filament with white filler can create a classic azulejo-inspired look. White filament with colored filler can reverse the effect. Black-and-white, terracotta-and-cream, or navy-and-gray combinations can make the project feel modern rather than historic.
4. Fill The Recessed Areas
Premixed spackling paste can be pressed into the open spaces with a putty knife. The goal is to slightly overfill the recessed areas, then scrape the surface as level as possible. Once dry, the excess can be sanded down until the raised printed pattern reappears cleanly.
This step is where patience pays off. If the filler is too thin, it may shrink or crack. If it is applied too messily, sanding becomes a full-body workout. Let the filler dry thoroughly before sanding; rushing this stage is how a promising tile becomes a chalky crime scene.
5. Sand Smooth And Control Dust
Sanding removes excess filler and smooths the top surface. Start gently and increase effort only as needed. Wet sanding can reduce dust, while hand sanding offers better control around fine details. If using a powered sander, work outdoors or in a well-ventilated area and wear appropriate protection.
Plastic and filler dust should be collected and disposed of properly. Even small DIY projects deserve responsible cleanup. A vacuum, drop cloth, dust mask, and patience are humble tools, but they keep your workspace from looking like a snow globe exploded.
6. Seal For Shine And Protection
A semi-gloss or gloss clear coat gives the tile a more ceramic-like finish. It also helps protect the filler and plastic surface from light handling. For a tougher finish, some makers use brush-on epoxy coatings designed for 3D printed parts. These products can reduce visible layer lines and create a smoother, glossier surface.
Clear coating should be done in thin, even layers. Heavy coats can pool in corners, blur fine details, or create tacky spots. Always follow product instructions, allow proper curing time, and test on a spare print before committing to a full set of tiles.
Where These Tiles Make Sense
Prusa-made decorative tiles are best used where beauty matters more than impact resistance. They can work well as framed wall art, decorative backsplashes away from heat and heavy moisture, shelf accents, cabinet inserts, studio signs, craft room panels, or sample boards. They are especially appealing for renters because they can be mounted on removable boards instead of permanently attached to a wall.
They are not ideal for floors, showers, countertops, or exterior walls exposed to sun and rain. Real ceramic and porcelain tiles are fired at high temperatures and engineered for durability, water resistance, and long-term performance. A 3D printed decorative tile is more like a handcrafted art object. Treat it kindly, and it will reward you. Treat it like porcelain, and it may remind you that plastic has feelings too.
How This Compares With Real Ceramic Tile
Traditional ceramic tile is made from clay and minerals shaped, dried, fired, glazed, and often fired again. Porcelain tile is denser and generally more water-resistant than standard ceramic. These materials are strong, hygienic, heat-resistant, and appropriate for demanding installations when properly selected and installed.
By contrast, a Prusa-made tile is a decorative hybrid. It uses plastic, filler, sanding, and sealant to imitate the visual effect of tile. It offers customization, low-cost experimentation, and fast design iteration. It does not offer the same moisture resistance, fire resistance, or load-bearing performance as fired tile.
The comparison is not really fair unless the purpose is clear. For a bathroom floor, choose professional tile. For a custom decorative panel with a pattern nobody else owns, the 3D printed route is far more flexible. Real tile wins the durability contest. Printed tile wins the “I made this on my desk while drinking coffee” contest.
Design Ideas For Better 3D Printed Tiles
Use Modular Patterns
One of the best ways to make these tiles look professional is to design them as modular repeats. A single tile can be beautiful, but four or nine arranged together can create a larger pattern. Think of each tile as one square in a bigger visual puzzle.
Create A Limited Color Palette
Too many colors can make the tile look busy. Two or three colors often feel more intentional. Classic blue and white is timeless, but green and cream, charcoal and sand, or cobalt and pale gray can look striking in modern interiors.
Try A Mold Workflow For Multiple Copies
If the goal is to make many identical pieces, printing every tile individually may become slow. A better approach may be to 3D print a master pattern and use it to create a mold. That mold could then be used with resin, plaster, cementitious materials, or even ceramics depending on skill level and materials. This is where 3D printing becomes a bridge between digital design and traditional casting.
Design Around Layer Lines
Layer lines are not always the enemy. Sometimes they add texture. For a handmade look, the slight evidence of printing can make the piece more interesting. For a glossy ceramic illusion, use sanding, filler primer, or epoxy coating to reduce them.
Common Mistakes To Avoid
The first mistake is making the pattern too delicate. Fine filigree may look elegant on screen but become frustrating after printing, filling, and sanding. The second mistake is underestimating drying time. Filler that feels dry on the surface may still be soft underneath. The third mistake is using the finished tile in the wrong environment. A decorative PLA tile is not a substitute for code-compliant building materials in wet, hot, or high-traffic areas.
Another common mistake is skipping test pieces. A small test tile can save filament, filler, and emotional stability. Print one small section first, fill it, sand it, and seal it. If it looks good, scale up. If it looks bad, congratulations: you failed efficiently, which is the official love language of prototyping.
Why Makers Love Projects Like This
This tile project is appealing because it changes the role of the 3D printer. The machine is not just making gadgets; it is making decor. It gives homeowners, artists, and hobbyists a way to produce custom objects that would be expensive or impossible to buy. Want a tile with your initials worked into a Moorish-inspired pattern? Possible. Want a backsplash accent based on a family symbol, local landmark, or favorite flower? Also possible. Want a kitchen wall covered in tiny 3D printed raccoons wearing crowns? Technically possible, though your real estate agent may need a moment.
That freedom is the magic. Desktop fabrication lets people move from consumer to creator. Instead of choosing from what a store stocks, you can design what a space needs. The results may not always be perfect, but they are personal.
Experience-Based Notes: Making Prusa-Style Decorative Tiles Feel Professional
From a hands-on maker perspective, the most important lesson is that the print is only half the project. The finishing work determines whether the final tile looks like a polished decor piece or a plastic experiment that escaped the hobby room. A clean model, a reliable print, and a smooth first layer matter, but the real transformation happens after the printer stops.
The first practical experience is to keep the pattern bold. Designs that look stunning in flat artwork can become too busy once raised, filled, and sanded. Thick lines, balanced spacing, and clear negative areas produce a more tile-like finish. Tiny curls and hairline borders often create sanding headaches. If the goal is an azulejo-inspired look, symmetry helps. A centered motif with corner details can make one tile look complete while also allowing multiple tiles to form a larger repeat.
The second experience is to print a small sample before committing to a full panel. A sample reveals how the filler behaves, how much sanding is needed, and whether the clear coat changes the color. Some fillers dry brighter than expected. Some clear coats slightly deepen the filament color. A test piece lets you adjust before producing six tiles and discovering they all look like they were frosted by an impatient cupcake decorator.
The third experience is to avoid rushing the filler stage. Press the spackle or filler firmly into the recessed spaces, scrape the excess carefully, and let it dry fully. It is tempting to sand early, especially when the project looks almost finished, but soft filler can tear, smear, or crumble. A longer drying period usually produces a cleaner surface and less frustration.
The fourth experience is to sand with intention. Do not attack the tile like it owes you money. Begin gently, check progress often, and use a flat sanding block where possible. The goal is to reveal the raised plastic pattern cleanly while leaving the filled areas smooth. If the design includes detailed corners, hand sanding may be slower but safer. Powered sanding can work, but it can also remove too much material quickly.
The fifth experience is to think about mounting before the tile is finished. If the piece will become wall art, a lightweight backing board can make installation easier. If several tiles will be arranged together, spacing should be planned early. Small inconsistencies between printed pieces can be hidden with a shadow gap, frame, or painted backing. Trying to align handmade decorative tiles perfectly after finishing can feel like negotiating with very flat, very stubborn roommates.
The sixth experience is to choose the finish based on the final location. A simple clear coat may be enough for display art. A stronger epoxy coating may be better for pieces that will be touched or cleaned occasionally. Matte finishes can look modern, while gloss finishes give a more ceramic impression. Always test the finish first because some coatings can yellow, pool, or make fine details look softer.
Finally, remember that the charm of this project is not perfection. True handmade tile often has slight variation, and that variation gives it warmth. A Prusa-made tile can carry the same spirit in a digital way. The printer provides precision, but the filling, sanding, sealing, and design choices give the piece personality. That combination is what makes the project memorable: it is not fake ceramic; it is a new kind of DIY object with one foot in craft history and the other on a heated print bed.
Conclusion
“Forget The Kiln, These Tiles Were Made On A Prusa” is more than a catchy maker headline. It captures a bigger idea: desktop 3D printing is not limited to mechanical parts and novelty toys. With a good design, a practical material, and patient finishing, a Prusa printer can help create decorative tiles that echo traditional azulejo beauty while remaining fully modern and customizable.
These tiles are best understood as decorative art panels, not replacements for fired ceramic. Still, they offer something valuable: creative freedom. You can experiment with patterns, colors, textures, coatings, and layouts without needing a kiln, a pottery studio, or a truckload of specialized tools. The result is a project that feels accessible, personal, and just weird enough to be delightful.
If traditional ceramic tile is the grand old cathedral of surface design, Prusa-made tile is the clever garage chapel next door, humming quietly, smelling faintly of PLA, and producing something surprisingly beautiful one layer at a time.
SEO Tags
Note: This article is written for informational and creative DIY purposes. Prusa-made decorative tiles are suitable for accent decor, wall art, and light-use interior projects, but they should not be treated as professional ceramic, porcelain, structural, heat-rated, or wet-area tile unless tested and installed according to appropriate material and building standards.