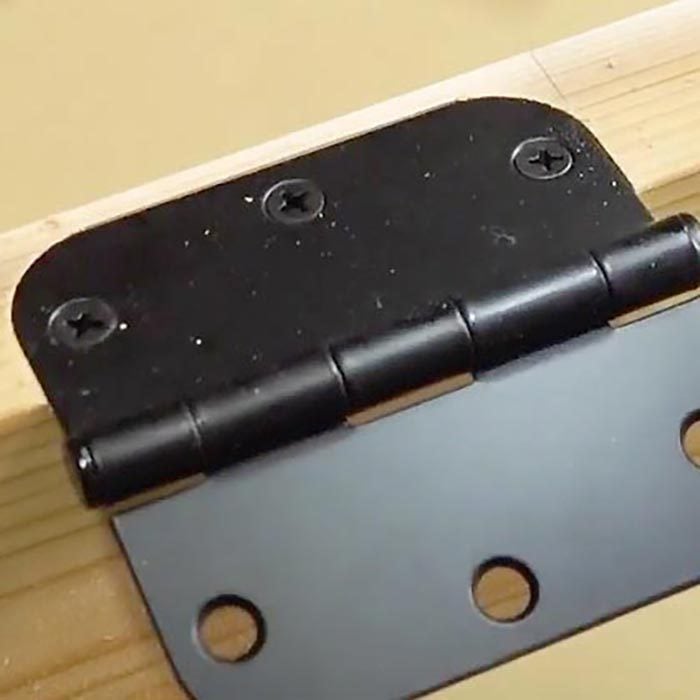
Recessing hingesalso called cutting or mortising hinge pocketsis one of those DIY jobs that looks suspiciously simple. Trace a hinge, remove a little wood, add screws, and celebrate, right? Mostly. The trouble is that “a little wood” can quickly become “why is there a crater in my new door?”
A properly recessed hinge sits flush with the edge of the door and the door jamb. This allows the hinge leaves to close together correctly, keeps the door aligned, and helps prevent binding, sagging, rubbing, and uneven gaps. The work can be completed with a sharp chisel and mallet, or sped up with a trim router and hinge-mortising jig. Both methods can produce professional results when the layout and depth are accurate.
This guide explains how to recess hinges on a door using either method, how to transfer hinge locations to the frame, and how to fix the most common mistakes without turning your door into expensive firewood.
What Does It Mean to Recess a Door Hinge?
Most residential butt hinges are designed for full-mortise installation. One hinge leaf is recessed into the edge of the door, while the matching leaf is recessed into the jamb. The mortise should generally be as deep as the thickness of the hinge leaf, allowing the metal surface to sit flush with the surrounding wood.
If the mortise is too shallow, the hinge protrudes and may push the door toward the latch side. If it is too deep, the hinge becomes buried, which can pull the door toward the hinge side or cause the leaves to bind when the door closes. Accurate depth matters more than brute force.
Tools and Materials You Will Need
For the Hand-Chisel Method
- Sharp 3/4-inch or 1-inch wood chisel
- Wooden or rubber mallet
- Utility knife with a fresh blade
- Combination square
- Tape measure and sharp pencil
- Drill or driver
- Self-centering hinge bit or standard drill bit
- Screwdriver
- Clamps and stable sawhorses
For the Router Method
- Trim router or compact router
- Door-hinge mortising jig or template
- Bearing-guided router bit compatible with the jig
- Corner chisel for square-corner hinges
- Scrap wood for test cuts
- Eye protection, hearing protection, and a dust mask
A chisel is economical and ideal for one or two doors. A router and jig are useful when installing several doors because they create fast, repeatable mortises. Commercial jigs commonly accommodate multiple hinge sizes, common door thicknesses, and either 1/4-inch or 5/8-inch corner radii.
Chisel or Router: Which Method Should You Use?
Use a Chisel When:
- You are mortising only one door.
- The door is already installed and access is limited.
- You do not own or regularly use a router.
- You need to make a small depth adjustment to an existing mortise.
- The hinge has unusual dimensions that do not match a standard jig.
A sharp chisel offers excellent control and requires almost no setup. Fine Homebuilding notes that an inexperienced router user can make a larger mistake more quickly than someone working carefully with a hand chisel.
Use a Router and Jig When:
- You are hanging several slab doors.
- You need identical hinge mortises.
- You are comfortable controlling a compact router.
- You are working with rounded-corner hinges.
- You want to reduce the amount of hand chiseling.
A trim router is often easier to balance on a door edge than a full-size router. A correctly fitted template also reduces measuring differences from one hinge position to the next. Test cuts remain essential because a router set only slightly too deep can remove more wood than intended.
How to Recess Hinges on a Door Step by Step
Step 1: Remove and Secure the Door
If the door is already hanging, support it before removing the hinge pins. Place the door on padded sawhorses with the hinge edge facing upward. Clamp it securely so it cannot rock or slide while you work.
Remove knobs, levers, or other hardware if they make the door unstable. Use padding beneath finished doors to avoid scratches. Do not balance the door against a wall and attempt to chisel it one-handed unless you enjoy combining carpentry with emergency juggling.
Step 2: Confirm the Hinge Size and Corner Style
Before marking anything, verify the hinge height, width, thickness, screw pattern, and corner shape. Common residential hinges may have square corners, 1/4-inch-radius corners, or 5/8-inch-radius corners. Your mortise must match the actual hingenot the hinge you vaguely remember buying.
Open the hinge and position one leaf on the door edge. The hinge barrel, or knuckle, should project beyond the face of the door so the door can swing without the wood edges colliding.
Step 3: Mark the Hinge Locations
When replacing an existing door slab, the most reliable approach is to transfer the hinge positions from the old door or from the existing jamb. Lay the old door on top of the new one with the tops and hinge edges aligned, then mark the top and bottom of every hinge mortise. Lowe’s recommends using the existing door as a template when fitting a replacement slab.
If you are starting from scratch, follow the hinge or door manufacturer’s placement instructions. Do not assume that every frame uses identical spacing. Measure all hinge positions from one reference pointusually the top of the doorto avoid cumulative errors.
Step 4: Trace the Hinge
Place the hinge leaf in its final position and hold it firmly. Trace around it with a sharp pencil. Next, use a utility knife to score the outline. A knife line creates a crisp boundary and helps prevent the grain from splintering beyond the mortise. Score lightly on the first pass, then deepen the line with one or two controlled passes.
Never cut toward your supporting hand. Keep both hands behind the cutting edge and work with the door clamped securely.
Step 5: Mark the Mortise Depth
Measure the thickness of one hinge leafnot both leaves folded together. Transfer that measurement to the side of the door with a marking gauge, combination square, or pencil.
You can also hold the hinge against the door face and use the leaf itself as a visual depth reference. The target is a flush fit. It is safer to begin slightly shallow and make another pass than to cut too deep and later build the mortise back up with shims.
Step 6A: Cut the Mortise With a Chisel
- Hold the chisel vertically on the scored outline, with the bevel facing toward the waste area.
- Tap lightly with a mallet to establish the boundary.
- Make a series of shallow cross-grain cuts inside the outline, spaced roughly 1/8 inch apart.
- Turn the chisel bevel-side up and pare away the small wood chips.
- Work gradually toward the marked depth.
- Flatten high spots with light, controlled paring cuts.
Do not try to remove the full depth in one heroic swing. Shallow cuts are cleaner, safer, and easier to control. This Old House and Bob Vila both recommend scoring the layout first, making closely spaced cuts, and removing the waste in small layers.
Use the widest sharp chisel that comfortably fits the mortise. A dull chisel crushes fibers instead of slicing them and encourages you to hit harder, which is woodworking’s traditional way of announcing that a mistake is about to happen.
Step 6B: Cut the Mortise With a Router and Jig
- Select the template matching the hinge size and corner radius.
- Attach or clamp the jig squarely to the door edge.
- Unplug the router or remove its battery before installing the bit.
- Set the bit depth to the thickness of the hinge leaf.
- Make a test cut in scrap wood of similar density.
- Place the router flat on the jig before switching it on.
- Guide the bearing along the template and remove the center waste.
- Keep the router base flat until the bit has stopped spinning.
Router-template systems are designed to guide the bit around the mortise perimeter and maintain consistent dimensions. Some jigs include depth guides, self-centering bits, latch templates, and corner-radius inserts.
Square-corner hinges require one extra step because a round router bit leaves rounded corners. Use a sharp chisel or spring-loaded corner chisel to square them carefully. Do not square the corners when installing rounded hinges; the extra empty space will be visible and provide no practical benefit.
Step 7: Test-Fit the Hinge
Place the hinge into the mortise without screws. Run a fingertip across the hinge and surrounding wood. The leaf should feel flush, without rocking on a high spot.
If the hinge sits high, mark the high area with a pencil and remove a paper-thin shaving. If it sits below the surface, stop cutting. A slightly deep mortise can be corrected with a purpose-made hinge shim, thin cardboard, plastic laminate, or another stable shim material placed beneath the hinge.
Step 8: Drill Pilot Holes
With the hinge seated in the mortise, mark the center of each screw hole. A self-centering hinge bit is especially helpful because its guide sleeve centers the drill within the countersunk hole.
Drill straight pilot holes that are slightly narrower than the screw shanks. Pilot holes reduce splitting, prevent wandering screws, and make it easier to keep the hinge from shifting. Drive the screws snugly with a screwdriver or a drill set to low torque. Excessive torque can strip the wood or damage the screw heads.
Step 9: Transfer the Hinge Locations to the Jamb
If the jamb mortises do not already exist, position the door in the opening on shims, maintaining an even gap around the top and sides. Mark the top and bottom of each hinge leaf directly onto the jamb.
Remove the door, position the matching hinge leaf between the marks, and trace it. Cut the jamb mortises using the same method used on the door. Match the depth carefully; inconsistent mortise depths can twist the hinge and change the door’s alignment.
Step 10: Hang and Test the Door
Attach the hinges, bring the door into the opening, align the hinge knuckles, and insert the pins. Test the swing slowly.
Check that:
- The top gap is reasonably even.
- The door does not rub the jamb or flooring.
- The latch enters the strike plate smoothly.
- The door stays where placed instead of swinging open or closed by itself.
- The hinge leaves close without binding.
Before altering the mortises again, tighten all hinge screws. Loose screws are a common cause of sagging and poor latching, and tightening them is considerably easier than removing another layer of wood.
Common Door-Hinge Mortising Mistakes
Cutting the Mortise Too Deep
A deep mortise pulls the hinge leaf below the wood surface. Correct it by removing the hinge and adding a full-size shim beneath the leaf. Avoid stacking several tiny scraps around individual screw holes because uneven support can bend the hinge.
Leaving the Mortise Too Shallow
A proud hinge may create an oversized gap at the hinge side and force the latch edge into the frame. Remove the hinge, score the perimeter again, and pare away only the high spots. Check the fit after every few cuts.
Allowing the Router to Tip
A door edge provides a narrow platform. If the router tilts, the bit can dig deeper on one side. Keep downward pressure on the jig, use a compact router when possible, and consider adding an auxiliary base for greater stability.
Tracing the Hinge With the Barrel in the Wrong Position
The hinge knuckle must project far enough beyond the door face to allow the door to swing. A hinge positioned too far inward can cause the door and jamb edges to bind together.
Skipping the Pilot Holes
Screws driven directly into hardwood can wander, split the edge, or pull the hinge out of position. Pilot holes take only a few seconds and can prevent a surprisingly creative collection of problems.
Using a Dull Chisel
A dull edge requires greater force and is harder to control. Sharpen the chisel before beginning, especially when working with dense hardwood or a veneered door edge. Sharp tools generally produce cleaner mortises and require lighter mallet blows.
How to Fix a Door After Recessing the Hinges
The Door Rubs at the Top Latch-Side Corner
First tighten the top-hinge screws. If they no longer grip, replace one jamb-side screw with a longer screw capable of reaching framing behind the jamb. If the mortise is too deep, add a thin shim under the top hinge.
The Door Rubs Along the Hinge Side
Check for shallow mortises, debris beneath the hinge leaves, protruding screw heads, or a hinge barrel positioned too far inward. Correct the specific obstruction rather than automatically planing the door.
The Door Will Not Latch
Inspect the door gaps and hinge screws before moving the strike plate. An incorrectly seated hinge can shift the latch several millimeters. Correcting the hinge alignment may solve the problem without enlarging the strike mortise.
The Screw Holes Are Stripped
For a lightly stripped hole, insert wood slivers coated with wood glue, allow the glue to cure, trim the repair flush, and drill a new pilot hole. Severely damaged or split door edges may require a larger structural repair or professional evaluation.
Professional Tips for Cleaner Hinge Mortises
- Make test cuts before routing the actual door.
- Use one reference edge for all measurements.
- Label the top, middle, and bottom hinges during removal.
- Keep paint, sawdust, and wood chips out of existing mortises.
- Use a self-centering bit for accurate screw placement.
- Stop frequently and check the hinge fit.
- Support heavy exterior doors with help from another person.
- Follow the router, jig, hinge, and door manufacturers’ instructions.
For repeated installations, a template can significantly improve consistency. A shop-made jig can also work well when built for a particular hinge and router combination. Fine Homebuilding and WOOD Magazine both describe custom templates as practical ways to produce repeatable, accurately sized mortises.
Experience-Based Lessons From Real-World Door-Hinge Projects
The biggest lesson from hinge-mortising work is that measuring is rarely the difficult part. The challenge is resisting the urge to remove too much material. A hinge mortise may be only about as deep as a thin metal leaf, so one enthusiastic chisel strike can double the intended depth. Experienced installers approach the final depth with paring cuts rather than chopping cuts. The first cuts establish the outline; the last cuts should feel more like shaving than excavation.
Another common experience is discovering that the door itself is not the only variable. Existing jambs can be twisted, floors can slope, old hinge screws can be loose, and layers of paint can change how a hinge seats. Before blaming a newly cut mortise, it pays to inspect the entire opening. A door that rubs may have a perfect mortise but a loose top hinge. A door that refuses to latch may be reacting to a shifted jamb rather than an incorrectly positioned hinge.
Working with an old door as a template is usually faster than relying on standard hinge-spacing formulas. Even when two doors are nominally the same size, their hinge positions may differ enough to prevent a direct swap. Aligning the tops and hinge edges of the old and new doors allows the existing jambnot a generic diagramto determine the layout. The phrase “measure twice, cut once” remains useful, but “compare with the old door before cutting anything” may be even more valuable.
The choice between a chisel and router also becomes clearer with experience. For one interior door, setting up a router jig can take longer than cutting three mortises by hand. For eight doors, however, a jig becomes a major advantage. Once the depth and template are verified on scrap material, the router can produce matching pockets quickly. The important qualification is that the first mortise should never be the test mortise. Scrap lumber is cheaper, less decorative, and far less likely to cause colorful language.
Router stability is another lesson that often arrives suddenly. The narrow edge of a door does not provide much support for a tool with a spinning bit. Keeping the base flat is essential from the moment the router starts until the bit stops. Many accidental gouges occur when the user lifts or tilts the router while the bit is still moving. A trim router, broad jig platform, and firm clamping arrangement make the work noticeably calmer.
Sharpness changes the hand-tool experience completely. A properly sharpened chisel can slice across fibers with modest hand pressure. A dull one requires pounding, crushes the wood, and tends to follow the grain away from the layout line. Beginners sometimes assume they lack skill when the actual problem is a neglected cutting edge. Sharpening the tool can improve the result more than another hour of practice with a dull blade.
It is also useful to install only one or two screws during the first test fitting. Fully driving every screw before checking the door creates unnecessary work if an adjustment is needed. Seat the hinges, hang the door, inspect the gaps, and confirm that the leaves are flush. Once the alignment is correct, install and tighten the remaining screws.
Finally, small corrections usually outperform dramatic ones. If a hinge is slightly high, remove a thin shaving rather than recutting the entire mortise. If it sits slightly low, use a full-size shim rather than carving the surrounding door edge. If a door sags, tighten the screws before changing the hinge pockets. Good door fitting is often a series of tiny adjustments. Patience may not appear on the tool list, but it deserves a place near the top.
Conclusion
Learning how to recess hinges on a door is a manageable DIY project when you focus on three things: precise layout, controlled depth, and frequent test fitting. A sharp chisel is perfectly capable of producing a clean mortise, while a router and hinge jig can save time on larger projects.
Work in shallow passes, keep the hinge barrel correctly positioned, and drill centered pilot holes before installing the screws. When the hinge sits flush and the matching mortises are aligned, the door should swing smoothly, close evenly, and latch without requiring a shoulder tackle.