If your dream craft room currently lives somewhere between a Pinterest board and a folding table covered in glitter, welcome. The good news is that you do not need custom cabinetry, celebrity-level square footage, or a suspiciously expensive wallpaper budget to create a craft room that works. You need a plan, a little creativity, and the courage to stop buying adorable baskets before you know what they are supposed to hold.
Designing a craft room on a budget is really about making smart choices instead of flashy ones. The most affordable craft rooms are built around function first: a work surface you can actually use, storage that keeps supplies visible or easy to grab, lighting that helps you see what color “seafoam” really is, and a layout that prevents your scissors, paper, ribbon, beads, paint, and mystery glue sticks from staging a full-scale rebellion.
The best part? Budget-friendly design often ends up being more personal than expensive makeovers. A thrifted bookcase, a repainted desk, some labeled bins, a pegboard, and a rolling cart can create a room that feels useful, cheerful, and uniquely yours. In other words, your craft room can look charming without requiring you to sell a kidney on Etsy.
Start With a Plan Before You Buy a Single Bin
The biggest budget mistake people make is shopping before they assess what they already own. That is how you end up with six matching containers, three label makers, and zero place to put your cutting mat. Before you buy anything, gather your supplies into categories. Put paper with paper, fabric with fabric, yarn with yarn, paints with paints, and tools with tools. If an item does not belong to a current hobby or get used more than once in a blue moon, be honest about whether it deserves premium real estate.
Once you know what you have, measure your space. Not “eyeball it and hope for the best” measure. Real tape-measure numbers. Write down the room width, wall height, window placement, outlet locations, and any awkward corners or closet doors. Small spaces can work beautifully for craft rooms, but only if you know what can realistically fit.
Then set a real budget. Give yourself a total number and break it into categories such as furniture, storage, lighting, wall organization, and finishing touches. When you do this up front, you protect yourself from the classic crafting trap of spending your entire budget on cute containers and then using cardboard boxes as a chair.
Choose the Cheapest Possible Space That Can Still Work
A budget craft room does not have to be a full spare bedroom. It can be a guest room corner, a walk-in closet, a nook under the stairs, part of a basement, an unused dining area, or even one wall of a home office. What matters is not the room’s official title but whether it can support your workflow.
If you mostly scrapbook, sew, paint miniatures, make jewelry, or work with paper crafts, you probably need three things above all else: a flat work surface, storage for small supplies, and a way to keep projects out of the family traffic lane. A closet craft room can be brilliant because the doors let you hide the mess when life happens. A corner setup can work if you build vertically. Even a shared room can function well when your storage is mobile and your supplies are grouped by activity.
The goal is to create a zone, not chase a fantasy. A modest space designed well will always beat a larger room that becomes an expensive landfill for half-finished projects.
Build the Room Around Four Budget Basics
1. A Work Surface That Fits Your Crafts
Your desk or table is the star of the room. It does not have to be fancy, but it does have to match what you make. If you cut fabric, wrap gifts, or assemble projects, go for the largest surface your space can handle. If you mostly draw, journal, or do detail work, a smaller desk may be fine as long as it is sturdy and comfortable.
Save money by repurposing what you already own. A dining table, old desk, console table, or even a solid-core door placed on filing cabinets can become a fantastic craft station. Folding tables can work temporarily, but if they wobble every time you use a hole punch, they will get old very fast.
Also think about chair height, knee room, and whether you need a standing-height spot for cutting or wrapping. Comfort is not a luxury item. If your back hates your setup, your hobby will start to feel like unpaid overtime.
2. Vertical Storage That Uses Empty Wall Space
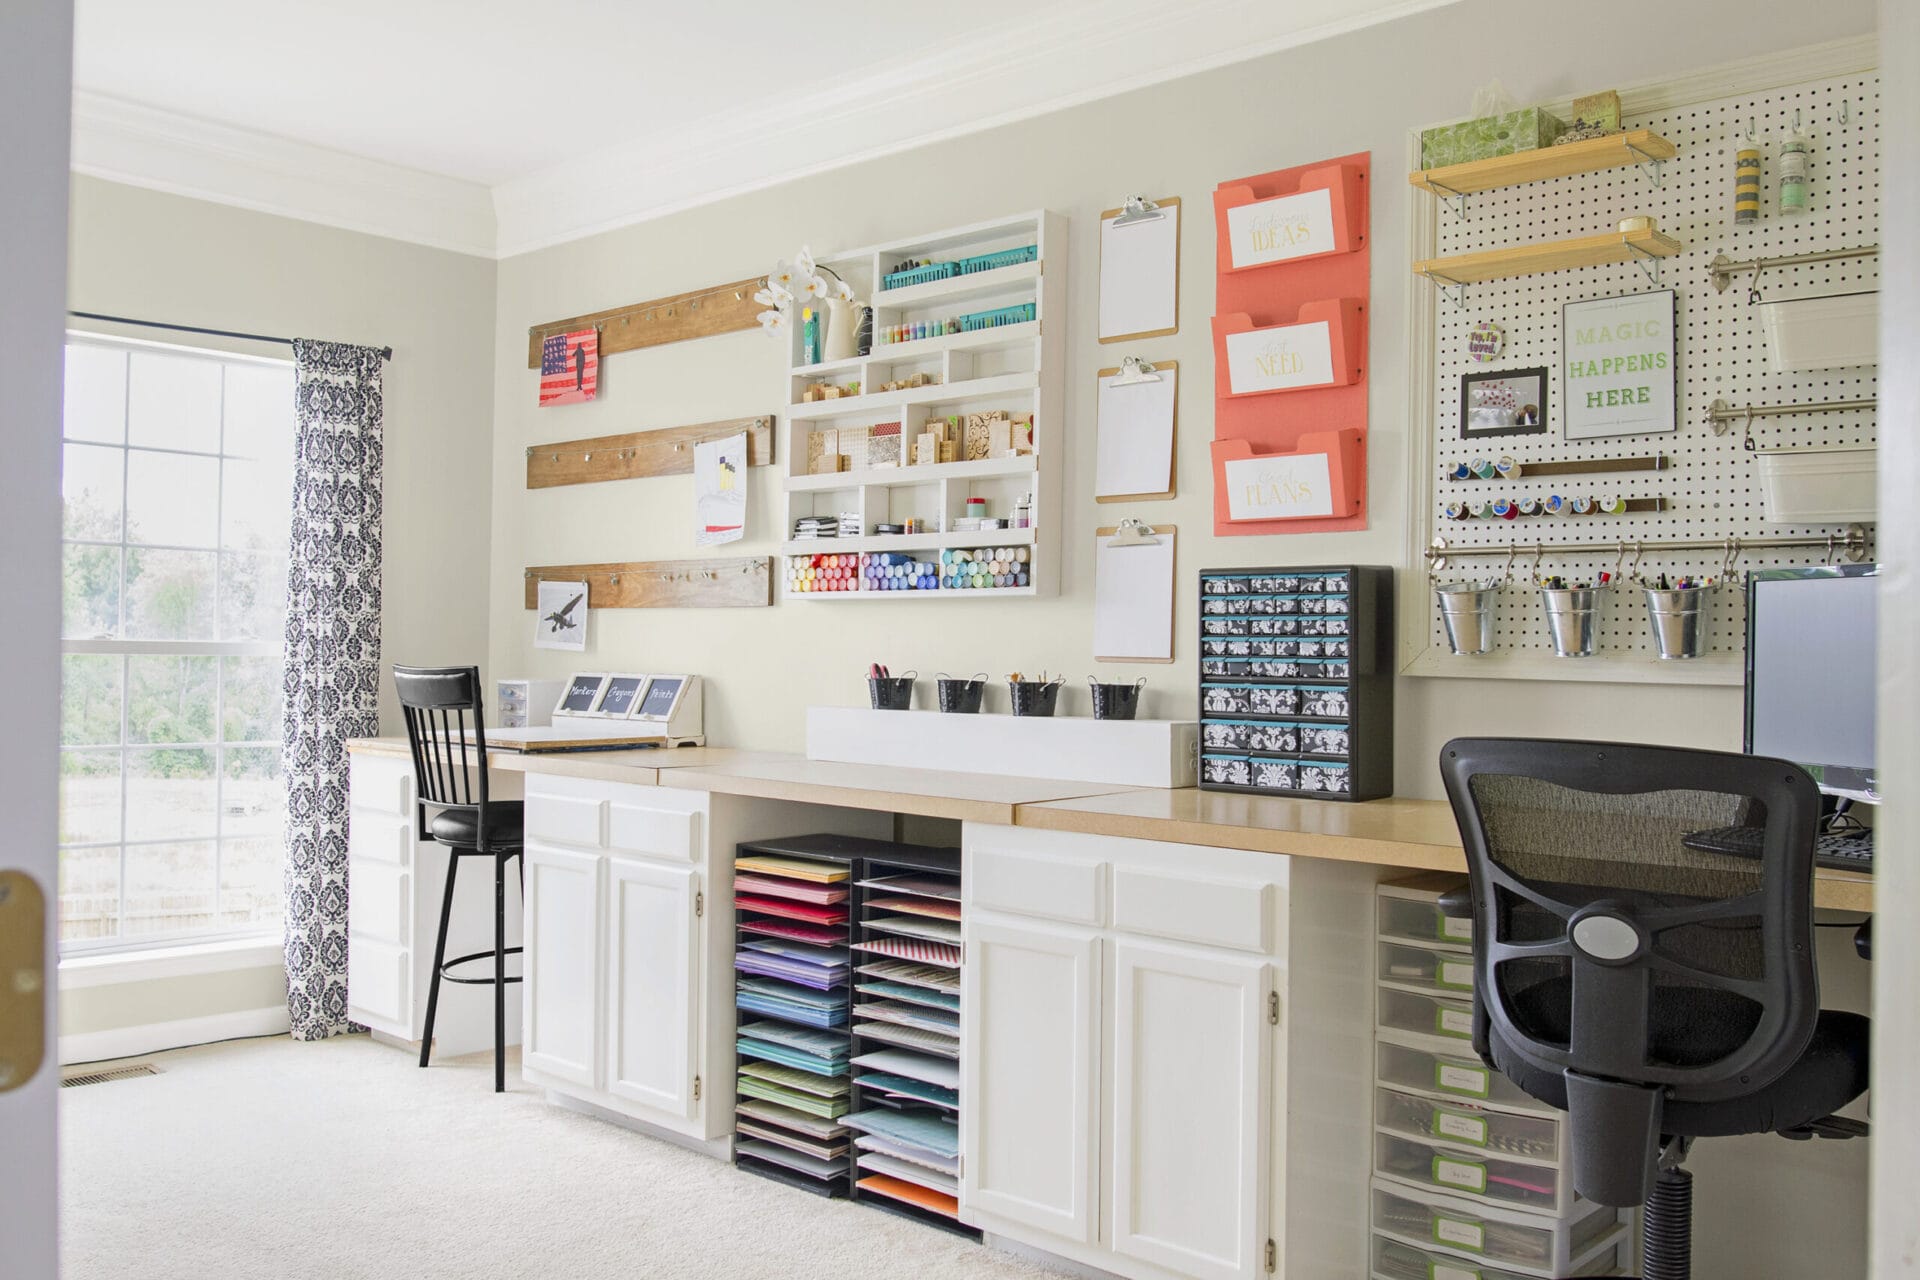
Budget craft rooms win by going up, not out. Walls are free storage waiting to happen. Pegboards, floating shelves, wall rails, hooks, magazine holders, corkboards, and over-the-door organizers can pull clutter off your desk and make supplies easier to see.
Pegboards are especially useful because they can flex as your hobbies change. Today they hold ribbon, scissors, rulers, and paintbrushes. Tomorrow they hold embroidery hoops, washi tape, and tools you forgot you owned. Add small baskets or narrow shelves to make a single wall handle a surprising amount of gear.
If pegboard is not your style, use open shelving. Tall bookcases and stacked cube organizers make the most of narrow footprints. Shelves near your desk should hold the items you use most. High shelves can store seasonal, bulky, or less frequently used supplies.
3. A Mix of Open and Hidden Storage
This is where many craft rooms either shine or spiral. Open storage is wonderful for pretty supplies and everyday essentials. It keeps things visible, accessible, and motivating. Hidden storage is wonderful for visual peace, weirdly shaped tools, backup supplies, and all the odds and ends that are not exactly “decor.”
The sweet spot is a combination of both. Use clear bins, jars, shallow drawers, and open shelves for items you want to see quickly. Use cabinets, lidded bins, fabric boxes, or lower drawers for the messy stuff. That way the room still feels creative instead of chaotic.
If you have beautiful paper, thread, fabric, or neatly arranged jars of buttons, let some of that become part of the room design. When functional items also add color and texture, your room starts looking styled without extra spending.
4. Lighting That Helps You Actually See
Lighting is one of the least glamorous budget decisions and one of the most important. A dim craft room makes everything harder. You misjudge color, strain your eyes, and somehow manage to glue something crooked with real confidence.
Start with the best overhead light you already have, then add task lighting right where you work. A basic adjustable desk lamp can make a huge difference for detail work like sewing, drawing, painting, cutting, or beading. If your shelves are deep or your room lacks natural light, battery-powered or plug-in LED lights can brighten dark corners without major installation.
Good lighting is not about making the room look dramatic. It is about making the room usable. Save the moody lamp for the reading chair. Your craft station deserves brightness.
Budget-Friendly Storage Ideas That Actually Earn Their Keep
Not every storage product deserves a place in your budget. The best ones solve a real problem. Here are the affordable options that tend to work hardest in a craft room:
Clear Bins
Clear bins are the workhorses of craft room design. They let you see what you have without digging through mystery boxes. Use them for paper scraps, vinyl, yarn, sewing notions, cords, stamps, or project leftovers. Label them clearly so your future self does not have to perform an archaeological dig to find one glue gun stick.
Mason Jars and Reused Containers
Jars are perfect for pens, paintbrushes, markers, scissors, buttons, clips, and other upright tools. They are inexpensive, easy to clean, and oddly satisfying to look at. Repurposed food jars, coffee tins, and sturdy containers can do the same job for free.
Rolling Carts
A rolling cart is excellent if your craft room doubles as another room or if you move between tasks. It can hold your current project, your daily tools, or supplies for one hobby category. Mobile storage is especially helpful in small spaces because it gives you flexibility without permanent bulk.
Drawer Dividers
Drawers turn into junk caves fast unless you divide them. Use inexpensive trays, small containers, or repurposed boxes to separate rulers, blades, thread, tapes, adhesives, and embellishments. Once each item has a home, cleanup becomes faster and the drawer stops acting like a black hole.
Over-the-Door Organizers
If your room has a door, it has storage potential. Over-the-door organizers are great for ribbon, paint, markers, glue, scissors, and other small or medium supplies. They are especially useful in closets and tiny rooms where wall space is limited.
Secondhand Shelves and Cabinets
Thrift stores, yard sales, online marketplaces, and neighborhood swap groups are gold mines for bookcases, trays, baskets, cabinets, and side tables. A coat of paint and updated knobs can transform an inexpensive piece into something that looks custom enough to earn compliments from people who think you “must have spent a fortune.” You do not need to correct them unless you want to be insufferably triumphant.
How to Lay Out a Small Craft Room Without Losing Your Mind
A good layout saves money because it prevents duplicate purchases and random “fixes” later. Try to organize the room by zones. Keep your main work area in the brightest part of the room if possible. Store your most-used supplies within arm’s reach. Place bulky storage on the perimeter. Keep frequently used tools between waist and eye level, where they are easiest to access.
If you sew, put fabric storage near the cutting area. If you scrapbook, keep paper close to your work surface. If you paint, store brushes, palettes, and water containers where they can be grabbed quickly. This sounds obvious, but many rooms are organized by container size instead of actual use. That is how the scissors end up on one side of the room and the tape on the other, as if they recently filed for separation.
Leave at least a little open space. Every wall does not need a shelf. Every surface does not need a basket. A room that can breathe will feel cleaner, bigger, and easier to maintain.
Decorate the Room Without Blowing the Budget
Once the function is sorted, you can make the room feel fun. The cheapest design upgrade is paint. A fresh wall color, a painted thrifted shelf, or even a painted pegboard can change the whole mood of the room. If you cannot paint, use removable wallpaper on a small accent wall, line shelves with contact paper, or frame your own finished craft pieces as art.
Stick to a loose color palette so the room feels intentional. That does not mean everything must match like a showroom. It just means your storage and decor should feel coordinated enough that the room reads as “creative studio” rather than “garage sale after a windstorm.”
Labels also matter more than people think. Matching labels make a mixed collection of jars, bins, and boxes look much more cohesive. You can handwrite them, print them, or use simple tags. Fancy labels are optional. Clarity is not.
A Smart Budget Craft Room Formula
If you are wondering where to spend and where to save, here is a practical rule of thumb: spend on the work surface, the chair, and lighting; save on decorative storage, small containers, and accent pieces. It is worth paying for comfort and durability where your body and workflow depend on it. It is not worth paying premium prices for bins that do the exact same job as inexpensive ones.
Another good strategy is to build the room in phases. Start with the basics: table, chair, task light, and simple storage. Then live with the space for a couple of weeks. You will quickly learn what is missing. Maybe you need more drawer dividers. Maybe your yarn needs a better home. Maybe the over-door organizer is the true hero of the whole setup. When you add slowly, you buy with intention instead of panic.
That is how a budget craft room becomes a smart craft room. Not all at once. Not perfectly. But in layers that make sense.
Final Thoughts
Designing a craft room on a budget is not about settling for less. It is about choosing what matters most and building a room that supports your creativity without draining your wallet. When your supplies are organized, your work surface is comfortable, and your room makes it easy to begin instead of easy to procrastinate, you have already won.
You do not need a picture-perfect studio to make beautiful things. You need a room that helps you find your tools, finish your projects, and enjoy the process. If that room also includes a thrifted shelf, a rolling cart, three jars of buttons, and one suspicious drawer full of ribbon you swear you will use someday, that just means you are doing it correctly.
Real-Life Experiences: What It Feels Like to Design a Craft Room on a Budget
In real life, a budget craft room usually comes together in a way that is less “grand reveal” and more “pleasantly evolving science experiment.” You start with a vision. Maybe it is neat shelves, a bright desk, and a room where every item has a home. Then you actually begin, and the first thing you learn is that your supplies have apparently been multiplying in secret for years. One box of scrapbook paper becomes four. Your “small yarn stash” reveals itself as a soft and judgmental mountain. You find glue in places where glue should never be.
That first stage can feel chaotic, but it is useful. You learn what you really use. The expensive-looking bins you almost bought suddenly seem less important than a decent lamp and a table that does not wobble. A lot of people discover that the most satisfying improvement is not decorative at all. It is being able to sit down and start creating without spending 20 minutes hunting for scissors.
Another common experience is realizing that pretty storage is not always practical storage. Open shelves look lovely until every shelf becomes a colorful monument to visual clutter. On the other hand, hiding everything away can make you forget what you own. The happy middle usually comes after a little trial and error. You keep the supplies that inspire you in sight and tuck away the backup packs, refills, and awkward equipment that do not need front-row seating.
People also tend to underestimate how much a mobile piece helps. A rolling cart, a small table on wheels, or a portable caddy often becomes the unexpected hero of the room. It follows you, adapts to different projects, and makes small spaces feel less cramped. Budget rooms thrive on flexibility. When one piece can do three jobs, you feel like a genius and a coupon champion at the same time.
Lighting is another lesson that tends to arrive dramatically. Many people set up a cute corner and think it is done, only to realize at night that the room is dim enough to make navy blue and black thread look identical. One affordable task lamp later, the whole space feels more expensive and more usable. It is a small upgrade with an unfairly large payoff.
Then there is the emotional side. A well-designed budget craft room often feels more personal than a polished showroom because so much of it is assembled thoughtfully. The thrifted shelf you painted yourself, the jars you reused, the labels you finally added, the pegboard you hesitated to install but now love, those details create a room with history. It feels lived in, practical, and encouraging. It feels like yours.
And perhaps the best experience of all is this: one day you walk into the room, sit down, and begin. No clearing off the dining table. No moving laundry. No muttering, “I know I have that somewhere.” That is when the room starts paying you back. Not in money, but in time, momentum, and a little creative peace. For a budget project, that is a pretty luxurious return.