Building a digital bench power supply used to feel like one of those projects that quietly asked, “How much do you enjoy drilling crooked holes, reading confusing datasheets, and smelling warm plastic?” Then modules like the DPS5005 arrived and changed the mood. Suddenly, makers, repair hobbyists, students, and electronics tinkerers could assemble a surprisingly capable adjustable DC power supply without designing a regulator from scratch.
The DPS5005 is a compact programmable DC-DC step-down power supply module commonly used to build a DIY bench power supply. It can regulate voltage and current, display live electrical values, save presets, and turn a suitable DC input source into a practical lab tool. In plain English: it takes a higher DC voltage, trims it down to the level you need, and lets you control the output with digital precision instead of guessing with a tiny screwdriver and a prayer.
This article explains what the DPS5005 does, why it became popular, how it fits into a digital power supply build, and what to consider before using one on your electronics bench.
What Is the DPS5005?
The DPS5005 is a programmable buck power supply module. The name gives away the headline specs: “50” refers to its output voltage range up to 50 volts, and “05” refers to its output current range up to 5 amps. In ideal conditions, that gives it a maximum output power of 250 watts. For a module small enough to fit in a modest enclosure, that is not bad at all.
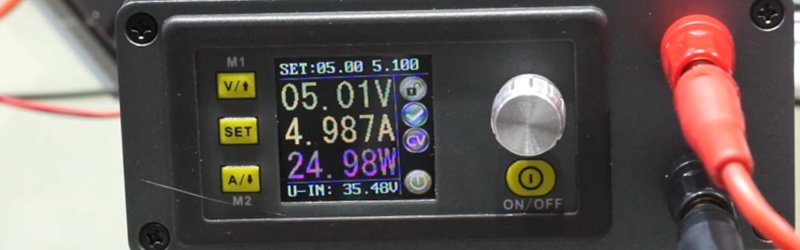
Unlike a basic adjustable buck converter, the DPS5005 includes a digital display, a rotary encoder, push buttons, voltage and current regulation, and memory presets. Instead of grabbing a multimeter every time you need 3.3V, 5V, 12V, or a careful current limit for testing LEDs, you can dial values in directly and see what is happening in real time.
The module is not a complete wall-powered bench supply by itself. It needs a suitable DC input source, such as a 24V, 36V, or 48V power adapter or switching supply. The DPS5005 then steps that DC input down to your selected output voltage. Because it is a buck converter, it cannot boost voltage. If your input is 24V, do not expect a clean 50V output. Physics is not taking requests today.
Why Makers Like the DPS5005
The DPS5005 became popular because it solves a common workshop problem: many electronics projects need adjustable, current-limited DC power, but professional bench supplies can be expensive. A commercial lab supply is still the better choice for critical measurement work, production testing, or sensitive professional use. But for hobby projects, educational benches, LED experiments, battery-related testing, small motors, Arduino projects, and repair work, a DPS5005-based build can be extremely useful.
Its biggest advantage is convenience. Traditional DIY supplies often require separate voltage meters, current meters, knobs, switches, binding posts, and regulator circuits. The DPS5005 wraps much of that control experience into a single front-panel module. You mount it, wire input and output terminals, provide cooling and a proper enclosure, and you are already most of the way there.
Key DPS5005 Specifications
Typical DPS5005 modules are designed for a DC input range of about 6V to 55V and an adjustable output range from 0V to 50V. Output current is adjustable from 0A to 5A, with power up to 250W when voltage, current, input supply, wiring, and cooling all cooperate.
The voltage adjustment resolution is commonly listed as 0.01V, while current adjustment resolution is commonly listed as 0.001A. That makes the module feel much more refined than old-school analog buck boards where a quarter-turn can mean “fine” or “oops, why is that chip warm?”
Another practical feature is preset storage. Many versions allow users to save multiple voltage and current combinations. This is helpful if you frequently jump between common rails such as 3.3V logic, 5V microcontrollers, 9V pedal circuits, 12V fans, and 24V control hardware.
Understanding CV and CC Modes
A good adjustable bench power supply usually operates in two important modes: constant voltage and constant current.
Constant Voltage Mode
Constant voltage, often shown as CV, means the supply tries to keep the output voltage at the value you selected. If you set 5V, the module attempts to hold 5V while the connected circuit draws only the current it needs. Most normal electronics testing happens in CV mode.
Constant Current Mode
Constant current, often shown as CC, means the supply limits current to the value you set. This is especially useful when testing LEDs, unknown circuits, motors, or newly repaired boards. A current limit can prevent one wiring mistake from turning a small project into a tiny smoke machine.
For example, suppose you are powering a new microcontroller board. You might set the voltage to 5V and the current limit to 200mA before turning on the output. If the board suddenly tries to pull 2A because of a short circuit, the DPS5005 should move into current limiting instead of blindly feeding the fault. That does not make it magic armor, but it is a very welcome safety net.
How the DPS5005 Fits Into a DIY Bench Supply
A typical DPS5005 bench supply build includes four main parts: the DPS5005 module, a DC input power source, an enclosure, and output connectors. Many builders also add a power switch, fuse, cooling fan, ventilation slots, banana jacks, rubber feet, and labels. The result can look impressively professional, even if the inside contains the usual maker fingerprints and one screw that mysteriously went missing.
Choosing the Input Power Source
The input supply determines what your finished unit can actually do. If you feed the module with a 12V adapter, it can be useful for lower-voltage work but will not deliver high output voltages. If you want an output range closer to 0-50V, you need a higher-voltage DC source, commonly around 48V to 55V, with enough current and wattage for your intended use.
A 48V power supply is a common choice because it gives enough headroom for many higher-voltage projects while staying within the input range of the module. However, input supplies must be selected carefully. Cheap, poorly insulated power bricks are not worth the risk. A quality, certified DC supply is a better foundation than a mystery box that weighs less than its power cord.
Enclosure and Cooling
At light loads, the DPS5005 may run comfortably. At higher current and power levels, heat becomes a real design issue. A closed plastic box with no airflow is not a cooling system; it is a slow cooker for electronics. Use ventilation, leave space around the module, and consider adding a fan when the supply will be used near its upper range.
Good wiring matters too. Output leads should be thick enough for the expected current. Banana jacks should be rated appropriately. Internal connections should be secure, insulated, and strain-relieved. The cleaner the build, the less likely you are to discover a loose wire by hearing a suspicious pop.
Best Uses for a DPS5005 Power Supply
The DPS5005 shines in everyday electronics work where adjustable voltage and current limiting are more important than laboratory-grade metrology. It is great for powering microcontroller boards, testing DC fans, checking LED strips, reviving small gadgets, experimenting with relays, powering op-amp circuits, and learning how current-limited supplies behave.
It is also useful for repair diagnostics. When a device is suspected of having a short, a current-limited supply can help you bring voltage up slowly and observe current draw. This can prevent further damage and give clues about what is happening on the board.
For LED experiments, current limiting is especially valuable. LEDs are current-driven devices, and connecting them directly to a voltage source without proper resistance or regulation is a classic beginner mistake. With the DPS5005, you can set conservative current limits while testing, although it should not replace proper LED driver design in finished products.
Where the DPS5005 Is Not the Perfect Tool
The DPS5005 is affordable and capable, but it is not a miracle instrument. It is a switching converter, so it may introduce more ripple and noise than a high-quality linear bench supply. For audio preamps, RF circuits, precision analog measurements, or low-noise sensor testing, a better lab supply may be preferable.
It also does not provide isolation by itself. Isolation depends on the input supply and the overall system design. This matters when testing circuits connected to other equipment, computers, oscilloscopes, or grounded instruments. Grounding surprises are rarely fun, and they are even less fun when expensive test equipment is involved.
Finally, the module is only as good as the build around it. A DPS5005 wired with thin leads, poor cooling, weak connectors, and an underrated input adapter will not perform like a 250W supply. It will perform like a warning sign with a display.
Setup Tips for Better Results
Start With Conservative Limits
Before connecting a device, set the current limit lower than the expected maximum. If the circuit behaves normally, you can increase the limit as needed. This habit is one of the easiest ways to protect projects during first power-up.
Use a Multimeter for Verification
The DPS5005 display is convenient, but a separate multimeter is still useful. Check the output voltage before connecting sensitive electronics, especially after changing presets or modifying wiring.
Label Your Presets
If your enclosure has room, add a small label showing which memory slots hold your favorite settings. For example, M1 could be 3.3V with a 200mA limit, M2 could be 5V with a 500mA limit, and M3 could be 12V with a 1A limit. Future you will appreciate the organization. Future you is already dealing with enough unlabeled cables.
Do Not Ignore Input Headroom
A buck converter needs input voltage above the desired output voltage. If you want 24V output, a 24V input supply will not give the module enough room to regulate properly. Use an input source with adequate headroom, while staying safely within the module’s maximum input rating.
DPS5005 vs. a Traditional Bench Power Supply
A traditional bench power supply usually offers a complete, tested, enclosed solution with built-in mains safety, calibrated controls, output protection, and sometimes lower noise. It is the better option when accuracy, certification, and reliability are mission-critical.
The DPS5005, on the other hand, is attractive because it is compact, affordable, flexible, and fun to build into custom projects. It is less of a finished instrument and more of a power-control building block. That distinction matters. If you treat it like a component and design the surrounding supply carefully, it can become a very handy tool.
Why the DPS5005 Makes Digital Power Supply A Snap
The phrase “makes digital power supply a snap” fits because the DPS5005 reduces the hardest parts of a DIY bench supply project. You do not need to design the control interface, display system, voltage readout, current readout, or basic regulation from zero. The module packages those features in a format that is friendly to panel mounting and practical workshop use.
For beginners, it teaches important concepts: voltage, current, power, current limiting, heat, input headroom, and load behavior. For experienced makers, it saves time. Instead of spending a weekend designing yet another adjustable regulator interface, you can spend that weekend building the enclosure, adding nice connectors, and actually using the supply.
That is the real appeal. The DPS5005 is not glamorous in the way a shiny oscilloscope is glamorous, but it earns its place on the bench. It turns “I need adjustable DC power” from a shopping problem into a buildable project.
Common Build Example
Imagine a hobbyist wants a compact power supply for microcontroller projects, LED testing, and small motor experiments. They choose a 48V DC input supply, mount the DPS5005 in a ventilated enclosure, add an AC input socket only if they understand mains wiring and safety requirements, install a fuse, connect output banana jacks, and add a small fan for airflow. For a safer beginner-friendly route, they use an external certified 48V DC power brick and avoid internal mains wiring altogether.
On the front panel, the module displays voltage, current, power, and operating mode. The user saves presets for 3.3V, 5V, 9V, 12V, and 24V. When testing a new board, they set the current limit low, turn on the output, watch current draw, and increase the limit only when everything looks normal. That workflow is simple, repeatable, and far better than poking a random adapter into a circuit and hoping the electrons show manners.
500-Word Experience Section: What It Feels Like to Use a DPS5005-Based Supply
The first thing most people notice about a DPS5005 build is how quickly it becomes part of the bench routine. Before having an adjustable supply, you tend to collect wall adapters like strange electronic souvenirs: 5V from an old router, 9V from a forgotten gadget, 12V from something that may or may not have once powered a printer. Each adapter has a different plug, questionable labeling, and the emotional energy of a junk drawer. A DPS5005-based supply replaces that chaos with one front panel and a pair of output terminals.
In day-to-day use, the current limit becomes the feature you appreciate most. Voltage gets all the attention because it is printed on components and shouted in tutorials, but current limiting is the quiet hero. When powering a newly soldered board, setting a low current limit feels like putting training wheels on the first test. If the board draws a reasonable amount, great. If it slams into the limit, you know something needs inspection before the damage gets dramatic.
The preset memory is another surprisingly pleasant feature. It sounds minor until you use it often. Being able to jump from 3.3V logic testing to 5V USB-style projects and then to 12V fans saves time and reduces mistakes. It also makes the supply more approachable for repeated tasks. You stop thinking, “What was I using yesterday?” and start thinking, “M2, output on, done.” That is the kind of convenience that keeps a tool on the bench instead of in a box.
The display also changes how you troubleshoot. Seeing current draw live gives you a quick sense of whether a circuit is asleep, active, overloaded, or suspicious. A small DC motor that pulls a big startup current tells a different story than a microcontroller board sipping milliamps. An LED strip that draws less than expected may have a wiring issue. A repaired device that immediately hits the current limit may still have a short. The numbers become little clues.
Of course, the experience is not perfect. The interface can feel crowded, especially on smaller displays. The module is compact, but that means enclosure planning matters. Cooling, wiring, and connector quality are not optional details if you want reliable performance. The DPS5005 will happily look professional from the outside while silently judging your airflow decisions from the inside.
The biggest lesson is that the DPS5005 rewards careful building. Use a good input supply, leave thermal breathing room, verify output with a multimeter, and label your presets. Do those things, and it feels like a clever shortcut. Skip them, and it becomes another reminder that electronics is very good at exposing laziness. Overall, the DPS5005 makes a digital power supply feel achievable, affordable, and genuinely useful. It is not just a module; it is a small upgrade to the way you work.
Conclusion
The DPS5005 is one of those modules that makes DIY electronics feel more accessible. It combines adjustable voltage, current limiting, digital control, preset memory, and live display feedback in a small package that can become the heart of a practical bench power supply. It is not a replacement for every professional instrument, and it deserves respect when it comes to wiring, heat, input power, and safety. But for makers who want a flexible digital power supply without starting from a blank schematic, the DPS5005 is a smart and satisfying choice.
If your workbench still depends on a pile of mismatched adapters, a DPS5005 project may be the upgrade that finally brings order to the power corner. Your circuits get cleaner testing. Your desk gets fewer mystery bricks. And you get the small joy of turning a simple module into a tool you will actually use.