Note: This article is written for educational publishing. Reflow soldering involves high heat, solder fumes, and sometimes household-voltage appliance modifications. A toaster oven used for electronics should never be used for food again, and any electrical modification should be handled only by a qualified adult or professional.
Introduction: When a Toaster Oven Becomes a Tiny PCB Factory
Somewhere between “I need to solder this tiny chip” and “why does this component have legs smaller than a mosquito’s yoga mat,” hobby electronics makers discovered a strange but useful truth: a humble toaster oven can become a surprisingly capable reflow soldering oven. No, it will not replace a professional SMT production line. It will not sing factory hymns or wear a hairnet. But for prototypes, small batches, maker projects, and the occasional “please work, little board” moment, toaster oven reflow soldering can be a practical bridge between hand soldering and full PCB assembly services.
This toaster oven reflow soldering roundup looks at the most common methods, tools, safety rules, solder paste behavior, temperature profiles, and real-world lessons from the maker and electronics assembly world. The goal is not to turn your kitchen appliance into a reckless science experiment. The goal is to understand how DIY reflow works, when it makes sense, and how to avoid turning a clean PCB into a modern art piece titled Regret in Flux Residue.
What Is Toaster Oven Reflow Soldering?
Toaster oven reflow soldering is a small-scale electronics assembly method used to solder surface-mount components to a printed circuit board. Instead of touching each pad with a soldering iron, the builder applies solder paste to the PCB pads, places components on the paste, and heats the entire board until the solder particles melt and form joints.
The magic ingredient is solder paste. It is not just “solder in toothpaste cosplay.” It is a mixture of tiny solder alloy particles and flux. The flux cleans metal surfaces and helps the molten solder wet the pads and component terminals. When heated correctly, the paste changes from gray blobs into shiny solder joints. When heated poorly, it changes from gray blobs into sadness.
Why Makers Use Toaster Ovens for Reflow
The biggest reason is accessibility. A used toaster oven, a thermocouple, a basic controller, and a few careful process habits cost far less than a professional reflow oven. For makers working with Arduino shields, sensor boards, QFN packages, LEDs, tiny passives, and short prototype runs, the toaster oven method can be good enough to produce clean, reliable boards.
It also scales better than hand soldering. A board with five surface-mount parts may be easy with a soldering iron. A board with 120 parts, several 0402 capacitors, and a fine-pitch IC is where the soldering iron begins to look at you like, “We need to talk.” Reflow lets the oven heat all joints at once, which saves time and reduces the chance of dragging solder bridges across pins.
The Main Toaster Oven Reflow Approaches
1. The Manual Watch-and-Wait Method
The simplest approach uses an unmodified toaster oven, a thermometer or thermocouple, and careful observation. The user preheats the oven, watches the solder paste change, and opens the door when reflow is complete. This method is inexpensive, but it depends heavily on experience. It is also easy to overshoot the ideal temperature because toaster ovens are designed for toast, not thermally sensitive IC packages.
Manual reflow can work for forgiving boards, larger components, and learning. However, it is not ideal for complex assemblies, moisture-sensitive packages, expensive chips, or boards with tight process requirements. It is the electronics equivalent of cooking pancakes by vibe. Sometimes delicious, sometimes smoke alarm.
2. The Thermocouple-Monitored Method
A more controlled version adds a thermocouple placed near the PCB or attached to a scrap board. This gives a better view of actual board temperature, not just the air temperature inside the oven. That distinction matters because a PCB heats more slowly than the air around it. Heavy copper pours, large ground planes, metal connectors, and thick boards can absorb heat and lag behind the oven reading.
With temperature feedback, a maker can compare the actual heating curve against the solder paste manufacturer’s recommended profile. This is where DIY reflow starts to look less like “hot box guessing” and more like a repeatable process.
3. The Controller-Based Reflow Oven
Many popular toaster oven reflow builds use a microcontroller, thermocouple amplifier, display, relay module, or solid-state relay to automate the heating cycle. The controller follows a programmed temperature profile: preheat, soak, reflow, and cool. Some projects display the target and actual curves, beep at each stage, or even control a servo to open the door for cooling.
This approach is more repeatable than manual reflow, but it must be treated carefully. Toaster ovens contain high-voltage wiring and heating elements. A good published article should not pretend appliance modification is a casual weekend craft for everyone. The safe takeaway is this: automated control can improve consistency, but electrical work should be done only by people who understand mains safety, proper enclosures, fusing, grounding, strain relief, and heat-rated components.
4. The “No Appliance Modification” Controller
Some systems avoid opening the toaster oven by switching power externally with a controlled outlet or relay box. This can reduce the need to modify the appliance itself, though it still requires safe power switching hardware. These builds appeal to makers who want automation without gutting the oven like a tiny stainless-steel fish.
Understanding the Reflow Profile
A reflow profile is the temperature-over-time plan used to heat the board. The exact numbers depend on the solder paste, component ratings, PCB size, and oven behavior. Still, most profiles follow four basic stages.
Preheat
During preheat, the PCB temperature rises gradually. The goal is to warm the board evenly without shocking components. If the ramp is too aggressive, components can shift, flux may splatter, and thermally sensitive packages may be stressed.
Soak
The soak stage holds the board in a moderate temperature range long enough for components and copper areas to even out. Flux becomes active, solvents evaporate, and the board prepares for the final climb. Think of it as the PCB’s warm-up lap before the solder sprint.
Reflow
During reflow, the temperature rises above the solder alloy’s liquidus point. The solder melts, wets the pads and component leads, and forms joints. Time above liquidus matters. Too short, and joints may be dull or incomplete. Too long or too hot, and components can be damaged, flux can burn off, and the board may discolor.
Cooling
Cooling should be controlled but not painfully slow. If the board cools too slowly, solder joints may become grainy. If it cools too abruptly, thermal stress can become a problem. Many DIY users open the oven door slightly after reflow to encourage cooling, but the best practice is to observe the solder paste data sheet and avoid dramatic temperature shocks.
Lead-Free vs. Leaded Solder Paste
Lead-free solder paste generally requires higher reflow temperatures than traditional tin-lead paste. That higher peak temperature can be more demanding for a toaster oven because inexpensive ovens may have uneven heating, slow ramp rates, or hot spots. Lead-free solder is common for modern electronics and regulatory reasons, but it narrows the margin for error.
Leaded solder paste often melts at a lower temperature and can be easier for beginners to reflow, but it introduces toxic material concerns and may be unsuitable for products that need to meet lead-free compliance standards. Either way, solder paste should be handled with care, stored according to the manufacturer’s instructions, and kept away from food preparation areas.
The Gear That Actually Matters
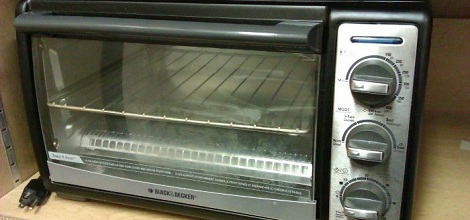
A Dedicated Toaster Oven
The oven must be dedicated to electronics only. Once solder paste, flux fumes, PCB finishes, and component residues enter the party, that oven has left the breakfast business forever. Label it clearly. Do not make toast in it. Do not “just use it once” for pizza rolls. The pizza rolls deserve better, and so do you.
A Reliable Thermocouple
Temperature feedback is one of the biggest upgrades. A thermocouple placed near the board gives useful process data and helps reveal whether the oven reaches the target profile. Air temperature alone can mislead because the board’s thermal mass changes the real heating curve.
Solder Paste and Stencils
Solder paste quality matters. Old, dried-out paste can print poorly and produce weak or messy joints. Stencils improve consistency by placing the right amount of paste on each pad. Hand-dispensing paste can work for simple boards, but once you move into fine-pitch components, a stencil becomes less of a luxury and more of a sanity-preservation device.
Tweezers, Magnification, and Inspection
Good tweezers, magnification, and lighting are essential. Reflow can self-align many small passives because molten solder naturally pulls components toward pad centers, but it cannot fix everything. A badly rotated IC will not magically meditate itself into the right footprint. Inspection after reflow is still required.
Common Defects in Toaster Oven Reflow
Solder Bridges
Solder bridges happen when too much solder connects adjacent pads or pins. They are common on fine-pitch ICs when paste volume is excessive or placement is sloppy. A stencil with proper aperture design helps reduce this issue.
Tombstoning
Tombstoning occurs when a small two-terminal component stands up on one end like it has seen a ghost. It is usually caused by uneven heating, unbalanced pad design, or different wetting forces on the two sides of the part.
Cold or Dull Joints
Cold-looking joints can result from insufficient temperature, poor wetting, oxidized pads, expired paste, or too little time above liquidus. A good profile and fresh materials reduce the risk.
Scorched Boards and Damaged Parts
Overheating is the classic toaster oven mistake. Some ovens overshoot heavily because their controls were designed to brown bread, not protect microcontrollers. A controller and measured profile help, but the operator still needs to verify results.
When Toaster Oven Reflow Makes Sense
Toaster oven reflow is best for prototypes, personal projects, small batches, educational labs, and boards where professional assembly would be too expensive or slow. It is especially useful for components that are awkward to hand solder, such as QFN packages, small passives, LED arrays, and compact sensor modules.
It is not the best choice for high-reliability medical electronics, automotive control systems, aerospace hardware, safety-critical products, or commercial production without proper validation. For those jobs, professional PCB assembly exists for a reason. The reason is not glamour. It is process control.
Toaster Oven vs. Hot Plate vs. Hot Air
A toaster oven heats the whole board from multiple directions, which can be helpful for batch assembly. A hot plate heats from below and is popular for simple boards because it is easy to observe the solder paste as it reflows. Hot air is excellent for rework and individual components, but it can blow tiny parts around if airflow is too strong. Each method has its place.
For boards with many components, toaster oven reflow is often more efficient. For a single IC repair, hot air may be better. For a tiny breakout board with parts on one side, a hot plate can be wonderfully simple. The best tool is not always the fanciest; it is the one that gives enough control for the job without turning the bench into a circus.
Practical Tips for Better DIY Reflow Results
Start with scrap boards or low-cost test projects before trusting an expensive PCB. Use fresh solder paste and follow its storage guidance. Keep the paste volume controlled. Place components carefully, but do not panic if tiny passives are slightly off-center; surface tension during reflow often corrects small errors.
Measure the board temperature, not just the oven air. Record the profile so you can improve it. Avoid crowding the oven tray with too many boards until you know how your setup behaves. Keep ventilation in mind, and never hover over the oven inhaling flux fumes like it is a new candle scent called “Startup Garage.”
After reflow, inspect every board. Look for bridges, shifted parts, tombstoned components, dull joints, and reversed polarities. A multimeter, microscope, or USB inspection camera can save hours of troubleshooting later.
Experience Section: Lessons From the Bench
The first experience most people have with toaster oven reflow is surprise. The solder paste looks messy at the beginning, almost like someone decorated the PCB with gray cake frosting using a toothpick during an earthquake. Then the oven warms up, the flux activates, and suddenly the paste snaps into shiny joints. It feels like magic, but it is physics wearing a tiny cape.
One useful lesson is that paste quantity matters more than beginners expect. Too little paste can create weak joints. Too much paste can create bridges, especially on fine-pitch chips. A stencil usually gives the most repeatable result. Hand application can work, but it rewards patience and punishes caffeine. If your hands are shaking like a washing machine full of sneakers, take a break before placing 0402 capacitors.
Another lesson is that each toaster oven has a personality. Some heat quickly, some crawl toward temperature like they are negotiating with the laws of thermodynamics, and some have hot spots that turn one side of the board into a spa and the other into a freezer. This is why testing matters. A thermocouple and a few practice runs can reveal whether your oven is reasonably consistent or secretly auditioning for a disaster movie.
Board design also affects success. Large ground planes and thick copper areas absorb heat, so the solder on those pads may lag behind smaller pads. If one side of a tiny resistor reflows earlier than the other, tombstoning becomes more likely. Good footprint design, thermal reliefs where appropriate, and balanced pad geometry can make DIY reflow far more forgiving.
Component placement is another skill that improves quickly. At first, every part feels microscopic. After a few boards, the process becomes calmer. Tweezers, magnification, and good lighting make a huge difference. It also helps to organize components before opening the solder paste. Nothing adds drama like realizing that C17 and R17 look identical while the paste is slowly drying and your cat is considering a career in PCB assembly.
Cooling teaches patience. The temptation is to grab the board immediately after reflow because shiny joints are exciting. Do not. The board is hot, the solder needs to solidify, and sudden movement can shift parts. Let the assembly cool safely before inspection. Once cool, inspect under magnification and clean only if the flux type requires it. Many no-clean pastes leave residues that are acceptable for many projects, but sensitive circuits may need extra consideration.
The biggest experience-based takeaway is that toaster oven reflow is a process, not a trick. The oven is only one piece of the system. Paste freshness, stencil quality, placement accuracy, PCB design, thermal profile, ventilation, and inspection all matter. When those pieces work together, a simple toaster oven can produce boards that look impressively professional. When they do not, the result may still be educationaljust not in the way you hoped.
Conclusion: A Tiny Oven With Big Maker Energy
Toaster oven reflow soldering remains popular because it solves a real problem: modern electronics use tiny surface-mount parts, and hand soldering every connection can be slow, frustrating, or nearly impossible. With the right safety mindset, a dedicated oven, reliable temperature measurement, quality solder paste, and careful inspection, makers can assemble prototypes and small batches with impressive results.
The best toaster oven reflow soldering setup is not necessarily the most complicated one. It is the one that gives repeatable heat, respects the solder paste profile, protects components, and keeps the user safe. Manual methods can teach the basics, thermocouples add visibility, and controller-based systems improve consistency. But no setup eliminates the need for common sense.
So yes, the toaster oven can become a mini reflow oven. Just remember: once it joins the electronics bench, it retires from breakfast forever. No toast, no bagels, no “just one snack.” In the grand roundup of DIY PCB assembly tools, toaster oven reflow earns its place as affordable, practical, slightly quirky, and very maker-friendlyas long as you treat the heat, fumes, and electronics with the respect they deserve.