Every home has one piece of furniture that seems to whisper, “I was fashionable once, probably near a shag carpet.” For many people, that piece is a coffee table set: the bulky centerpiece, the matching side tables, maybe even a few mystery scratches that look like a raccoon tried to learn calligraphy. The good news? An ugly coffee table set is not a decorating disaster. It is a renovation invitation.
A coffee table makeover can transform a tired living room without the cost of buying new furniture. With smart cleaning, sanding, painting, staining, hardware updates, and a protective finish, even a sad little table set can become the stylish anchor of a room. The secret is not magic. It is preparation, patience, and resisting the urge to declare “good enough” while dust is still stuck in the paint.
This guide walks through how to remake one ugly coffee table set from forgotten and frumpy to refreshed and functional. Whether your table is solid wood, veneer, laminate, painted, stained, scratched, water-marked, or simply guilty of crimes against taste, there is a practical path forward.
Why Remake an Ugly Coffee Table Set Instead of Replacing It?
Buying a new coffee table set sounds easy until you start comparing prices, sizes, finishes, shipping fees, and reviews written by people who somehow received only three legs. A DIY coffee table makeover is often cheaper, more personal, and more satisfying than replacing the entire set.
Refinishing furniture also keeps usable pieces out of the landfill. Many older coffee tables are sturdier than today’s lightweight flat-pack options, especially if they are made from solid wood or quality veneer. Even if the style is outdated, the bones may be excellent. Think of it as giving furniture a haircut, not performing open-heart surgery.
There is also the design advantage. When you remake a coffee table set yourself, you can choose the exact finish that fits your living room: warm wood stain, matte black paint, coastal whitewash, two-tone farmhouse style, mid-century walnut, or a bold color that says, “Yes, I own throw pillows on purpose.”
Step One: Inspect the Coffee Table Set Like a Detective
Before grabbing sandpaper, inspect every piece. Look at the tabletop, legs, joints, drawers, shelves, and underside. Check for loose screws, cracked veneer, deep gouges, wobbly legs, peeling paint, water rings, stains, and missing hardware. This step helps you decide whether the project needs a simple refresh or a full furniture refinishing job.
Solid Wood, Veneer, or Laminate?
Solid wood is the easiest material to sand and refinish because it can usually handle more surface removal. Veneer is a thin layer of real wood over another material, so it requires a gentler touch. Sand too aggressively and you may burn through the veneer, which is the furniture version of shaving off one eyebrow. Laminate is not real wood and usually performs better with cleaning, scuff sanding, primer, and paint rather than traditional stain.
If you are unsure, inspect the edges and underside. Solid wood usually shows continuous grain. Veneer may have a thin layer visible along an edge. Laminate often has a printed or plastic-like surface. Knowing the material helps you choose the right makeover method.
Safety First: Old Paint Needs Respect
If the coffee table set is vintage or may have old paint, test before sanding. Older painted furniture can contain lead-based paint. Do not dry-sand questionable old paint into dust. Use a lead test kit, follow safe work practices, wear protective gear, and consider professional help if lead is present. A beautiful table is not worth turning your living room into a hazardous glitter bomb.
Step Two: Choose the Makeover Style
The best coffee table remake starts with a style direction. Without one, you may end up halfway between rustic farmhouse and “garage sale thunderstorm.” Choose a finish that works with your room, not just a finish that looks good in a tiny social media photo.
Popular Coffee Table Set Makeover Ideas
A two-tone makeover is one of the most reliable options. Stain the tabletop and paint the legs or base. This gives the set warmth and contrast while hiding imperfect lower sections. A dark-stained top with cream, sage, charcoal, or black legs can look polished without feeling overly formal.
For a modern look, matte black or deep espresso paint can make bulky tables feel cleaner and more intentional. For a cottage or coastal room, soft white, light gray, pale blue, or natural wood tones work beautifully. If the table has interesting details, glaze or distressing can highlight them, but use restraint. Distressing should look charming, not like the table lost a bar fight.
If the set has drawers, new hardware can make a huge difference. Brass knobs, black pulls, leather tabs, or simple wood handles can instantly update the look. Hardware is small, but it has big “I planned this” energy.
Step Three: Gather Tools and Materials
Having the right supplies makes the project smoother and reduces those dramatic mid-project store runs where you arrive covered in dust and regret.
Basic Supplies for a Coffee Table Makeover
- Drop cloth or plastic sheeting
- Mild soap, degreaser, or furniture cleaner
- Microfiber cloths and tack cloth
- Screwdriver or drill
- Wood filler or epoxy putty
- Putty knife
- Sandpaper in several grits, such as 120, 180, and 220
- Sanding block or orbital sander
- Painter’s tape
- Primer for painted finishes
- Furniture paint, wood stain, or gel stain
- Quality brushes, foam brushes, or lint-free cloths
- Clear protective finish, such as polyurethane, polycrylic, or furniture wax
- Protective gloves, safety glasses, and a respirator when needed
Use products according to the manufacturer’s label. Dry time, ventilation needs, and recoat windows vary. Furniture refinishing rewards rule-followers, which is annoying but true.
Step Four: Clean Before You Sand
Never sand dirty furniture. Old coffee tables collect body oils, snack residue, candle soot, furniture polish, pet hair, and the spiritual remains of movie nights. Sanding through grime pushes it into the surface and can cause paint or stain to fail.
Remove hardware, drawers, glass inserts, and removable shelves. Clean every surface with mild soap and water or a suitable degreaser. For sticky areas, take extra time. Let the table dry completely before moving on. Moisture trapped under primer or stain can cause bubbling, blotching, or peeling.
Step Five: Repair Scratches, Dents, and Wobbles
Once the set is clean, repair obvious damage. Tighten screws and reinforce loose joints. Fill nail holes, dents, and gouges with wood filler. For missing corners or deeper damage, epoxy putty may work better because it can be shaped and sanded after curing.
If veneer is lifting, use wood glue and clamps to secure it. If a piece of veneer is missing, you can patch it, fill the area smooth, or design around it by painting that section. Not every flaw must disappear. Some imperfections add character. Others scream, “I was stored in a damp basement next to a lawn mower.” Choose wisely.
Step Six: Sand for a Smooth, Durable Finish
Sanding is not glamorous, but it is the difference between a furniture makeover that lasts and one that flakes off the first time someone sets down a coffee mug. The goal is to remove loose finish, smooth repairs, and create a surface that paint or stain can grip.
For solid wood, start with medium-grit sandpaper such as 120 grit, then move to 180 and 220 for a smoother finish. Always sand with the grain when possible. For veneer, use a light hand and avoid aggressive sanding. For laminate, scuff sand the surface just enough to dull the shine so primer can bond.
After sanding, remove dust thoroughly. Vacuum the piece, wipe with a dry cloth, and finish with a tack cloth. Dust left behind can turn a sleek tabletop into a bumpy moonscape.
Step Seven: Paint, Stain, or Try a Two-Tone Look
Now comes the fun part: color. The right finish depends on the table material, room style, and your patience level.
Option One: Paint the Coffee Table Set
Painting is ideal for laminate, damaged veneer, or wood that is not attractive enough to stain. Apply primer first, especially on glossy surfaces, dark finishes, or laminate. Let the primer dry, then sand lightly with fine-grit paper for a smoother base. Wipe away dust before painting.
Use thin coats of furniture paint rather than one thick coat. Thick paint may drip, show brush marks, or cure poorly. Two or three thin coats usually look better than one heroic glob. For a high-use coffee table, choose a durable paint and add a protective topcoat after the paint fully dries.
Option Two: Stain the Wood
Stain works best on bare wood or properly stripped solid wood. Apply stain with a lint-free cloth or brush, working with the grain. Let it penetrate according to the product instructions, then wipe away excess. The longer stain sits, the deeper the color may become, but leaving too much on the surface can create sticky trouble.
Test stain on the underside first. Different wood species absorb stain differently. Pine can blotch, oak shows strong grain, and mystery thrift-store wood does whatever it wants because it has lived a full life.
Option Three: Paint the Base and Stain the Top
A two-tone coffee table makeover is a great compromise. The stained top adds warmth and durability, while the painted legs or base hide old scratches and dated design details. This approach works especially well for matching coffee table sets because it creates a coordinated but updated look.
Use painter’s tape to separate stained and painted areas. Complete one finish before starting the other, and allow enough dry time to prevent smudging. This is not the moment to test whether wet paint respects personal boundaries. It does not.
Step Eight: Seal the Surface for Real Life
A coffee table is not decorative sculpture. It holds drinks, remotes, books, laptops, snacks, feet, board games, and occasionally the cat, who believes everything is a throne. That means the finish needs protection.
For stained wood, apply a clear protective finish such as polyurethane or polycrylic. Brush in the direction of the grain, apply thin coats, and sand lightly between coats when recommended. Two to three coats are common for furniture that gets regular use.
For painted tables, a clear topcoat can prevent scratches and make cleaning easier. Water-based topcoats are popular because they dry clear and are less likely to yellow light paint. Oil-based polyurethane can add warmth and durability but may amber over time. Wax can create a soft, hand-rubbed finish, but it may require more maintenance than a hard clear coat.
Step Nine: Reassemble and Style the Remade Coffee Table Set
After the finish cures, reattach hardware, drawers, shelves, and glass inserts. Do not rush curing time. Dry to the touch does not always mean ready for daily use. Give the surface time to harden before placing heavy objects on it.
When styling the finished set, keep it simple. Add a tray, a stack of books, a candle, a small plant, or a decorative bowl. Leave enough open space for actual living. A coffee table should not look like a boutique exploded on it.
If the side tables match, repeat a few design elements without cloning every detail. For example, use the same finish but different lamps, baskets, or accessories. Matching furniture can look stylish when it feels intentional rather than showroom-stiff.
Common Mistakes to Avoid During a Coffee Table Makeover
Skipping Prep Work
Cleaning, sanding, and priming may feel slow, but they are what make the final finish last. Skipping them is like baking a cake and deciding flour is optional.
Using the Wrong Product for the Material
Laminate needs bonding primer. Veneer needs gentle sanding. Solid wood can often be stripped and stained. Treating every surface the same can lead to peeling paint, uneven stain, or accidental damage.
Applying Thick Coats
Paint, stain, and topcoat all perform better in thin layers. Thick coats take longer to dry and often show drips or tacky spots. Patience creates polish.
Forgetting the Underside and Edges
You do not need to make the underside museum-worthy, but visible edges matter. Sand and finish the parts people can see from normal angles. A table that looks great from above but chaotic from the sofa is only half-remade.
Budget-Friendly Upgrade Ideas
A remake of one ugly coffee table set does not have to be expensive. Many updates cost less than a restaurant dinner. Change the hardware. Add cane webbing to drawer fronts. Attach a lower shelf basket for storage. Replace cloudy glass with clear glass or wood panels. Use peel-and-stick wallpaper inside drawers. Add small furniture feet for height. Try a stencil on the tabletop if the surface is too damaged for a clean stain.
You can also make the set feel more expensive by simplifying it. Remove overly ornate trim, replace dated knobs, and choose a restrained color palette. Sometimes the best makeover is not adding more; it is editing away the visual noise.
Specific Example: From Orange Gloss to Warm Modern
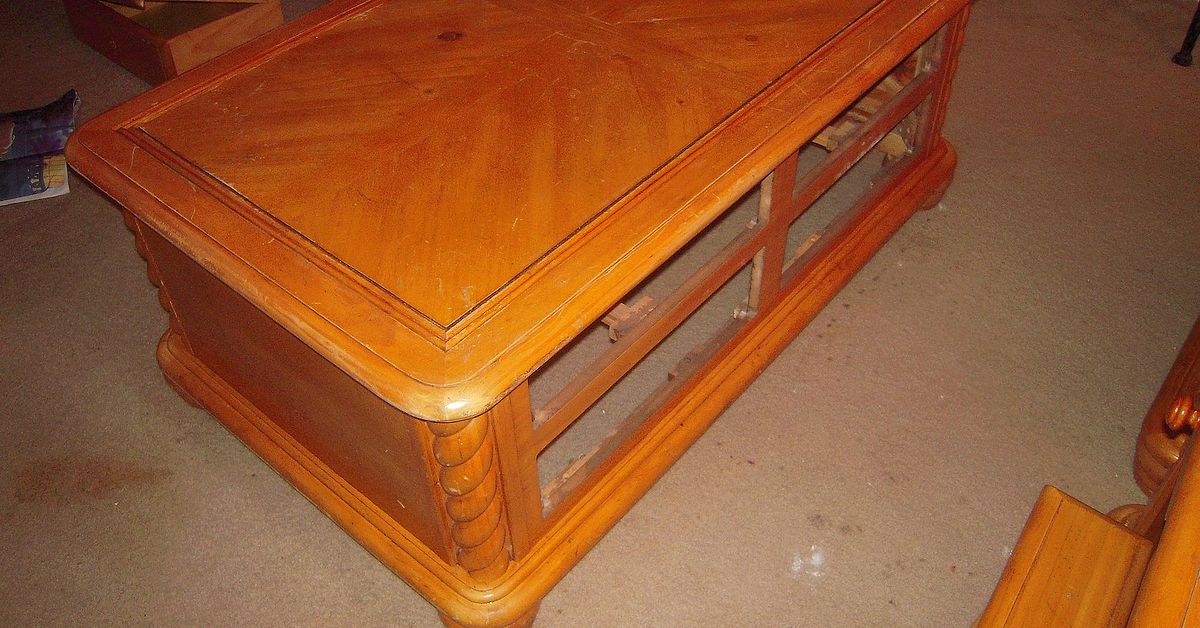
Imagine a three-piece coffee table set from the early 2000s: orange-toned glossy wood, chunky legs, scratched tops, and brass knobs that look like tiny golden mushrooms. The structure is solid, but the finish makes the room feel dated.
The remake plan is simple. Clean all pieces thoroughly. Remove the hardware. Sand the tabletops down to reduce the orange shine. Scuff sand the legs and lower shelves. Fill scratches with wood filler. Stain the tops in a medium walnut tone. Paint the bases a soft black or warm white. Add simple matte black pulls or brushed brass knobs. Seal the tops with three thin coats of protective finish.
The result is a coordinated coffee table set that feels current without looking trendy for only five minutes. The warm wood top keeps the pieces inviting, while the painted base adds contrast and hides old damage. Best of all, the set still fits the room because it is the same size and shape as before, just no longer dressed like it is auditioning for a furniture catalog from 2004.
Experience Notes: What Remaking One Ugly Coffee Table Set Teaches You
The first thing you learn during a coffee table set makeover is that ugly furniture often looks worse before it looks better. Once the hardware comes off, the dust appears, the sanding starts, and the old finish turns patchy, there is a moment when you may wonder whether you have ruined everything. This is normal. The middle of a DIY project is where confidence goes to take a short nap.
One useful experience is to work on the least visible piece first. If the set includes two side tables and one coffee table, practice on the back side of a side table or the lower shelf. That small test area teaches you how the surface reacts to sanding, primer, paint, or stain. It also helps you adjust your plan before committing to the main tabletop, which is the star of the show and therefore allowed to be dramatic.
Another lesson is that lighting matters. A finish can look perfect in garage lighting and then suddenly reveal streaks when moved near a window. Inspect each coat from multiple angles. Run your hand lightly over the surface after it dries. If you feel bumps, dust nibs, or brush ridges, sand lightly and clean before the next coat. This small step can make a DIY furniture makeover look much more professional.
Dry time is another place where experience becomes wisdom. The label may say a finish is dry in a few hours, but heavy use should wait until the surface cures more fully. Coffee tables live a hard life. They face condensation rings, hot mugs, sliding remotes, snack plates, and the occasional person who believes tables are footrests. Giving the finish extra time before everyday use can prevent dents, smudges, and disappointment.
It also helps to organize the project in stages. Day one can be cleaning, repairs, and sanding. Day two can be primer or stain. Day three can be paint, touch-ups, and topcoat. Yes, some projects can be done faster, but a relaxed schedule often creates a better finish. It also reduces the chance of making wild decisions at midnight, such as adding glitter glaze “just to see.” Do not let midnight you manage the design department.
One of the best parts of remaking an ugly coffee table set is the emotional payoff. The furniture does not just look better; it becomes a story. Instead of saying, “We need to replace that,” you get to say, “I made that work.” The set becomes proof that taste can evolve, old pieces can earn a second act, and a living room can change without a giant shopping cart total.
The biggest practical takeaway is this: choose durability over drama. A coffee table set should look good, but it also has to survive real life. Use a finish that can be cleaned. Protect the top. Keep coasters nearby. Add felt pads under accessories. If you have kids, pets, or enthusiastic snackers, embrace a finish that forgives small scratches. A table that looks beautiful but terrifies everyone into not using it has missed its calling.
Remaking one ugly coffee table set is not only about paint and stain. It is about learning to see potential. The scratched top becomes a warm wood surface. The dated legs become a clean painted base. The clunky matching set becomes a coordinated living room feature. And the ugly table that once made you sigh every time you walked past it? It becomes the piece guests compliment, which is extremely satisfying and only slightly dangerous to your ego.
Conclusion
A remake of one ugly coffee table set can completely change the feel of a living room without requiring a full furniture shopping spree. With careful inspection, cleaning, repairs, sanding, paint or stain, and a durable protective finish, an outdated table set can become stylish, useful, and personal. The key is to respect the material, prep the surface properly, and choose a design that fits the room instead of chasing every trend that wanders by wearing linen pants.
Whether you go modern black, warm walnut, coastal white, two-tone farmhouse, or bold and colorful, the makeover should make the furniture feel intentional. The best DIY coffee table makeover does not hide the fact that the piece had a past. It simply gives that past better lighting, a smoother finish, and a much nicer outfit.
SEO Tags
Note: This article is written for web publishing in standard American English and is based on practical furniture refinishing methods, safety guidance, and common DIY coffee table makeover techniques.