Note: This article synthesizes real DIY craft practices, home-decor styling ideas, kid-friendly art guidance, and safe crafting recommendations from reputable U.S. craft, lifestyle, and consumer-safety resources. Source links are intentionally omitted for clean web publishing.
Introduction: Love, but Make It Slightly Puzzling
A Puzzle Art Valentine Garland is exactly the kind of craft that makes you feel clever before the glue even dries. It takes something ordinaryold puzzle pieces, especially the ones from that 1,000-piece landscape puzzle your family gave up on after discovering the sky was basically 700 shades of blueand turns it into festive Valentine’s Day décor. Instead of tossing mismatched pieces into the trash, you paint them, arrange them, string them together, and suddenly you have a handmade garland that says, “I’m creative, romantic, and practical enough to recycle.” A triple threat.
This project works beautifully for homes, classrooms, parties, kids’ craft tables, Galentine’s Day brunches, library activities, and even handmade gifts. Puzzle pieces naturally carry a sweet message: love is made of many little parts, everyone fits somewhere, and yes, sometimes the missing piece is hiding under the couch. That symbolism makes puzzle art especially charming for Valentine’s Day.
In this guide, you’ll learn how to make a puzzle art Valentine garland from start to finish, including supplies, design ideas, painting tips, layout options, safety notes, troubleshooting, and creative variations. You’ll also find practical examples for decorating a mantel, classroom bulletin board, bedroom wall, office cubicle, or party table. The result is affordable, personal, and much more memorable than another plastic heart decoration that mysteriously sheds glitter until July.
What Is a Puzzle Art Valentine Garland?
A puzzle art Valentine garland is a decorative hanging banner made with painted or embellished jigsaw puzzle pieces. The pieces can be arranged into hearts, letters, flowers, mini wreaths, abstract clusters, or small tags that spell out messages such as “LOVE,” “BE MINE,” “XOXO,” or “YOU COMPLETE ME.” The finished shapes are attached to twine, ribbon, yarn, or string and hung as Valentine’s Day décor.
The craft is popular because it checks nearly every DIY box. It is budget-friendly, easy to customize, suitable for multiple age groups, and perfect for upcycling puzzles that are missing pieces. It can look rustic, cute, elegant, quirky, classroom-friendly, or farmhouse-chic depending on the colors and finishing touches you choose.
The best part is that puzzle pieces already have built-in texture. Their tabs, curves, and odd little edges create instant visual interest. Once painted in Valentine shadesred, blush pink, white, berry, coral, lavender, champagne, or metallic goldthey stop looking like abandoned game-night evidence and start looking like intentional mixed-media art.
Why Puzzle Pieces Are Perfect for Valentine Crafts
They Carry a Built-In Message
Valentine’s Day crafts often lean on hearts, flowers, candy, and romantic phrases. Puzzle pieces add a little more personality. They suggest connection, patience, uniqueness, and the joy of finding where things belong. That makes them perfect for family projects, classroom activities, friendship crafts, and couples’ gifts.
A garland made from puzzle pieces can quietly say, “We fit together,” without needing a giant neon sign. Although, if you own a giant neon sign, congratulationsyou are already winning Valentine’s décor.
They Are Easy to Find
You do not need a brand-new puzzle for this project. In fact, using an incomplete puzzle is ideal. Look in game closets, thrift stores, dollar stores, donation bins, garage sales, or classroom supply cabinets. Larger puzzle pieces are easier for young kids to paint and arrange, while smaller pieces create a more delicate, mosaic-style look.
They Encourage Creative Reuse
Upcycled Valentine crafts are a smart way to reduce waste while making something meaningful. Puzzle pieces, cardboard, scrap ribbon, leftover paint, and old greeting cards can all be reused in this project. A homemade garland also gives your décor a warm, personal feel that mass-produced decorations rarely achieve.
Supplies You’ll Need
Before starting your Puzzle Art Valentine Garland, gather your materials. You can keep the project simple or add embellishments depending on your time, budget, and tolerance for glitter. Proceed carefully with glitter; it has the survival instincts of a houseplant and the travel habits of confetti.
Basic Supplies
- Old jigsaw puzzle pieces
- Acrylic craft paint in red, pink, white, or Valentine colors
- Paintbrushes or foam brushes
- Cardboard, cardstock, felt, or foam sheets for backing
- Hot glue, tacky craft glue, or school glue
- Twine, ribbon, yarn, baker’s twine, or string
- Scissors
- Hole punch
- Pencil
- Heart template or cookie cutter for tracing
- Newspaper, craft mat, or cardboard to protect your table
Optional Embellishments
- Glitter paint or fine glitter
- Mod Podge or another clear sealer
- Mini clothespins
- Letter stickers
- Wood beads
- Paper doilies
- Pom-poms
- Felt hearts
- Small photos
- Paint pens or permanent markers
- Decorative scrapbook paper
Safety Tips Before You Start
If children are helping, choose washable, non-toxic, age-appropriate art supplies. Look for craft materials labeled for children and follow package instructions. Adults should handle hot glue guns, craft knives, and sharp scissors when younger kids are involved. For classrooms or group events, tacky glue or glue dots may be safer than hot glue, though they usually require more drying time.
Small puzzle pieces can be choking hazards for toddlers and young children, so keep them away from kids who still put objects in their mouths. Cover the work surface, provide smocks or old shirts, and set up a drying area before paint appears. Paint has a magical ability to migrate onto sleeves, chairs, elbows, and occasionally the family dog.
How to Make a Puzzle Art Valentine Garland
Step 1: Sort and Prepare the Puzzle Pieces
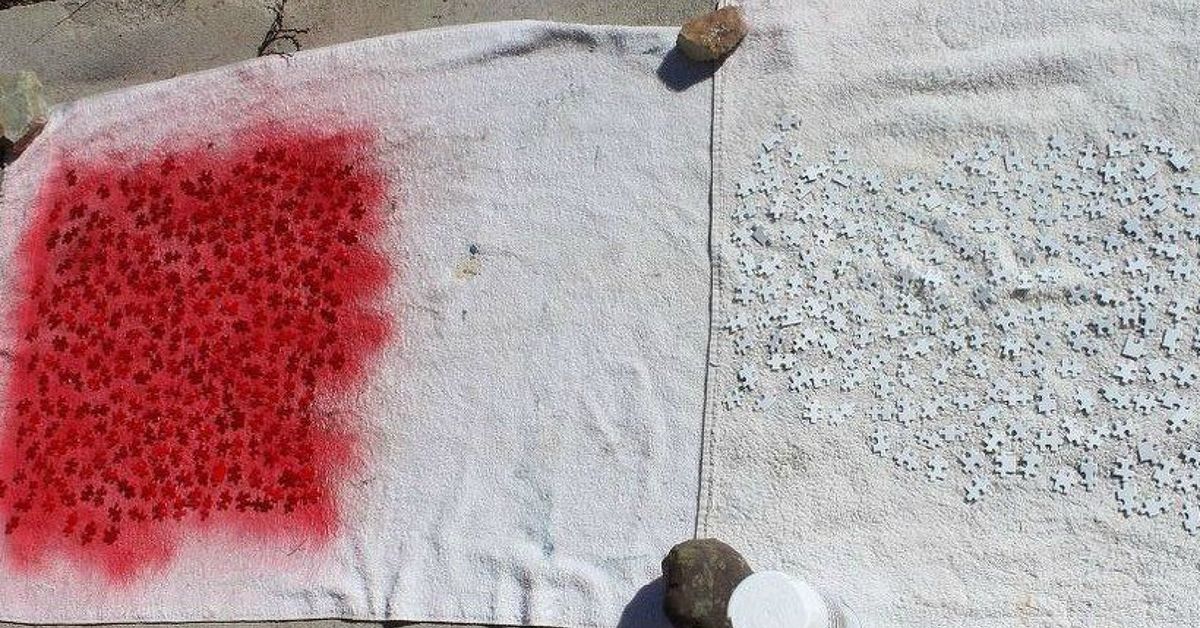
Start by choosing puzzle pieces that are clean, dry, and not overly bent. If the pieces have glossy images on one side, paint the plain cardboard side first. The printed side can also be painted, but it may need two coats for solid coverage. Separate pieces by size if you want a more polished look.
For a heart-shaped garland, you may need 10 to 25 puzzle pieces per heart depending on the size of the heart and the puzzle pieces. For a letter garland, gather enough pieces to build each letter with overlapping edges.
Step 2: Paint the Pieces
Paint puzzle pieces in a Valentine color palette. Classic red, pink, and white always work, but you can make the garland more modern with blush, burgundy, cream, rose gold, or soft lavender. For a farmhouse style, try whitewashed pieces with a few muted red accents. For kids’ crafts, let every color join the party. Valentine’s Day does not have a bouncer.
Allow the first coat to dry, then add a second coat if needed. You can also dry-brush lighter paint over darker pieces for texture. If you want sparkle, apply glitter paint or sprinkle fine glitter over wet glue. Seal glitter with a thin coat of clear sealer to prevent your home from becoming a long-term sparkle habitat.
Step 3: Create Heart Bases
Trace hearts onto cardboard, cardstock, felt, or craft foam. Cut them out carefully. These bases will support the puzzle pieces and help the hearts keep their shape when hung. For a cleaner look, paint the base the same color as the puzzle pieces or use a contrasting shade for depth.
You can make all hearts the same size for a neat garland or vary the sizes for a playful, handmade look. A good starter size is four to six inches wide per heart. This is large enough to show detail but not so large that the garland begins to resemble festive armor.
Step 4: Arrange the Puzzle Pieces
Before gluing, arrange puzzle pieces on the heart base. Overlap them slightly so the base does not show through too much. Rotate pieces in different directions to create movement and texture. Let tabs and notches stick out around the edge for a whimsical silhouette.
If you are making letters, sketch each letter lightly on the backing first. Then place puzzle pieces along the pencil lines until the letter shape is clear. Simple block letters work best. Script letters look beautiful, but they can quickly become a glue-covered geometry exam.
Step 5: Glue Everything Down
Once you like the layout, glue the pieces in place. Hot glue works quickly and creates a strong bond, making it ideal for adult-led crafts. Tacky glue is slower but safer for kids. Press each piece gently and allow enough drying time before lifting the heart.
For extra dimension, add a second layer of puzzle pieces around the edges. This creates a fuller, wreath-like appearance. You can also glue a few contrasting pieces on top as accents.
Step 6: Add Messages or Decorations
After the hearts are dry, decorate them with short Valentine phrases. Try “LOVE,” “XOXO,” “BE MINE,” “TRUE,” “KIND,” “HUGS,” or “YOU FIT.” Use letter stickers, paint pens, tiny paper banners, or handwritten tags. For a classroom version, each child can write one kind word on a heart, creating a friendship garland that celebrates the whole group.
Other embellishments include mini bows, paper doilies, tiny felt hearts, buttons, faux flowers, or small black-and-white photos. Keep the decorations lightweight so the garland hangs well.
Step 7: Attach the Hearts to String
There are several ways to attach your puzzle hearts to a garland. You can punch holes near the top of each backing and thread twine through them. You can glue the string directly to the back of each heart. You can also use mini clothespins so the hearts can be moved around or replaced later.
Leave a few inches between each heart. Add wood beads, ribbon knots, paper hearts, or pom-poms between them for extra texture. When finished, tie loops at both ends of the string for easy hanging.
Design Ideas for Different Styles
Classic Valentine Garland
Use bright red, bubblegum pink, and white puzzle pieces. Add heart shapes, “LOVE” lettering, and red ribbon. This version is cheerful, easy to recognize, and great for kids’ spaces or party decorations.
Vintage-Inspired Garland
Paint puzzle pieces cream, dusty rose, burgundy, and faded gold. Add lace ribbon, tea-stained paper tags, or antique-style letter stickers. This style looks lovely on a mantel, mirror, or headboard.
Modern Minimalist Garland
Choose a limited palette such as white, blush, and matte black. Create simple hearts or geometric clusters and hang them on thin cotton string. The result feels stylish without shouting “Valentine explosion in aisle five.”
Classroom Friendship Garland
Let students paint puzzle pieces and contribute to a shared garland. Each heart can feature a word such as kindness, respect, friendship, courage, or joy. This turns the project into both decoration and a community-building activity.
Photo Memory Garland
Attach small photos to the centers of puzzle-piece hearts. This idea works well for couples, families, grandparents, or best friends. It becomes a keepsake rather than just seasonal décor.
Where to Display a Puzzle Art Valentine Garland
A finished garland is lightweight and flexible, so it can brighten many areas of the home. Hang it across a fireplace mantel, window frame, bookshelf, bedroom wall, kitchen hutch, classroom whiteboard, party dessert table, office shelf, or entryway mirror.
For a cozy look, layer the puzzle garland with fairy lights or a plain fabric banner. For a party, hang it behind a snack table or photo booth. For a classroom, place it over a bulletin board with the title “We Fit Together” or “Our Class Is Full of Pieces That Matter.” That message is sweet, inclusive, and only mildly likely to make parents tear up during pickup.
Budget-Friendly Tips
This craft can cost very little if you use supplies you already own. Old puzzles are often available at thrift stores for a low price, especially if they are missing pieces. Scrap cardboard from shipping boxes works well for backing. Leftover ribbon from gift wrapping can become the hanging string. Even old Valentine cards can be cut into tags, hearts, or accent pieces.
If you are making garlands with a group, set up stations: painting, drying, arranging, gluing, decorating, and stringing. This keeps the process organized and prevents one table from becoming a sticky kingdom ruled by one overwhelmed glue bottle.
Common Mistakes and How to Fix Them
The Paint Looks Streaky
Use two thin coats instead of one heavy coat. Acrylic craft paint usually covers well, but glossy puzzle surfaces may need a primer coat or extra drying time.
The Hearts Bend or Flop
Use sturdier backing such as cardboard, foam board, or layered cardstock. If the garland is large, attach the string to the backing rather than the puzzle pieces themselves.
The Pieces Fall Off
Make sure paint is fully dry before gluing. Hot glue, tacky glue, or strong craft glue works better than basic glue sticks for dimensional puzzle pieces.
The Garland Looks Too Busy
Limit the color palette. Try three main colors and one accent. Repeating the same colors throughout the garland creates visual harmony.
Why This Craft Works for Kids and Adults
For kids, puzzle art builds creativity, color recognition, hand-eye coordination, and fine motor practice through painting, arranging, gluing, and stringing. For adults, it offers a relaxing, low-pressure project that can be completed in an afternoon. It is creative without requiring advanced art skills. You do not need to draw a perfect heart; the puzzle pieces do most of the charming work for you.
The project also supports open-ended creativity. Two people can use the same supplies and produce completely different garlands. One may be neat and symmetrical; another may be wild, glittery, and emotionally committed to hot pink. Both can be beautiful.
Gift Ideas Using Puzzle Art Valentine Garland
A puzzle art garland can be more than decoration. Wrap a small finished garland around a gift box instead of using disposable ribbon. Give a personalized photo garland to grandparents. Make a mini version for a teacher’s desk. Create a romantic “You Complete Me” garland for a partner. Or make friendship garlands for Galentine’s Day, because love is not limited to candlelit dinners and overpriced prix fixe menus.
You can also package a DIY kit. Place painted puzzle pieces, pre-cut hearts, twine, stickers, and instructions in a small box or paper bag. This makes a thoughtful craft kit for kids, friends, babysitters, classrooms, or community groups.
500-Word Experience Section: What Making a Puzzle Art Valentine Garland Actually Feels Like
Making a Puzzle Art Valentine Garland feels a little like hosting a tiny art party where every puzzle piece arrives wearing the wrong outfit and leaves looking fabulous. The first experience most people have with this project is surprise. Puzzle pieces do not look very promising at first. They are random, oddly shaped, and sometimes covered with bits of old sceneryhalf a barn, one suspicious cloud, a piece of someone’s elbow from a family portrait puzzle. But once the paint goes on, everything changes.
The painting stage is usually the most relaxing part. There is no need for perfection. In fact, the pieces look better when they are slightly varied. Some can be bright red, some pale pink, some white with rough brush marks. The irregularity gives the garland character. It looks handmade in the best way, not handmade in the “I panicked at midnight before a school event” way.
Arranging the pieces into hearts is where the craft becomes genuinely satisfying. You start moving pieces around, overlapping corners, turning tabs outward, filling gaps, and suddenly a heart appears. It feels like solving a puzzle without having to match 400 pieces of identical blue sky. For kids, this step can be exciting because there is no single correct answer. For adults, it can be oddly calming. You are not chasing perfection; you are building texture.
The project also has a wonderful social quality. Around a kitchen table or classroom desk, people naturally begin trading pieces, comparing colors, and suggesting ideas. Someone will always invent a better method halfway through. Someone else will use too much glue. A child will proudly announce that their heart is “abstract,” which is often code for “I glued everything everywhere,” and honestly, that confidence should be protected.
When the hearts are finally attached to twine and lifted for the first time, the garland has a handmade charm that store-bought decorations rarely match. It may not be perfectly straight. One heart may tilt. A ribbon knot may sit slightly off-center. But those little imperfections are part of the appeal. The garland feels warm, personal, and alive with evidence that real hands made it.
Displaying it is another small joy. Across a mantel, it softens the room. On a classroom board, it makes the space feel more welcoming. Above a child’s bed, it becomes a seasonal decoration they helped create. On a party table, it adds texture and conversation. People notice it because it is different. They ask, “Is that made from puzzle pieces?” and that question is basically the DIY equivalent of applause.
The best experience, though, may come after Valentine’s Day. Unlike disposable decorations, this garland can be saved. Wrap it gently around cardboard, place it in a storage box, and bring it out next year. Over time, it becomes a small tradition. Maybe one year you add names. Another year you add photos. Another year you make a longer version because someone found another incomplete puzzle in the closet. The project grows with your memories, piece by piece.
Conclusion: A Sweet Craft That Fits Together Beautifully
A Puzzle Art Valentine Garland is simple, affordable, meaningful, and endlessly customizable. It transforms forgotten puzzle pieces into festive art, making it a perfect DIY Valentine decoration for homes, classrooms, parties, and handmade gifts. With a little paint, glue, backing, and twine, you can create hearts, words, photo keepsakes, or friendship banners that feel personal and full of charm.
This craft works because it combines symbolism with creativity. Puzzle pieces remind us that love, friendship, family, and community are built from many small parts. Some pieces are bright, some are odd, some do not seem to fit at firstbut together, they create something worth hanging up and celebrating.
Whether you prefer classic red hearts, soft vintage colors, bold classroom designs, or a modern minimalist look, this project gives you room to play. It is easy enough for beginners, fun enough for kids, and satisfying enough for adults who just want a cozy seasonal project that does not require a craft degree or a second mortgage at the hobby store.
So grab that incomplete puzzle, rescue a few cardboard scraps, open the paint, and start building your Valentine garland one piece at a time. Love may be complicated, but this craft is delightfully simple.