The Commodore VIC-20 has always had a strange superpower: it looks tiny, feels friendly, and then quietly drags you into a rabbit hole of memory maps, solder fumes, cartridge ports, and 1980s engineering decisions that somehow still matter today. A new Commodore VIC-20 build is not just a nostalgia project. It is a hands-on lesson in how personal computing became personal in the first place.
Modern retro-computing fans are no longer limited to hunting for fragile, yellowed, half-working machines at estate sales or online auctions. Thanks to replacement PCBs, community documentation, modern components, open hardware projects, and patient builders with multimeters in one hand and coffee in the other, it is now possible to build a fresh VIC-20-style machine with many new parts while preserving the charm of the original “friendly computer.”
This article explores what a new Commodore VIC-20 build involves, why the Vicky Twenty replacement PCB matters, what makes the original VIC-20 historically important, and why builders still get excited about a computer with less free memory than a modern email signature.
Why the Commodore VIC-20 Still Matters
Before the Commodore 64 became the heavyweight champion of 8-bit home computers, the VIC-20 opened the door. Released widely in North America in 1981 after its earlier Japanese launch as the VIC-1001, the VIC-20 was designed to be affordable, approachable, and friendly enough for families who had never touched a computer before.
That friendliness was not just marketing fluff. The machine connected to a television, used plug-in cartridges, booted directly into Commodore BASIC V2, and invited users to start typing immediately. There was no app store, no cloud account, no “please update your firmware before fun may begin.” You turned it on and got a blinking cursor. The cursor did not judge you. Mostly.
The VIC-20 became famous as the first computer to sell more than one million units, eventually reaching well over two million units worldwide. That success helped normalize the idea that a computer could live in a bedroom, den, classroom, or family roomnot just in an office or university lab.
What Is a New Commodore VIC-20 Build?
A new Commodore VIC-20 build usually means creating a working VIC-20-style computer using a reproduction or replacement motherboard, original chips where necessary, and modern substitute parts where practical. The goal is not always to create a museum-perfect replica. For many builders, the goal is to produce a reliable, repairable machine that behaves like a VIC-20 while avoiding the most common failures of aging hardware.
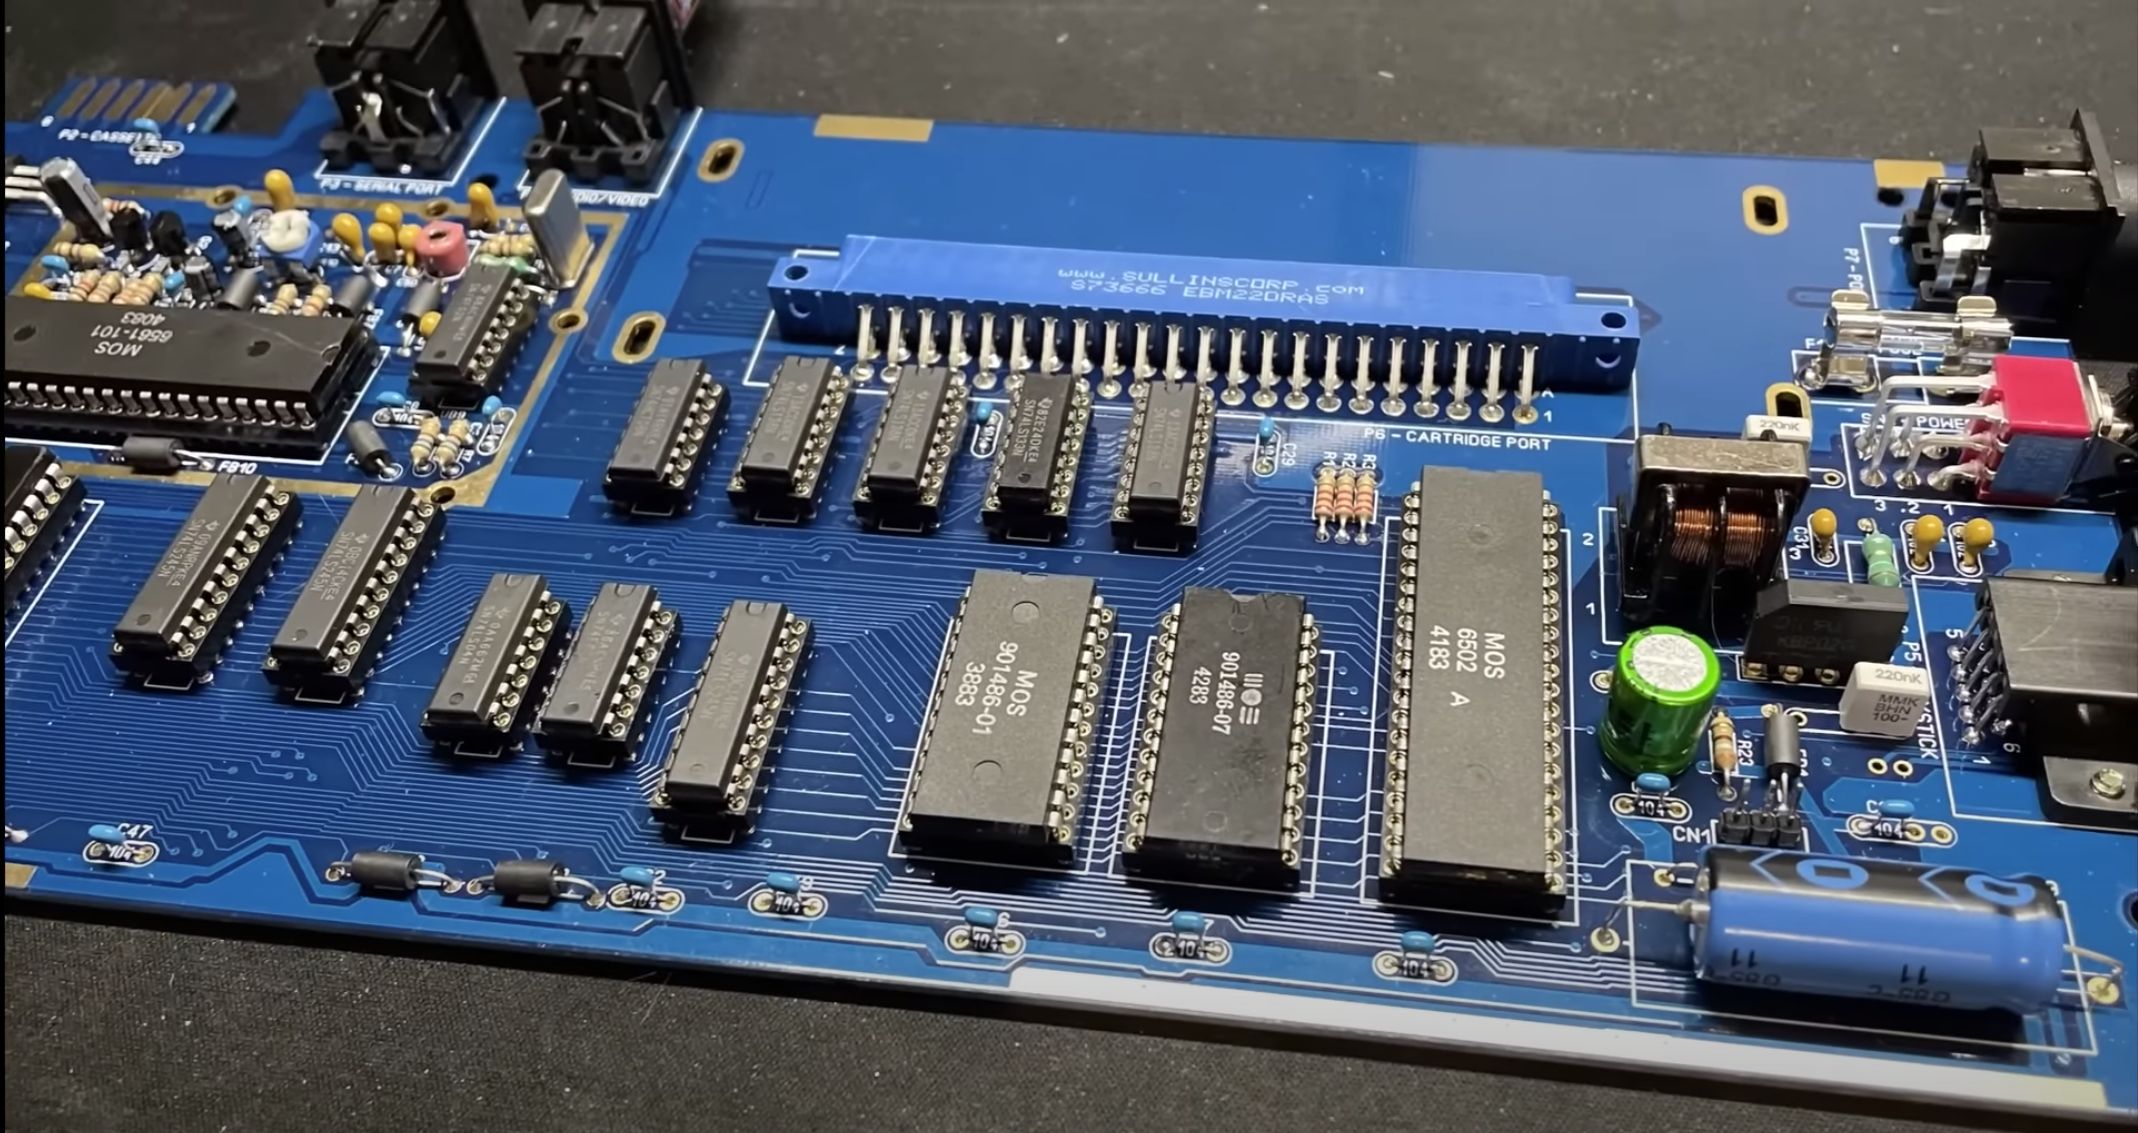
The build that sparked renewed interest in the community used the “Vicky Twenty” replacement PCB from Bob’s Bits as the foundation. This board is a replica PCB derived from the Commodore VIC-20 8-bit computer and was designed to help repair systems with damaged or faulty original boards. In practice, it can also become the basis for a nearly new VIC-20 build when combined with sockets, passive components, logic chips, original custom chips, and careful assembly.
The Vicky Twenty PCB: A Fresh Foundation
The original VIC-20 motherboards are now decades old. Time is not kind to electronics. Storage conditions, corrosion, leaky capacitors, cracked solder joints, damaged traces, previous repair attempts, and mysterious “I found this in a garage” energy can all make restoration difficult. A replacement PCB gives builders a clean foundation.
The Vicky Twenty board is based on Commodore’s later VIC-20 board design, specifically the Assembly #250403-style layout. This matters because later boards used a 7-pin DIN-style power connector rather than the earlier two-pin 9VAC arrangement. For builders, that affects the power supply, wiring, case compatibility, and troubleshooting process.
A replacement board does not magically make the project easy. It still needs to be populated with components, checked for orientation, soldered cleanly, inspected carefully, and tested in stages. However, starting from a fresh PCB removes one giant uncertainty: the board itself. When a vintage board has broken traces or hidden corrosion, diagnosing faults can feel like arguing with a haunted toaster.
Original Chips vs. Modern Components
The most interesting challenge in a new VIC-20 build is deciding which parts must remain original and which can be replaced with modern equivalents. Many standard logic components, resistors, capacitors, sockets, voltage regulators, connectors, and memory-related parts can often be sourced new or replaced with modern alternatives. That helps reliability and reduces dependence on salvage parts.
The custom chips are the tricky celebrities in the room. The VIC-20 depends on the MOS 6502 processor, the MOS 6560 or 6561 Video Interface Chip, and VIA chips for input/output duties. The VIC chip is especially important because it handles video and sound. It gives the machine its name, its look, and much of its personality.
Modern clone projects such as VIC-2020 show another path: using a mix of period-style 7400-series logic and newer components such as modern 6502 variants, SRAM, and flash ROM. These projects demonstrate that the VIC-20 concept can be rebuilt and reinterpreted, even if the original VIC video chip remains one of the hardest pieces to replace completely.
What Makes the VIC-20 Hardware Special?
On paper, the VIC-20 looks modest. It uses a 6502-family CPU, includes 5 KB of RAM, and gives BASIC users roughly 3.5 KB of usable program space on an unexpanded machine. Yes, kilobytes. Not megabytes. Not gigabytes. Kilobytes. Your smartwatch is trying not to laugh.
Yet that limitation is exactly why the VIC-20 remains fascinating. Programmers had to be economical. Game designers had to be clever. Hardware tinkerers had to understand what was happening at a low level. The VIC-20 was not a sealed appliance; it was a machine that rewarded curiosity.
CPU and BASIC
The VIC-20 runs Commodore BASIC V2, making it immediately approachable. Type a few lines, press return, and the machine responds. BASIC was not the fastest or most elegant language, but it was accessible. For many users, it was the first programming language they ever saw.
Video and Sound
The VIC chip provides color video and sound. The VIC-20’s standard text display is 22 columns by 23 rows, which gives it a chunkier, more toy-like feel than 40-column systems. It lacks hardware sprites, so motion and graphics require different techniques than on the later Commodore 64. The sound system includes square wave channels and noise, enough for simple effects, melodies, bleeps, bloops, and the occasional audio event that makes nearby pets reconsider their life choices.
Memory Expansion
The cartridge port allowed memory expansion and software cartridges. Commodore offered expansion cartridges such as 3K, 8K, and 16K options, and third-party expansion went even further. This makes VIC-20 compatibility interesting because some software expects a specific memory configuration. A new build should be tested both unexpanded and with common expansion setups if the owner plans to run a wide software library.
Planning a New VIC-20 Build
A successful new Commodore VIC-20 build starts before the soldering iron heats up. The best builders treat the project like a careful restoration, not a weekend race. Good planning helps avoid mistakes that are easy to make and annoying to fix.
1. Choose the Build Approach
The first decision is whether to build a repair-oriented replica using a board such as the Vicky Twenty, a modern clone-style system, or a restored original machine with selective upgrades. A Vicky Twenty-style build is ideal for people who want something close to original hardware. A clone project may appeal more to builders who enjoy experimentation and modern substitutions.
2. Source Components Carefully
Use reliable suppliers for modern components and be cautious with vintage chips. Counterfeit, remarked, or damaged ICs can cause strange failures. Sockets are strongly recommended because they make testing and replacement much easier. Installing chips directly into a new board may look tidy, but future-you may have strong words for present-you.
3. Study the Technical Manual and Schematics
The VIC-20 technical manual, programmer’s reference materials, and archived schematics are essential. They help builders understand the board layout, signal flow, memory map, power rails, connector functions, and expected behavior. Even if the new PCB includes modern conveniences, the underlying design still follows vintage logic.
4. Build in Stages
Do not populate the entire board, power it up, and hope the magic smoke remains inside. A staged approach is safer. Install sockets and passive components first. Verify power before inserting expensive ICs. Check voltages. Inspect solder joints under magnification. Confirm orientation of diodes, electrolytic capacitors, regulators, and IC sockets. Then begin adding chips and testing functions step by step.
Common Challenges in a VIC-20 Build
Every retro computer build has its gremlins. The VIC-20 is no exception. A few common issues deserve special attention.
Power Supply Compatibility
Different VIC-20 board revisions used different power arrangements. A later board with a 7-pin DIN connector is not the same as an early two-pin model. Builders should confirm the correct supply type and voltage expectations before applying power. Vintage power supplies may also need testing or replacement because old supplies can fail in ways that damage the computer.
Video Output
The VIC-20 was designed for CRT-era displays. Modern LCD televisions and capture devices can be picky about old composite signals. A build may work perfectly while a modern display shrugs and says, “No signal.” Testing with known-good cables, compatible displays, or video converters can save a lot of confusion.
Keyboard and Case Fit
A new PCB may be electrically accurate, but a satisfying build also needs the right physical fit. Keyboard alignment, connector placement, shield clearance, case posts, and cable routing all matter. Retro builds live in the real world, where plastic tabs snap, screws vanish, and one connector always seems to sit two millimeters too smugly to the left.
Chip Health
The custom chips are valuable and sometimes fragile. If a build fails, the problem may not be the new board at all. It could be a bad VIC chip, a weak VIA, a ROM issue, or a marginal socket connection. Known-good test chips and diagnostic cartridges can make troubleshooting much easier.
Why Build Instead of Emulate?
Emulation is wonderful. It is convenient, inexpensive, and often more practical than maintaining vintage hardware. A VIC-20 emulator can run software instantly and safely. For many users, it is the best way to explore the system.
But building real hardware offers something different. It teaches timing, signals, power, noise, connectors, memory layout, and the physical reality of computing. You do not just run a program; you understand the machine that runs it. The experience is slower, more tactile, and occasionally more stubborn. That is part of the charm.
A real VIC-20 build turns computing into a physical conversation. The keyboard has travel. The board has traces. The chips get warm. The cassette port, cartridge slot, serial bus, user port, and joystick port are not icons on a menu. They are real interfaces with real electrical behavior.
Software Testing for a New VIC-20 Build
Once the machine powers on and displays the familiar BASIC screen, testing should continue. A proper new Commodore VIC-20 build should be exercised with several types of software and peripherals.
BASIC Programs
Start simple. Write short BASIC programs that print text, change colors, loop, read input, and poke values into video registers. This confirms keyboard input, screen output, RAM behavior, and general system stability.
Cartridge Software
Cartridges are a major part of the VIC-20 ecosystem. Testing with cartridge software checks the expansion port and reveals whether the build handles ROM mapping properly.
Memory Expansion
Try common RAM expansions and confirm the reported free memory. Because VIC-20 software can depend on memory configuration, testing multiple modes is valuable.
Joystick and Sound
Games are not just entertainment here; they are diagnostic tools wearing fun hats. A joystick game can test input timing, graphics updates, sound channels, and overall stability.
Modern Upgrades That Respect the Original
A new VIC-20 build does not have to be frozen in 1981. Many upgrades can improve reliability without ruining authenticity.
Modern capacitors, quality sockets, safer power supplies, SD-based storage adapters, composite video improvements, diagnostic cartridges, and RAM expanders can all make the machine easier to use. The key is balance. The more modern conveniences you add, the more the build shifts from restoration to reinterpretation. Neither approach is wrong. The important thing is to know what experience you want.
The Appeal of Constraints
The VIC-20’s limitations are not defects in the modern retro scene; they are the main attraction. With only a small amount of usable RAM, no hardware sprites, and a narrow text display, the machine forces creativity. Every byte matters. Every screen trick feels earned. Every successful program carries the quiet satisfaction of fitting a camping trip into a lunchbox.
For developers, this makes the VIC-20 a great platform for learning. It teaches memory discipline, simple graphics architecture, CPU timing, direct hardware access, and the joy of making something work without layers of abstraction. In a world where software can consume gigabytes just to display a settings panel, the VIC-20 is refreshingly blunt.
Experience Notes: What a New Commodore VIC-20 Build Feels Like
Working on a new Commodore VIC-20 build feels less like assembling a modern PC and more like restoring a tiny historical instrument. A modern desktop build is mostly modular: click in the RAM, mount the cooler, route the cables, and hope the glass side panel does not judge your cable management. A VIC-20 build is slower and more intimate. You are not just installing parts; you are recreating a logic ecosystem.
The first experience that stands out is the pace. You learn to slow down. Component placement matters. IC orientation matters. A single solder bridge can create a mystery that consumes an evening. That sounds frustrating, and sometimes it is, but it also turns every successful test into a small celebration. Seeing the BASIC prompt appear for the first time after a careful build is genuinely exciting. It is a simple screen, but it feels like the machine has just cleared its throat and said, “All right, what shall we make?”
The second experience is how educational the build becomes. You begin noticing things that modern computing hides. Power is not abstract. Ground is not theoretical. Address lines and data lines are not textbook decorations. They are real paths across a real board. When you test continuity, check voltage rails, or follow a schematic from one chip to another, the computer stops being a mysterious box and becomes a readable system.
The third experience is the emotional tug of old and new working together. A fresh PCB, new sockets, and modern passive components can sit beside original chips that were manufactured when arcades were loud, televisions were heavy, and software came in boxes with actual manuals. That combination feels oddly poetic. The new parts provide stability; the old chips provide identity. Without the VIC chip, it may be compatible, useful, or cleverbut with it, the machine has the authentic voice of a VIC-20.
There is also a practical lesson in humility. Retro hardware does not care how confident you are. If the screen is blank, the screen is blank. You must investigate. Is the power correct? Is the clock running? Is the reset line behaving? Is the ROM seated properly? Is the display compatible? Did you install one chip backward because you were distracted by a sandwich? These projects reward patience more than bravado.
Finally, using the completed machine is its own kind of joy. Typing a BASIC program on real keys, loading a cartridge, testing a joystick, or hearing simple sound from the VIC chip connects the project to the early home-computing era in a way that screenshots cannot. It reminds you that computers were once sold not as lifestyle accessories, but as invitations. The VIC-20 invited people to learn, experiment, play, and occasionally type “GOTO 10” until the screen became a chaotic little parade. A new build keeps that invitation alive.
Conclusion
A new Commodore VIC-20 build is more than a retro novelty. It is a bridge between early home computing and today’s maker culture. The project combines restoration, electronics, programming, troubleshooting, preservation, and a healthy respect for machines that did a lot with very little.
The Vicky Twenty replacement PCB and similar community-driven efforts prove that classic computers do not have to fade away as original boards fail. With good documentation, careful sourcing, and patient assembly, builders can create reliable new versions of one of the most important home computers ever made.
The VIC-20 may be small, limited, and delightfully stubborn, but that is exactly why it remains lovable. It represents a time when computers encouraged users to peek behind the curtain. Building one today is not just about owning vintage hardware. It is about understanding it, preserving it, and enjoying the rare thrill of making a friendly little computer come alive again.