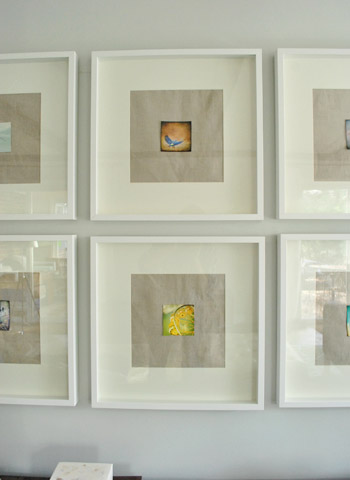
If a plain white mat board feels a little too polite for your wall art, burlap is here to kick off its shoes and bring texture to the party. Making burlap fabric mats for frames is one of those DIY projects that looks custom, expensive, and “I definitely know what I’m doing,” even if your craft table currently looks like a tiny fabric tornado passed through it.
Burlap adds warmth, rustic charm, and a handmade feel to picture frames, photo displays, farmhouse wall decor, wedding signs, nursery art, botanical prints, family portraits, and gallery walls. It is affordable, easy to find, and wonderfully forgiving. A little wrinkle or loose fiber does not ruin the look; it often makes the finished mat feel more natural. That said, burlap also has opinions. It frays, sheds, shifts, and occasionally behaves like it would rather be a potato sack than a polished frame mat. The trick is learning how to tame it without destroying its character.
This guide walks you through how to make burlap fabric mats for frames from start to finish, including supplies, measuring, cutting, gluing, preventing frayed edges, choosing the right frame, and keeping your artwork safe. Whether you are upgrading thrift-store frames or building a cozy gallery wall, this project is practical, stylish, and much cheaper than ordering custom fabric-covered mat board.
Why Use Burlap Fabric Mats For Frames?
Burlap has a texture that paper mats cannot imitate. It brings depth to flat artwork and softens the hard edges of glass, wood, and metal frames. A burlap mat works especially well when the artwork has a natural, vintage, handmade, or rustic mood.
For example, a black-and-white family photo can look warmer with a natural burlap border. A pressed fern print suddenly feels like it belongs in a charming cottage. A wedding invitation gains keepsake energy. Even simple typography prints look more interesting when surrounded by woven texture instead of a basic mat. Burlap is basically the friendly neighbor of frame materials: casual, approachable, and always ready to help.
Best Projects For Burlap Frame Mats
Burlap mats are ideal for farmhouse decor, coastal interiors, boho rooms, rustic wedding displays, craft room wall art, vintage maps, recipe cards, family photos, botanical prints, and small handmade artworks. They also pair beautifully with wood frames, distressed white frames, black frames, antique gold frames, and shadow boxes.
However, burlap is not always the best choice for valuable documents, original fine art, antique photographs, or museum-quality pieces. Because burlap is a natural fiber with texture and potential acidity, it should not touch priceless artwork directly. For sentimental but replaceable decor, it is wonderful. For rare family letters from 1890, call a professional framer. Your great-great-grandmother deserves better than experimental glue night.
What You Need To Make Burlap Fabric Mats
Before you begin, gather your supplies. A smooth project starts with having the right tools nearby, not discovering halfway through that your only scissors are hiding in the junk drawer under seven batteries and a mystery key.
Supplies List
- Burlap fabric, preferably tightly woven
- Pre-cut mat board or acid-free mat board
- Picture frame with glass or acrylic glazing
- Artwork, photo, print, or keepsake
- Craft knife or mat cutter
- Cutting mat
- Metal ruler
- Pencil
- Spray adhesive, fabric glue, or archival-safe adhesive tape
- Binder clips or small weights
- Iron and pressing cloth
- Fray prevention product, clear-drying glue, or diluted fabric stiffener
- Optional: lint roller, masking tape, rotary cutter, or pinking shears
If you are framing a valuable photo or original art, use acid-free mat board and keep adhesives away from the artwork. Acid-free boards are designed to reduce yellowing and deterioration over time. For everyday wall decor, a basic mat board may be enough, but for anything precious, choose preservation-friendly materials.
Choosing The Right Burlap
Not all burlap behaves the same way. Some burlap is loose, hairy, and dramatic. Some is smoother, tighter, and easier to cut. For frame mats, choose burlap with a consistent weave and minimal gaps. A tighter weave gives cleaner edges and a more refined finish.
Natural tan burlap is the classic choice, but white, cream, gray, black, dyed, printed, and laminated burlap can also work. If the art is already busy, stick with neutral burlap. If the artwork is simple, a colored or patterned burlap mat can add personality without overpowering the piece.
Test Before You Commit
Always place a small piece of burlap next to your artwork before cutting the full mat. Look at it in daylight and evening light. Burlap can change color depending on the lighting, and some pieces have warm yellow, green, or gray undertones. If your photo suddenly looks like it is wearing a burlap sweater from the wrong decade, try a different shade.
How To Measure Your Frame Mat
Good measuring is the difference between a custom-looking burlap mat and a project that whispers, “I was cut during a coffee emergency.” Start by measuring the inside back opening of your frame. This is the outer size of your mat board. Do not measure the front of the frame; measure the part where the mat actually sits.
Next, measure your artwork. The mat opening should usually be slightly smaller than the artwork, often by about 1/8 inch to 1/4 inch on each side, so the edges of the art are hidden behind the mat. This overlap keeps the artwork from slipping forward and prevents tiny gaps from showing.
Example Measurement
If your frame holds an 11-by-14-inch mat and your photo is 8-by-10 inches, your mat board should measure 11 by 14 inches. The opening might be around 7 3/4 by 9 3/4 inches, allowing the mat to overlap the photo slightly. If you want a wider border for a more dramatic look, use a smaller opening or a larger frame.
For small artwork, a 2-inch border often looks balanced. For larger artwork, wider borders can feel more elegant. Bottom-weighting, where the bottom border is slightly larger than the top and sides, can also make framed pieces look more professional.
Step-By-Step: Making Burlap Fabric Mats For Frames
Step 1: Prepare The Burlap
Lay the burlap flat and inspect it. Remove loose fibers and shake it gently outdoors if it sheds. Burlap dust is real, and it has a talent for landing exactly where you just cleaned.
If the fabric is wrinkled, press it with an iron using a pressing cloth. Do not drag the iron aggressively across the weave. Press, lift, and move. For stubborn creases, a light mist of water can help, but avoid soaking the fabric. Let the burlap dry completely before gluing it to the mat board.
Step 2: Cut The Mat Board
If you are using a pre-cut mat, you can skip this step. If you are cutting your own mat board, mark the outer size first, then mark the window opening on the back of the board. Use a sharp blade and a metal ruler for straight cuts.
For a clean bevel, cut from the back of the mat board if your cutter requires it. Use a slip sheet or scrap board underneath so the blade exits cleanly. Replace dull blades quickly. A dull blade tears the board, snags the burlap later, and generally acts like a tiny villain.
Step 3: Cut The Burlap Larger Than The Mat
Place the mat board on the burlap and cut the fabric at least 1 inch larger on all sides. This extra fabric wraps around the back of the mat and gives you room to pull the weave straight. If your burlap has a visible line pattern, align it carefully before cutting.
To cut straighter, remove one thread from the burlap where you want the cut line. This creates a visible channel in the weave. Cut along that channel for a cleaner edge. This old craft trick is surprisingly satisfying, like burlap finally agreeing to cooperate.
Step 4: Attach Burlap To The Front Of The Mat
Turn the burlap wrong side up. Place the mat board face down on top of it. If using spray adhesive, apply it lightly and evenly to the front of the mat board in a well-ventilated area. Let it become tacky according to the product directions, then position it on the burlap.
Smooth the burlap from the center outward with your hands. Do not stretch it too hard or the weave may distort. The goal is snug, not gym-membership-level tension. If you prefer a less permanent method, use acid-free double-sided tape around the edges instead of full adhesive coverage.
Step 5: Wrap The Outer Edges
Flip the mat over so the back is facing up. Fold the excess burlap around the outer edges and glue or tape it to the back of the mat board. Work one side at a time. Pull gently to keep the front smooth, then secure the fabric.
At the corners, trim away bulk before folding. A neat mitered corner helps the mat sit flat inside the frame. Too much fabric at the corners can make the frame backing bulge, and nobody wants a frame that closes like an overstuffed suitcase.
Step 6: Cut The Inner Window
Now comes the part that sounds scarier than it is. Turn the mat face down and locate the opening. Cut an X through the burlap in the center of the window, stopping before you reach the inner corners. Then trim the fabric so each flap can fold neatly to the back of the mat.
For a rectangular opening, cut diagonally toward each corner, but do not cut past the mat board corner. Fold the burlap flaps around the inner edge and secure them on the back with glue or tape. Use small clips or weights while the adhesive dries.
Step 7: Control Fraying
Burlap frays because it is a loose woven fabric. That is part of its charm, but inside a frame mat, too much fraying looks messy. Apply a small amount of clear-drying glue, fabric stiffener, or seam sealant to the raw inner edges on the back side. Use a light hand. Too much product can darken the fabric or make it stiff and shiny.
If you like a softer handmade look, allow a tiny bit of fringe to show. If you prefer a crisp finish, keep the fray treatment hidden on the back and press the folded edges flat before framing.
Step 8: Assemble The Frame
Clean the glass or acrylic before assembling the frame. Place the burlap-covered mat into the frame, then position the artwork behind it. Secure the artwork with acid-free photo corners or archival-safe tape if needed. Add the backing board and close the frame.
Before hanging, inspect the front for lint, loose threads, dust, or rogue fibers. A lint roller can help, but press lightly so you do not pull the weave. Once everything looks clean, hang your finished frame and admire it like a person who just saved a suspicious amount of money on custom decor.
Design Ideas For Burlap Frame Mats
Farmhouse Family Photo Display
Use natural burlap mats with black or distressed wood frames. This combination works beautifully for family portraits, childhood photos, and black-and-white prints. Keep the frame style consistent for a clean gallery wall.
Wedding Keepsake Frame
Burlap is a favorite material for rustic weddings. Use it to mat a wedding invitation, vows, dried flowers, or a reception photo. Add a white or cream inner liner if you want contrast between the burlap and the keepsake.
Botanical Print Gallery
Pressed leaves, fern prints, herb illustrations, and garden sketches look right at home with burlap. Choose simple wood frames and keep the burlap tone light so the artwork remains the focus.
Coastal Wall Art
Pair pale burlap with white frames, driftwood frames, or weathered gray frames. This style works well with shell prints, beach photography, nautical maps, and soft blue watercolor art.
Layered Mat Look
For a more polished result, use burlap as the outer mat and add a thin paper mat underneath. The paper mat creates a clean border around the artwork while the burlap provides texture. This is especially helpful when the artwork has fine details that need breathing room.
Common Mistakes To Avoid
Using Too Much Glue
Heavy glue can soak through burlap and leave dark stains. Use light coats and test on a scrap first. Spray adhesive should be applied evenly, not blasted like you are frosting a cake with hardware-store confidence.
Skipping The Test Fit
Burlap adds thickness. Always test the mat inside the frame before final assembly. Some frames have shallow rabbets and may not close properly with extra fabric layers.
Letting Burlap Touch Valuable Art
If the item is important, old, original, or expensive, create a barrier between the burlap and the artwork. Use acid-free materials and avoid direct contact with natural fibers or craft adhesives.
Ignoring The Weave Direction
Crooked burlap lines are very noticeable. Align the weave with the mat edges before gluing. Step back and check it from a distance. Your eyes will catch slanted lines faster than your ruler sometimes will.
Cutting With Dull Tools
Sharp blades matter. A dull craft knife drags through burlap and chews up mat board. Change blades often for cleaner cuts and safer handling.
How To Make Burlap Mats Look More Professional
The best burlap frame mats look intentional, not improvised. Start with quality mat board, press the fabric first, use even tension, and keep the back neat. Even though nobody sees the back once it is hanging, a tidy back usually means a smoother front.
Use a frame with enough depth to hold the extra fabric. Keep the glass clean. Center the artwork carefully. If you are making several mats for a gallery wall, cut all pieces at the same time so the borders match. Consistency makes DIY projects look custom.
You can also add a decorative detail, such as a narrow ribbon border, jute twine accent, small brass label holder, or thin inner paper mat. Just remember that the mat should support the artwork, not compete with it. If the frame starts looking like it joined a craft parade, remove one element.
Cleaning And Caring For Burlap Frame Mats
Burlap does not love moisture, heavy scrubbing, or rough handling. Once your mat is framed, the glass protects it from dust and fingerprints. To clean the outside, wipe the frame and glass with a soft cloth. Avoid spraying cleaner directly onto the frame, because liquid can seep inside and stain the burlap.
Keep burlap-framed pieces away from damp bathrooms, steamy kitchens, and direct sunlight. Moisture can encourage odor or warping, and strong sunlight can fade natural fibers over time. A hallway, bedroom, living room, office, or dining area is usually a safer home.
Budget Tips For DIY Burlap Mat Boards
One reason people love making burlap fabric mats for frames is the cost. You can upgrade old frames, thrifted frames, or standard store-bought frames without paying for custom framing. Look for frame sets during sales, buy burlap by the yard, and use leftover fabric scraps for smaller mats.
Pre-cut mats save time, while full sheets of mat board give you more flexibility. If you are nervous about cutting the window opening, purchase pre-cut mats and simply wrap them with burlap. That way, you still get the custom fabric look without needing professional mat-cutting skills.
Personal Experience: What I Learned Making Burlap Fabric Mats For Frames
The first time I made burlap fabric mats for frames, I underestimated the burlap. That was my opening mistake. I thought, “It is just fabric. I will glue it down, fold it over, and be done in twenty minutes.” The burlap heard this confidence and immediately began shedding fibers across the table like a golden retriever in July.
The biggest lesson was preparation. Pressing the burlap before gluing made a huge difference. Wrinkles that look small on loose fabric become much more obvious once the burlap is stretched across mat board. I also learned that pulling the fabric too tightly can distort the weave. Burlap is not like smooth cotton. If you tug one side too hard, the lines can lean, and suddenly the whole mat looks slightly seasick.
Another useful discovery was that spray adhesive works best when used lightly. My first test piece had too much adhesive, and the burlap darkened in spots. It was not a disaster, but it looked less polished. On the next try, I used a thinner coat, waited until the adhesive became tacky, and pressed the mat down slowly from one side to the other. The result was smoother and cleaner.
The inner window was the part I worried about most, but it turned out to be manageable. Cutting an X in the center and folding the flaps back worked better than trying to cut the exact opening all at once. The key was stopping before the corners and trimming little by little. Burlap rewards patience. It does not reward dramatic scissor decisions.
I also found that a layered mat looks especially good. One of my favorite results used burlap as the outer mat with a thin cream paper mat underneath. The cream border separated the photograph from the rough texture and made the whole frame look more expensive. It was still rustic, but not “I found this in a barn and hoped for the best” rustic.
For family photos, natural burlap looked warm and casual. For botanical prints, lighter burlap felt airy and organic. For black frames, the contrast was sharp and modern. The same fabric changed personality depending on the frame, which made the project more flexible than I expected.
The most practical tip from experience is to make one sample mat before cutting fabric for a full set. A sample helps you test glue, fray control, frame depth, and color. It also gives you permission to make small mistakes without ruining your best materials. Once the sample works, the rest of the mats go much faster.
Finally, I learned that burlap mats are best when they are allowed to look handmade. Do not chase absolute perfection. A tiny fiber, a natural color variation, or a slightly uneven thread can add charm. The goal is not to make burlap look like factory-smooth paper. The goal is to use its texture in a way that feels warm, thoughtful, and personal.
Conclusion
Making burlap fabric mats for frames is a simple way to turn ordinary artwork into something warm, textured, and custom-looking. With the right mat board, careful measuring, light adhesive, clean folds, and a little fray control, burlap can transform photos, prints, keepsakes, and gallery walls without requiring a professional framing budget.
The secret is balance. Let the burlap bring rustic charm, but keep the lines clean. Use quality materials when the artwork matters. Test your adhesive before committing. Choose frames with enough depth. Most importantly, remember that burlap is supposed to look natural. It does not need to be perfect to be beautiful. In fact, that slightly relaxed, woven texture is exactly why it works so well.
Note: This article is written for web publishing in standard American English and is based on practical DIY framing methods, mat board best practices, and common fabric-craft techniques.