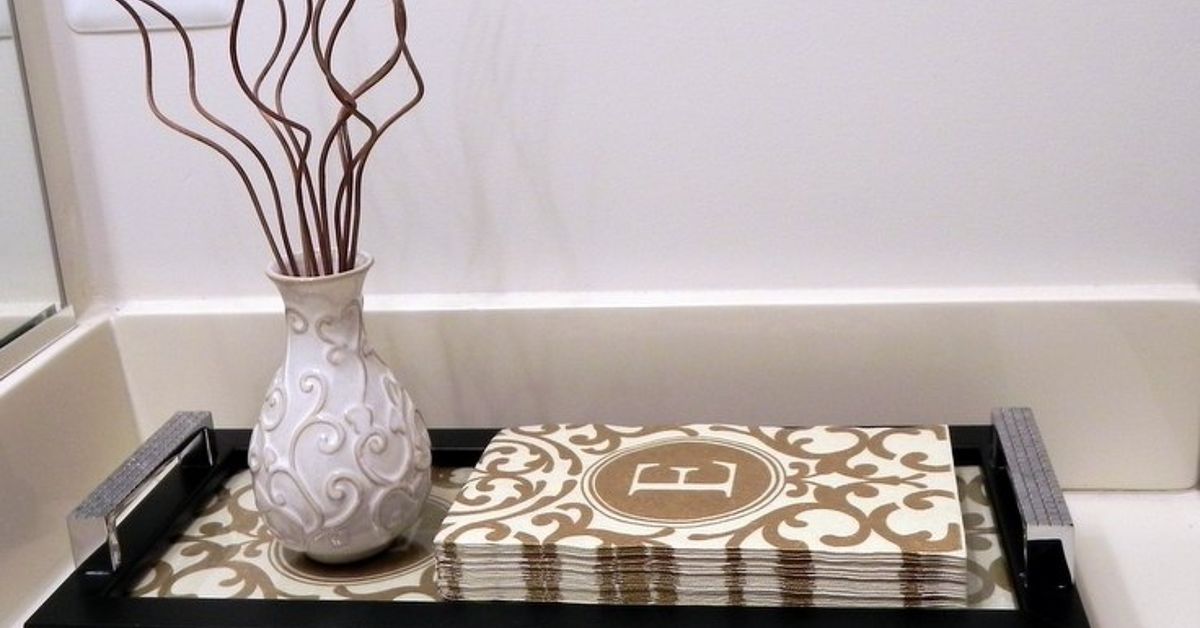
A guest bathroom can be spotless, scented, and stocked like a tiny spa, but let one lonely paper guest towel sit on the counter like it lost its way at a bus station and the whole mood changes. That is where the interchangeable guest towel picture frame tray steps in: part DIY serving tray, part seasonal décor, part “yes, I absolutely have my life together” bathroom accessory.
This project turns an ordinary picture frame into a decorative tray for guest towels, napkins, soaps, perfume bottles, small toiletries, or countertop styling. The magic is in the interchangeable insert. Instead of permanently gluing one design inside the tray forever, you can swap the paper, fabric, wallpaper sample, printable art, or themed guest towel pattern whenever your décor changes. Spring florals? Slide them in. Coastal stripes? Absolutely. Holiday plaid? Toss it in like your bathroom just got invited to a Christmas movie.
Best of all, this is a practical DIY project that does not require a workshop, a garage full of power tools, or the emotional stamina of a home renovation show. With a sturdy frame, a few handles, decorative backing, and a little planning, you can create a custom guest towel tray that looks polished, personal, and surprisingly expensive.
What Is an Interchangeable Guest Towel Picture Frame Tray?
An interchangeable guest towel picture frame tray is a decorative tray made from a picture frame, usually with the glass or acrylic front left in place to protect the decorative insert underneath. Handles are often attached to the frame sides, and the frame backing is used to hold artwork, fabric, scrapbook paper, wrapping paper, wallpaper, or seasonal printables.
The tray is especially useful in a guest bathroom, powder room, vanity area, coffee station, or entry table. In a bathroom, it gives paper guest towels a neat home instead of letting them sprawl across the counter like they are sunbathing. It also creates a clear “use these” signal for visitors, which is surprisingly important. Guests should not have to decode whether the embroidered towel with a satin bow is decorative, sacred, or guarded by an invisible museum alarm.
The interchangeable design makes this project more flexible than a standard decoupage tray. Traditional decoupage is beautiful, but once the design is sealed, it is committed. A picture frame tray lets you change the look in seconds. Remove the backing, swap the insert, close it again, and suddenly your guest bathroom has a whole new personality.
Why This DIY Tray Works So Well
The best home projects solve a real problem while looking good doing it. This tray does both. It organizes guest towels, protects the vanity from clutter, adds color, and gives you a simple way to decorate for seasons, parties, holidays, or everyday style.
It Makes Guest Towels Feel Intentional
Paper guest towels are convenient, hygienic, and easy for visitors to understand. But the packaging is not always glamorous. A tray makes them feel arranged instead of abandoned. Place a stack of folded guest towels inside the frame tray, add a small soap or mini vase, and the bathroom counter instantly feels more thoughtful.
It Lets You Decorate Without Rebuying Everything
Instead of purchasing a new tray for every holiday, you only change the insert. Use botanical paper in spring, lemon prints in summer, warm plaid in fall, velvet-look paper in winter, or a monogram design for year-round elegance. Your wallet remains calm, and your storage closet does not become a tray museum.
It Is Beginner-Friendly
This project is excellent for beginners because the frame already provides structure. You are not building a tray from raw lumber. You are upgrading an existing object with simple materials. The main skills are measuring, cutting, arranging, and attaching hardware carefully.
Materials You Will Need
Gather everything before you start so you do not end up holding a screwdriver in one hand and Googling “where did I put the tiny screws” with the other.
- A sturdy picture frame, preferably 8×10, 9×12, 11×14, or similar
- Frame glass or acrylic insert
- Decorative paper, fabric, wallpaper sample, gift wrap, or printable art
- Two small cabinet pulls, drawer handles, or tray handles
- Screws sized for the handles and frame thickness
- Drill or awl for pilot holes
- Screwdriver
- Measuring tape or ruler
- Pencil
- Scissors or craft knife
- Felt pads or rubber bumpers for the underside
- Optional: paint, stain, sandpaper, spray sealer, removable tape, or cardstock backing
How to Choose the Right Picture Frame
The frame is the foundation of the tray, so choose one that is sturdy rather than flimsy. A thin plastic frame may work for light display, but a wood or solid composite frame usually feels more substantial. Look for a frame with enough width on the side rails to hold handles securely.
Size Matters
For a guest towel tray, an 8×10 frame works for small counters and compact towel stacks. An 11×14 frame gives more room for towels, soap, lotion, and a small decorative accent. If your bathroom counter is tiny, measure first. A tray that overhangs the sink area is not charming; it is just a countertop obstacle course.
Check the Depth
A slightly deeper frame is helpful because it creates a raised lip around the tray. This keeps towels in place and gives the piece a real tray feel. Very flat frames can still work, but they may look more like a framed picture pretending to be helpful.
Glass or Acrylic?
Glass gives a crisp, polished appearance and protects the insert well. Acrylic is lighter and less fragile, making it a smart option for busy households, kids’ bathrooms, or areas where the tray might be moved often. If you use glass, inspect it for chips and make sure it sits securely in the frame. This tray is meant for light decorative use, not carrying a full breakfast across the house like a hotel server in a movie.
Step-by-Step: How to Make an Interchangeable Guest Towel Picture Frame Tray
Step 1: Clean and Inspect the Frame
Remove the backing, glass, and any existing artwork. Wipe the frame clean and check the corners. If the frame feels loose, reinforce the back with small corner brackets or strong adhesive suitable for the frame material. A tray should not wobble like it is keeping a secret.
Step 2: Paint or Refinish the Frame
If you like the frame as-is, move on. If not, lightly sand it and apply paint or stain. Matte black creates a modern look, white feels fresh and spa-like, gold adds vintage charm, and natural wood works beautifully with farmhouse, coastal, or organic modern décor. Let the finish cure fully before assembling the tray.
Step 3: Plan the Handle Placement
Place the frame face down and decide where the handles should go. Usually, handles look best centered on the short sides of the frame. Measure carefully and mark the screw holes with a pencil. Symmetry matters here. Crooked handles will stare at you forever.
Step 4: Drill Pilot Holes
Use a small drill bit or awl to create pilot holes. This helps prevent splitting, especially on wood frames. Be sure the screws are not too long. If they poke through the decorative side, your elegant tray will suddenly have tiny metal horns.
Step 5: Attach the Handles
Screw the handles into place gently but firmly. Do not overtighten. If the frame is thin, use washers or shorter screws as needed. The handles are mostly decorative and useful for repositioning the tray, not for carrying heavy items.
Step 6: Cut the Interchangeable Insert
Use the original frame paper or cardboard insert as a template. Trace it onto your decorative paper, fabric, wallpaper, or cardstock. Cut cleanly so it fits behind the glass without buckling. If the material is thin, mount it on cardstock for a smoother look.
Step 7: Assemble the Tray
Place the glass or acrylic back into the frame, add the decorative insert behind it, and secure the backing. The design should show through the top, protected from towels, splashes, and light use. Add felt pads or rubber bumpers to the underside so the tray does not scratch your counter.
Step 8: Style with Guest Towels
Stack paper guest towels neatly inside the tray. You can align them flat, fold them in half, or place them at a slight angle for a boutique look. Add a small soap dish, travel-size lotion, candle, faux greenery, or a tiny vase if space allows. Keep the arrangement useful. A guest towel tray should not require guests to move a ceramic pumpkin, three shells, and a decorative bird just to dry their hands.
Creative Insert Ideas for Every Season
The interchangeable insert is the fun part. Think of it as a tiny stage set for your bathroom counter.
Everyday Elegant
Use linen-textured cardstock, subtle stripes, marble paper, cane webbing print, or a soft neutral pattern. This style works year-round and pairs well with white paper guest towels, clear soap bottles, and brushed nickel or brass hardware.
Spring and Summer
Try floral wrapping paper, botanical prints, watercolor lemons, blue-and-white chinoiserie patterns, seashell paper, or gingham. For a coastal powder room, a pale blue insert with white towels and a small glass jar of cotton rounds feels fresh without trying too hard.
Fall and Thanksgiving
Use warm plaid, rust-colored florals, kraft paper, pressed-leaf prints, or copper-toned paper. Pair it with cream guest towels and a small amber soap bottle. Congratulations, your bathroom is now seasonally festive without wearing a sweater.
Winter and Holidays
Holiday inserts can be classic or subtle. Think tartan plaid, metallic stars, snowflake paper, deep green velvet-look cardstock, or simple black-and-white holiday typography. For a polished look, match the insert to the guest towels instead of using every holiday color at once.
Parties and Special Occasions
For showers, birthdays, graduations, or family gatherings, print a custom insert with a monogram, event date, quote, or small welcome message. It is a simple detail that makes guests feel expected and cared for.
Best Places to Use the Tray
The guest bathroom is the obvious location, but this project is more versatile than its name suggests.
- Powder room: Hold paper guest towels, soap, and a small decorative accent.
- Vanity: Organize perfume, jewelry, lotion, or hair accessories.
- Guest bedroom: Display bottled water, wrapped mints, and a welcome note.
- Coffee bar: Hold napkins, stirrers, sugar packets, and seasonal art.
- Entry table: Use it for keys, mail, sunglasses, or a small catchall bowl.
- Holiday buffet: Display cocktail napkins or dessert forks in style.
Design Tips for a High-End Look
A DIY tray looks expensive when the details are edited. Choose two or three finishes and repeat them. For example, a black frame with brass handles and cream towels feels intentional. A white frame with blue floral paper and polished chrome handles feels crisp and classic.
Also, pay attention to scale. If your guest towels are heavily patterned, use a calmer insert. If the insert is bold, choose plain towels. The tray should not look like a design argument happening on your counter.
For a boutique-hotel feel, keep the tray stocked but not overfilled. A neat stack of towels, one soap, and one small decorative item is usually enough. Negative space is not wasted space; it is breathing room for the eyes.
Care and Cleaning
Wipe the glass or acrylic with a soft cloth. Avoid soaking the frame, especially if it is wood or painted. If the tray sits near the sink, check underneath occasionally for moisture. Felt pads can hold dampness, so replace them if they become worn or dirty.
For paper inserts, store extras flat in a folder or envelope. Label them by season so you are not digging through a drawer in December muttering, “Where is the snowflake paper?” If you use fabric inserts, iron them first and mount them to cardstock for a smooth finish.
Common Mistakes to Avoid
Using a Weak Frame
A delicate frame may look pretty, but it can flex or separate at the corners. Choose a frame with enough strength to handle light use.
Skipping Pilot Holes
Pilot holes make handle installation cleaner and reduce the risk of splitting the frame. This tiny step saves big frustration.
Choosing Screws That Are Too Long
Measure the frame thickness before attaching handles. Screws should secure the hardware without poking through the visible side.
Overdecorating the Tray
The tray should help guests, not confuse them. Keep the towels easy to reach and the styling simple.
Using It Like a Heavy Serving Tray
A picture frame tray is best for display and light organization. It is not designed for carrying heavy drinks, full dishes, or anything that could damage the glass.
Experience Notes: What This Project Teaches You in Real Life
The first thing you learn from making an interchangeable guest towel picture frame tray is that small projects can change the feel of a room faster than big purchases. A powder room is usually one of the smallest spaces in the house, but guests notice it because they use it alone. That means every detail feels more visible: the soap, the towels, the counter, the lighting, and yes, the tray quietly holding everything together like a well-dressed stage manager.
In practice, the most satisfying part of this project is how easily it adapts. You might start with a simple white frame and a floral insert, then realize you can create a whole library of inserts from leftover gift wrap, wallpaper samples, scrapbook paper, or printable art. Suddenly, that drawer full of “too pretty to throw away” paper has a purpose. This is excellent news for anyone who has been emotionally attached to a two-foot scrap of wrapping paper since 2019.
Another real-life lesson is that guest-friendly design is not always about being fancy. It is about being clear. When towels are stacked neatly in a tray, guests know what to use. When the soap is nearby, the counter is uncluttered, and the towel stack looks fresh, the whole room feels more welcoming. Nobody has to ask awkward questions like, “Is this towel decorative?” or “Am I allowed to touch the one with the tassels?” A good tray answers those questions silently.
The interchangeable feature also prevents décor fatigue. Many people decorate enthusiastically for one season, then get tired of storing bulky items. Inserts solve that problem. A flat folder of seasonal papers takes almost no space, and changing the insert takes less time than finding where you stored the fall wreath. This makes the tray especially useful for small homes, apartments, dorm-style spaces, or anyone who loves seasonal decorating but not seasonal clutter.
From a crafting standpoint, the best results come from patience in the boring steps. Measuring the handles carefully, cutting the insert straight, cleaning the glass, and choosing the right screw length are not glamorous tasks. They are also the reason the finished tray looks polished instead of “homemade in a panic.” If something feels slightly off, fix it before final assembly. DIY projects are much nicer when they do not whisper regrets every time you wash your hands.
One of the most practical experiences is learning what inserts actually look good under glass. Some papers become more vibrant, while others show wrinkles or shadows. Thicker cardstock usually lies flatter. Fabric looks beautiful but often needs backing. Metallic paper can be stunning, but too much shine may reflect bathroom lighting in strange ways. Testing a few options before committing helps you avoid a tray that sparkles like a disco ball at 7 a.m.
Finally, this project reminds you that hospitality lives in details. A guest towel tray will not remodel your bathroom, but it will make the counter feel finished. It gives visitors a clean, obvious place to reach. It gives you an easy creative outlet. And it turns an everyday object into something personal. That is the charm of this DIY: it is useful, affordable, customizable, and just a little bit smug in the best possible way.
Conclusion
An interchangeable guest towel picture frame tray is one of those rare DIY projects that is simple, practical, and genuinely stylish. It organizes guest towels, upgrades a bathroom counter, and gives you endless decorating options without requiring a new tray for every season. With a sturdy frame, attractive handles, protective glass or acrylic, and a collection of swappable inserts, you can create a custom tray that works for holidays, parties, everyday hosting, and quick bathroom refreshes.
Whether your style is coastal, farmhouse, modern, vintage, romantic, or “I bought this paper because it made me happy,” this project gives you room to personalize. Keep it neat, keep it useful, and let the insert do the decorating. Your guests may not know you made it from a picture frame, but they will notice that the bathroom feels thoughtful, tidy, and welcoming. And honestly, that is the whole point.
Note: This article is an original, publish-ready synthesis of practical DIY, home décor, guest towel styling, craft finishing, and basic safety guidance. Source links have intentionally not been inserted into the article body.