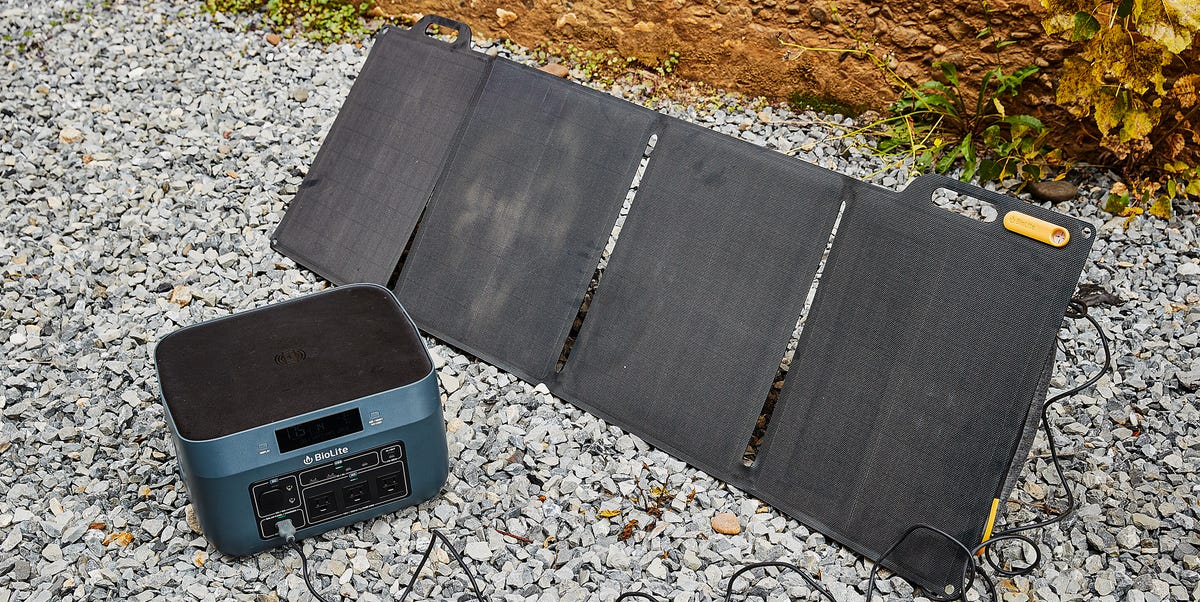
Power outages have a talent for arriving at the least convenient moment. Dinner is half-cooked, the Wi-Fi is carrying your entire household’s emotional stability, and the refrigerator is quietly holding $200 worth of groceries hostage. A portable solar generator can be a smart, quiet, fuel-free way to keep essential devices running when the grid takes a nap.
But let’s be clear from the start: a portable solar generator is not a magic box that runs the whole house forever while you continue laundry, gaming, baking, and central air conditioning like nothing happened. It is a battery-powered backup system, usually paired with solar panels, that can support selected loads. Used correctly, it can keep the refrigerator cold, lights on, phones charged, medical devices powered, and your sanity mostly intact.
This guide explains how to set up a portable solar generator to back up your home safely, how to size the system, where to place solar panels, how to connect appliances, when to use a transfer switch, and what mistakes to avoid. The goal is simple: backup power without backfeeding the grid, overloading the battery, or turning your emergency plan into a very expensive extension-cord sculpture.
What Is a Portable Solar Generator?
A portable solar generator is usually a portable power station plus one or more solar panels. The power station contains a rechargeable battery, inverter, charge controller, outlets, display screen, and safety electronics. The solar panels convert sunlight into DC electricity, and the generator stores that energy so you can use it later through AC outlets, USB ports, DC ports, or a compatible home backup connection.
The word “generator” can be confusing because traditional gas generators create electricity by burning fuel. A portable solar generator does not burn gasoline and does not produce exhaust. That makes it much friendlier for indoor battery use, though the solar panels themselves need sunlight outdoors. Think of the unit as a giant rechargeable battery with manners.
Step 1: Decide What You Actually Need to Power
The first setup step happens before you buy cables, panels, or a shiny battery with more ports than an airport lounge. You need an outage plan. List the devices that truly matter during a blackout. For most homes, the essentials include a refrigerator or freezer, phone chargers, Wi-Fi router and modem, a few LED lights, a laptop, a CPAP machine or other medical device, and possibly a sump pump, garage door opener, or gas furnace blower.
Do not start with “I want to power my whole house.” That phrase is where budgets go to become ghost stories. Start with “What must stay on for safety, food, communication, and basic comfort?” Once you know that, you can size the portable solar generator correctly.
Example Essential Load List
| Device | Typical Priority | Setup Note |
|---|---|---|
| Refrigerator | High | Allow extra inverter capacity for compressor startup surge. |
| Wi-Fi router and modem | High | Low wattage, high usefulness, especially for storm updates. |
| LED lights | High | Use efficient bulbs or rechargeable lamps to stretch runtime. |
| Phones and tablets | High | Charge directly from USB ports when possible. |
| CPAP or medical device | Critical | Confirm wattage, runtime, and whether humidifier mode increases draw. |
| Sump pump | Situation-dependent | Requires high surge capacity; test before storm season. |
Step 2: Size the Battery, Inverter, and Solar Panels
Portable solar generator setup comes down to three numbers: watts, watt-hours, and solar input. Watts measure how much power a device needs at one moment. Watt-hours measure how much energy it uses over time. Solar input tells you how quickly the battery can recharge from panels.
Use this simple formula:
Device watts × hours used = watt-hours needed
For example, a 15-watt router running for 20 hours needs about 300 watt-hours. A 10-watt LED lamp running for 6 hours needs 60 watt-hours. A refrigerator is trickier because it cycles on and off. Instead of assuming it runs at full power all day, use a plug-in watt meter for 24 hours or check the appliance energy label for better estimates.
After listing your devices, add the watt-hours together, then add a cushion of at least 20% to 30%. Batteries lose some energy through inverter conversion, standby draw, cold weather, and normal inefficiencies. Backup power is not the time to size things like a minimalist backpacker who saw one inspirational video.
Battery Capacity
A 1,000Wh portable power station might handle phones, lights, internet, and small electronics for a day, but it may struggle with refrigerators or pumps during longer outages. A 2,000Wh to 4,000Wh unit is more realistic for a refrigerator, communications, lighting, and small medical devices. Larger modular systems, often 5,000Wh and above, can support more circuits when paired with the correct transfer equipment.
Inverter Output
The inverter converts battery DC power into household AC power. Check two inverter ratings: continuous output and surge output. Continuous output is what the generator can supply steadily. Surge output is the brief burst needed by motors and compressors. Refrigerators, freezers, sump pumps, and furnace blowers may need more startup power than their normal running wattage suggests.
Solar Input
Solar panels recharge the unit, but panel wattage is not the same as guaranteed charging speed. A 400-watt panel array may produce less in cloudy weather, winter sun, shade, high heat, or poor angle. For emergency planning, assume real-world output will vary. A portable solar generator works best when you reduce loads first and treat solar as daily replenishment, not instant unlimited power.
Step 3: Choose Your Connection Method
There are two common ways to use a portable solar generator for home backup: plug devices directly into the power station, or connect selected home circuits through professionally installed transfer equipment. The right method depends on your budget, skill level, outage goals, and whether you need to power hardwired devices.
Option A: Direct Plug-In Setup
This is the simplest method. Place the portable power station in a dry, ventilated indoor location, then plug essential devices directly into it. Use properly rated extension cords only when needed, and avoid running cords under rugs, through standing water, or across high-traffic areas where someone can trip and perform an unplanned gymnastics routine.
Direct plug-in backup is ideal for phones, laptops, routers, lamps, small fans, and some refrigerators or freezers. It is also the best starting point for renters because it does not modify the home’s electrical system.
Option B: Transfer Switch or Interlock Setup
A transfer switch or approved interlock setup allows a backup source to power selected home circuits while isolating the house from utility power. This is the safer, cleaner option for hardwired loads such as lights, a gas furnace blower, a well pump, or outlets in specific rooms. It also avoids the “extension cords everywhere” look, which is practical in an emergency but not exactly interior design.
This part is not a DIY guessing game. A licensed electrician should install the transfer switch, inlet, breaker interlock, or manufacturer-specific smart home panel according to local code, the product manual, and permit requirements. Never plug a generator or power station into a wall outlet to “feed” the house. That dangerous practice, often called backfeeding, can energize utility lines, injure line workers, damage equipment, and create fire hazards.
Step 4: Pick the Right Location for the Power Station
The battery unit should sit indoors or in a protected location approved by the manufacturer. Keep it dry, stable, and away from direct heat, flammable clutter, water leaks, and blocked ventilation. Do not place it beside a furnace, under a dripping window, or in a garage corner where it can become best friends with paint thinner and mystery chemicals from 2008.
Unlike gas generators, battery power stations do not need to run outdoors for exhaust reasons. However, they still contain high-capacity lithium batteries and electronics. Respect the manufacturer’s temperature limits. Avoid charging or storing the unit in extreme heat or freezing conditions unless the model is specifically designed for it.
Keep the display visible so you can monitor battery percentage, input watts, output watts, and estimated runtime. During a real outage, those numbers become more interesting than most reality television.
Step 5: Set Up the Solar Panels
Portable solar panels should be placed outside in direct sunlight. In most U.S. locations, panels generally perform best facing true south, though portable panels give you the flexibility to adjust throughout the day. Keep them out of shade from trees, fences, rooflines, patio umbrellas, and that one decorative yard object that suddenly becomes a solar villain.
Use the panel stand or adjustable legs to angle the panels toward the sun. A practical rule is to start near your local latitude angle for year-round use, then adjust lower in summer and steeper in winter if your panel mounts allow it. The best angle is the one that produces the highest input watts on your power station display.
Solar Cable Safety
Use only compatible solar cables and connectors. Check the power station’s maximum solar input voltage, current, and wattage before connecting panels. Do not randomly connect panels in series or parallel unless the combined voltage and amperage stay within the manufacturer’s limits. Solar panels can produce higher open-circuit voltage in cold weather, so leave a safety margin.
Keep connectors dry, raise cables off wet ground when possible, and avoid pinching cords in doors or windows. Portable panels are convenient, but they are still electrical equipment, not picnic blankets with ambition.
Step 6: Test the System Before an Outage
The worst time to learn your refrigerator overloads your power station is 11:30 p.m. during a thunderstorm. Test everything in calm weather. Fully charge the portable solar generator, plug in each essential device, and watch the output wattage. Then run your most important loads together for at least an hour.
For refrigerators, freezers, pumps, and furnace blowers, confirm that the inverter can handle startup surge. For medical devices, test the exact settings you plan to use during an outage. For transfer switch systems, have your electrician explain the step-by-step switching process, label the circuits clearly, and practice the sequence when the grid is working.
Write the process on a laminated card or tape it near the unit. During an outage, everyone suddenly becomes a little less technical. A clear checklist beats “I think I watched a video about this once.”
Step 7: Operate It During a Blackout
When the power goes out, start by reducing demand. Turn off nonessential lights and unplug devices that are not needed. Keep refrigerator and freezer doors closed. Then connect the essential loads in priority order: medical equipment first, then refrigeration, communications, lighting, and comfort items.
Watch the output wattage and estimated runtime. If the generator says it has five hours left and the sun will not rise for ten hours, reduce loads. Turn the refrigerator on for cycles instead of powering every convenience continuously. Charge phones during sunny periods. Run laptops from their internal batteries after charging them. Small choices can double practical runtime.
If you have solar panels deployed, recharge during the strongest sunlight hours. Move panels as shadows shift. Even a small improvement in angle can noticeably improve input watts. In cloudy weather, accept slower charging and prioritize essentials.
What Not to Plug Into a Portable Solar Generator
Some appliances are poor matches for portable battery backup. Electric space heaters, electric ovens, clothes dryers, central air conditioners, large well pumps, and traditional electric water heaters can drain batteries quickly or exceed inverter limits. Heat-producing appliances are the usual troublemakers because turning electricity into heat requires a lot of power.
That does not mean backup heating or cooling is impossible. It means you need a realistic plan. Use efficient fans, heated blankets rated within the system’s capacity, safe non-electric heating alternatives, or a professionally designed larger backup system. For cooling, prioritize one room, shade windows, run fans, and conserve battery for the devices that matter most.
Safety Checklist for Home Backup
- Never backfeed power through a wall outlet, dryer outlet, or homemade cord.
- Use a licensed electrician for transfer switches, interlocks, inlet boxes, and hardwired circuits.
- Keep the battery unit dry, ventilated, and within manufacturer temperature limits.
- Use properly rated cords and avoid damaged plugs, loose connectors, and overloaded power strips.
- Keep solar panel wiring within the generator’s voltage, amperage, and wattage limits.
- Test refrigerators, pumps, and furnace blowers for startup surge before relying on them.
- Install working smoke alarms and, if you also own a fuel generator, carbon monoxide detectors.
- Store the unit at a healthy charge level according to the owner’s manual.
- Inspect panels, cables, adapters, and ports before storm season.
Maintenance: The Boring Part That Saves You Later
Portable solar generators need far less maintenance than gas generators, but they are not “buy it once and forget it in a closet until civilization flickers.” Recharge the battery periodically. Update firmware if the manufacturer provides app-based updates. Keep the ports clean and covered. Store cables together in a labeled bag. Check the solar panels for cracks, loose legs, or damaged connectors.
Every three to six months, run a short backup drill. Plug in the router, lamp, and refrigerator. Deploy the panels. Confirm charging input. This small ritual turns emergency power from a theory into a working household system.
Example Setup for a Practical Home Backup Plan
Imagine a family wants to power one refrigerator, Wi-Fi, two phones, two LED lamps, and a laptop during a one-day outage. They choose a portable power station with about 2,000Wh of battery capacity, a 2,000W inverter with adequate surge rating, and 400W to 800W of portable solar panels. They plug the router and lamps directly into the unit, use a properly rated cord for the refrigerator, and recharge from solar panels during the day.
For a more advanced version, they hire an electrician to install a manual transfer switch for six essential circuits: refrigerator outlet, living room outlet, internet equipment outlet, bedroom outlet for a medical device, furnace blower circuit, and a lighting circuit. Now they can power selected parts of the home without extension cords running like vines through the hallway.
This setup will not run central air, an electric range, and a clothes dryer. It will, however, keep food cold, devices charged, communication open, and the house livable. That is exactly what a portable solar generator backup plan should do.
Real-World Experience: What Setting One Up Actually Teaches You
The first thing most homeowners learn after setting up a portable solar generator is that wattage feels abstract until the battery screen starts counting down. A lamp seems tiny. A router seems tiny. A refrigerator seems reasonable. Then someone plugs in a coffee maker and the power station reacts like it just saw a ghost. Real-world experience quickly teaches the difference between “can power it” and “should power it during an emergency.”
One of the most useful habits is doing a weekend simulation. Fully charge the unit on Friday night, pretend the grid is down on Saturday morning, and run only your planned essentials for several hours. You will discover small but important things. Maybe the refrigerator cord does not reach. Maybe the Wi-Fi equipment is plugged into an awkward outlet behind furniture. Maybe the solar panel cable needs an extension. Maybe your “emergency flashlight” contains batteries that gave up emotionally sometime last winter.
Another lesson is that solar charging rewards attention. Portable panels are not set-and-forget devices unless you are content with lower output. Moving panels once or twice during the day can improve charging significantly, especially when shadows creep across the yard. In practice, the best solar spot may not be the prettiest spot. It may be the driveway, deck, or a patch of lawn where the panels can face open sky without shade.
People also learn that silence is underrated. During a neighborhood outage, a battery power station makes no engine noise and needs no fuel run. That quiet operation is wonderful at night, especially for medical devices, baby monitors, or keeping phones charged beside the bed. The tradeoff is discipline. With a gas generator, fuel is the limiting factor. With a solar generator, stored energy is the budget. Spend it wisely.
Labeling becomes surprisingly important. Label every cable, adapter, and circuit. Keep the solar charging cable with the panels, not in a random drawer guarded by expired takeout menus. Create a printed “outage mode” checklist: what to plug in first, what to leave off, where the panels go, and which appliances are not allowed. This prevents panic decisions and protects the battery from overload.
The biggest experience-based takeaway is that a portable solar generator works best as part of a system, not as a single gadget. Efficient LED lights, charged power banks, a cooler, surge-aware appliance choices, weather alerts, and a practiced household routine all make the generator more effective. Backup power is not about pretending the outage is not happening. It is about making the outage boring. And boring, during an emergency, is a beautiful thing.
Conclusion
Setting up a portable solar generator to back up your home is mostly about planning, sizing, safe connection, and practice. Choose your essential loads, calculate watt-hours, buy enough battery and inverter capacity, deploy panels in strong sunlight, and never connect to home wiring without proper transfer equipment installed by a qualified electrician.
A good portable solar generator will not turn your house into an off-grid mansion overnight. It will keep critical devices running, protect food, support communication, and reduce outage stress. That is a win. In a blackout, nobody needs luxury. They need light, cold milk, charged phones, and Wi-Fi that keeps working long enough for everyone to stop asking, “Is the power back yet?”