Planting a tree looks simple from a distance: dig a hole, drop in a tree, add dirt, take a proud photo, and wait for the birds to write you thank-you notes. In reality, a tree is not a fence post with leaves. It is a living investment with roots, stress, preferences, and a surprisingly strong opinion about being buried too deep.
Learning how to plant a tree properly can make the difference between a healthy shade-maker that thrives for decades and a sad stick that spends three years looking personally offended. The good news is that proper tree planting is not complicated. It is mostly about doing a few important things correctly: choosing the right location, finding the root flare, digging the right kind of hole, backfilling carefully, mulching like a donut instead of a volcano, and watering long enough for the tree to establish.
This guide walks you through the full process in plain American English, with practical examples, common mistakes, and real-world experience from what usually happens when enthusiastic homeowners meet compacted soil, stubborn nursery pots, and a shovel that suddenly feels too small.
Why Proper Tree Planting Matters
A tree may live for generations, but its future is often decided in the first hour after it arrives in your yard. Planting too deep, leaving circling roots untouched, piling mulch against the trunk, or forgetting to water can cause decline years later. That is the sneaky part: tree-planting mistakes do not always show up immediately. A tree can leaf out, look fine, and still be quietly struggling below the surface.
Roots need oxygen, moisture, and room to expand into surrounding soil. The trunk needs to stay dry at the base. The root flare, where the trunk begins to widen into the main roots, needs to remain visible. If the tree looks like a telephone pole stuck straight into the ground, it is probably planted too deep. Trees do not enjoy the telephone-pole lifestyle.
Step 1: Choose the Right Tree for the Right Place
Before digging, think about the mature tree, not the cute little nursery version sitting in a container. A small oak, maple, elm, magnolia, or sycamore can eventually become a large living structure. That means you need to consider overhead wires, underground utilities, sidewalks, driveways, foundations, fences, septic systems, rooflines, and neighboring property.
Look Up, Down, and Around
Look up for power lines and roof overhangs. Look around for buildings, pavement, patios, and sight lines. Look down by contacting 811 before you dig. In the United States, 811 is the national before-you-dig service that helps arrange utility marking. Even a small tree hole can hit shallow utility lines, and nothing ruins a Saturday gardening mood faster than discovering electricity the hard way.
Also match the tree to the site. Some trees love full sun. Others tolerate partial shade. Some need well-drained soil, while others can handle occasional wet conditions. A bald cypress may shrug at damp ground; many other trees will sulk. If your soil is compacted clay, sandy, salty, highly alkaline, or poorly drained, choose a species known to tolerate those conditions.
Step 2: Pick a Healthy Tree
A proper planting job starts with a good tree. At the nursery, look for strong structure, healthy leaves or buds, a straight trunk, and no major wounds. Avoid trees with cracked bark, broken leaders, obvious disease, or roots that are circling tightly around the trunk.
For container-grown trees, slide the root ball partly out if possible. If the roots are circling like spaghetti in a tiny bowl, they need correction before planting. For balled-and-burlapped trees, check whether the root flare is actually near the top of the root ball. Sometimes extra soil is piled over the flare during nursery production, and that soil should be removed before planting depth is measured.
Step 3: Gather the Right Tools
You do not need a professional landscaping truck to plant a tree, though it would be nice if one appeared with snacks. A basic kit usually includes a shovel, tape measure, utility knife, pruners, wire cutters for balled-and-burlapped trees, a tarp for soil, water source, mulch, gloves, and a sturdy piece of wood or shovel handle to check hole depth.
If the tree is large, get help. Dragging a heavy root ball by the trunk can damage the tree. Always lift by the container or root ball, not by the trunk. The trunk is not a handle, even if it looks conveniently handle-shaped.
Step 4: Find the Root Flare
The root flare is the widening area at the base of the trunk where the first major roots begin. This is your planting-depth guide. In a properly planted tree, the root flare should be at or slightly above the surrounding soil surface after settling.
If you cannot see the root flare, gently remove soil from the top of the root ball until you find the first main roots. Do not assume the top of the nursery pot or burlap ball equals the correct planting depth. Many trees are sold with soil piled too high over the trunk base. Planting based on that false surface is one of the most common ways people accidentally bury trees too deep.
Step 5: Dig a Wide, Shallow Hole
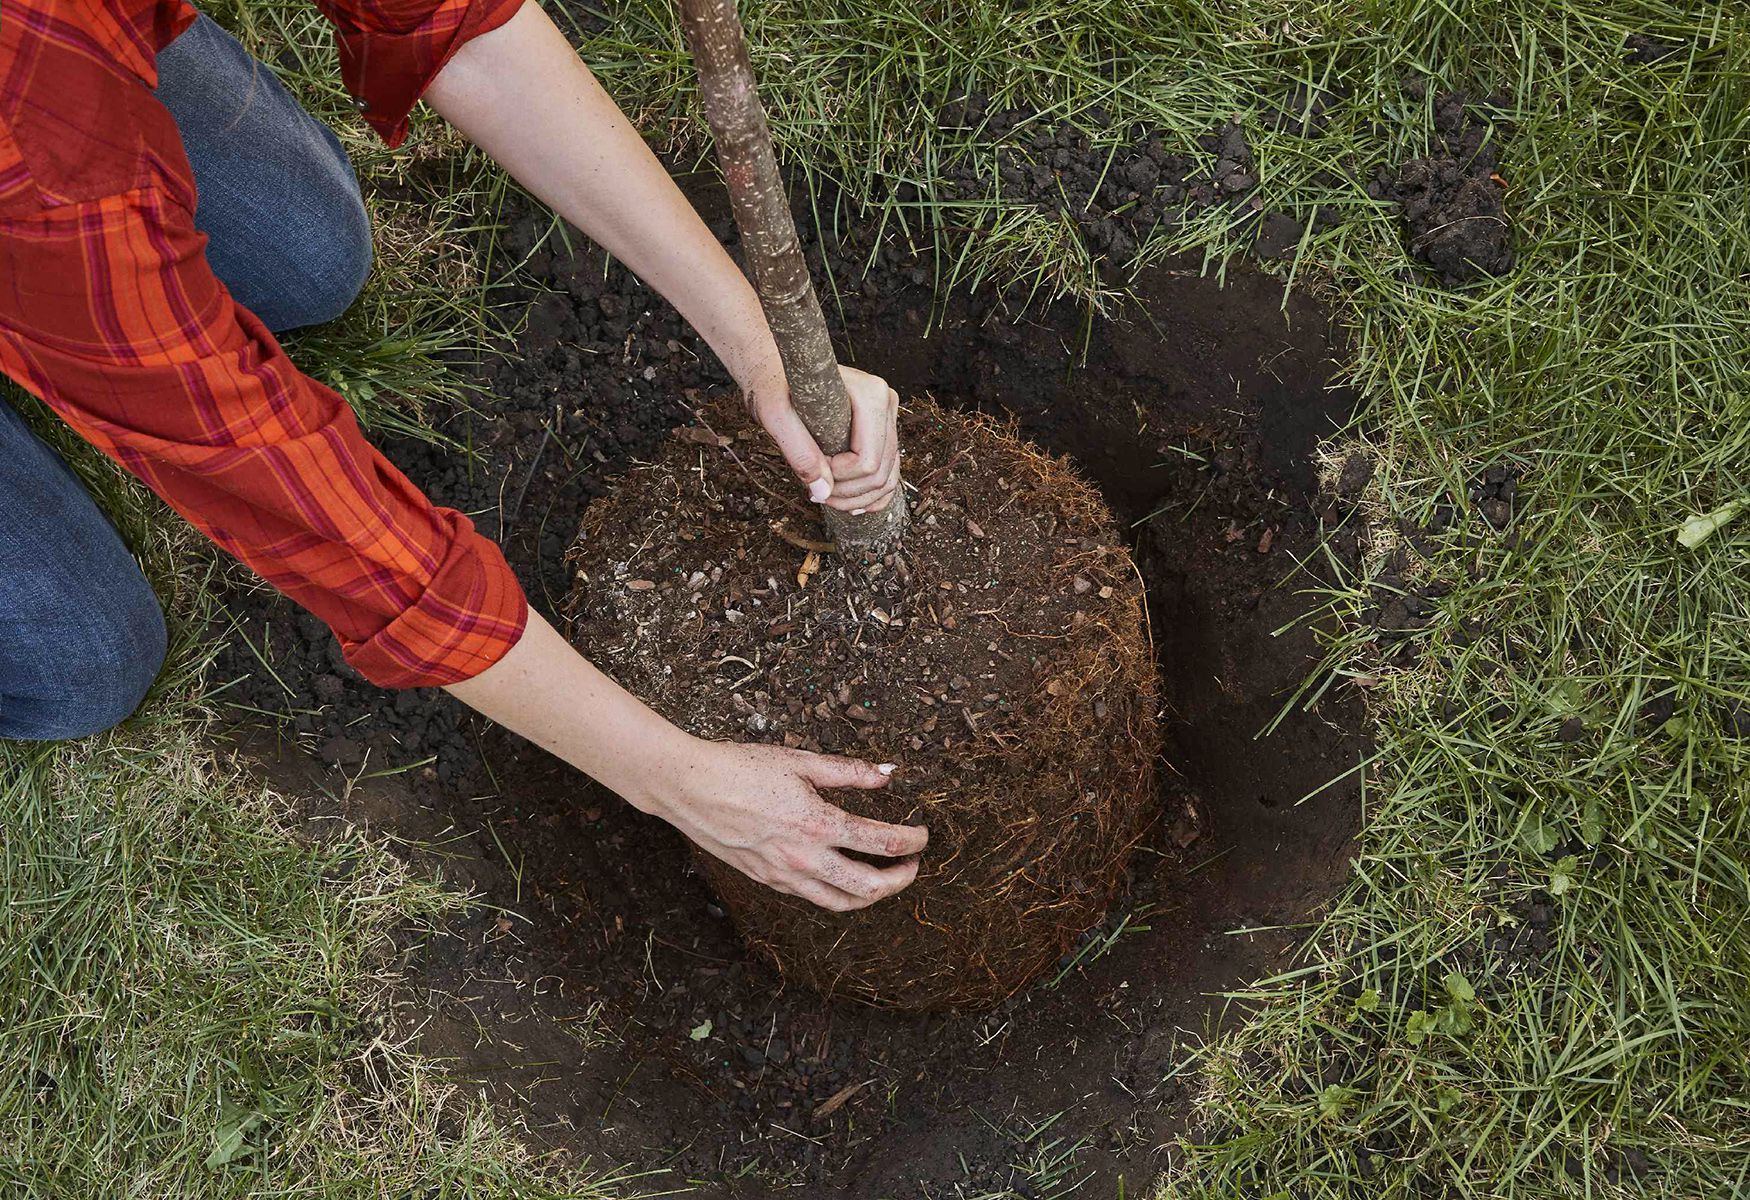
The planting hole should be wide, not deep. A good general rule is to dig the hole two to three times wider than the root ball, especially in compacted soil. The hole should be no deeper than the distance from the root flare to the bottom of the root ball.
Think saucer, not soup pot. Roots mostly grow outward through the upper layers of soil, where oxygen is available. A wide hole loosens the surrounding area and gives new roots an easier path into native soil. A deep hole, on the other hand, can cause the tree to settle too low after planting. Once the root flare sinks below grade, problems begin.
Do Not Improve the Hole Too Much
It may feel helpful to fill the hole with compost, peat moss, fertilizer, premium garden soil, and perhaps a motivational speech. Resist the urge. In most cases, backfilling with the original native soil is best. If you create a luxurious little pocket of amended soil, roots may stay inside that pocket instead of spreading into the surrounding ground. The goal is not to build a spa. The goal is to help the tree adapt to the real site.
Step 6: Prepare the Root Ball
How you prepare the root ball depends on how the tree was grown and sold.
Container-Grown Trees
Remove the container completely. If the tree is stuck, tap the sides or cut the pot away. Once the root ball is free, inspect the roots. Loosen outer roots with your hands. Cut or straighten circling roots, especially those wrapping around the trunk or crossing the outer edge of the root ball. If the root mass is very dense, shaving or slicing the outer layer may be necessary to encourage roots to grow outward.
Balled-and-Burlapped Trees
Set the tree in the hole first, then remove as much packaging as practical. Cut away twine from around the trunk. Remove burlap from the top and sides of the root ball. If there is a wire basket, remove at least the upper portion, and remove more if you can do so without destroying the root ball. Synthetic burlap should be removed because it does not break down like natural burlap.
Bare-Root Trees
Bare-root trees should be planted while dormant and kept moist before planting. Spread the roots naturally over a small mound of soil in the hole. Do not bend roots into a cramped space. If roots are damaged, trim only the broken sections. Plant so the root flare sits at the correct level.
Step 7: Set the Tree at the Correct Height
Place the tree in the center of the hole and check the height before backfilling. Lay a shovel handle or straight board across the hole to compare the root flare with the surrounding ground. The root flare should be level with or slightly above the soil surface. In heavy clay or poorly drained soil, planting slightly high can help prevent settling and waterlogging.
Step back and look at the tree from two directions. Straighten it now, because once the hole is backfilled, your tree will become much less interested in negotiation.
Step 8: Backfill Carefully
Backfill with the soil you removed from the hole. Break up large clods, but do not pulverize the soil into dust. Add soil around the root ball in layers, gently firming it with your hands. Avoid stomping hard with your boots. Heavy compaction removes air spaces that roots need.
Water during backfilling to help settle soil and remove large air pockets. When finished, the soil should cover the root ball but not bury the root flare. If extra soil remains, use it to create a low berm just outside the root ball to hold water during the establishment period. Do not pile extra soil against the trunk.
Step 9: Water Deeply After Planting
Water the tree thoroughly right after planting. The goal is to moisten the root ball and surrounding soil. A newly planted tree depends heavily on the original root ball until new roots grow outward. That means watering the surrounding yard lightly is not enough if the root ball stays dry.
For the first growing season, check soil moisture regularly. Water deeply when the top few inches of soil begin to dry. In hot, windy, or dry weather, new trees may need water more often. In cool or rainy periods, they need less. The soil should be moist, not swampy. Roots need water, but they also need oxygen. A tree planted in soup will not thank you.
Step 10: Mulch Like a Donut, Not a Volcano
Mulch is one of the best gifts you can give a new tree, but only when applied correctly. Spread organic mulch in a wide ring around the tree, usually about two to four inches deep. Keep mulch several inches away from the trunk so the root flare remains visible.
The shape should look like a donut: wide, flat, and open in the middle. It should not look like a volcano erupting around the trunk. Mulch volcanoes trap moisture against bark, encourage decay, invite pests, and can lead to girdling roots. They are popular in parking lots for mysterious reasons, but your yard can do better.
Good mulch options include arborist wood chips, shredded bark, pine bark, or leaf mulch. Mulch helps conserve soil moisture, moderate soil temperature, reduce weed competition, and protect the trunk from lawn mowers and string trimmers.
Step 11: Stake Only If Necessary
Not every new tree needs staking. In fact, unnecessary staking can prevent normal trunk movement, which helps the tree develop strength and taper. Stake only if the tree is unstable, top-heavy, planted in a windy site, or at risk of being knocked over.
If staking is needed, use flexible ties and allow slight movement. Do not tie the trunk tightly. Remove stakes as soon as the tree can stand on its own, often within one growing season. Forgotten stakes and tight ties can girdle the trunk, which is the tree version of wearing a belt three sizes too small forever.
Step 12: Prune Lightly at Planting
Pruning at planting should be minimal. Remove broken, dead, diseased, or badly damaged branches. Do not heavily prune the canopy to “balance” root loss. Leaves are the tree’s food factories, and the young tree needs them for recovery and growth.
Structural pruning can come later, after the tree begins to establish. For now, focus on reducing stress, keeping the root ball moist, and protecting the trunk.
Common Tree Planting Mistakes to Avoid
Planting Too Deep
This is the classic mistake. If the root flare is buried, the trunk base may stay too wet, roots may grow in circles, and the tree may decline over time. Always plant by the root flare, not by the top of the container soil.
Digging a Narrow Hole
A narrow hole forces roots to struggle against compacted soil immediately. A wide planting area encourages outward growth and faster establishment.
Adding Too Much Fertilizer
Fertilizer is usually not needed at planting. If you suspect a nutrient issue, get a soil test first. Water and proper planting depth matter much more during establishment.
Overwatering or Underwatering
Both can harm a new tree. Check the soil instead of watering by guesswork. Moist soil is good. Constantly saturated soil is not.
Piling Mulch Against the Trunk
Mulch belongs over the root zone, not on the bark. Keep the trunk clear and the root flare visible.
Aftercare: The First Three Years Matter
Planting day is only the beginning. Most new trees need regular care for at least the first two to three years while roots expand into surrounding soil. Keep the mulched area weed-free. Replenish mulch as it decomposes, but do not keep adding layers until it becomes too deep. Protect the trunk from mower damage. Check ties if the tree is staked. Watch for wilting, leaf scorch, early fall color, dieback, or soil cracking around the root ball.
During drought, even established trees may need supplemental water. For new trees, drought stress can be severe because the root system is still limited. Slow, deep watering is better than quick splashing. A hose set to a gentle trickle, a watering bag used correctly, or drip irrigation can help water soak into the root zone instead of running across the lawn.
Personal Experience: What Planting Trees Teaches You
Planting a tree properly teaches patience faster than almost any weekend project. The first lesson is that the tree does not care how excited you are. You may have bought the perfect specimen, imagined future shade, and already pictured a hammock beneath it. The tree, meanwhile, is focused on one thing: surviving the move. Transplanting is stressful, especially when roots have been cut, confined, wrapped, or dried out. That is why careful handling matters so much.
One of the most useful experiences is learning to slow down before digging. Many people want to rush straight to the shovel, but the best planting decisions happen before the hole exists. Walk the yard at different times of day. Notice where sunlight falls. Watch where water collects after rain. Think about where leaves will drop, where branches may spread, and whether the tree will still make sense when it is twenty, thirty, or forty feet wide. A beautiful tree in the wrong place becomes a future argument with pavement, gutters, power lines, or your neighbor’s patience.
Another practical lesson is that soil can surprise you. A spot that looks soft may hide construction debris, compacted clay, gravel, or old roots. When you dig a wide hole, you learn what the tree will actually be living in. If the soil is hard and compacted, widening the planting area becomes even more important. Roots are persistent, but they are not magic drills. Giving them loosened soil near the root ball can help them begin their journey outward.
The root flare is also a memorable teacher. Once you learn to look for it, you start noticing buried trees everywhere: in parking lots, office landscapes, parks, and yards. You see trunks disappearing into mulch mountains and suddenly feel the urge to rescue them with a rake. Finding the flare on your own tree may take a few minutes of gentle soil removal, but it is worth it. That small detail often determines whether the tree starts life at the correct depth.
Watering is where many good intentions go sideways. New planters often water too lightly because the surface looks wet, or too often because they fear the tree will dry out. The better habit is checking the soil. Push a finger or small trowel a few inches down near the root ball. If it is dry, water deeply. If it is soggy, wait. This simple routine builds confidence and prevents both drought stress and accidental drowning.
Finally, proper tree planting feels rewarding because it is an act of optimism. You are doing work today for shade, flowers, fruit, wildlife, cleaner air, and beauty that may outlast your current patio furniture, car, and possibly your knees. A tree planted well does not need perfection. It needs a fair start: the right place, the right depth, enough water, and freedom from mulch volcanoes. Give it those basics, and one day you may stand under its branches and feel like you got away with something wonderful.
Conclusion
Knowing how to plant a tree properly is less about fancy landscaping tricks and more about respecting how trees grow. Choose the right tree for the site, call 811 before digging, locate the root flare, dig a wide and shallow hole, correct circling roots, backfill with native soil, water deeply, mulch correctly, and provide steady aftercare.
The best tree planting method gives roots room to expand and keeps the trunk base dry and visible. Skip the deep hole, skip the fertilizer blast, skip the mulch volcano, and skip the “I’ll water it whenever I remember” strategy. A properly planted tree can become shade, habitat, curb appeal, seasonal color, and a long-term gift to everyone who passes by. Not bad for one hole in the ground.