Installing Photoshop brushes should feel exciting, not like you accidentally enrolled in a computer science night class. Whether you downloaded a dreamy watercolor brush pack, a gritty ink set, a cloud stamp collection, or a bundle of texture brushes that promises to make your art look “effortlessly handmade,” the process is usually simple: get the right file, import it into Photoshop, and find it in the Brushes panel.
The key phrase is “usually simple.” Every designer eventually meets the tiny gremlin known as “Where did my brush go?” This guide explains how to install Photoshop brushes on Windows or macOS, how to load ABR files correctly, where to find imported brushes, and how to fix the most common problems without panic-clicking every menu in sight.
By the end, you will know how to install custom Photoshop brushes, organize brush packs, back them up, and avoid the messy digital junk drawer that happens when you import 900 brushes named “Brush 1,” “Brush 2,” and “Final_Final_RealBrush.”
What Are Photoshop Brushes?
Photoshop brushes are presets used with the Brush Tool and related tools to create strokes, textures, patterns, marks, and effects. A brush can behave like a pencil, pen, marker, sponge, chalk, watercolor wash, smoke stamp, grass scatter, cloud generator, or a suspiciously magical shortcut for adding detail.
Most downloadable Photoshop brush packs come as ABR files. An ABR file can contain one brush or an entire brush library. When you import an ABR file into Photoshop, the brushes appear in the Brushes panel, where you can select and use them in your projects.
Common Photoshop Brush File Types
The most important brush file type is .ABR. This is the standard Photoshop brush preset format. Some older or specialty downloads may include .TPL files, which are tool presets. You may also see ZIP files, because many creators compress brush packs before uploading them. If your download is a ZIP file, you must extract it first before importing the ABR file inside.
In simple terms: if Photoshop is the kitchen, the ABR file is the spice rack. You do not eat the ZIP bag. You open it, take out the useful stuff, and then season your artwork like a professional.
Before You Install Photoshop Brushes
Before importing anything, take a few minutes to prepare your files. This prevents installation errors and makes your brush library easier to manage later.
1. Download Brushes From a Trustworthy Source
Only download Photoshop brushes from reputable websites, marketplaces, official Adobe sources, or creators you trust. Free brush packs can be wonderful, but random files from unknown websites may come with malware, broken downloads, or licensing issues. For commercial design work, always check whether the brush license allows client projects, merchandise, print-on-demand products, or resale usage.
2. Extract the ZIP File
If your brush download arrives as a ZIP file, extract it first. On Windows, right-click the ZIP file and choose Extract All. On macOS, double-click the ZIP file and the system will usually create an extracted folder automatically.
After extraction, look for a file ending in .abr. That is the brush file Photoshop needs.
3. Keep Your Brush Files Organized
Create a folder on your computer called something like Photoshop Brushes. Inside it, make subfolders such as Watercolor, Ink, Texture, Clouds, Hair, or Commercial Use. This small habit saves you from future chaos, especially when you upgrade Photoshop, move computers, or need to reinstall your favorite brushes.
How to Install Photoshop Brushes on Windows
The easiest way to install Photoshop brushes on Windows is through the Brushes panel. This method works well in modern versions of Photoshop and keeps the process clean.
Method 1: Import Brushes From the Brushes Panel
- Open Adobe Photoshop.
- Go to Window > Brushes to open the Brushes panel.
- Click the panel menu icon in the top-right corner of the Brushes panel.
- Select Import Brushes.
- Find the extracted .ABR file on your computer.
- Click Open.
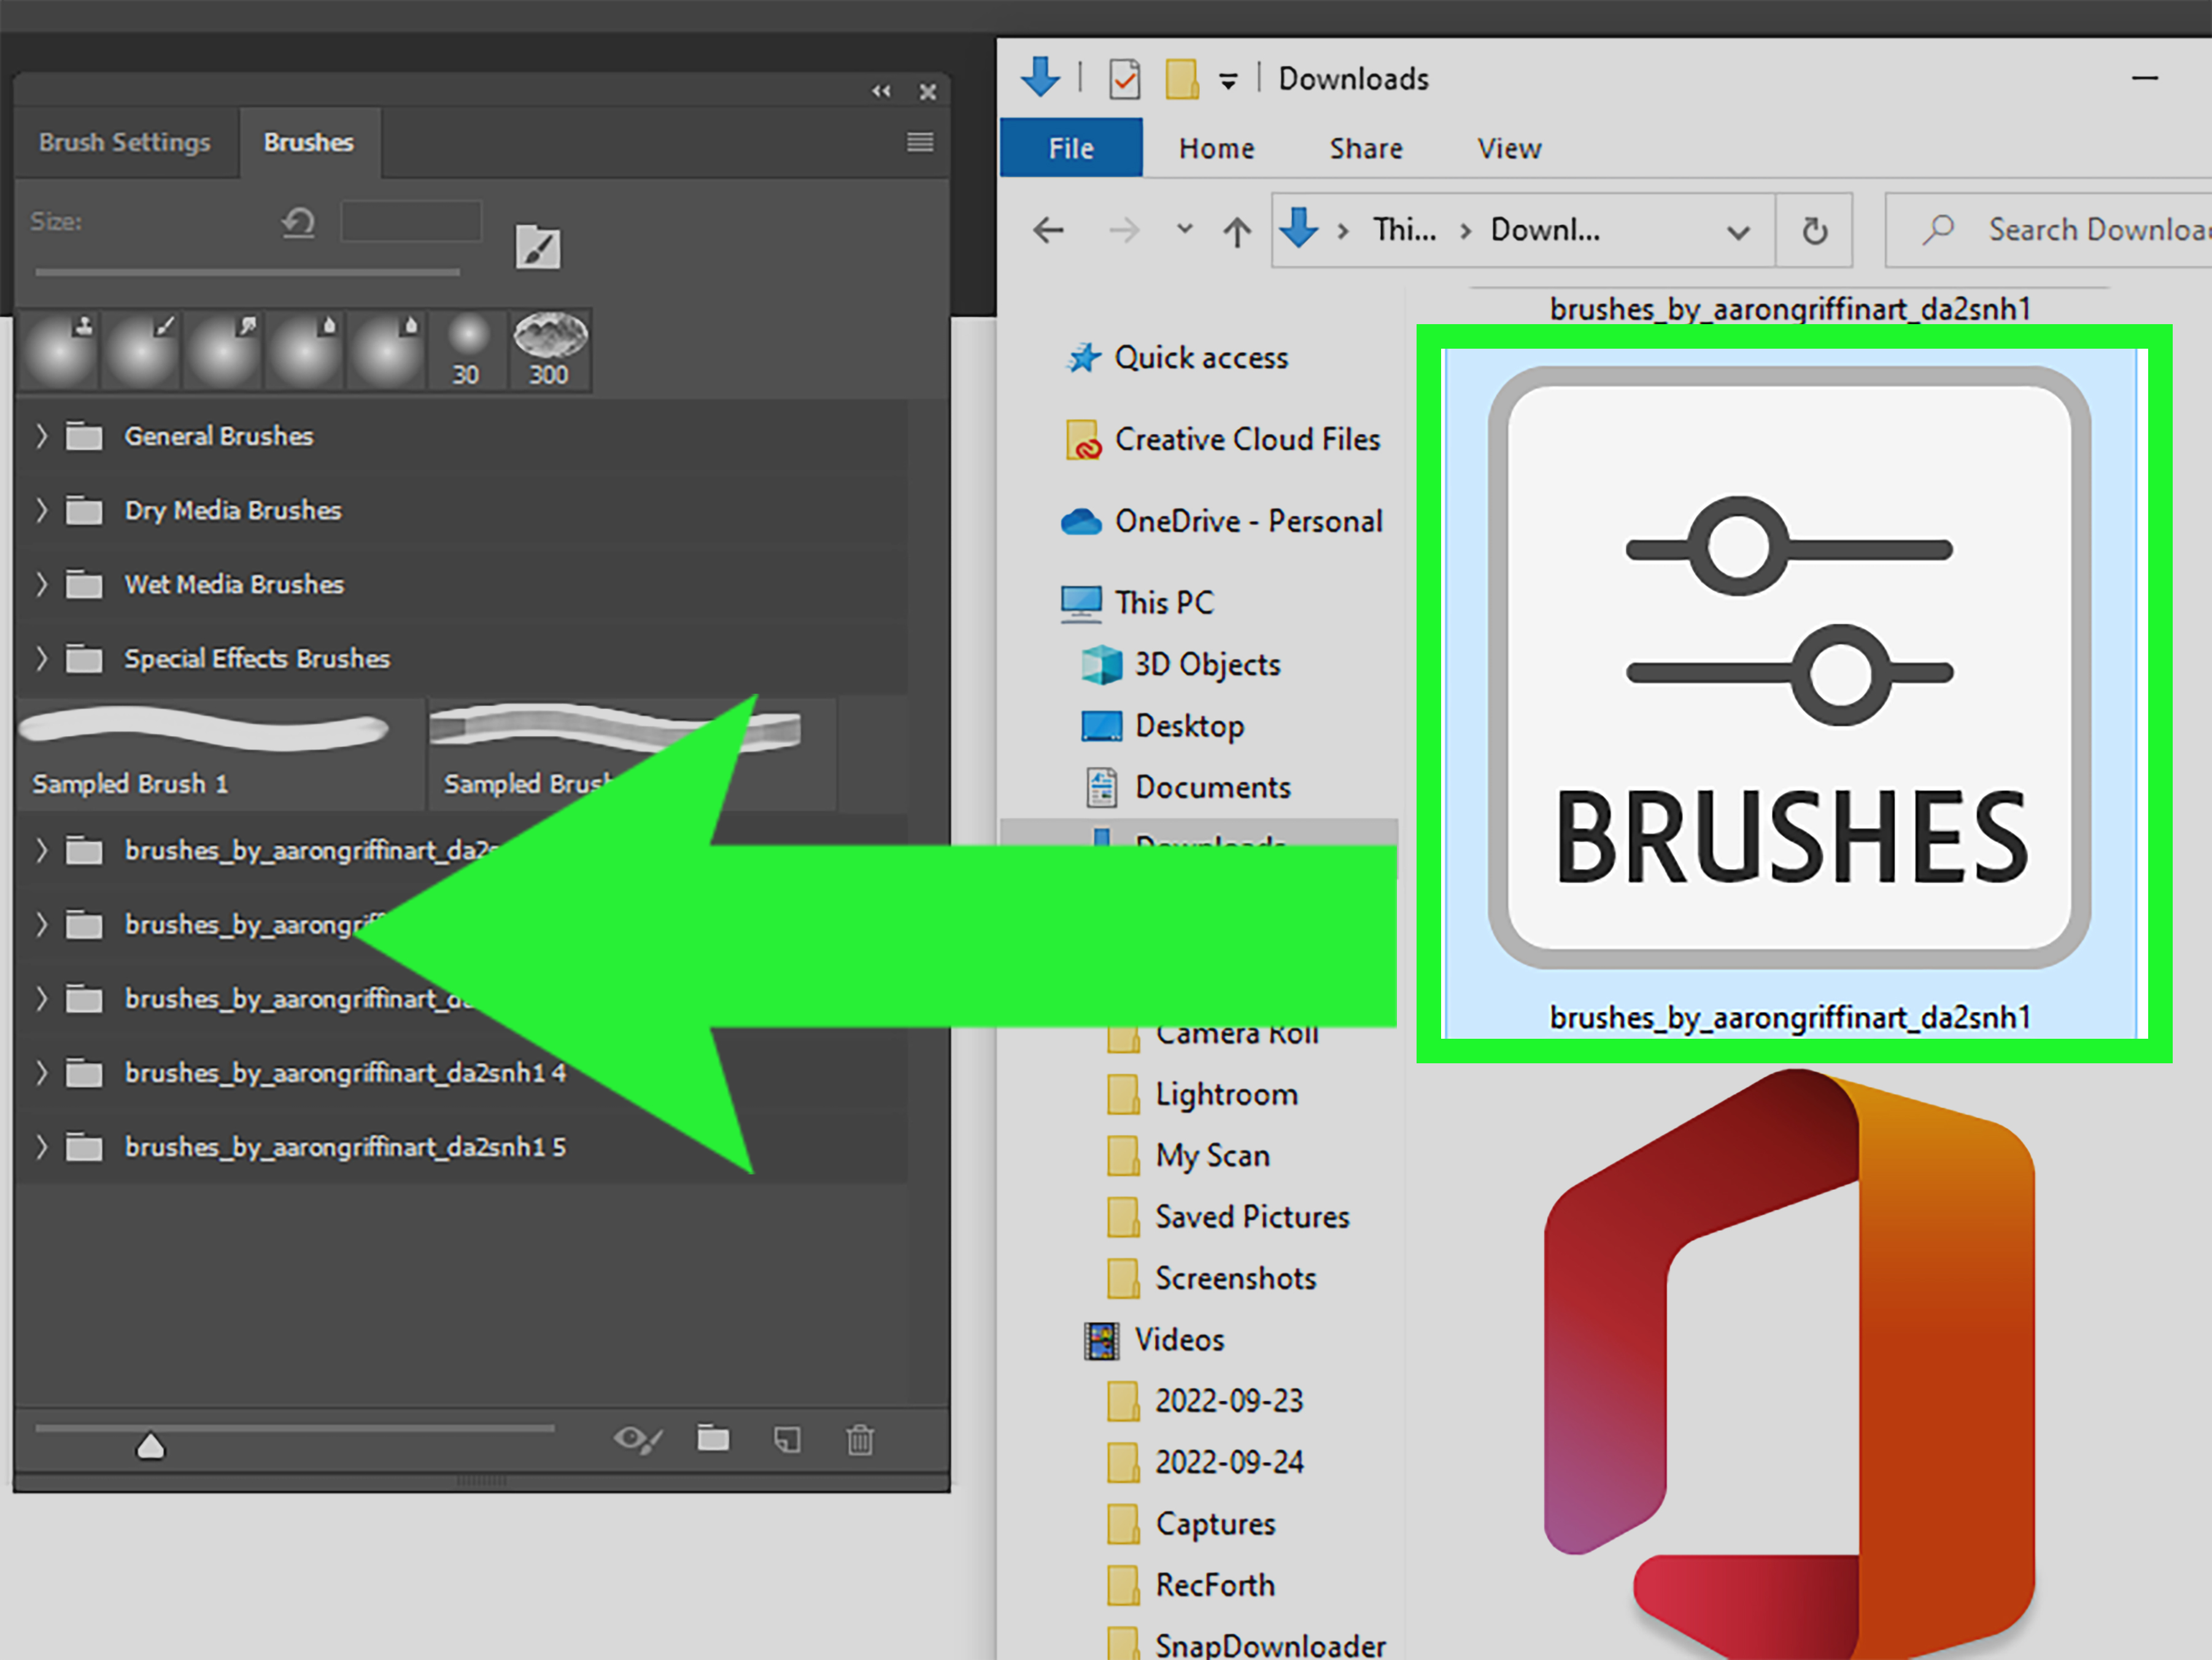
- Your new brush pack should appear in the Brushes panel, often near the bottom of the list.
Now select the Brush Tool by pressing B on your keyboard, choose one of the new brushes, and test it on a blank layer. Always test on a blank layer first. Your future self will thank you when you do not accidentally paint dramatic charcoal texture across a client’s perfectly clean product photo.
Method 2: Double-Click the ABR File
Another quick method is to double-click the ABR file while Photoshop is open. In many cases, Photoshop will automatically load the brush pack and add it to the Brushes panel.
This is the “I want it done now” method. It is fast and convenient, but if you manage a large brush collection, the manual import method gives you more control because you know exactly what file you selected and where it came from.
Method 3: Drag and Drop the ABR File
You can also try dragging the ABR file directly into the Photoshop workspace. If Photoshop recognizes the file, it may import the brushes automatically. This works best with modern Photoshop versions and properly formatted ABR files.
If drag and drop does nothing, do not argue with your computer. Use Window > Brushes > Import Brushes instead.
How to Install Photoshop Brushes on macOS
Installing Photoshop brushes on macOS is almost identical to installing them on Windows. The main difference is how you extract files and navigate your folders.
Method 1: Use the Brushes Panel
- Open Adobe Photoshop.
- Choose Window > Brushes.
- Click the Brushes panel menu icon.
- Choose Import Brushes.
- Navigate to the folder where your .ABR file is saved.
- Select the ABR file and click Open.
- Look for the new brush folder in the Brushes panel.
After importing, select the Brush Tool and paint a few test strokes. If the brush looks too large, too soft, too scattered, or like it is trying to summon a thunderstorm, adjust the size, hardness, opacity, flow, or brush settings.
Method 2: Double-Click the Brush File
With Photoshop open, double-click the ABR file from Finder. Photoshop should install the brushes automatically. If macOS asks which app should open the file, choose Photoshop.
Method 3: Use Get More Brushes
Photoshop also includes a convenient option called Get More Brushes in the Brushes panel menu. This can take you to Adobe brush resources, including brush packs that are designed to work smoothly with Photoshop. It is a good option if you want official brush packs rather than hunting across the internet like a digital raccoon.
Where Do Installed Photoshop Brushes Appear?
Imported brushes appear in the Brushes panel. To open it, go to Window > Brushes. New brush packs often appear as a folder near the bottom of the panel. Expand the folder to see individual brushes.
If you cannot see the brushes, make sure you are looking at the Brushes panel, not only the Brush Settings panel. The Brushes panel is where you select brush presets. The Brush Settings panel is where you customize how the selected brush behaves.
How to Use Your New Photoshop Brushes
Installing brushes is only half the fun. The real magic begins when you use them properly.
Select the Brush Tool
Press B to activate the Brush Tool. Then open the Brushes panel and choose your new brush. Paint on a new layer so you can edit, erase, mask, or delete strokes without damaging the original image.
Adjust Brush Size
Use the bracket keys to change size quickly. Press [ to make the brush smaller and ] to make it larger. This shortcut is one of those tiny Photoshop habits that makes you feel instantly faster, like your keyboard just got a caffeine upgrade.
Change Opacity and Flow
Opacity controls the maximum transparency of the stroke. Flow controls how quickly paint builds up as you brush. For soft shading, skin retouching, atmosphere, and digital painting, lower flow can create smoother, more natural results.
Explore Brush Settings
Go to Window > Brush Settings to adjust spacing, shape dynamics, scattering, texture, transfer, smoothing, and other behavior. These settings can dramatically change the feel of a brush. A basic round brush can become a dotted line, a texture brush, or a pressure-sensitive sketching tool depending on the settings.
How to Organize Photoshop Brushes
A few brushes are easy to manage. A few hundred brushes can become a tiny civilization with no government. Organizing your brushes early keeps your workflow fast and pleasant.
Create Brush Groups
In the Brushes panel, you can create groups for different brush categories. For example:
- Sketching Brushes
- Watercolor Brushes
- Ink and Comic Brushes
- Texture Brushes
- Cloud and Smoke Brushes
- Hair and Fur Brushes
- Favorite Retouching Brushes
Grouping brushes by purpose makes them easier to find when you are working under deadline and your brain has temporarily become soup.
Rename Brush Groups Clearly
Use names that describe the brush function, not just the creator or download title. “Dry Ink – Commercial Use” is more helpful than “Mega Pack 7.” If you work professionally, consider marking brushes that are safe for commercial projects.
Delete Brushes You Do Not Use
It is tempting to keep every brush forever, but an overloaded brush panel slows down decision-making. If you never use a brush, remove it from Photoshop. Keep the original ABR file in your backup folder in case you want it later.
How to Back Up Photoshop Brushes
Backing up brushes is important, especially if you rely on custom presets for paid work. Photoshop updates, computer changes, and accidental resets can make brushes disappear from your workspace.
To back up brushes, keep copies of your original ABR files in a cloud folder or external drive. You can also export selected brushes from Photoshop by selecting them in the Brushes panel and using the export option from the panel menu. Save exported brush files with clear names and dates, such as Ink_Brushes_Backup_2026.abr.
A simple backup routine can save hours of frustration. Losing your favorite brush in the middle of a project feels dramatic because it is dramatic. Artists bond with brushes. Designers bond with brushes. Retouchers bond with brushes. Everyone says, “I can replace it,” and then spends two hours searching for “that one scratchy pencil but not too scratchy.”
Troubleshooting: Photoshop Brushes Will Not Install
If your brushes do not appear after installation, do not worry. Most brush problems have simple causes.
Problem: The File Is Still Zipped
Photoshop usually needs the extracted ABR file, not the ZIP file. Extract the download first, then import the ABR file.
Problem: You Imported the Wrong File
Some downloads include documentation, preview images, license files, and multiple preset formats. Make sure you selected the file ending in .abr.
Problem: The Brushes Are Installed but Hidden
Scroll to the bottom of the Brushes panel. New brush packs often appear there. Also look for a collapsed folder with the name of the brush pack.
Problem: The Brush Pack Is for an Older Version
Most ABR files work in modern Photoshop versions, but very old brush packs may behave differently. If a brush pack includes special instructions, read them. Some older packs may rely on tool presets or legacy workflows.
Problem: Photoshop Needs a Restart
If the brush file imported but does not show up, restart Photoshop. This is not glamorous advice, but it works often enough to deserve a little respect.
Problem: You Are Looking in Brush Settings Instead of Brushes
The Brush Settings panel controls behavior. The Brushes panel shows installed presets. Open Window > Brushes and check there.
Best Practices for Installing Custom Photoshop Brushes
Installing brushes is easy, but installing them wisely makes your creative workflow much better.
Test Every Brush Pack
Create a blank Photoshop document and test new brushes before using them in real work. Try different sizes, colors, opacity levels, and pressure settings if you use a drawing tablet.
Use Separate Layers
Always paint with custom brushes on separate layers when possible. This gives you freedom to adjust blending modes, opacity, masks, and effects without damaging your original image.
Check Licensing
Some brushes are free for personal use but require a paid license for commercial projects. If you design logos, book covers, posters, packaging, merchandise, or client artwork, licensing matters.
Avoid Installing Too Many Brushes at Once
Install a few brush packs, test them, organize them, and then add more if needed. Importing hundreds at once may feel powerful, but it often leads to a cluttered brush panel and decision fatigue.
Windows vs. macOS: Is There Any Real Difference?
For Photoshop brush installation, Windows and macOS are very similar. The import path inside Photoshop is the same: Window > Brushes > Import Brushes. The difference is mostly in file handling. Windows users typically right-click ZIP files and choose Extract All. macOS users usually double-click ZIP files to extract them.
Both systems can import ABR files. Both can use double-click installation. Both can organize brush groups inside Photoshop. So if you switch from Windows to Mac or Mac to Windows, you do not need to relearn the whole process. Your brushes may be dramatic, but the installation process is refreshingly calm.
Experience-Based Tips for Installing Photoshop Brushes
After working with Photoshop brushes across design, photo editing, digital painting, and content production projects, one lesson becomes obvious: the installation step is rarely the hard part. The real challenge is building a brush workflow that stays useful after the excitement of downloading a new pack wears off.
The first practical tip is to create a “testing canvas.” Make a Photoshop document with a neutral background, a few text labels, and several blank layers. Whenever you install new brushes, test them there. Try one stroke at 100% opacity, one at 50%, one with pressure if you use a tablet, and one with a blending mode like Multiply or Overlay. This gives you a quick visual reference instead of relying on tiny brush thumbnails that all start looking like mysterious gray blobs after a while.
Second, separate “effect brushes” from “working brushes.” Effect brushes include clouds, smoke, dust, stars, splatter, leaves, scratches, and decorative stamps. Working brushes include sketching pencils, inking brushes, soft round brushes, texture brushes, and retouching brushes you use constantly. When these categories are mixed together, you waste time scrolling. When they are grouped clearly, Photoshop feels faster and less cluttered.
Third, do not judge a brush by its first stroke. Many Photoshop brushes are designed for specific sizes, pressure settings, or layer styles. A watercolor brush may look strange in pure black on a white canvas but beautiful in soft blue at low opacity. A texture brush may look too harsh until you use it on a layer mask. An ink brush may need smoothing adjusted before it feels natural. Give each brush a fair test before deleting it.
Fourth, keep your original ABR files outside Photoshop. This is one of the most useful habits you can build. Photoshop is where you use brushes; your organized backup folder is where you preserve them. If Photoshop resets, updates, or gets installed on a new machine, you can quickly reload your collection. A folder named “Brushes Installed” and another named “Brushes To Test” can make your workflow much cleaner.
Fifth, remember that more brushes do not automatically mean better artwork. A small set of excellent brushes usually beats a giant collection you never use. Many professionals rely on a handful of favorites: one sketch brush, one clean inking brush, one soft brush, one texture brush, and a few specialty brushes. The goal is not to own every brush on the internet. The goal is to know which brush solves the problem in front of you.
Finally, install brushes with intention. Before adding a new pack, ask what it is for. Do you need better hair texture? Faster clouds? More natural pencil lines? Vintage print grain? Cleaner masking edges? When every brush has a purpose, your Photoshop setup becomes a creative toolbox instead of a crowded attic. And unlike a crowded attic, it will not contain a haunted lamp from 1987.
Conclusion
Learning how to install Photoshop brushes on Windows or macOS is simple once you understand the basic workflow. Download a trusted brush pack, extract the ZIP file if needed, import the ABR file through the Brushes panel, and look for the new brush group inside Photoshop. From there, test your brushes, organize them into useful folders, back them up, and remove the ones you do not use.
Custom Photoshop brushes can speed up editing, improve digital painting, add realistic texture, and make creative work more enjoyable. Whether you are designing social graphics, retouching portraits, painting fantasy landscapes, or adding tasteful dust to a poster because “tasteful dust” is apparently a real design need, brushes give you more creative control. Install them properly, manage them wisely, and your future projects will feel smoother from the first stroke.