Changing opacity in Adobe Photoshop is one of those skills that looks tiny at first and then quietly becomes the secret sauce behind better photo edits, cleaner graphics, smoother composites, elegant text effects, and watermarks that do not scream, “I just discovered Photoshop five minutes ago.” Whether you are blending two images, softening a harsh adjustment, fading a logo, creating a ghosted background, or making a subtle brush effect, opacity gives you control over how visible a layer, tool, or effect appears.
The good news: changing opacity in Photoshop is simple. The better news: once you understand where opacity lives, how it differs from Fill, and when to use masks instead of lowering an entire layer, your edits become far more professional. This guide walks you through every practical way to adjust opacity in Adobe Photoshop, including layer opacity, brush opacity, text opacity, shape opacity, adjustment layer opacity, and selective opacity using masks.
What Does Opacity Mean in Photoshop?
In Photoshop, opacity controls how transparent or visible something is. A layer at 100% opacity is fully visible. A layer at 0% opacity is completely invisible. A layer at 50% opacity sits in the middle, allowing the layer or layers underneath it to show through. Think of opacity like tinted glass: the lower the opacity, the more you can see what is behind it.
Opacity is most often used with layers, but it also appears in tools and effects. You can change the opacity of a photo layer, a text layer, a shape layer, an adjustment layer, a group, a brush stroke, a clone stamp result, or even a gradient. That flexibility is why opacity is one of the first controls beginners learn and one of the controls professionals never stop using.
How to Change Layer Opacity in Photoshop
The most common way to change opacity in Adobe Photoshop is through the Layers panel. This method works for image layers, text layers, shape layers, Smart Objects, adjustment layers, and layer groups.
Step-by-Step: Change Opacity from the Layers Panel
- Open your image or design in Photoshop.
- Go to the Layers panel. If you do not see it, choose Window > Layers.
- Select the layer you want to adjust.
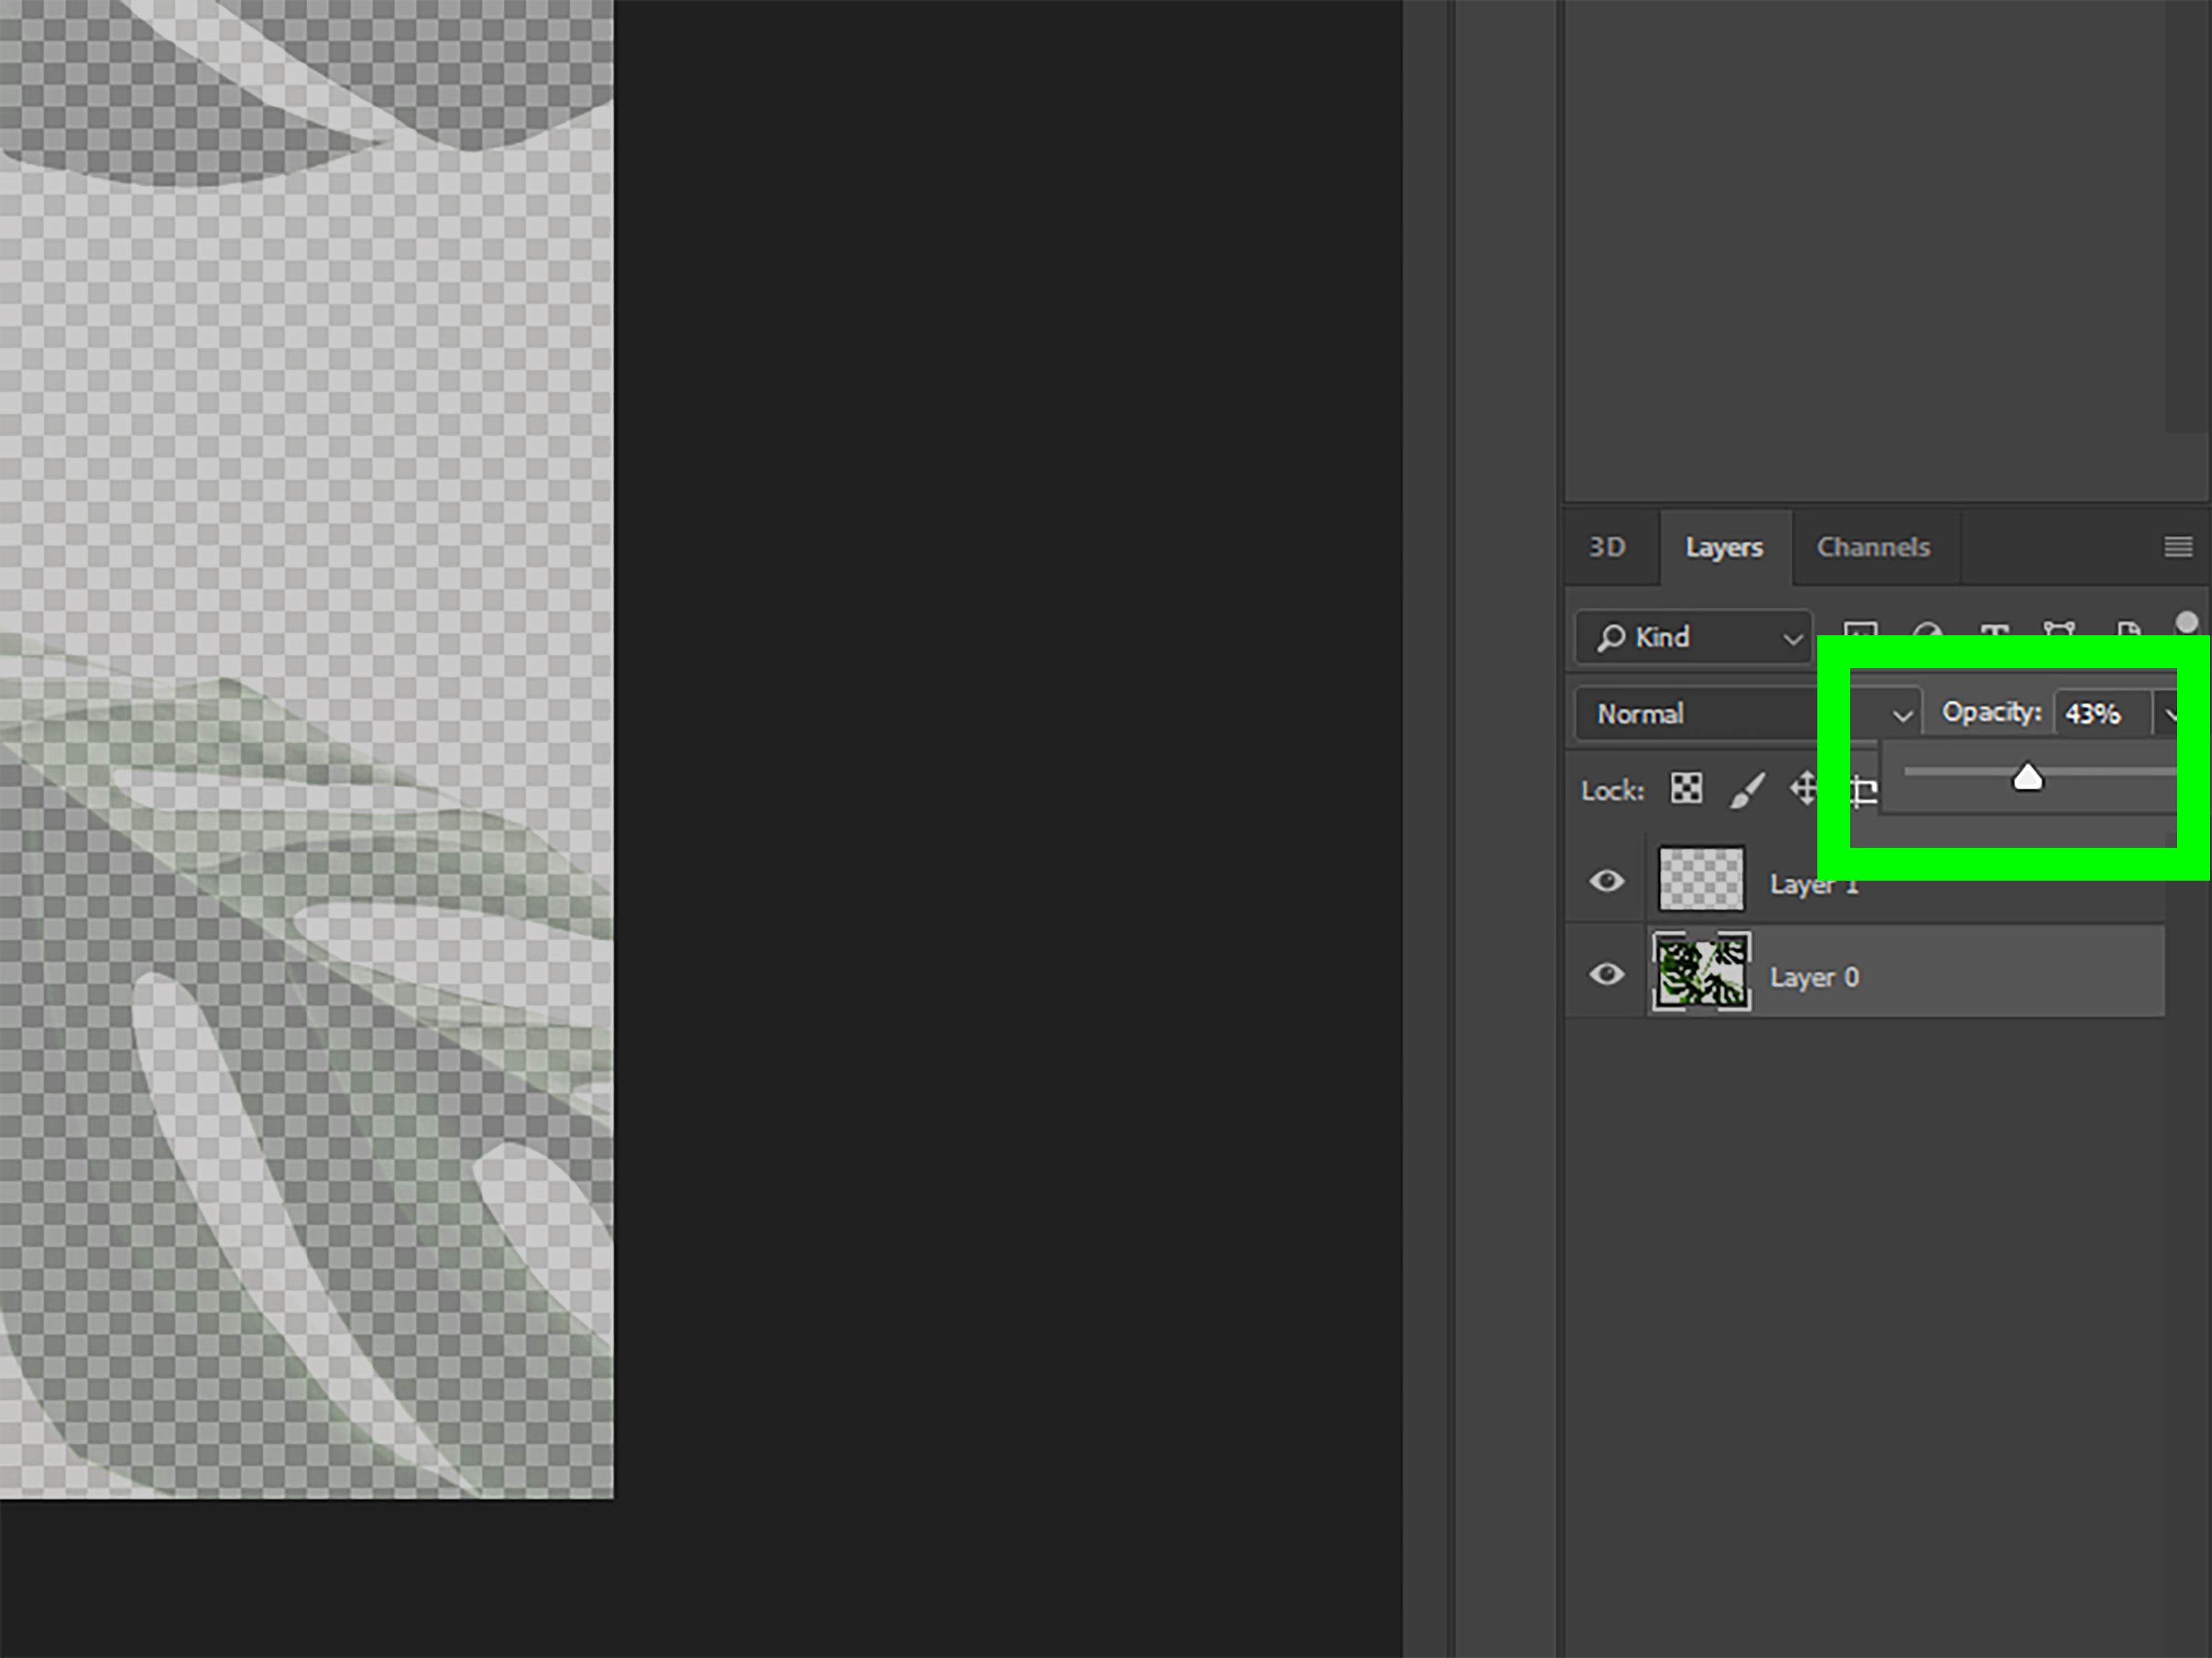
- Find the Opacity option near the top-right area of the Layers panel.
- Click the small arrow beside the percentage and drag the slider left or right.
- Lower the value to make the layer more transparent, or raise it to make the layer more visible.
For example, if you place a logo over a photo and set the logo layer to 35% opacity, the logo becomes visible but not distracting. If you set a dark overlay layer to 20% opacity, you can create a soft cinematic mood without turning the image into a cave. Opacity is a volume knob for visibility: sometimes you want a bold drum solo, and sometimes you want background jazz.
How to Change Opacity Using Keyboard Shortcuts
Photoshop also lets you change opacity quickly with number keys. This is one of the fastest opacity tricks, especially when you are testing different looks.
Select a layer and make sure a non-painting tool is active, such as the Move Tool. Then press a number key:
- 1 sets opacity to 10%
- 2 sets opacity to 20%
- 5 sets opacity to 50%
- 0 sets opacity to 100%
- 25 quickly sets opacity to 25%
This shortcut is perfect when comparing options. Want a watermark to be less bossy? Try 40%, then 30%, then 25%. Want a texture to show just enough to feel handmade but not enough to look like sandpaper attacked your design? Tap a few numbers and judge by eye.
Opacity vs. Fill in Photoshop: What Is the Difference?
Many users see Opacity and Fill sitting close together in the Layers panel and assume they do the same thing. Sometimes they look similar, but they are not identical.
Opacity affects everything on the selected layer, including the layer content and layer styles such as Drop Shadow, Stroke, Outer Glow, Inner Glow, and Bevel & Emboss.
Fill affects the actual pixels, text, or shape content on the layer, but it does not reduce the visibility of many layer effects. This is extremely useful when creating special effects. For example, you can create text with a Drop Shadow and Stroke, reduce Fill to 0%, and keep the effects visible while the text itself disappears. Congratulations, you have now made invisible text that somehow still has a dramatic entrance.
When Should You Use Opacity?
Use Opacity when you want to reduce the visibility of the entire layer, including its effects. This is the best choice for fading photos, softening overlays, reducing adjustment layer strength, and making an entire design element less dominant.
When Should You Use Fill?
Use Fill when you want to reduce the layer content while keeping layer styles strong. This is great for glass text, watermark effects, embossed typography, neon designs, and creative graphics where the outline or shadow matters more than the filled area.
How to Change Text Opacity in Photoshop
Changing text opacity works almost exactly like changing image layer opacity. Create or select a text layer, then lower the Opacity value in the Layers panel. This is useful for captions, background typography, watermarks, poster designs, social media graphics, and subtle website hero images.
For a clean watermark, try this simple setup:
- Add your text using the Type Tool.
- Place it over the photo.
- Set the text color to white or black, depending on the background.
- Lower the layer opacity to around 15% to 35%.
- Adjust the size and position so it protects the image without ruining it.
A good watermark should whisper, not walk into the room with a marching band. If the viewer notices the watermark before the photo, lower the opacity.
How to Change Shape Opacity in Photoshop
Shape layers are often used for buttons, banners, labels, overlays, icons, and design accents. To change shape opacity, select the shape layer and adjust the Opacity value in the Layers panel. This fades the entire shape, including any layer effects.
If you want to make only the inside of a shape transparent while keeping its stroke or shadow visible, use Fill instead. For example, a rectangle with Fill set to 20% and a Stroke effect at full strength can create a modern translucent label that sits nicely over a photo.
How to Change Brush Opacity in Photoshop
Brush opacity controls how transparent your brush strokes are. Select the Brush Tool, then look at the Options bar at the top of the screen. You will see an Opacity setting. Lower it for lighter, more transparent strokes; raise it for stronger strokes.
This is especially helpful for retouching, dodging and burning, digital painting, masking, and subtle local adjustments. A brush set to 100% opacity can be too aggressive. A brush set to 10% to 30% opacity gives you room to build an effect gradually.
Brush Opacity vs. Brush Flow
Brush Opacity and Brush Flow are related, but they behave differently. Opacity limits the maximum strength of a brush stroke until you release and paint again. Flow controls how quickly paint builds up as you keep brushing over an area. In practical terms, Opacity is like setting a ceiling, while Flow is like controlling how fast paint comes out of the can.
For retouching, many editors prefer a lower Flow because it allows smooth buildup. For quick masking, lower Opacity can work well because each stroke has a predictable transparency. The best setting depends on the task, the brush, your tablet pressure settings, and how patient you feel before your coffee kicks in.
How to Change Opacity of an Adjustment Layer
Adjustment layers are one of the best places to use opacity because they let you reduce the strength of an edit without damaging the original image. If a Curves adjustment is too strong, lower the adjustment layer opacity. If a Hue/Saturation adjustment makes skin tones look radioactive, reduce the opacity until humans look human again.
Example: Reduce a Strong Color Grade
- Create a color adjustment, such as Curves, Color Balance, or Hue/Saturation.
- Make your edit slightly stronger than needed.
- Select the adjustment layer in the Layers panel.
- Lower Opacity until the effect blends naturally.
This method is flexible, non-destructive, and beginner-friendly. It also encourages experimentation because you can always change the opacity later. No panic. No permanent damage. No dramatic staring contest with the Undo button.
How to Change Opacity of a Layer Mask
Sometimes you do not want the entire layer to become transparent. You only want part of it to fade. That is where layer masks become more powerful than basic layer opacity.
A layer mask lets you hide or reveal parts of a layer. Black hides, white reveals, and gray creates partial transparency. If you paint on a mask with a gray brush, the masked area becomes partially visible. This is one of the cleanest ways to control selective opacity in Photoshop.
How to Create Partial Transparency with a Mask
- Select the layer you want to fade.
- Click the Add Layer Mask icon in the Layers panel.
- Select the mask thumbnail.
- Choose the Brush Tool.
- Set the brush color to black, white, or gray.
- Paint on the mask to hide, reveal, or partially fade areas.
Use black to hide parts completely. Use white to bring them back. Use gray for partial opacity. A soft brush creates smooth transitions, while a hard brush creates sharp edges. Masks are ideal for blending portraits, replacing skies, creating product mockups, and combining images without obvious cutout lines.
How to Create a Fade Effect with Opacity and Gradients
If you want an image to fade gradually, use a layer mask with the Gradient Tool. This is much better than simply lowering the whole layer opacity because it lets one side remain visible while the other side fades away.
Step-by-Step: Fade an Image with a Gradient Mask
- Place the image you want to fade on its own layer.
- Add a layer mask.
- Select the Gradient Tool.
- Choose a black-to-white gradient.
- Click and drag across the image where you want the fade to happen.
The black part of the gradient hides the layer, the white part reveals it, and the gray transition creates the fade. This technique is excellent for banners, double exposures, photo composites, website headers, and soft image transitions.
How to Change Opacity of Multiple Layers
If you want to adjust several layers at once, you have two reliable options. First, select multiple layers in the Layers panel and change the Opacity value. Second, place the layers into a group and lower the opacity of the group.
Grouping is especially helpful when you have a complex design. For example, if a poster contains a title, subtitle, icon, and background shape that should all fade together, put them in a group and lower the group opacity. This keeps the edit organized and saves you from adjusting four separate layers like a person trying to tune a piano with oven mitts.
Why You Cannot Change Opacity on Some Layers
If the opacity control seems unavailable or does not behave as expected, check whether the layer is locked. Background layers are often locked by default. To make a Background layer editable, click the lock icon or convert it into a normal layer. Once unlocked, you can adjust opacity like any other layer.
Also check that you have selected the correct layer. This sounds obvious, but every Photoshop user has spent at least one minute adjusting the wrong layer and wondering whether the software has developed an attitude. The Layers panel tells the truth. Trust it.
Best Opacity Settings for Common Photoshop Tasks
There is no perfect opacity setting for every project, but these ranges are useful starting points:
- Watermark: 15% to 35%
- Dark overlay for text readability: 20% to 50%
- Texture overlay: 5% to 30%
- Color grading adjustment layer: 20% to 70%
- Brush retouching: 5% to 30%
- Subtle shadow or glow: 20% to 60%
- Background design element: 5% to 25%
Use these numbers as a starting point, not a law carved into a graphics tablet. The right opacity depends on contrast, image brightness, color, texture, file purpose, and whether the design needs to shout or politely clear its throat.
Practical Examples of Changing Opacity in Photoshop
Example 1: Make a Photo Overlay More Natural
Place a texture layer above your photo, change the blending mode to Soft Light or Overlay, then reduce the opacity to around 10% to 25%. This creates a subtle film, paper, dust, or grain effect without overwhelming the original image.
Example 2: Soften a Portrait Retouch
After retouching skin on a separate layer, lower the opacity until texture looks natural. This prevents the dreaded plastic-skin effect, also known as “portrait turned into wax museum audition.”
Example 3: Improve Text Readability
Add a black rectangle behind white text, then lower the rectangle opacity to around 30% to 45%. This helps text stand out while keeping the photo visible underneath.
Example 4: Create a Professional Watermark
Add your logo or name on a separate layer, place it in a corner, and reduce opacity to 20% to 30%. Keep it visible enough for protection but subtle enough that the image remains the star.
Common Opacity Mistakes to Avoid
The first mistake is lowering opacity when you really need a mask. If only one part of the layer should fade, do not reduce the whole layer. Use a layer mask and paint or apply a gradient instead.
The second mistake is confusing Opacity with Fill. If your layer styles disappear when you lower opacity, try lowering Fill instead. This is especially useful for text effects and graphic elements.
The third mistake is using opacity as a fix for every problem. Sometimes an edit looks wrong because the color, contrast, blend mode, or mask edge needs work. Opacity helps, but it is not a magical “make it good” button. If it were, every designer would be suspiciously well-rested.
Professional Tips for Better Opacity Control
Work non-destructively whenever possible. Use duplicate layers, Smart Objects, adjustment layers, and masks so you can change your mind later. Photoshop rewards flexible workflows. Your future self will thank you, probably while eating snacks and fixing something five minutes before a deadline.
Use opacity with blend modes. A layer set to Multiply at 100% may look too intense, but Multiply at 35% might be perfect. The same applies to Screen, Overlay, Soft Light, Color, and Luminosity. Blend modes create the interaction; opacity controls the strength.
Zoom out often. An opacity value that looks perfect at 300% zoom may look too weak or too strong when viewed at normal size. Always check the overall image before finalizing your edit.
Compare before and after. Toggle the layer visibility on and off to see whether the opacity adjustment improves the image. If turning the layer off makes the design feel cleaner, your opacity may still be too high.
Experience Notes: What Working with Opacity Teaches You Over Time
After using Photoshop for many real editing situations, one thing becomes clear: opacity is less about making something transparent and more about making something believable. Beginners often use opacity as a dramatic effect. They fade an image to 50%, add glowing text, throw in a texture, and hope the design suddenly becomes “cinematic.” Sometimes it does. Sometimes it looks like three stock images got trapped in an elevator. With experience, you start using opacity more quietly and more intentionally.
The biggest lesson is that small changes matter. Lowering an adjustment layer from 100% to 80% may seem minor, but it can be the difference between rich color and oversaturated chaos. Reducing a texture layer from 35% to 18% can make it feel printed instead of pasted on. A shadow at 40% might look realistic, while the same shadow at 75% looks like the object is floating under a stadium light. Opacity teaches restraint, and restraint is one of the most underrated design skills.
Another useful experience is learning when not to change layer opacity. If a portrait edit looks too strong only around the eyes, lowering the entire retouching layer may weaken parts that already look good. A layer mask gives better control. If a background replacement looks fake only along the hairline, brush opacity on the mask may solve the issue more naturally than changing the whole layer. Over time, you stop asking, “How do I make this layer less visible?” and start asking, “Which part needs less visibility?” That question leads to better edits.
Opacity also helps you build confidence because it makes experimentation safer. You can try a bold Curves adjustment, an intense gradient map, a heavy texture, or a wild blend mode, then lower the opacity until the effect becomes usable. This is how many polished edits are made. They often begin as something too strong, too colorful, or too weird, then get refined through opacity and masking. In other words, Photoshop rewards controlled chaos.
A practical habit is to name important layers before adjusting opacity. If your file has layers called Layer 7 copy copy final FINAL, you will eventually adjust the wrong one. Name layers like “Warm color grade,” “Soft shadow,” “Logo watermark,” or “Skin retouch.” Then opacity becomes easier to manage because you understand what each layer contributes.
The final experience-based tip is to judge opacity in context. A watermark that looks perfect on a dark image may disappear on a bright one. A text overlay that works on desktop may be too faint on mobile. A subtle texture may vanish after export compression. Always preview the final use case. Photoshop is not just about what looks good while editing; it is about what survives when published, printed, uploaded, shared, cropped, compressed, and viewed by someone scrolling at the speed of a caffeinated squirrel.
Conclusion
Learning how to change opacity in Adobe Photoshop is simple, but mastering it can transform the way you edit. Layer opacity helps you fade entire elements. Fill gives you special control over layer content while preserving effects. Brush opacity and flow help with subtle painting and retouching. Masks let you control opacity only where needed. Adjustment layer opacity allows you to fine-tune edits without damaging the original image.
The best Photoshop edits usually do not rely on one huge move. They come from small, thoughtful adjustments stacked together: a little less opacity here, a softer mask there, a gentler adjustment layer, a cleaner blend mode, and a final look that feels intentional. Opacity may be a small slider, but in Photoshop, small sliders often have big opinions.
Note: This article is written in standard American English, uses only the HTML body section for easy publishing, and is based on real Photoshop workflows without inserting source links or unnecessary reference markers.