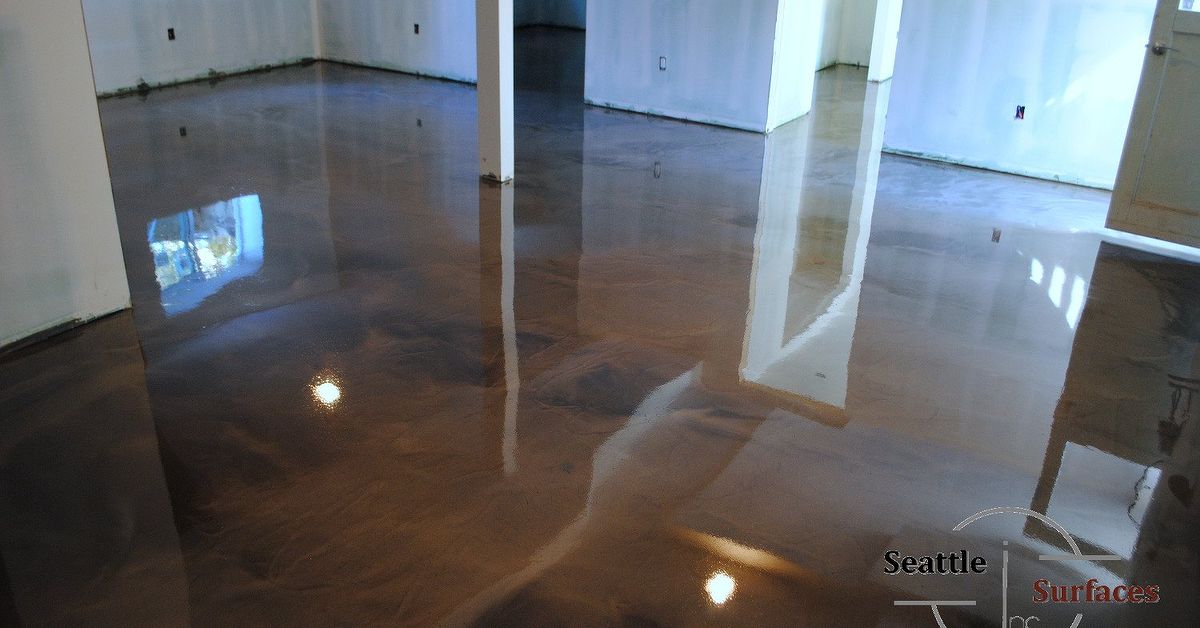
A designer metallic epoxy basement floor can make an ordinary concrete slab look like polished maehow wandered downstairs. Unlike basic gray floor paint, metallic epoxy uses reflective pigments suspended in resin to create depth, movement, and one-of-a-kind patterns.
The dramatic finish is only half the story. A properly installed epoxy flooring system can also produce a seamless, durable, stain-resistant surface that is easier to clean than unfinished concrete. That combination makes it attractive for basement family rooms, home theaters, bars, gyms, workshops, offices, and entertainment spaces.
However, metallic epoxy is not magic in a bucket. Basement moisture, weak concrete, poor preparation, incorrect mixing, and rushed curing can turn a dream floor into an expensive collection of bubbles and peeling patches. Before choosing colors or practicing your artistic swirls, you need to understand how the system works from the concrete upward.
What Is a Designer Metallic Epoxy Basement Floor?
A metallic epoxy floor is a multilayer resinous coating applied directly over prepared concrete. Metallic pigments are blended into clear or tinted epoxy and manipulated while the material is still fluid. As the resin moves, the pigments separate, blend, and reflect light at different angles.
The resulting pattern can resemble natural stone, clouds, water, smoke, brushed metal, or abstract art. Because the installer controls the pouring, blending, dragging, rolling, and swirling techniques, no two floors are exactly alike.
Metallic Epoxy Is Not the Same as Concrete Paint
Concrete paint creates a thin colored film. A true two-component epoxy system combines resin with a hardener, beginning a chemical curing reaction. Once properly mixed and cured, the material forms a harder and generally thicker surface than ordinary paint.
Designer systems commonly include:
- A moisture-mitigation primer when slab conditions require it
- A pigmented epoxy primer or base coat
- A metallic epoxy design coat
- A clear protective topcoat, often polyurethane, urethane, or polyaspartic
- An optional traction additive for improved slip resistance
Each layer has a job. Skipping one because the bucket collection is beginning to resemble a chemistry laboratory is rarely a good bargain.
Why Metallic Epoxy Works Well in Basements
It Transforms Plain Concrete
Basements often begin with gray concrete, exposed utility lines, and the visual charm of a parking structure. Metallic epoxy immediately changes the mood. Its reflective finish can help distribute available light, while flowing patterns add depth to rooms with limited windows.
Dark charcoal, black, and bronze combinations create a sophisticated theater or bar atmosphere. Pearl, silver, and soft gray can make a smaller basement feel brighter. Blue, teal, and white blends produce an aquatic effect, while copper and espresso tones work well with wood cabinetry and warm lighting.
It Creates a Seamless Surface
Unlike tile, metallic epoxy has no grout lines collecting dust, crumbs, or mysterious basement debris. A continuous surface is especially useful in recreation rooms, craft spaces, workshops, and home gyms where cleaning should not require an archaeological expedition.
It Resists Many Everyday Spills
Once fully cured, a compatible epoxy system can resist stains from many common household spills and cleaners. Liquids remain on the surface long enough to be wiped away instead of immediately soaking into porous concrete.
Resistance does not mean invincibility. Harsh chemicals, prolonged exposure, standing water, dragging sharp equipment, or using an incompatible cleaner can still damage the finish. Product-specific care instructions always take priority.
It Can Support Multiple Basement Uses
Metallic epoxy can suit a basement lounge, office, game room, laundry area, home gym, or creative studio. Area rugs and furniture can soften living zones, while the exposed coating remains practical in higher-activity areas.
Because epoxy does not provide much insulation or cushioning by itself, gym mats, rugs, or under-desk pads may improve comfort in spaces where people stand, exercise, or play for long periods.
The Most Important Issue: Basement Moisture
Moisture is the villain in many failed basement coatings. It can enter through foundation cracks, plumbing leaks, poor exterior drainage, seasonal groundwater pressure, or vapor moving upward through the concrete slab.
A floor may look dry on the surface while still transmitting enough moisture to interfere with adhesion. Once a low-permeability coating is installed, vapor pressure can contribute to blisters, bubbles, discoloration, whitening, or delamination.
Look for Warning Signs
Before coating the floor, inspect for:
- Dark or damp-looking areas
- White powdery efflorescence
- Musty odors
- Previous paint that is peeling or blistering
- Water marks near walls or floor joints
- Active cracks or past flooding
- Condensation beneath stored boxes or rubber mats
A taped plastic sheet can provide a basic warning about active condensation, but it is not a substitute for professional testing. Contractors may use in-slab relative-humidity testing, calcium-chloride testing, electronic moisture meters, or a combination of approved methods. The acceptable result depends on the specific primer and coating system.
Fix the Water Source First
An epoxy coating is not a cure for a leaking foundation. Gutters, downspouts, grading, drains, sump systems, plumbing problems, wall cracks, and exterior waterproofing may need attention before flooring begins.
Some systems include moisture-tolerant primers or vapor-control products, but they must be selected according to actual test results. Applying a generic coating over a damp slab and hoping for the best is not optimism. It is a future repair project wearing a glossy disguise.
How a Metallic Epoxy Basement Floor Is Installed
1. Inspect the Concrete
The installer checks the slab for moisture, contamination, weak concrete, sealers, old coatings, cracks, spalling, and uneven areas. Structural movement and active water intrusion require correction before decorative work starts.
2. Remove Old Coatings and Contaminants
Paint, adhesive, oil, grease, wax, curing compounds, and other bond-breaking materials must be removed. Coating over contamination may produce a beautiful surface that is attached mostly to dirt.
3. Mechanically Profile the Surface
Professional projects often use diamond grinding or shot blasting to open the concrete surface and create the profile required by the coating manufacturer. The objective is not merely to make the floor look scratched. It is to remove weak surface material and establish a clean, sound texture that supports adhesion.
Grinding concrete can create hazardous dust, so suitable dust collection, work-area isolation, protective equipment, and ventilation are essential. Adjacent HVAC registers should be protected from construction dust.
4. Repair Cracks and Surface Defects
Nonmoving cracks, pits, chips, and spalled areas are repaired with compatible materials. Repairs are then smoothed so they do not telegraph through the glossy finish.
A coating may bridge small cosmetic defects, but it cannot stop structural movement. Expansion joints and moving cracks require a system-specific treatment rather than being casually filled and forgotten.
5. Apply the Primer or Base Coat
The primer helps seal the concrete and promote adhesion. A pigmented base coat also provides visual consistency beneath the metallic layer. Black creates deep, dramatic color, while white or light gray can brighten pearl and silver pigments.
6. Mix and Apply the Metallic Coat
Resin and hardener must be measured and mixed exactly as directed. Incorrect proportions can produce sticky areas, slow curing, softness, whitening, or color irregularities.
After the metallic pigment is incorporated, the coating is poured and spread with a roller, squeegee, gauge rake, or trowel. The installer then manipulates the material using controlled passes, ribbons of accent color, solvents approved by the manufacturer, air movement, or other system-specific techniques.
This is the artistic stage, but timing matters. Epoxy has a limited working period once mixed. The floor does not care that someone stopped to answer the phone or watch another tutorial.
7. Apply a Protective Topcoat
A clear topcoat protects the design layer from abrasion, scratches, chemicals, and wear. A UV-stable polyurethane or polyaspartic topcoat may also help protect areas receiving sunlight through basement doors or windows.
Gloss creates maximum depth and reflectivity. Satin or matte finishes reduce glare and may hide small scratches more effectively. A traction additive can improve footing, although too much texture may soften the mirror-like appearance and make mopping less effortless.
8. Allow the System to Cure
Dry-to-the-touch, light-foot-traffic, furniture-return, and full-chemical-cure times are not the same. Temperature, humidity, ventilation, product chemistry, film thickness, and the number of layers all influence the schedule.
Follow the manufacturer’s written instructions before walking on the floor, replacing heavy furniture, laying rugs, or cleaning it. Moving a sofa onto a half-cured surface is an excellent way to create a permanent furniture map.
Designer Color and Pattern Ideas
Silver and Charcoal
This combination creates a modern, industrial appearance and works well in home theaters, gyms, offices, and minimalist lounges. Black accents can add depth, but excessive black may make a windowless basement feel smaller.
Pearl White and Soft Gray
Light colors reflect more available light and can make compact spaces feel open. They also reveal dirt, hair, and surface scratches more readily, so a lightly varied pattern is often more forgiving than solid white.
Copper, Bronze, and Espresso
Warm metallic tones pair naturally with brick, wood bars, leather furniture, and amber lighting. The finish can resemble aged metal, polished stone, or rich mineral deposits.
Blue, Teal, and White
These colors can mimic waves, ice, or deep water. They are popular for entertainment rooms and bold contemporary designs. Careful blending is important; otherwise, the floor may resemble a weather radar map during a severe storm.
Marble-Inspired Neutrals
Gray, beige, cream, and restrained veining provide a timeless look. This is often a safer design choice for homeowners concerned about resale value or changing décor.
Cost of a Metallic Epoxy Basement Floor
Professional epoxy flooring commonly ranges from approximately $2 to $12 per square foot, but a custom metallic system often falls toward the higher end or beyond it. Extensive grinding, moisture mitigation, crack repair, multiple colors, custom artwork, stairs, small divided rooms, and premium topcoats can increase the price.
A 700-square-foot basement priced at $8 per square foot would cost about $5,600. At $12 per square foot, the same area would cost about $8,400. These examples are planning estimates, not contractor quotes.
Small projects may have a higher per-square-foot rate because setup, equipment transportation, mixing, and cleanup still require substantial labor. A basement with old adhesive, failing paint, or high moisture can also cost considerably more than a clean, sound slab.
DIY Versus Professional Installation
A DIY kit may reduce labor expense, but metallic epoxy is less forgiving than ordinary floor paint. Common DIY problems include visible roller lines, poorly blended pigments, mismatched batches, trapped debris, bubbles, bare spots, premature curing, and insufficient material.
Professional installation is worth serious consideration when:
- The basement has moisture or drainage concerns
- The slab contains extensive cracks or repairs
- Old paint, glue, or tile residue must be removed
- You want several metallic colors or detailed effects
- The floor will be a major visual feature
- You cannot provide strong ventilation and dust control
Advantages and Disadvantages
Advantages
- Custom, high-end appearance
- Seamless surface without grout lines
- Good stain and abrasion resistance when properly topcoated
- Easy routine sweeping and damp mopping
- Can hide discoloration in sound concrete
- Suitable for many finished-basement styles
- Each installation is visually unique
Disadvantages
- Requires careful moisture evaluation
- Surface preparation can be noisy, dusty, and labor-intensive
- Glossy finishes may be slippery when wet
- The floor remains hard and relatively cold
- Repairs may not blend invisibly into the original pattern
- Standard epoxy may yellow under repeated ultraviolet exposure
- Installation temporarily disrupts access to the basement
- Custom professional work can be expensive
Safety During Installation
Uncured epoxy resins and hardeners can irritate the skin and may cause allergic sensitization. Installers should follow the product safety data sheets, avoid skin contact, wear appropriate chemical-resistant gloves and eye protection, and use protective clothing.
Basements are enclosed spaces, making ventilation especially important. Exhaust air should be directed outdoors without allowing fumes or dust to spread through the home. Open product containers should be kept away from ignition sources, children, pets, food, and HVAC returns.
Concrete grinding also requires suitable dust controls. A grinder connected to an appropriate vacuum system is preferable to releasing a gray cloud that eventually decorates every object in the house.
How to Maintain a Metallic Epoxy Basement Floor
Routine care is simple:
- Sweep, dust mop, or vacuum loose grit regularly.
- Wipe spills promptly.
- Damp mop with a neutral cleaner approved for the topcoat.
- Avoid highly abrasive pads and harsh chemicals unless permitted.
- Use furniture pads beneath heavy or frequently moved items.
- Place mats near exterior entrances to capture sand and moisture.
- Lift heavy furniture instead of dragging it.
Wax is usually unnecessary unless the flooring manufacturer recommends a compatible finish. Household polish can create a slippery film and may complicate future recoating.
Inspect high-traffic areas periodically. A sacrificial clear topcoat can often be renewed before wear reaches the metallic design layer, which is far easier than attempting to recreate a section of an intricate pattern.
Practical Experiences With Designer Metallic Epoxy Basement Floors
The Preparation Usually Takes Longer Than the Artistic Pour
One of the most common surprises is how little of the project is spent making dramatic swirls. On a typical basement, inspection, moisture testing, grinding, edge work, vacuuming, crack repair, and masking may consume most of the schedule. The actual metallic pour can happen comparatively quickly.
This matters when comparing estimates. A contractor who promises to arrive in the morning and finish an elaborate floor before dinner may be skipping important stepsor may possess a time machine. Detailed preparation is not wasted labor. It is what gives the decorative layer a dependable surface to bond to.
Sample Boards Do Not Perfectly Predict the Finished Floor
Metallic epoxy continues to flow after it is spread. Pigments move, colors merge, and patterns soften as the material levels. A sample board is useful for choosing a palette, but a full basement has different lighting, temperature, airflow, and scale.
Homeowners tend to be happiest when they select a general visual direction rather than demanding an exact copy of a photograph. “Mostly charcoal with subtle silver movement” is realistic. “Reproduce this precise swirl from a 200-square-foot showroom on my 817-square-foot basement” is a recipe for frustration.
Lighting Changes the Floor More Than Expected
The same floor can look completely different under recessed LEDs, warm lamps, daylight, or television lighting. Metallic particles reflect light directionally, so patterns may appear stronger from one side of the room and quieter from another.
Testing the sample under the basement’s actual lighting is therefore essential. Warm light enhances bronze, copper, and beige. Cooler light emphasizes silver, blue, charcoal, and white. Adding dimmers can turn the floor from bright and energetic during a party to moody and dramatic during movie night.
Gloss Shows Beautyand Everything Else
A high-gloss clear coat creates exceptional depth, but it can also highlight dust, footprints, pet hair, and minor scratches. Families with children, pets, workout equipment, or frequent gatherings sometimes prefer a satin topcoat or a lightly textured gloss finish.
Pattern selection also affects maintenance. A multitone design hides everyday debris better than a solid black or nearly white surface. Dark floors can show pale dust, while very light floors reveal dark hair and dirt. A medium-value blend is often the peace treaty between dramatic style and realistic housekeeping.
Traction Deserves a Serious Conversation
A glossy metallic floor can become slippery when wet, particularly near basement entrances, bars, laundry areas, bathrooms, or dehumidifiers. Installers can incorporate traction media into the clear coat, but texture changes both appearance and cleaning behavior.
A fine additive may be almost invisible while offering modest grip. A heavier broadcast improves traction but reduces the glasslike effect and can hold dirt more readily. The right choice depends on how the basement will be used. A display room has different needs from a family recreation space where children arrive carrying juice, socks, and an impressive disregard for gravity.
Furniture Placement Requires Patience
People often underestimate full cure time because the floor feels dry. Returning a pool table, sectional sofa, safe, or gym equipment too early can leave dents, scuffs, or impressions. Heavy items should remain out until the complete system has reached the manufacturer’s required cure stage.
After curing, felt or polymer pads help protect the topcoat. Rubber-backed mats should be checked for compatibility because some materials can discolor certain coatings over time. Breathable mats are also a sensible choice where moisture could become trapped.
A Successful Floor Changes the Entire Basement
The most positive experience is often not simply having a better floor. It is finally seeing the basement as a finished part of the home. A metallic surface can visually connect separate zones, provide a durable foundation for changing furniture layouts, and reduce anxiety about routine spills.
The best results come from balancing creativity with restraint. One primary color, one supporting metallic tone, and a controlled accent often produce a more timeless design than five competing pigments. The goal is a floor people noticenot a floor that appears to be shouting at the furniture.
Conclusion
A designer metallic epoxy basement floor combines decorative artistry with the practical benefits of a seamless resinous surface. It can turn unfinished concrete into a marble-like, smoky, pearlescent, or metal-inspired feature that supports everything from a home theater to a polished entertainment lounge.
The final appearance may receive the compliments, but the hidden work determines whether the floor lasts. Moisture testing, water control, mechanical preparation, compatible repairs, accurate mixing, proper ventilation, sufficient cure time, and a durable topcoat are the foundations of a successful installation.
Choose colors with the basement’s lighting and size in mind, discuss slip resistance before installation, and budget for concrete preparation rather than focusing only on the decorative coating. When the slab is suitable and the system is installed correctly, metallic epoxy can make the basement feel less like “downstairs storage” and more like one of the best-designed rooms in the house.
Note: Product compatibility, moisture limits, coverage rates, ventilation requirements, application temperatures, and cure times vary by manufacturer. Always follow the current technical data sheet and safety instructions for the complete flooring system being installed.