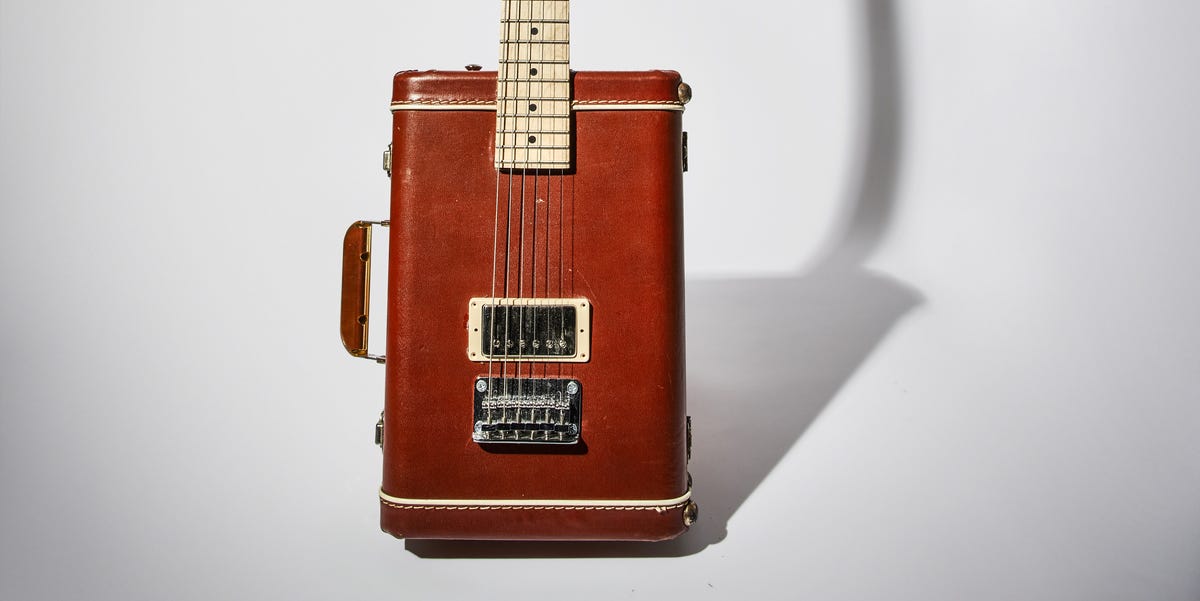
If you have ever looked at an old clarinet case and thought, “You know what this needs? Strings, attitude, and absolutely no respect for tradition,” congratulations: you are the exact kind of person this project was made for. Building a guitar from a clarinet case is part woodworking, part scavenger hunt, part electric-guitar science, and part glorious nonsense. It is also very real. People have done it, and the results can be surprisingly playable, surprisingly sturdy, and surprisingly cool.
That said, let’s clear something up before we start hot-gluing our dreams to a vintage instrument case: this is not a conventional acoustic guitar build. A clarinet case does not behave like a carefully braced spruce top. It is better to think of this project as a minimalist DIY electric guitar built around a quirky shell. The case gives you shape, style, and some resonance, but the real magic comes from the neck, bridge, scale length, strings, pickup, and setup. Get those right, and your weird little case-guitar can become a legitimate instrument instead of an art project that only knows one sad chord.
What This Project Really Is
The smartest way to build a clarinet case guitar is to treat the case as the body shell, not the body structure. In other words, the case can look fabulous on the outside, but hidden reinforcement needs to do the heavy lifting. Guitar strings put serious tension on a neck. That is why a successful build depends on internal wood support, accurate bridge placement, and a neck that can actually handle string pull.
If you are a first-time builder, the easiest route is to use a ready-made bolt-on neck with frets already installed. Could you carve your own neck from scratch? Sure. Could you also decide to raise wolves and become a horologist? Also sure. But a pre-made neck removes the hardest geometry from the process and lets you focus on turning a clarinet case into a playable instrument.
Before You Build: The Core Rules
1. Respect scale length like it pays rent
The single most important measurement in this project is the guitar scale length. That is the distance from the nut to the 12th fret, doubled. If you get this wrong, your guitar may still make noise, but it will not play in tune up the neck. And nothing crushes DIY joy faster than a guitar that sounds like it is arguing with itself at the 12th fret.
2. Reinforcement matters more than vintage charm
An old case looks cool, but it was never designed to resist string tension. Reinforce the inside with solid wood blocks or rails so the neck and bridge anchor into something substantial. The prettier the case, the more tempting it is to go easy on the surgery. Resist that temptation. A stylish collapse is still a collapse.
3. Build it like an electric, not a faux-acoustic
A magnetic pickup, steel strings, a stable bridge, and a clean output jack are your friends here. You are not chasing dreadnought volume. You are chasing playability, character, and tone. Think garage-built electric guitar with unexpected luggage.
Parts You’ll Want
- Old clarinet case with enough length and width for your chosen neck and bridge layout
- Ready-made bolt-on neck, ideally with an adjustable truss rod
- Bridge with adjustable saddles
- One humbucker or single-coil pickup
- Output jack and basic wiring
- Tuners, nut, strap buttons, strings
- Wood blocks or rails for reinforcement
- Screws, solder, shielding tape if desired, and basic finishing supplies
If you like simplicity, use one pickup and a jack. That stripped-down setup is part of the charm. You can always add a volume control later. Starting simple means fewer wiring headaches and more time actually hearing your creation make music.
Step-by-Step: How to Build Your Own Guitar from a Clarinet Case
Step 1: Pick the right case
Not every clarinet case is a good guitar body candidate. You need one long enough to accommodate your chosen scale length and compact enough to remain comfortable to hold. A case that looks amazing but cannot physically support the neck-to-bridge distance is just decor with abandonment issues.
Look for a rigid shell, decent width through the center, and enough interior depth to hide reinforcement and wiring. Clean it out completely. Remove old lining, hardware that gets in the way, and anything fuzzy that will later become mysterious dust inside your pickup cavity.
Step 2: Establish a centerline
Before cutting anything, mark a clean centerline from the neck area through the bridge area. This becomes the reference for the entire project. Guitar builds succeed when everything relates back to that line: neck alignment, pickup position, bridge position, and string path.
If the centerline wanders, your strings may not sit evenly over the fretboard, the pickup may look crooked, and the whole thing can end up feeling like modern art with intonation problems.
Step 3: Reinforce the inside
This is the hidden engineering part. Install solid wooden supports inside the case, especially where the neck mounts and where the bridge screws down. Some builders use rails along the top and bottom interior edges; others fit a larger center block. The exact layout can vary, but the principle does not: the case shell should not be doing the structural work alone.
If you can anchor the neck and bridge into real wood rather than thin case material, you improve sustain, durability, and your odds of not hearing a terrible cracking sound during final string-up.
Step 4: Fit the neck
Dry-fit the neck before drilling anything permanent. The joint needs to be square, centered, and strong. A square-heel bolt-on neck makes this much easier than a complicated set-neck design. If your neck includes a two-way truss rod, even better. That gives you a way to adjust relief later as string tension and seasonal changes do their usual drama.
Take your time here. If the neck angle or lateral alignment is wrong, every later step becomes a creative writing exercise in denial.
Step 5: Lay out the bridge using real scale math
Now the project becomes a guitar instead of a decorative rumor. Measure from the nut to the 12th fret, double it, and use that number to determine where the strings should break over the saddles. Because bridges with adjustable saddles allow for compensation, you want enough forward and backward travel to fine-tune intonation later.
Do not eyeball this. Do not “pretty close” this. Do not let your excitement convince you that half an inch is spiritually accurate. Bridge placement is one of the easiest ways to ruin an otherwise great build.
Step 6: Decide on pickup location
You have flexibility here. Pickup position affects tone more than basic function. Closer to the bridge tends to sound brighter and more cutting. Farther from the bridge usually sounds fuller and rounder. A single humbucker is a great match for a case guitar because it is simple, powerful, and forgiving.
If you want the most stripped-down version possible, one bridge-adjacent humbucker and an output jack will give you a raw, lively sound with very little complexity. Think less “studio perfection,” more “DIY bar-band hero who carries an instrument that confuses airport security.”
Step 7: Install hardware carefully
Mount the tuners, nut, bridge, pickup, and jack only after confirming your alignment one more time. Drill pilot holes carefully. Masking tape depth guides are helpful when you are working on thin material or unfamiliar hardware. Go slowly. Rushing this part is how screws strip, finishes chip, and your afternoon turns into a vocabulary lesson.
If you are using power tools, wear eye protection and get help from a skilled adult when needed. The guitar should be the loudest part of this project, not the emergency room bill.
Step 8: Wire it simply
Basic pickup-to-jack wiring is enough to make the instrument functional. If you want more control, add a volume pot later. For a first build, simpler is better. Many DIY disasters begin with the sentence, “I figured I’d also add coil splitting, phase switching, and a custom LED cavity light.”
Keep your solder joints neat, rough up slick metal surfaces if needed, and test continuity before sealing everything up. A guitar that looks incredible but stays silent is still mostly furniture.
Step 9: String it up and do a real setup
Once strung, check neck relief, string action, pickup height, and intonation. Relief is the slight forward curve that gives the strings room to vibrate. Too little can cause fret buzz in lower positions. Too much can make the middle of the neck feel clunky and high. Then adjust string height at the bridge until the guitar feels playable.
Finally, intonate by comparing the open note and the fretted 12th-fret note. If the fretted note is sharp, lengthen the string by moving the saddle back. If it is flat, move the saddle forward. Retune between adjustments. This part is tedious, but so is flossing, and both make future pain less likely.
How Will a Clarinet Case Guitar Sound?
Better than the idea has any right to sound, honestly. The tone will depend more on the pickup, strings, scale length, neck stiffness, and setup than on the case itself. A humbucker can give the build a warm, punchy voice with enough output to feel serious. A single-coil can make it brighter, more open, and a bit more wiry.
Still, the case is not meaningless. It influences the feel, the resonance, and the visual personality. But it does not replace the carefully engineered top, bracing, and structural behavior of a traditional acoustic guitar. That is why this build works best as a scrappy electric hybrid rather than a fake flattop in costume.
Common Mistakes to Avoid
- Choosing the wrong case size: cool shape, impossible geometry
- Skipping internal reinforcement: stylish shell, weak structure
- Misreading scale length: the fastest route to intonation misery
- Mounting the pickup too high or too low: weak output or weird balance
- Ignoring humidity and storage: wood moves, even on oddball builds
- Overcomplicating the electronics: first build, first heartbreak
If you are storing the finished instrument, keep it in a reasonable humidity range and avoid treating it like a coffee table prop. Wood still reacts to dry and humid conditions, and setup can drift over time. Your guitar may be unconventional, but physics still refuses to be impressed.
The Real Experience of Building One
The most interesting thing about building a guitar from a clarinet case is that the emotional curve is almost identical to learning an instrument: confidence, confusion, tiny success, weird noise, panic, breakthrough, then a dramatic overestimation of your abilities. At first, the project feels charming and manageable. You have a case, a neck, a pickup, and a vision. In your head, it is already half-finished and probably legendary. Then you start measuring, and suddenly you realize guitars are not magical objects created by forest spirits. They are systems. Beautiful, stubborn systems.
One of the first surprises is how quickly the project stops being about style and becomes about geometry. You can spend an hour admiring the case and three days worrying about where the bridge should sit. That sounds unromantic, but it is actually where the fun begins. Every small improvement feels earned. When the neck finally lines up with the centerline, it feels like you cracked a secret code. When the pickup sits in the right spot and the strings run true over the fretboard, you start looking at the thing on your workbench differently. It is no longer a joke with hardware attached. It is becoming an instrument.
There is also a very specific kind of builder humility that arrives the first time you string it up. Until that moment, you are living on hope and measurements. String tension is the courtroom where your decisions are cross-examined. Will the neck stay stable? Will the bridge location make sense in real life? Did you mount something one-eighth of an inch off because you got cocky with a ruler? Stringing up a homemade guitar is thrilling because it is the first honest answer the project gives you.
Then comes the setup phase, which is where many builders go from “I made a thing” to “I understand why guitars cost money.” Tiny adjustments matter. A little truss rod tweak, a little saddle movement, a little pickup-height change, and suddenly the instrument starts cooperating. The transformation is addictive. What felt stiff and scratchy can become lively and musical with patience. You begin to appreciate that playability is not a bonus feature; it is the whole game.
And finally, there is the moment you plug it in. That moment is ridiculous in the best way. You are holding an object that used to store a woodwind instrument and now wants to play blues riffs. The first chord is rarely perfect, but it is unforgettable. Even the flaws become part of the story. Maybe the high frets are a little feisty. Maybe the output is rough around the edges. Maybe the tone has more bark than polish. Fine. That is the point. A clarinet-case guitar should have some nerve.
What stays with most builders is not just the sound. It is the shift in perspective. After a project like this, every guitar makes more sense. You notice scale length, hardware choices, neck relief, pickup placement, and body structure in ways you never did before. Building one weird guitar teaches you how all guitars work. And that may be the best payoff of the whole strange adventure.
Final Thoughts
If you want the easiest path to a perfect instrument, buy one. If you want a wildly satisfying project that teaches you real guitar-building fundamentals while producing something memorable, build your own guitar from a clarinet case. Done well, it is more than a novelty. It is a playable, expressive, conversation-starting machine with equal parts charm and chaos.
Keep the design simple. Reinforce the structure. Measure like your dignity depends on it. Respect scale length. Choose solid hardware. Set it up properly. And remember: the goal is not to fool anyone into thinking your clarinet case was born a Telecaster. The goal is to make something delightfully original that sounds good enough to keep on a stand instead of a shelf.
Note: This article is designed for publication-ready HTML. Any citation artifacts, source placeholders, or editing markup have been intentionally excluded.