If your entryway turns into a tiny swamp every time it rains, snows, or merely thinks about bad weather, a wooden boot tray is one of the smartest upgrades you can build. It protects floors, keeps muddy footwear contained, and adds a custom touch that looks far more polished than a sad plastic pan from aisle twelve. In other words, it does the glamorous work of catching slush while pretending to be décor.
The best part is that a wood boot tray can be as simple or as fancy as you want. You can make a clean, minimalist tray from project boards in an afternoon, or dress it up with stained hardwood, black hardware, and decorative pebbles so it looks like it belongs in a magazine-worthy mudroom. Either way, the goal is the same: create a durable, easy-to-clean landing spot for wet boots that does not leave your floor looking like a weather report.
This guide walks through the full process, from planning the size to choosing wood, assembling the tray, adding a moisture-resistant finish, and giving it enough style to earn compliments from visitors who are secretly just there to drip on your rug.
Why a Wooden Boot Tray Is Worth Building
A boot tray is one of those small home projects that solves an everyday annoyance. Instead of shoes, boots, and sneakers wandering around your entry like confused tourists, everything lands in one designated zone. That means less water on hardwood, less grit on tile, and less muttering under your breath while wiping up mysterious puddles.
A wooden version has a few advantages over store-bought plastic trays. First, it looks better. Second, you can size it to your space, whether you need a slim tray for a city apartment entry or a larger one for a family mudroom. Third, you control the details: side height, finish color, interior liner, feet, and drainage layer. That kind of customization makes the tray feel intentional, not like a last-minute surrender to winter.
Before You Build: Plan the Right Size
The most common mistake in DIY boot tray projects is making the tray too small. It may look cute sitting on the workbench, but the moment two pairs of boots show up, the tray starts negotiating with reality.
A practical tray should fit your household’s footwear habits. For one or two pairs of adult boots, a tray around 30 to 36 inches long and 14 to 16 inches wide usually works well. For a family entry, go wider or build two matching trays instead of one oversized monster that becomes awkward to move. Side walls around 1 1/2 to 3 inches tall are usually enough to contain pebbles, drips, and muddy debris without making the tray bulky.
Questions to ask before cutting wood
- Will the tray hold tall winter boots, sneakers, or both?
- Do you want room for decorative stones or a removable mat inside?
- Will it sit on hardwood, tile, laminate, or concrete?
- Do you want it to blend into your trim, bench, or mudroom cabinetry?
If you are unsure, mock up the size with painter’s tape on the floor first. It is much easier to adjust tape than explain to your household why only one boot fits at a time.
Best Wood and Materials for a Boot Tray
Because a boot tray deals with water, dirt, and regular wear, material choice matters. You want something stable, reasonably moisture-tolerant, and easy to finish.
Good wood options
Pine: Affordable, easy to cut, beginner-friendly, and widely available. Great for painted trays or casual rustic styles.
Poplar: Smooth, straight, and easy to paint. Ideal if you want a clean, modern finish.
Oak: Tough, durable, and attractive with stain. Excellent for a more upscale look.
Cedar: Naturally suited to damp environments, though many people choose to leave cedar more natural-looking instead of heavily coating it.
Plywood project panels: A smart option for the tray base because they are stable, easy to source, and practical for small projects.
For the base, plywood can be especially useful because it resists movement better than many cheaper engineered boards. Avoid materials that dislike moisture, such as basic particle board, which is not the hero of this story.
What you will need
- Wood for the frame and base
- Wood glue
- Brad nails or screws
- Sandpaper in medium and fine grits
- Wood filler if needed
- Primer and paint, stain and clear coat, or a clear protective finish
- Optional tray liner, rubber mat, metal sheet, pebbles, or river rocks
- Optional felt or rubber feet
Design Ideas That Make a Boot Tray Look Impressive
If you want the tray to look more impressive than “weekend panic project,” the secret is in the details. Even a simple rectangular tray can look high-end when the design choices feel intentional.
Style upgrades worth considering
- Mitered corners: Cleaner and more furniture-like than plain butt joints.
- Stained hardwood frame: Instantly richer than bare softwood.
- Contrasting base: Use a darker base panel or painted interior for depth.
- Decorative pebbles: They elevate wet boots so moisture can collect below instead of around the soles.
- Metal liner: Galvanized sheet, copper-look liner, or a removable tray insert makes cleanup easier.
- Small feet: Rubber or wood feet lift the tray off the floor and make it look finished.
- Handles or cutout grips: Helpful for moving the tray when cleaning underneath.
If your entryway style leans farmhouse, use warm stain and visible grain. For a more modern mudroom, try black paint, a slim profile, and matte hardware. For classic interiors, dark walnut stain with neatly sanded edges looks timeless.
Step-by-Step: How to Build the Boot Tray
Step 1: Cut the base and side pieces
Start by cutting your base panel to size. Then cut the front, back, and two side pieces for the tray walls. If you want a more refined look, cut the corners at 45 degrees. If you want the simplest possible build, straight cuts are perfectly fine.
A beginner-friendly example might be a 34-inch by 15-inch base made from 1/2-inch plywood, framed with 1×3 boards. If you do not want to make multiple cuts at home, many home centers can cut project boards and plywood panels for you.
Step 2: Dry-fit everything first
Before opening the glue, assemble the pieces without fasteners. Check that the sides sit flush, the corners line up, and the overall tray looks square. This quick test prevents one of DIY’s most humbling moments: discovering a bad cut after the glue is already judging you.
Step 3: Assemble the frame
Apply wood glue to the joints and clamp the frame around the base. Secure it with brad nails or screws. If you are using screws, pre-drill to help prevent splitting, especially on hardwood.
Wipe away excess glue before it dries. Dried glue is stubborn, and it can interfere with stain later, leaving blotchy patches that look like the tray caught a rash.
Step 4: Fill, sand, and soften the edges
Once the tray is assembled and dry, fill visible nail holes or gaps if needed. Then sand the entire tray. A smart progression is to start around 120 grit for smoothing and finish around 180 to 220 grit for a cleaner surface. Sand with the grain, and slightly round over the top edges so the tray feels comfortable and looks professionally finished.
Do not skip this stage. Sanding is the difference between “custom boot tray” and “wood box with a mood.”
Step 5: Choose your finish
Since the tray will face regular moisture, use a finish with real protective value. For many indoor projects, polyurethane or varnish is a reliable choice. If you want a lower-odor option, a quality water-based product can be appealing. If you prefer richer warmth and stronger water resistance, oil-based finishes are often favored, though they typically take longer to dry.
Apply thin, even coats and allow full drying time between coats. Light sanding between coats helps the next layer bond and gives you a smoother final surface. Finish all sides of the tray, including the underside and edges, not just the visible top. That complete coverage helps the wood handle changing moisture more gracefully.
Step 6: Add the interior solution
Now decide how you want the inside of the tray to work.
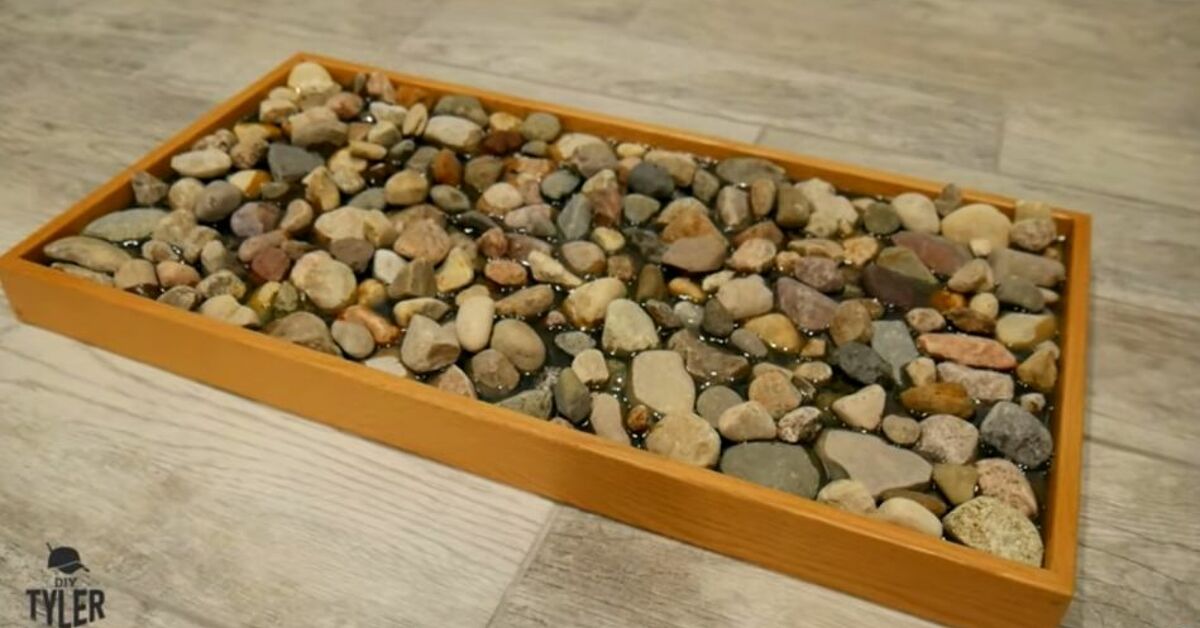
Option 1: Decorative pebbles or river rocks. These create space under the boots so water can drip below. They also look great and give the tray that “I absolutely planned this mudroom” energy.
Option 2: Rubber or coir insert. Easy to remove, easy to clean, and practical for high-traffic households.
Option 3: Metal liner. A thin insert can make the tray more water-friendly and easier to wipe out.
Option 4: Slatted wood insert. A raised removable grid keeps boots elevated while preserving an all-wood appearance.
Step 7: Protect the floor underneath
Attach felt pads or rubber feet to the bottom. This simple upgrade prevents scratching and keeps the tray from trapping moisture directly against the floor. It also makes the tray look more deliberate, which is a nice bonus for such a small detail.
Finishing Choices: Paint, Stain, or Natural Wood?
The finish you choose changes the entire personality of the tray.
Painted boot tray
Great for mudrooms, laundry rooms, and homes with colorful trim. Black, charcoal, deep green, and warm white are all strong choices. Paint also hides less-than-perfect lumber better than stain.
Stained boot tray
Best if you want the project to look more furniture-like. Walnut, provincial, espresso, or medium oak tones work particularly well in entryways. If you stain, test on scrap first. Wood species absorb color differently, and surprises are more fun in birthday gifts than in finishing work.
Natural clear-coated tray
Perfect if you have attractive wood grain and want a lighter, more Scandinavian or modern look. A clear finish keeps things simple while still protecting the wood.
Common Mistakes to Avoid
- Making the tray too shallow to contain melting snow and grit
- Using moisture-sensitive sheet goods without proper sealing
- Skipping the underside when finishing
- Choosing beauty over practicality and forgetting cleanup
- Using a glossy finish that shows every speck of dirt instantly
- Forgetting pads or feet underneath
A beautiful tray that is annoying to clean is not a victory. Aim for a balance of style and easy maintenance.
How to Keep Your Boot Tray Looking Good
Once built, the tray needs only simple upkeep. Dump out debris regularly, wipe the interior dry when needed, and refresh the protective coat if the surface starts to dull or wear thin. If you used pebbles, give them a rinse from time to time. Mud has a special talent for settling into anything decorative and making it look less “designer entryway” and more “archaeological find.”
If the tray sits in a very wet spot, check underneath occasionally to make sure moisture is not collecting between the tray and the floor. Good airflow, feet, and routine cleaning go a long way.
Why This Project Works So Well for Beginners
A wooden boot tray is one of the best beginner woodworking projects because it teaches real skills without requiring a full workshop or elite-level joinery. You practice measuring, cutting, assembly, sanding, and finishing, but the project remains manageable. It is functional, forgiving, and useful from day one.
And unlike some DIY projects that end up “decorative” in the same way a mystery drawer of extra screws is decorative, this one solves a real household problem. Every time the weather gets messy, your tray earns its keep.
Final Thoughts
If you want a practical DIY upgrade that also adds style to your home, building a wooden boot tray is a smart move. It protects floors, keeps footwear organized, and gives you a chance to create something that looks custom rather than generic. With the right size, a moisture-conscious material choice, and a durable finish, this project can hold up beautifully through rainy days, snowy mornings, muddy afternoons, and all the small chaos that enters through the front door.
The real secret to an impressive boot tray is not making it complicated. It is making it thoughtful. Choose materials that can handle wet boots, finish every surface well, and add a few design details that match your home. Do that, and your tray will look less like an afterthought and more like one of those small upgrades that quietly makes everyday life better.
Real-World Experiences Building a Wooden Boot Tray
The first time I built a wooden boot tray, I thought the project would be mostly about cutting boards and brushing on a finish. It turned out to be more about understanding daily life in an entryway. That sounds dramatic for a tray, but stay with me. Once you start paying attention to how people actually come into a house, you realize that a boot tray is less of a woodworking accessory and more of a peace treaty between weather and flooring.
My earliest version looked decent on the bench but was too small in practice. It fit one pair of boots beautifully, which would have been excellent if the home had been occupied by a single, highly organized person with impeccable aim. In reality, the tray was used by multiple people coming in with wet shoes, backpacks, and zero interest in precision parking. That experience taught me that generosity in size matters. A tray that is a little too large feels helpful. A tray that is too small feels like a decorative dare.
I also learned that the interior matters as much as the outer frame. On one tray, I left the inside flat and thought the finish alone would do all the work. Technically, it did, but the boots sat directly in the puddles, which was not ideal. Adding pebbles on the next build made a huge difference. Shoes dried better, the tray looked more finished, and the whole project suddenly felt less homemade in the “I ran out of ideas” sense and more homemade in the “I know what I’m doing” sense.
Another useful lesson came from finishing. A rushed finish job is a future regret with excellent memory. One tray got only a quick coat on the visible surfaces, and after a season of winter use, the underside told the whole story. Slight swelling, a tired-looking bottom edge, and the unmistakable feeling that I had tried to outsmart moisture and lost. Since then, I finish the underside, edges, and inside corners just as carefully as the front face. No one compliments the underside of a boot tray, but it quietly determines how long the tray keeps its dignity.
Style-wise, I found that simple details make the biggest visual impact. A tray with neatly softened edges, a rich stain, and little feet underneath can look surprisingly upscale even when the construction is straightforward. Guests often assume a well-finished tray was bought from a home décor store, which is satisfying in a completely reasonable and not-at-all-smug way. Matching the tray color to a bench, coat hooks, or nearby trim also makes the whole entry feel intentional.
Perhaps my favorite part of this project is that it keeps proving its value long after the tools are put away. On wet days, it catches drips. On snowy days, it contains slush. On dry days, it still keeps everyday shoes from wandering around the doorway like they are looking for purpose. That kind of quiet usefulness is what makes small woodworking projects so rewarding. A boot tray may not be the flashiest build in the shop, but it earns its place every single week.
So if you are debating whether this project is worth your time, my experience says yes. Build it a little bigger than you think, seal it better than you think, and design it nicely enough that you enjoy seeing it by the door. The result is one of those rare DIY wins: practical, attractive, affordable, and constantly useful. Not bad for a humble box that spends its life catching dirty boots.