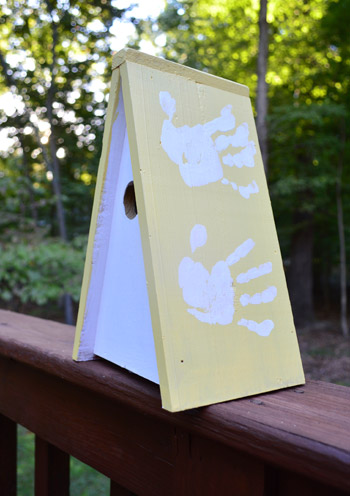
A sweet hand print birdhouse is one of those rare crafts that checks every happy little box: it is adorable, personal, beginner-friendly, giftable, and just messy enough to make kids feel like real artists. It turns a plain wooden birdhouse into a keepsake covered in tiny handprints, cheerful colors, and the kind of charm you cannot buy in a store, no matter how determinedly you wander the craft aisle.
Even better, this project can be more than a cute afternoon activity. When done thoughtfully, a DIY handprint birdhouse can introduce children to backyard birds, nesting habits, safe outdoor materials, and the idea that art can live outside among trees, flowers, and curious feathered neighbors. It is part craft, part memory capsule, and part mini wildlife lesson.
This guide walks you through how to make a hand print birdhouse from start to finish, including supplies, painting tips, kid-friendly steps, safety notes, design ideas, drying advice, and practical birdhouse details that matter if you want the finished piece to be more than porch decor. Grab the paint shirts. The cute chaos is about to begin.
What Is a Hand Print Birdhouse?
A hand print birdhouse is a wooden birdhouse decorated with painted handprints, fingerprints, or palm shapes. The handprint can become a bird’s body, a flower, a sun, a leafy branch, a set of wings, or simply a colorful stamp that says, “A very small person helped make this, and yes, paint got everywhere.”
The most popular version uses a child’s handprint as the body of a bird. The thumb becomes the head, the fingers become tail feathers or wings, and simple painted details turn the print into a cardinal, bluebird, chickadee, robin-inspired bird, or an imaginary backyard celebrity with fabulous plumage. You can also use multiple handprints from siblings, classmates, cousins, or grandchildren to create a family birdhouse.
There are two ways to approach this craft. One is decorative: make the birdhouse as a keepsake for a shelf, nursery, classroom, or grandparent gift. The other is functional: decorate the outside of a properly built nest box while keeping bird safety in mind. Both are lovely. The key is knowing which one you are making before you start.
Supplies You Will Need
You do not need a professional workshop to make a sweet hand print birdhouse. A kitchen table, a washable tablecloth, and a brave adult with paper towels will do nicely.
Basic Materials
- Unfinished wooden birdhouse or simple wooden nest box
- Non-toxic acrylic craft paint or water-based exterior paint
- Foam brushes
- Small detail paintbrushes
- Paper plate or paint palette
- Pencil
- Baby wipes or damp cloths
- Water cup for brushes
- Drop cloth, newspaper, or craft mat
- Clear, non-toxic outdoor-safe sealer for decorative outdoor use
- Optional: painter’s tape, stencils, wooden letters, or fine-tip paint pens
Bird-Friendly Extras for a Functional Birdhouse
- Drainage holes in the bottom
- Ventilation holes near the top
- Clean-out door or hinged side panel
- Correct entrance-hole size for your target bird species
- No perch near the entrance hole
- Untreated wood, especially for the interior
- Predator baffle if mounting on a pole
If this craft is for young children, choose a pre-built birdhouse instead of building from raw lumber. Adults should handle sanding, drilling, cutting, stapling, and any hardware installation. Kids can safely take over the best parts: painting, stamping, naming the birdhouse, and proudly announcing that they are now “bird landlords.”
Step-by-Step: How to Make a Sweet Hand Print Birdhouse
Step 1: Choose the Right Birdhouse
Start with a plain wooden birdhouse. Craft stores often sell small unfinished birdhouses that are perfect for keepsakes. If you want birds to actually use it, choose a birdhouse designed for real nesting. A functional nest box should have a solid roof, ventilation, drainage, easy cleaning access, and an entrance hole sized for the birds in your area.
For example, many backyard cavity-nesting birds such as wrens, chickadees, bluebirds, and nuthatches use nest boxes, but not every bird does. Cardinals, hummingbirds, and goldfinches generally do not move into enclosed birdhouses. They prefer other nesting styles, so do not take it personally if your birdhouse stays empty. Birds are picky tenants. They have opinions.
Step 2: Sand Rough Spots
Lightly sand any sharp or rough edges on the outside of the birdhouse. This helps paint go on smoothly and prevents little fingers from catching splinters. Wipe away dust with a dry cloth before painting.
If the house will be used outdoors by birds, do not sand the interior until it is slippery-smooth. A slightly textured inside wall can help young birds grip as they climb toward the entrance. The goal is safe, not polished like a fancy dining table.
Step 3: Paint the Base Color
Paint the outside of the birdhouse with a soft base color. White, cream, pale blue, sage green, light yellow, tan, or muted gray all work beautifully. If you are making a decorative keepsake, you can go brighter. If you hope birds will use it, natural and muted colors are better because they blend into the surroundings and are less likely to attract unwanted attention.
Use a foam brush for smooth coverage. Apply one thin coat, let it dry, then add a second coat if needed. Avoid painting the inside of a functional birdhouse. Birds do not need interior decorating, and they will not appreciate accent walls.
Step 4: Plan the Handprint Design
Before painting a hand, decide where the print will go. The side panel usually gives you the most space. The front can look adorable too, but avoid blocking or painting heavily around the entrance hole on a functional birdhouse.
You can make one large handprint bird on each side, a row of small handprint birds, or a family design where every child contributes a print. If the handprint will become a bird, place it sideways. The thumb can form the head, while the fingers form wings or tail feathers. After it dries, you can add a beak, eye, legs, branch, flowers, or little music notes.
Step 5: Paint the Hand
Pour a small amount of non-toxic paint onto a plate. Use a foam brush to coat the child’s palm evenly. Do not dunk the hand directly into a blob of paint unless you enjoy cleaning paint from fingernails, elbows, and possibly the dog.
Choose colors based on your design. Red makes a cardinal-inspired bird. Blue works for a bluebird-style look. Yellow creates a sunny spring bird. Pink, purple, and teal are perfect for whimsical art birds that may not exist in nature but absolutely deserve a dramatic entrance.
Step 6: Stamp the Handprint
Guide the child’s hand to the birdhouse and press gently but firmly. Hold the birdhouse steady with your other hand. Ask the child to keep fingers still for a few seconds, then lift the hand straight away. This helps prevent smudging.
Here is the secret: do not panic if the print is imperfect. A slightly wiggly handprint often looks sweeter than a perfect one. The tiny gaps, uneven edges, and surprise thumb angle are what make the birdhouse feel handmade instead of factory-made.
Step 7: Add Bird Details
Once the handprint is dry, use a small brush to add the details. Paint a small triangle beak near the thumb. Add a dot for the eye. Paint little legs under the palm. If the fingers are the tail feathers, add feather lines. If the fingers are wings, add a few curved strokes to create movement.
You can also add a branch under the bird, leaves around the sides, clouds near the roof, or tiny flowers made from fingerprints. Fingerprint flowers are wonderfully simple: press a fingertip in paint, stamp five dots in a circle, and add a yellow center. Suddenly, the birdhouse has a garden. The bird is now living in a better neighborhood than most of us.
Step 8: Personalize the Birdhouse
Add the child’s name, age, date, or a short message such as “Grandma’s Garden,” “Welcome Birds,” “Made with Love,” or “The Tweet Suite.” For a Mother’s Day, Father’s Day, teacher, or grandparent gift, write a small message on the bottom or back panel.
If several children are making one birdhouse, assign each side to one child. Another idea is to make the roof a fingerprint pattern and the walls a handprint mural. This works especially well for classrooms, playgroups, and family reunions.
Step 9: Let It Dry Completely
Let the paint dry fully before sealing or handling. Overnight drying is ideal. Acrylic paint may feel dry quickly, but thicker handprint areas can stay soft longer. If you rush this step, you may end up with fingerprints on top of the handprints, which is very meta but not always intentional.
Step 10: Seal the Outside
If the birdhouse will stay indoors, sealing is optional. If it will be displayed on a covered porch or outdoors, apply a non-toxic, outdoor-safe clear sealer to the outside only. Follow the product directions and allow it to cure completely before hanging the birdhouse.
For a functional birdhouse, keep sealer away from the interior. Also avoid glossy, strong-smelling finishes. The outside needs protection from weather; the inside needs to remain simple, dry, and safe.
Design Ideas for a Sweet Hand Print Birdhouse
Cardinal-Inspired Handprint Birdhouse
Paint the birdhouse in a soft green or natural wood tone, then use a red handprint for the bird. Add a black face mask, orange beak, and small feet. This makes a beautiful winter or Christmas gift, especially for grandparents who love bright red cardinals in the yard.
Spring Garden Handprint Birdhouse
Use pastel colors for the base. Add one blue or yellow handprint bird on the side, then decorate the rest with fingerprint flowers, grass, bees, and clouds. This style is perfect for preschoolers because the extra dots and dabs do not need to be precise.
Family Flock Birdhouse
Have each family member add one handprint in a different color. Large hands can go on the back, smaller hands on the sides, and baby handprints on the roof if there is enough space. Label each print with a name and year. This turns the project into a keepsake that becomes more meaningful over time.
Grandparent Gift Birdhouse
Paint the phrase “Grandma’s Little Birds” or “Grandpa’s Garden Crew” across the front. Add each grandchild’s handprint as a bird. This is the kind of gift that makes people say, “Oh my goodness,” and then immediately look for a safe place to display it.
Classroom Birdhouse Project
Use a larger wooden birdhouse or several small ones. Let each student add a thumbprint flower, fingerprint feather, or mini handprint. Display the finished birdhouses in a reading corner, school garden, or spring art show. For a classroom theme, add a sign that says “Our Class Is Ready to Soar.” Yes, it is a little cheesy. That is allowed. It is a birdhouse.
Important Birdhouse Safety Tips
A handprint birdhouse can be cute and responsible at the same time. If it is only decorative, you have more creative freedom. If you want birds to use it, follow a few practical rules.
Do Not Add a Perch
Perches may look charming, but most cavity-nesting birds do not need them. A perch can make it easier for predators or aggressive birds to reach the entrance. Skip the perch and let the birdhouse keep its clean, safer design.
Leave the Interior Empty
It is tempting to tuck in yarn, cotton, dryer lint, or craft fluff to make the house cozy. Resist. Birds prefer to choose and arrange their own nesting materials. The best interior is clean, dry, untreated, and empty.
Include Drainage and Ventilation
A real nest box should have small drainage holes in the bottom and ventilation openings near the top. Drainage helps moisture escape after rain, and ventilation helps air circulate during warm weather.
Use the Right Entrance Hole Size
Entrance size matters. If the hole is too small, your target birds cannot enter. If it is too large, bigger birds or predators may get access. Before making a functional birdhouse, look up nest box dimensions for the birds common in your area.
Clean It Once a Year
A functional birdhouse should be cleaned after nesting season, when you are sure birds are no longer using it. A hinged side or clean-out panel makes this much easier. Remove old nesting material and let the house dry before closing it again.
Where to Place a Hand Print Birdhouse
If your hand print birdhouse is decorative, place it on a covered porch, bookshelf, mantel, garden shelf, or classroom display. If it is functional, location matters. Birds need safety, shade, and the right habitat.
Mount the birdhouse securely on a pole, post, or stable structure. Avoid placing it where cats can easily reach it. A predator baffle can help protect a pole-mounted nest box. In many yards, a spot facing away from harsh afternoon sun and strong prevailing winds is a smart choice. Nearby native plants, shrubs, and trees can also make the area more inviting by supporting insects and shelter.
Do not be discouraged if birds do not move in right away. Sometimes a birdhouse takes a season or two to be discovered. Birds are not ignoring your artwork; they are simply conducting a very serious real estate evaluation.
Common Mistakes to Avoid
Using Paint That Is Not Kid-Safe or Bird-Safe
Choose non-toxic paints, especially when children are involved. For outdoor use, water-based exterior paints are generally a better choice than harsh solvent-based products. Always let paint and sealer dry and cure completely before putting the birdhouse outside.
Painting the Inside
The outside is for creativity. The inside is for birds. Keep the interior unpainted and free from glue, glitter, stickers, and sealers if the birdhouse is meant to be used as a nest box.
Adding Loose Decorations
Buttons, beads, sequins, pom-poms, and glued-on gems may look cute, but they can fall off outdoors. If birds peck at them or if pieces drop into the yard, they become a problem. Painted decorations are safer and last longer.
Hanging It in Full Blazing Sun
A birdhouse can get hot in direct sun. Choose a location with some protection, especially in warm climates. Shade during the hottest part of the day is helpful.
Expecting Every Bird to Use It
Only certain cavity-nesting birds use birdhouses. If you want to attract a specific species, match the house design, entrance hole, placement height, and habitat to that bird. A beautiful handprint birdhouse is more likely to succeed when it is also practical.
How to Turn This Craft Into a Learning Activity
This project is a natural doorway into science, art, and observation. While painting, talk with kids about why some birds nest in holes and others build nests in branches. Discuss why the birdhouse needs air holes, drainage, and a roof. Ask children what birds they have seen in the yard or at the park.
After the birdhouse is finished, start a simple birdwatching journal. Children can record the date, weather, bird colors, sounds, and behaviors. They can draw birds they see nearby or make guesses about what birds might like the birdhouse. Even if no birds move in, the project teaches patience, care for nature, and the joy of noticing small things.
You can also connect the craft to reading. Pair the activity with a children’s book about birds, migration, spring, gardens, or animal homes. Suddenly, a painted birdhouse becomes a full afternoon of hands-on learning, storytelling, and outdoor curiosity.
Extra Experience: What Making a Hand Print Birdhouse Really Teaches You
The first thing you learn while making a hand print birdhouse is that children do not press their hands flat on command like polite little rubber stamps. Fingers wiggle. Palms slide. Someone laughs at the exact wrong second. The thumb lands in a surprising direction. And somehow, the final result still looks sweeter than anything you carefully planned.
That is the heart of this project. It is not about perfection. It is about capturing a tiny moment in paint. A child’s handprint changes quickly from year to year. The small palm that fits neatly on the side of a birdhouse today may be much bigger next spring. When you look back at the finished birdhouse, you are not just seeing a craft. You are seeing proof of a particular afternoon: the color they picked, the way they giggled when the brush tickled, the serious concentration they used while adding the eye, and the dramatic announcement that their bird was “definitely the boss bird.”
Another thing you learn is that simple materials often create the best memories. You do not need expensive supplies or complicated techniques. A plain wooden birdhouse, a few cheerful paints, and a handprint can become a gift with more personality than something bought online in three clicks. The charm comes from the little human details: uneven brush lines, a beak that is slightly too large, flowers that look like polka dots, and a roof painted with great confidence but limited concern for straight edges.
If you make this craft with more than one child, expect negotiations. Someone will want red. Someone else will insist that birds can be purple. A third child may decide the birdhouse needs lightning bolts. Let some of that personality in. Real backyard birds may prefer practical, muted colors, but decorative keepsake birdhouses can celebrate imagination. If you are making a functional nest box, compromise by keeping the brightest art on a side that is less exposed or by using softer versions of favorite colors.
One of the best experiences is giving the birdhouse away. Grandparents, teachers, and parents tend to understand immediately that a handprint gift is different from a regular craft. It carries time. It says, “Someone small made this for you.” A hand print birdhouse works especially well for Mother’s Day, Father’s Day, birthdays, teacher appreciation, spring celebrations, or a “just because we love you” surprise.
When placing the birdhouse outside, the experience changes again. Kids begin checking it. They look for movement near the entrance. They ask whether birds like the colors. They notice feathers, calls, twigs, bugs, and leaves. A craft that started at the table suddenly pulls them toward the window or into the yard. That is a quiet win. Any project that helps children observe nature more closely is doing something valuable.
The biggest lesson, though, is patience. Birds may not use the birdhouse immediately. They may inspect it and fly away. They may choose a tree cavity, a shrub, or the neighbor’s gutter instead. That does not mean the project failed. The birdhouse can still be a keepsake, a garden accent, and a reason to learn more about local wildlife. And when a bird finally does show interest, the excitement is enormous. You would think a celebrity moved in.
Making a sweet hand print birdhouse is really about blending creativity with care. It lets kids be artists, builders, observers, and tiny conservationists all at once. It reminds adults that the best crafts are not always the neatest ones. Sometimes the best craft is the one with paint on the table, laughter in the room, and a small handprint that turns into a bird with a very big personality.
Conclusion
A sweet hand print birdhouse is more than a cute kids’ craft. It is a personal keepsake, a backyard decoration, a nature lesson, and a joyful way to turn small hands into lasting art. Whether you make one for a grandparent, a teacher, a spring project, or your own garden, the process is simple: choose a wooden birdhouse, paint the outside, stamp the handprint, add bird details, let everything dry, and seal it safely if needed.
For a decorative piece, let your imagination fly. For a functional birdhouse, keep the design bird-friendly by using safe materials, leaving the inside untreated, skipping the perch, adding ventilation and drainage, and placing it thoughtfully outdoors. The result is a project that looks adorable, teaches something real, and gives everyone involved a reason to smile whenever they see it.
Note: This article was written for web publication and synthesized from real craft practices, backyard birding guidance, nest box recommendations, and child-safe painting principles. Source links and unnecessary citation placeholders were intentionally omitted for clean publishing.