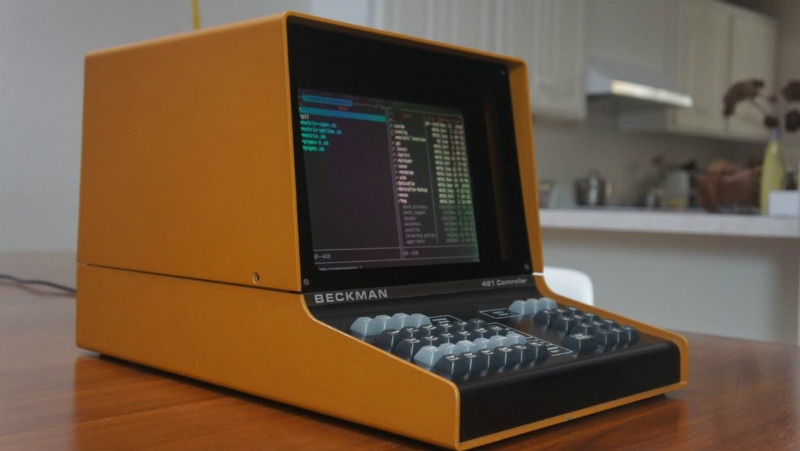
Some people see a dusty piece of 1970s laboratory equipment and think, “That belongs in a museum.” Makers see the same beige-and-orange relic and think, “That needs Linux.” The project known as 1970s Lab Equipment Turned Retro Pi Terminal is exactly that kind of wonderfully unreasonable idea: a vintage Beckman Model 421 lab controller transformed into a functional Raspberry Pi computer with old-school character, modern brains, and enough retro charm to make a floppy disk blush.
At first glance, the machine looks like it should be measuring solvent flow, concentration, or some mysterious number that only a chemist in a lab coat understands. In its original life, the Beckman Model 421 was part of a liquid chromatography setup, helping technicians interact with scientific instruments during a time when screens were chunky, keyboards were specialized, and computers looked serious enough to know your tax history. Decades later, the same enclosure became the shell for a custom Raspberry Pi terminalpart restoration, part recycling, part cyberdeck, and part love letter to the era when electronics had actual posture.
This build matters because it shows what happens when retrocomputing, hardware hacking, and sustainable reuse meet in one gloriously odd box. Instead of treating old lab gear as junk, the project turns it into something useful again: a compact, conversation-starting terminal for retro gaming, internet radio, command-line tinkering, and general nerdy joy.
What Was the Beckman Model 421?
The Beckman Model 421 was not a personal computer in the modern sense. It was a controller and display interface used with Beckman liquid chromatography systems. In high-performance liquid chromatography, samples are pushed through a column so their components separate and can be measured. That process needs pumps, detectors, flow control, and data display. In other words, the Model 421 was not there to play games. It was there to help science behave itself.
Its built-in CRT screen and dedicated keyboard made it easier for lab workers to view readings and control instrument functions. The screen could display values such as flow rate and concentration, while the keys were designed around lab tasks rather than everyday typing. No one at Beckman was thinking, “One day someone will run RetroPie on this.” Yet here we are, living in the best timeline for strange electronics.
The beauty of the Model 421 is its industrial design. It has the sloped face, sturdy body, compact footprint, and warm vintage color palette that instantly says “serious machine from a serious decade.” Unlike modern black rectangles that all look like they were designed by a committee trapped in an airport lounge, this unit has personality. It looks like it should boot with a satisfying hum and ask whether you want to analyze a sample or launch a space probe.
The Maker Idea: Keep the Soul, Replace the Brain
The central idea behind the conversion was simple: preserve the retro exterior while replacing the nonfunctional or obsolete electronics inside. The original CRT was no longer usable, likely because of a failed driver board, so the build swapped in a 10.4-inch 640×480 Sharp LCD panel salvaged from an old digital photo frame. That screen size and resolution were a perfect match for the machine’s vintage feel. Modern 4K would have looked too clean, like putting laser headlights on a horse carriage.
The Raspberry Pi became the new computing heart. Small, affordable, and capable of running a full Linux operating system, the Pi fits beautifully into projects where space is limited and flexibility matters. With the right adapters, a Pi can output video, accept USB input, run scripts, play media, host lightweight services, and emulate classic game systems. It is basically the Swiss Army knife of hobby computing, except easier to lose under a pile of jumper wires.
To connect the Pi to the display, the builder used an HDMI-to-VGA path and added a scanline generator. That detail is important. A plain LCD can make a vintage enclosure feel like it is wearing a costume. Scanlines soften the modern display output and mimic the visual rhythm of an old CRT. The result is not just functional; it feels right. Retro projects often succeed or fail in the tiny aesthetic decisions, and scanlines are one of those tiny decisions that tell your eyes, “Yes, this machine has stories.”
The Keyboard Problem: Lab Keys Are Not QWERTY Keys
The Beckman Model 421 keyboard was never meant for writing emails, coding Python, or typing “sudo apt update” for the 300th time. Its keys were dedicated to instrument control. That created one of the project’s most interesting challenges: how do you turn a specialized lab keypad into a usable computer input device?
The solution was to use an Arduino Pro Micro as a USB Human Interface Device. In plain English, the microcontroller reads the original key presses and presents them to the Raspberry Pi as if they came from a normal USB keyboard. The clever part is not merely connecting buttons. It is designing layers, shortcuts, and remapped functions so a small number of original keys can perform many tasks.
This is where the project shifts from “cool case mod” to “proper hardware hack.” The builder did not simply gut the device and slap in a modern keyboard. Instead, the original interface remained part of the experience. That choice preserves the character of the machine. Yes, typing may require more planning than on a full-size keyboard. But that is part of the charm. A retro terminal should make you feel like you are operating something, not casually ordering socks online.
Why the Raspberry Pi Is Perfect for a Retro Terminal
The Raspberry Pi is ideal for this kind of conversion because it offers a full Linux computer in a small board. Depending on the model, it can handle HDMI output, USB devices, network connectivity, audio, storage, and GPIO-based hardware interaction. It can be a terminal, media player, retro gaming station, small server, development box, or command-line playground.
For a retro Pi terminal, that flexibility is gold. You can boot into a lightweight desktop, open a terminal emulator, run cool-retro-term for a simulated CRT effect, launch RetroPie for classic games, or use MPD to stream internet radio. The machine can look like a lab instrument from the 1970s while doing very 2020s things in the background. That contrast is the magic.
There is also a practical advantage. Old lab equipment often has spacious metal or plastic enclosures compared with modern consumer gadgets. That makes it easier to mount a Pi, display controller board, power hardware, speakers, switches, and cabling without needing microscopic soldering skills or the patience of a watchmaker. Vintage machines were built in a world where repairability still had a seat at the table.
Retro Computing Meets Upcycling
This project is more than a novelty. It is a strong example of electronic upcycling. Instead of throwing away an old scientific controller, the build gives it a second life. That matters because vintage electronics often contain beautiful cases, switches, bezels, labels, and mechanical details that are difficult to recreate with modern parts. Even a good 3D print rarely captures the authenticity of an enclosure that actually lived through the era it represents.
Upcycling also teaches a different way of thinking. Many projects begin with a shopping cart. This one begins with a question: “What can this old thing become?” That question leads to more creative engineering. You work around existing dimensions, preserve useful hardware, adapt strange layouts, and solve problems that no product manual anticipated. It is less like assembling a kit and more like negotiating with a stubborn but charming machine.
The sustainability angle is real, too. Electronics waste is a growing problem, and not every old device can or should be restored to its original function. Some equipment is missing parts, unsafe to operate, undocumented, or simply no longer useful in its original context. Thoughtful conversion can keep the best physical pieces alive while replacing failed internals with safer, lower-power, modern components.
Design Details That Make the Build Work
1. The Enclosure Keeps the Original Identity
The most important design choice is retaining the Beckman shell. The sloped front, screen opening, chunky body, and original keyboard area make the terminal instantly recognizable as vintage lab equipment. Without that enclosure, the project would be just another Raspberry Pi in a box. With it, the build becomes a character.
2. The LCD Replacement Feels Period-Correct
The 10.4-inch LCD does not overwhelm the machine. Its 640×480 resolution also works well for retro visuals, terminal text, and classic emulation. A display that is too sharp can ruin the illusion. Sometimes the best upgrade is not the most powerful one; it is the one that matches the personality of the build.
3. The Scanline Generator Adds Visual Texture
Scanlines are a small touch with a big emotional payoff. They make modern video output feel closer to old CRT imagery, especially when running text interfaces or vintage games. It is the difference between “modern screen installed in an old case” and “this machine looks like it woke up from 1978 and brought receipts.”
4. The Keyboard Remapping Preserves the Interface
Keeping the original keyboard is harder than replacing it, but it makes the project more satisfying. The Arduino Pro Micro turns the custom key matrix into a usable USB input device, while layered mappings allow limited keys to perform multiple functions. It is a smart compromise between authenticity and usability.
5. The Raspberry Pi Makes the Terminal Flexible
A dedicated retro terminal could do one thing. A Raspberry Pi terminal can do many. It can run Linux, emulate classic systems, stream audio, act as a command station, display dashboards, or become a writing terminal. That flexibility means the project is not just a display piece. It can earn a place on a desk.
Possible Uses for a Retro Pi Terminal
One of the best parts of a project like this is that it invites customization. The same physical build can become several different machines depending on the software installed.
Retro Gaming Station
With RetroPie, the terminal can run classic games from older systems. The lab-key keyboard layout may not be ideal for every game, but external controllers can solve that problem. And honestly, there is something hilarious about playing arcade games on a machine originally meant to assist chromatography. Somewhere, a lab technician’s ghost is either delighted or deeply confused.
Internet Radio Player
Using MPD or similar software, the machine can become a stylish internet radio. The original buttons could be mapped to station presets, volume controls, and playback functions. Place it on a shelf, tune into a favorite station, and suddenly your room has a retro command center that also plays jazz.
Writing or Coding Terminal
For distraction-free writing or coding, a retro Pi terminal can be surprisingly effective. Boot into a terminal-based editor, connect to a server, or run lightweight development tools. The constrained interface encourages focus. It is hard to waste time in twelve browser tabs when your machine looks like it expects a lab report.
Home Dashboard
The display could show weather, server status, network statistics, calendar events, or smart home information. The vintage case makes a modern dashboard feel less like a tablet stuck on a wall and more like a control panel from a friendly underground research facility.
Educational Display Piece
This project is also a great teaching tool. It connects chemistry history, electronics repair, Linux, microcontrollers, display interfaces, and design thinking. For students, makerspaces, and STEM classrooms, it offers a memorable example of how old and new technology can work together.
What This Build Teaches About Good Hardware Hacking
Great hardware hacking is not just about making something work. It is about making the result feel inevitable, as if the object secretly wanted to become this all along. The Beckman terminal conversion succeeds because it respects the original object. The builder did not erase its identity. The machine still looks like lab equipment. It still has its unusual keyboard. It still carries the visual language of scientific instruments from the 1970s and early 1980s. But now it runs modern software.
That balance is difficult. Too much modernization, and the vintage shell becomes a costume. Too much preservation, and the device may remain impractical. The sweet spot is functional nostalgia: a machine that looks old, feels old in the right ways, but actually does something useful today.
The project also reminds us that constraints can make builds better. The odd keyboard forced creative input mapping. The dead CRT led to an LCD retrofit. The vintage enclosure shaped the internal layout. Each limitation became part of the final design instead of a reason to abandon the project.
Tips for Anyone Inspired to Build Something Similar
Choose the Right Donor Equipment
Look for old test equipment, lab controllers, terminals, point-of-sale machines, industrial panels, or medical-adjacent display units that are clearly retired and safe to handle. The best candidates have a strong visual identity, enough internal space, and controls worth preserving. Avoid rare working machines that collectors or museums may want intact. The goal is rescue, not vandalism with a screwdriver.
Plan the Display First
The screen determines much of the build. Measure the original opening carefully and choose a replacement panel that fits the proportions. A slightly lower-resolution display may look more authentic than a modern ultra-sharp panel. If you want the CRT feel, consider scanline effects or software-based terminal shaders.
Respect Power and Safety
Vintage electronics can contain high-voltage components, old capacitors, brittle wiring, and materials that deserve caution. If you are not experienced with electronics repair, get help before working inside old equipment. A cool terminal is not worth a shocking surprise. The machine should produce nostalgia, not sparks and regret.
Preserve Original Controls When Possible
Buttons, switches, knobs, and keypads are what make old equipment special. Even if they require a microcontroller to translate input, keeping them gives the finished build authenticity. Modern USB keyboards are convenient, but original controls give the project its handshake.
Make the Software Match the Hardware
Install software that suits the design. A retro terminal theme, a text-based dashboard, a classic game launcher, or a minimalist music interface will feel more natural than a crowded modern desktop. The best software choice is the one that makes the machine feel like it belongs to itself.
The Bigger Appeal of Retro Pi Terminals
Retro Pi terminals are popular because they satisfy several maker instincts at once. They are useful, nostalgic, customizable, and visually interesting. They also push back against the disposable design of modern electronics. A vintage terminal build says, “This object still has value.” It also says, “Yes, I did spend a weekend making an old lab controller play internet radio, and no, I will not apologize.”
There is a deeper emotional layer, too. Old equipment carries a sense of purpose. Lab instruments were built to measure, control, and endure. When you convert one into a Raspberry Pi terminal, you inherit that seriousness and redirect it toward creative computing. The result feels different from a new device because it has history baked into its shape.
That is why the Beckman Model 421 conversion stands out. It is not the most powerful Raspberry Pi project. It is not the smallest. It is not the cheapest. But it has presence. It looks like something discovered in the corner of a retired research lab, dusted off, rewired, and convinced to join the Linux era.
Conclusion: Old Lab Gear, New Digital Life
The 1970s Lab Equipment Turned Retro Pi Terminal project is a perfect example of what makes maker culture exciting. It takes a specialized scientific instrument from another era and gives it a second life as a modern Raspberry Pi computer. The build preserves the original enclosure, adapts the keyboard, replaces the dead display, adds CRT-style visual flavor, and turns a once-narrow lab interface into a flexible retro computing machine.
More importantly, it proves that old technology does not have to be useless just because its first job is over. With imagination and careful engineering, a retired lab controller can become a gaming station, radio player, Linux terminal, dashboard, or educational conversation piece. It can also sit on a desk looking ridiculously cool, which is a legitimate technical achievement in its own right.
In a world full of sleek devices that hide their personality behind glass, this kind of project feels refreshingly physical. It has screws, angles, labels, keys, and history. It reminds us that computers can be more than anonymous slabs. They can be objects with stories. And sometimes, the best future for old lab equipment is not a storage shelfit is a Raspberry Pi, a glowing screen, and one more chance to beep proudly into the modern age.
Personal Experiences and Reflections on Retro Pi Terminal Builds
Working with a concept like a 1970s lab equipment Pi terminal is less like building a normal computer and more like collaborating with a stubborn artifact. A standard Raspberry Pi project usually begins with neat parts: a case, a microSD card, a power supply, maybe a small display. Everything has mounting holes, documentation, and a product photo where the wires behave politely. A vintage conversion does not offer that luxury. It arrives with odd screw sizes, mysterious brackets, faded labels, and a keyboard layout that seems to have been designed during a very intense meeting about solvent delivery.
The first experience that stands out is the importance of patience. Retro enclosures rarely reveal their secrets quickly. You may remove one panel and discover another hidden bracket. You may think the display opening is rectangular until you measure it and realize it is almost rectangular, which is the most annoying kind of rectangle. Cable routing becomes a puzzle. Mounting a screen requires creativity. Even deciding where to place the Raspberry Pi can take longer than installing the operating system.
But that slow process is also the fun. Modern electronics often feel sealed and final. Vintage equipment feels conversational. Every part asks a question. Should the original buttons remain functional? Can the old indicator lights be reused? Should the new display sit flush or slightly recessed? Would a power switch feel better as a modern pushbutton or the original chunky toggle? These decisions turn a project into a design exercise rather than a simple upgrade.
Another lesson is that authenticity does not mean suffering. It is tempting to keep every original part, even when doing so makes the final machine awkward or unreliable. A better approach is to preserve the visible soul of the device while modernizing the parts that need to be safe and dependable. Replacing a dead CRT with an LCD is not cheating if the result respects the original proportions. Using a microcontroller to translate old keys into USB input is not cheating either; it is how the old machine learns a new language.
The most satisfying moment in a build like this is usually the first successful boot. The Raspberry Pi logo appears, terminal text scrolls, and the old enclosure suddenly feels alive again. It is not exactly restoration, because the machine is no longer doing its original job. It is not exactly a new computer, because the physical experience belongs to another decade. It sits in a wonderful middle ground: a revived object with a new purpose.
These projects also change how you look at discarded electronics. After seeing what a lab controller can become, you start noticing potential everywhere. An old cash register becomes a writing terminal. A broken oscilloscope becomes a system monitor. A dead industrial panel becomes a home automation dashboard. This habit can become dangerous for storage space, of course. One day you are saving a single interesting enclosure; the next day your garage looks like a small electronics museum curated by a raccoon with Wi-Fi.
Still, the experience is worth it. A retro Pi terminal is not just about computing power. It is about presence, tactility, and the joy of making technology feel personal. The Beckman-style conversion captures that perfectly. It reminds makers that the best projects do not always begin with the newest hardware. Sometimes they begin with an obsolete machine, a curious mind, and the deeply unreasonable belief that old lab equipment deserves one more adventure.
Note: This article is written for maker inspiration and general information. Vintage electronics can contain high-voltage parts, degraded wiring, and fragile components, so hands-on restoration should be approached carefully and with qualified guidance when needed.