Some hobbies begin with a camera. Some begin with a rock. And then there is UV mineral photography, which begins when someone points an ultraviolet lamp at an ordinary-looking stone and suddenly discovers it has been secretly auditioning for a neon music video. That is the magic of a UV photography box: it turns small mineral specimens, crystals, gemstones, and “fancy rocks” into glowing subjects with drama, color, and personality.
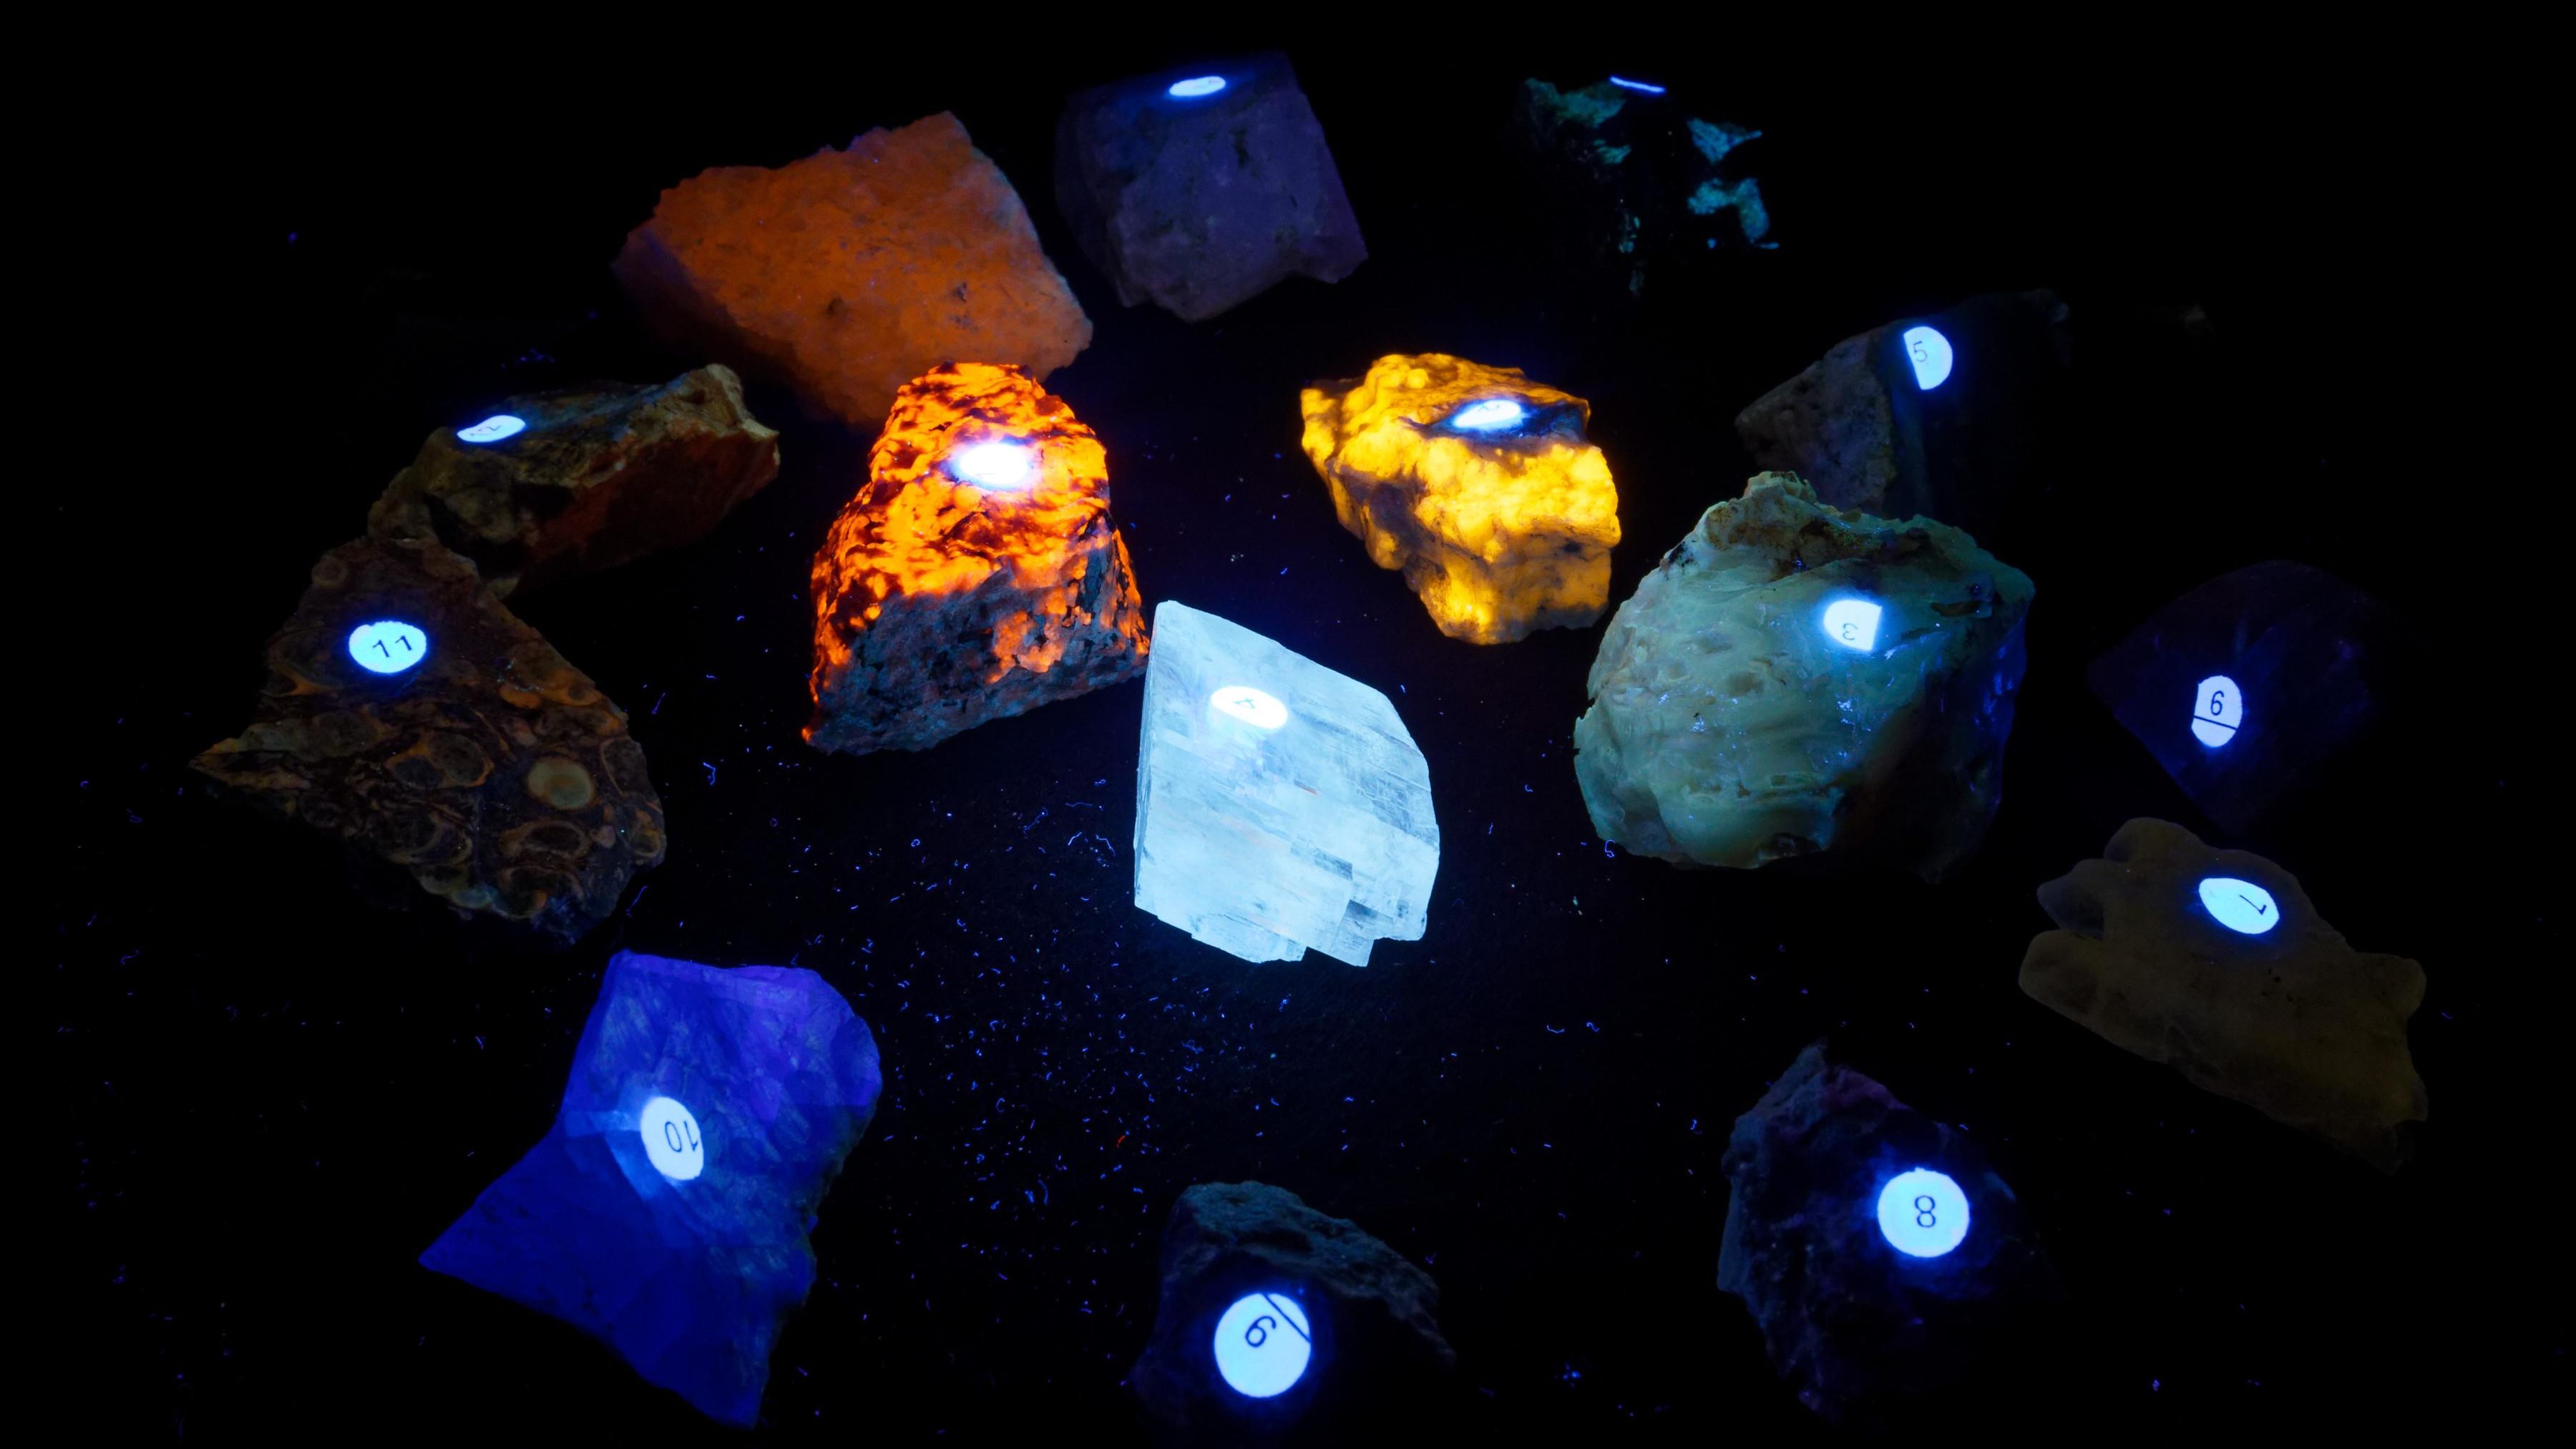
A UV photography box is essentially a controlled mini-studio designed for ultraviolet-induced visible fluorescence photography, often shortened to UVIVF photography. Instead of photographing the ultraviolet light itself, which human eyes and standard cameras do not see in the usual way, you photograph the visible glow emitted by minerals when they are excited by UV light. The result can be dazzling: calcite glowing red or orange, willemite flashing electric green, fluorite showing violet or blue, and certain gemstones revealing fluorescent clues that are invisible under normal room lighting.
For collectors, jewelry lovers, geology educators, online sellers, and macro photography fans, a UV photography box is more than a gadget. It is a tiny cave of controlled darkness where rocks stop being polite and start being fabulous.
What Is a UV Photography Box?
A UV photography box is a light-controlled enclosure used to photograph fluorescent materials under ultraviolet illumination. Think of it as a photo light box, but with a darker personality. Instead of bright white LED panels, the setup usually includes longwave UV lights, sometimes shortwave or midwave UV sources, a matte black interior, a stable platform for specimens, and a front opening or camera port.
The purpose is simple: block unwanted visible light, control reflections, and let the mineral’s fluorescence become the star. In normal light, a mineral specimen may look gray, brown, white, or “I found this in a driveway.” Under UV, that same specimen may bloom with green veins, red patches, pink halos, or ghostly blue edges. A box helps capture that transformation cleanly.
Why the Box Matters More Than People Expect
UV mineral photography is not just “shine light, press button, become famous.” The glow from many minerals is relatively dim, and even a small amount of room light can wash it out. A box gives you repeatable conditions. It keeps the camera steady, keeps the subject in one position, reduces stray light, and helps prevent the mysterious blue haze that appears when unfiltered UV lamps leak visible light into the scene.
In other words, the UV photography box is the difference between “scientific glamour shot” and “blurry radioactive potato.”
How UV Makes Fancy Rocks Glow
Fluorescence happens when a mineral absorbs energy from ultraviolet light and releases part of that energy as visible light. The glow color depends on the mineral’s chemistry, crystal structure, trace impurities, and defects. These trace ingredients are often called activators. Manganese, lead, uranium compounds, rare earth elements, and other components can all influence fluorescence depending on the mineral and location.
Not all rocks fluoresce. In fact, only a minority of mineral species show strong fluorescence under UV light. But the ones that do can be spectacular. Famous fluorescent minerals include calcite, willemite, fluorite, scheelite, sodalite, aragonite, hackmanite, ruby, and some varieties of opal and diamond.
Longwave, Midwave, and Shortwave UV
UV light is usually divided into ranges. For mineral photography, the most commonly discussed categories are:
- Longwave UV: Often around 365 nm, commonly used by beginners and photographers because it is easier to work with than shorter wavelengths.
- Midwave UV: Less common, but useful for certain minerals that respond differently outside longwave and shortwave ranges.
- Shortwave UV: Often around 254 nm, powerful for many fluorescent minerals but also more hazardous and more demanding in terms of filtering and safety.
Different minerals may react to different UV wavelengths. A specimen that looks sleepy under longwave UV may throw a full disco under shortwave UV. Another may do the opposite. This is why serious collectors often test specimens under more than one UV wavelength, especially when photographing minerals from famous localities such as Franklin and Sterling Hill in New Jersey.
Why Fancy Rocks Look Better in a UV Photography Box
A UV photography box creates consistency, which is the secret sauce of good photography. Without one, you may find yourself waving a flashlight over a rock in a dark room, bumping the tripod, dropping the specimen, and wondering whether the strange glow is from the mineral or the lint on your hoodie. With a box, you can control the environment and repeat your results.
It Blocks Ambient Light
Fluorescent minerals often glow best in darkness. Even a desk lamp across the room can reduce contrast. A box keeps the scene dark so the camera records the mineral’s actual fluorescent response instead of a muddy mix of UV glow and household lighting. This matters especially for faint specimens, small crystals, and stones with subtle color zones.
It Reduces Reflections and Glare
Many minerals have shiny faces, glassy surfaces, or wet-looking fracture planes. Under uncontrolled lighting, these surfaces can reflect unwanted blue or violet light from the UV source. A matte black interior absorbs stray light and helps the glow appear cleaner. The result is a photograph that looks closer to what your eyes see in the dark.
It Makes Camera Settings Repeatable
Once you know that a certain specimen looks good at ISO 400, f/8, and a 10-second exposure, you can use that setup again. Repeatability matters if you are photographing a collection, building an online catalog, selling minerals, or comparing specimens. A UV photography box gives you a stable environment where adjustments are meaningful instead of random.
Best Rocks and Minerals to Photograph Under UV
Some minerals are naturally more photogenic under UV than others. The best subjects have strong fluorescence, interesting patterns, and enough surface texture to create depth. Here are a few favorites for UV rock photography.
Calcite
Calcite is one of the classic fluorescent minerals. Depending on its impurities and origin, it may glow red, orange, pink, yellow, or other colors. Some calcite specimens are also phosphorescent, meaning they continue glowing briefly after the UV light is turned off. That delayed glow can make for dramatic long-exposure images.
Willemite
Willemite is famous for its bright green fluorescence, especially from the Franklin and Sterling Hill mining district in New Jersey. Pair it with red-fluorescing calcite, and you get the mineral-world version of holiday lights, except older, cooler, and less likely to tangle in a box in your garage.
Fluorite
Fluorite can fluoresce in blue, violet, cream, yellow, or other shades. It is also the mineral that gave fluorescence its name. Some fluorite specimens glow brightly; others are more subtle. A UV photography box helps bring out the glow without overpowering the crystal’s shape.
Sodalite and Hackmanite
Sodalite can show a vivid orange glow under longwave UV, especially in certain decorative stones sometimes sold as “yooperlite” when found in syenite-rich rocks near the Great Lakes region. Hackmanite, a variety of sodalite, can show tenebrescence, meaning its color may change after exposure to light. For photographers, these stones are fun because they offer color, texture, and a bit of mineral drama.
Ruby and Corundum
Ruby can glow red under UV due to chromium. This fluorescence is useful in gem observation, though it is not a standalone proof of identity or value. For photography, ruby’s red glow can look striking against a black background, especially in rough crystals or specimens embedded in matrix.
Camera Gear for UV Mineral Photography
You do not need a museum budget to begin. A basic setup can include a camera with manual controls, a tripod, a UV light source, a dark box, and safety eyewear. More advanced photographers may add macro lenses, focus rails, remote shutters, UV-pass or UV-blocking filters, and multiple lamps.
Camera
A DSLR, mirrorless camera, advanced compact camera, or even a modern smartphone with manual camera controls can work. The key is stability and exposure control. Fluorescence can be dim, so automatic camera modes often panic and produce noisy, over-bright, or weirdly colored images. Manual mode is your friend. It will not judge your rock obsession.
Lens
A macro lens is ideal for small crystals and mineral details. For larger cabinet specimens, a standard lens can work well. Use a lens that focuses close enough to frame the subject. Sharpness matters because fluorescent colors can easily become blobs if the image is slightly out of focus.
Tripod or Fixed Mount
A tripod is essential. Many UV mineral photos require exposures from a fraction of a second to 30 seconds or more, depending on lamp strength, specimen brightness, aperture, and ISO. A stable mount prevents blur and allows careful composition.
Remote Shutter or Timer
Pressing the shutter button can shake the camera. Use a remote shutter, cable release, app trigger, or two-second timer. This tiny habit saves many photos from becoming abstract art accidentally.
Choosing UV Lights for a Photography Box
The UV light source is the heart of the setup. For beginners, a good-quality 365 nm longwave UV LED light is often the easiest place to start. It is widely used for UVIVF photography and tends to produce strong fluorescence in many subjects while being simpler to manage than shortwave UV.
Why 365 nm Is Popular
Many inexpensive “blacklights” emit a lot of visible violet light along with UV. That visible spill can stain the photo blue or purple. Better 365 nm lights with proper filtering reduce visible contamination, helping the camera capture the mineral’s fluorescence instead of the lamp’s glow.
Shortwave UV Requires Extra Caution
Shortwave UV can reveal spectacular fluorescence in some minerals, but it is more hazardous to skin and eyes and requires proper filters, shielding, and handling. For casual photography, longwave UV is usually the safer and more practical starting point. Shortwave systems should be treated as specialized equipment, not as a toy or a “let’s see what happens” weekend project.
Safety First: UV Light Is Invisible, Not Harmless
Because UV light is invisible, it can feel less dangerous than a bright white lamp. That is a bad assumption with a tiny villain mustache. UV exposure can irritate or damage eyes and skin, and the risk increases with stronger sources, shorter wavelengths, and longer exposure times.
Use UV-blocking protective eyewear, avoid looking directly at UV lamps, keep skin exposure low, and never point UV lights at people, pets, or reflective surfaces near your face. A photography box should reduce stray UV, not invite it to escape like a tiny sci-fi monster. If you are younger or new to UV equipment, work with a knowledgeable adult and choose low-risk longwave tools from reputable suppliers.
Smart Safety Habits
- Wear UV-rated eye protection whenever UV lights are on.
- Use a box or shield that blocks stray UV from reaching your eyes.
- Turn off the lamp before repositioning specimens.
- Avoid shortwave UV unless you understand the risks and equipment requirements.
- Keep UV lights away from children, pets, and anyone not wearing protection.
- Do not use cracked, modified, or unknown UV lamps.
How to Set Up a UV Photography Box for Fancy Rocks
A good UV photography box does not have to be fancy, but it should be controlled. The inside should be dark, non-reflective, and large enough for your specimens and lighting angle. A black background usually works best because it makes fluorescent colors pop. If the specimen is very dark, a neutral gray base can help define the edges.
Positioning the Rock
Place the mineral on a stable platform. Rotate it under normal light first and find the most interesting face. Then turn off visible lights, switch on UV, and study how the glow changes as you move the lamp angle. Some specimens have hidden fluorescent zones that only appear from one direction. Rocks are moody. Respect the mood.
Positioning the UV Light
Angle the UV source so it lights the mineral evenly without shining directly into the camera lens. Side lighting can emphasize texture. Overhead lighting can create even coverage. For mixed-mineral specimens, you may need to balance the lamp position so bright areas do not overpower dimmer ones.
Controlling Visible Light Leak
If your photo looks overly blue or purple, the problem may not be the rock. It may be visible light leaking from the UV lamp. Use a better-filtered light source, adjust the angle, add internal baffles, or use post-processing carefully. The goal is not to make the photo look “more neon.” The goal is to show the specimen’s actual fluorescence as honestly and attractively as possible.
Camera Settings That Usually Work
There is no single perfect setting because minerals vary wildly in brightness. Start with a tripod, manual focus, low ISO, and a moderate aperture. Then adjust exposure until the highlights are not blown out.
Beginner Starting Point
Try ISO 100 to 400, f/5.6 to f/11, and a shutter speed between 2 and 20 seconds. If the image is too dark, increase exposure time first. If the specimen is very dim, raise ISO modestly. If bright fluorescent patches lose detail, shorten the exposure or stop down the aperture.
Focus Before the Lights Go Out
Autofocus may struggle in darkness. Focus under visible light first, then switch to manual focus so it does not change. If the mineral surface has depth, use a smaller aperture or focus stacking. For macro images, depth of field gets thin quickly, and fluorescent minerals are not famous for standing still and helping.
White Balance
White balance can be tricky because fluorescent colors are not the same as reflected daylight colors. Shoot RAW when possible so you can adjust later. Avoid pushing colors too far. Oversaturated mineral photos may look exciting, but they can misrepresent the specimen. The best UV mineral photography feels magical without becoming a cartoon.
Post-Processing UV Rock Photos
Editing is part of the workflow, but restraint matters. Adjust exposure, contrast, noise reduction, and black levels. Remove dust spots if needed. Correct unwanted blue or violet cast caused by the lamp, but do not invent colors that are not there. A good rule is to keep the specimen nearby under UV while editing, so the screen version stays close to the real view.
Common Editing Fixes
- Too blue: Reduce blue saturation or adjust white balance carefully.
- Too noisy: Use lower ISO next time and apply gentle noise reduction.
- Highlights blown out: Shorten exposure and recover highlight detail in RAW.
- Flat image: Add modest contrast and deepen the background blacks.
- Soft focus: Refocus manually and use a tripod or focus rail.
Using UV Photography for Collecting, Selling, and Education
A UV photography box is useful beyond pretty pictures. Collectors use UV images to document specimens and compare responses under different wavelengths. Sellers use them to show buyers the fluorescent character of a mineral. Teachers use them to explain energy, light, minerals, and crystal chemistry in a way that actually wakes up the room.
For online mineral listings, UV photos should be paired with normal-light photos. A buyer needs to see both personalities: the daytime rock and the nighttime diva. Include the UV wavelength used, such as longwave 365 nm or shortwave 254 nm, because the same specimen may look different under different lamps.
Common Mistakes to Avoid
The first mistake is using a weak or poorly filtered blacklight and expecting museum-level results. The second is photographing in a room that is not truly dark. The third is overediting until every rock looks like it came from a superhero laboratory.
Do Not Ignore Safety
Safety is not optional. UV light can harm eyes and skin, even when the lamp does not appear bright. A proper box, protective glasses, and careful handling should be part of the process from the beginning.
Do Not Trust the Camera Screen Too Much
Camera screens can exaggerate brightness and color. Check the histogram, zoom in for focus, and review images on a larger display. Fluorescent images often look exciting on the camera and disappointing later if the highlights are clipped or focus is soft.
Do Not Assume Every Rock Will Glow
Most rocks will not perform under UV, and that is normal. Some will barely glow. Some will glow in one wavelength but not another. Some will surprise you completely. That unpredictability is part of the fun. Fluorescent mineral photography is half science, half treasure hunt, and half “wait, that math does not work.” Exactly.
Why a UV Photography Box Is Worth It
If you love minerals, macro photography, science, or unusual visual effects, a UV photography box is a small setup with huge creative potential. It helps you control darkness, improve sharpness, reduce color contamination, protect your eyes from stray light, and produce consistent images. It also makes the whole process feel intentional instead of improvised in a closet at midnight.
The best part is that UV mineral photography rewards curiosity. A dull gray rock can become a glowing map. A crystal can reveal hidden growth zones. A mixed specimen can show different minerals responding in different colors. The box simply gives that hidden world a stage.
Extra Experience Notes: What Shooting Fancy Rocks in a UV Box Actually Feels Like
Working with a UV photography box teaches patience in a surprisingly friendly way. At first, every glowing rock feels like a tiny miracle. You place a specimen in the box, switch on the UV lamp, and suddenly the camera sees a secret version of the object. Then reality taps you on the shoulder: the photo is blurry, the red channel is blown out, the background has dust, and the brightest spot looks like a laser pointer had a dramatic incident.
That is when the real learning begins. The first practical lesson is that fluorescent minerals have range. Some glow so brightly that they need very short exposure times. Others are so faint that you start wondering whether the rock is shy. A UV box helps because you can compare specimens under the same conditions. After a while, you begin to recognize which minerals need longer exposure, which ones need side lighting, and which ones are trying to ruin your histogram for sport.
The second lesson is that composition still matters. Fluorescence is exciting, but a glowing rock placed awkwardly in the center of a frame can still look boring. Turning the specimen slightly, raising one side with a small hidden support, or cropping closer can make a huge difference. In UV photography, shape and texture matter as much as color. A glowing vein running diagonally through the frame feels dynamic. A cluster of crystals with one bright corner and one dim edge feels mysterious. A flat glowing patch can look like a spilled energy drink unless you give it context.
The third lesson is that dust becomes a main character. Under UV, tiny fibers, paper scraps, fingerprints, lint, glue, and random mystery particles may fluoresce. This is both annoying and hilarious. You think you are photographing a rare mineral, but the camera is equally excited about a speck of fuzz glowing in the corner like it has a solo career. Clean the stage, use a blower, handle specimens carefully, and check test shots before doing a full session.
The fourth lesson is to photograph the same rock in normal light. This is not just useful for documentation; it makes the UV result more impressive. A before-and-after pair shows the transformation clearly. Online readers, buyers, or students immediately understand the magic when a plain beige specimen becomes red, green, and orange under UV. Without the normal-light view, people may assume the rock always looks that way.
The fifth lesson is not to chase extreme brightness. Early UV photos often become overexposed because the photographer wants maximum glow. But the most beautiful images usually preserve detail inside the fluorescent areas. If a red calcite section turns into a flat red blob, shorten the exposure. If green willemite loses texture, reduce ISO or change the lamp angle. A good UV mineral photo should feel bright, but it should still look like a mineral, not a traffic signal having a spiritual awakening.
Finally, a UV photography box makes the process more enjoyable because it removes chaos. You are not fighting room lights, awkward shadows, shaky hands, or unpredictable angles. You can focus on the specimen, the glow, the camera settings, and the story you want the image to tell. For fancy rocks, that story is often simple: nature hid fireworks inside a stone, and with the right box, you get to photograph the show.
Conclusion
A UV photography box is one of the best tools for shooting fancy rocks because it gives fluorescent minerals the dark, controlled stage they deserve. It helps reduce stray light, improve color accuracy, protect the shooting environment, and make camera settings repeatable. Whether you are documenting a mineral collection, creating educational content, photographing gemstones, or simply enjoying the thrill of making rocks glow like tiny geological nightclubs, the setup is practical, creative, and endlessly fun.
Start with safe longwave UV, use protective eyewear, keep your camera steady, and shoot in RAW when possible. Then experiment. Try calcite, fluorite, willemite, sodalite, ruby, and any mystery rock that looks suspiciously ordinary. The best discoveries often begin with the least impressive specimen on the table. Under UV, even the quiet rocks sometimes have jazz hands.
Note: This article is intended for educational and publishing purposes. UV light can be harmful to eyes and skin, so use proper UV-rated protection, avoid direct exposure, and handle UV equipment responsibly.