Swipe acrylic pour painting is the wonderfully dramatic art technique that makes paint look like it is blooming, foaming, stretching, and whispering, “Yes, I meant to do that.” It belongs to the larger world of acrylic pouring, also called fluid art, where artists thin acrylic paint with pouring medium and let color move across a surface instead of brushing it into place. The swipe method adds one simple but powerful move: dragging a thin layer of paint across other wet colors to reveal cells, lacing, ribbons, waves, and feathery patterns.
If a flip cup pour is a surprise party and a Dutch pour is a windstorm with better manners, the swipe technique is the smooth talker of the family. It looks fancy, but beginners can learn it with basic supplies, patience, and a willingness to make peace with drips. In fact, the swipe acrylic pour painting technique is one of the best entry points for anyone who wants impressive results without needing traditional drawing skills.
This guide explains what swipe acrylic pouring is, how it works, what supplies you need, how to mix paint, how to create cells, and how to avoid common mistakes such as muddy colors, cracks, bald spots, and the dreaded “why does this look like a wet salad?” moment. Let’s pour with purpose.
What Is Swipe Acrylic Pour Painting?
Swipe acrylic pour painting is a fluid art technique in which multiple colors of acrylic paint are poured onto a canvas or panel, then a contrasting “swipe color” is pulled gently across the wet surface with a tool such as a damp paper towel, palette knife, plastic sheet, spatula, silicone wedge, or even a piece of acetate. This movement spreads the top color in a thin film and encourages the underlying colors to break through.
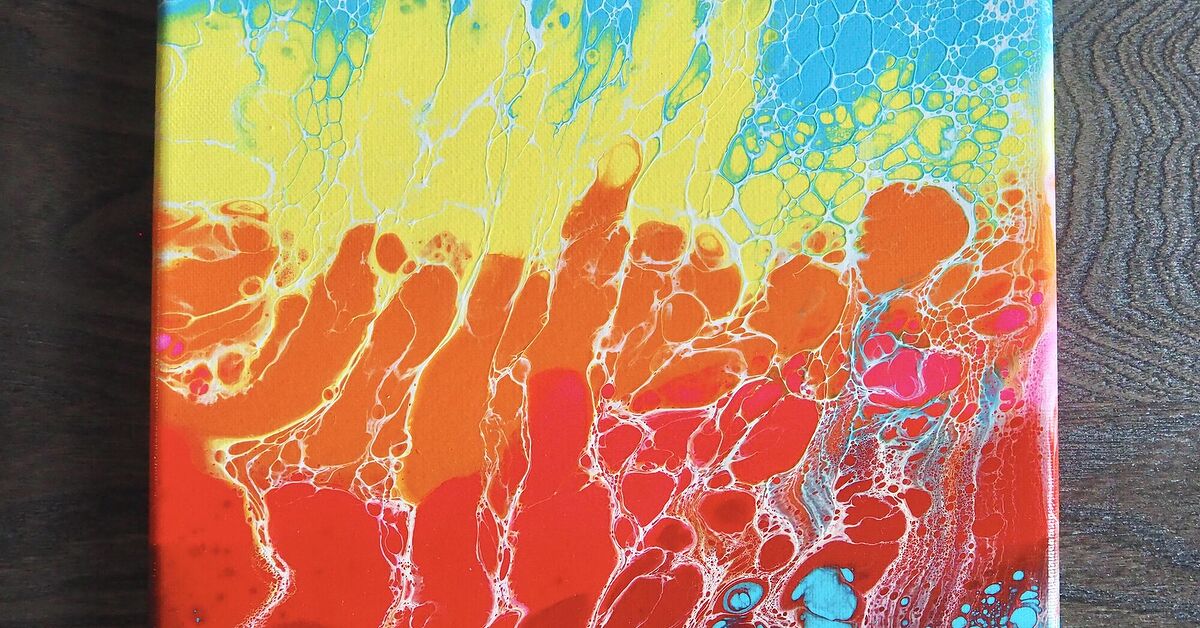
The visual result often includes cells, lacing, webbing, wispy edges, and organic patterns that resemble coral reefs, ocean foam, nebula clouds, flower petals, dragon scales, or the inside of a geode that has been attending art school. The technique is popular because it combines control and surprise. You choose the palette, direction, surface, and swipe tool, but the paint still gets a vote.
Why the Swipe Technique Creates Cells and Lacing
The magic of swipe acrylic pour painting comes from differences in paint density, viscosity, surface tension, pigment load, and additives. In plain English: some paints are heavier, some are thinner, some slide faster, and some want to sit on top like they paid for the best seat in the theater.
When a swipe color is dragged across wet paint, it forms a thin layer. If the paints underneath have different weights or contain additives such as silicone oil or a cell activator mixture, the lower colors can push through the top layer. These openings become cells. When many small cells gather along the swipe path, they create lacing, which looks like delicate netting or sea foam.
Artists often use white or black as the swipe color because strong contrast outlines the cells clearly. However, metallic gold, pearl white, deep navy, Payne’s gray, or even neon colors can produce stunning effects. A gold swipe over turquoise, magenta, and deep purple can look like a galaxy ordered from a luxury catalog.
Essential Supplies for Swipe Acrylic Pour Painting
You do not need a palace-sized studio to begin. You need a protected workspace, a level surface, and supplies that work together. Acrylic pouring is forgiving, but it is not fond of chaos. Neither is your dining table.
Basic Materials
- Acrylic paint in three to six colors
- Pouring medium
- Canvas, cradled wood panel, tile, or primed board
- Mixing cups and stir sticks
- Disposable gloves
- Plastic sheeting, tray, or silicone mat for catching drips
- A swipe tool such as a damp paper towel, plastic card, palette knife, or silicone spatula
- Small cups or push pins to elevate the canvas
- Level tool or phone level app
- Optional silicone oil or cell activator
- Optional torch or heat tool used carefully for bubbles
Choosing a Surface
Canvas is beginner-friendly, affordable, and lightweight. Wood panels are sturdier and less likely to sag under heavy paint. Ceramic tiles are excellent for practice because they are smooth, inexpensive, and easy to display as coasters after sealing. Whatever surface you choose, make sure it is clean, stable, and level. A tilted table will slowly pull your masterpiece toward one edge like it is trying to escape.
How to Mix Paint for a Swipe Pour
Paint consistency matters more than almost anything else in swipe acrylic pour painting. Too thick, and the swipe tool plows through the paint like a snow shovel. Too thin, and the colors run together into a muddy puddle of regret. The goal is a fluid consistency similar to warm honey or melted ice cream: smooth, pourable, and able to leave a small mound that disappears back into the surface after a second or two.
A common beginner ratio is one part acrylic paint to one or two parts pouring medium, adjusted with a few drops of water if needed. Professional acrylics, craft paints, inks, and fluid acrylics all behave differently, so ratios are starting points, not commandments carved into a canvas stretcher.
Mix gently to reduce bubbles. Scraping the sides and bottom of the cup helps avoid unmixed paint lumps. After mixing, let the paint rest for several minutes so air bubbles can rise. This small pause can save you from a surface that dries with tiny craters. Art rewards patience, which is unfair but true.
Step-by-Step Swipe Acrylic Pour Painting Tutorial
Step 1: Prepare the Workspace
Cover your table with plastic, parchment paper, or a silicone mat. Elevate the canvas on cups, push pins, or small blocks so paint can drip freely over the edges. Check that the surface is level from front to back and side to side. Even a slight tilt can change the final composition.
Step 2: Choose a Color Palette
Start with three to five colors plus one swipe color. For beginners, a limited palette is easier to control. Good combinations include teal, navy, white, and gold; magenta, violet, black, and pearl white; or orange, red, yellow, and deep brown for a fiery abstract look. Place colors that mix well next to each other. Red and green may be festive on a holiday sweater, but in a pour they can quickly become brown soup.
Step 3: Lay Down a Base Layer
Pour a thin base coat over the canvas. Many artists use white, black, or a light neutral base because it helps the other colors glide. Spread the base gently with a spatula or gloved hand, making sure the surface and edges are covered. The base should be wet but not swimming like a tiny paint lake.
Step 4: Add Your Colors
Pour lines, puddles, ribbons, or bands of color across the canvas. For an ocean-style swipe, place blues, turquoise, and white in horizontal bands. For a floral swipe, create puddles that radiate from one corner. For an abstract galaxy, scatter deep colors with metallic accents. Leave enough room for the swipe color to move across the surface.
Step 5: Apply the Swipe Color
Add a thin line or band of swipe color along one edge, through the center, or in selected areas. White creates airy lacing; black adds drama; metallics produce shimmer; and pearl colors can create a soft glow. The swipe color should be slightly thinner than the other paints so it glides instead of bulldozing.
Step 6: Swipe Gently
Place your swipe tool lightly into the swipe color and pull it across the wet paint in one smooth motion. Do not press hard. The tool should kiss the surface, not interrogate it. A damp paper towel works well for beginners because it bends softly and creates delicate feathering. A palette knife or plastic sheet makes sharper, cleaner lines.
Step 7: Watch for Cells
Cells may appear immediately or develop over several minutes. If you use a torch, move it quickly and carefully over the surface to pop bubbles and encourage cell formation. Do not hold heat in one spot. Overheating can damage the paint film, cause skinning, or create texture you did not invite.
Step 8: Tilt and Finish the Edges
Tilt the canvas slowly to stretch the design and move excess paint off the edges. Avoid over-tilting or you may lose the best cells. Use leftover paint to touch up bare corners and sides. Then place the painting on a level drying area and leave it alone. This is the hardest part. The wet painting will call to you. Do not answer.
Best Swipe Tools and the Effects They Create
Different swipe tools produce different personalities. A damp paper towel creates soft, airy lacing and is perfect for learning. A palette knife makes strong, clean lines and works well for controlled compositions. A silicone spatula gives a smooth pull and is easy to clean. A plastic sheet or acetate strip can create wide, even swipes. A string, chain, or comb can be used for experimental patterns.
The tool should be clean, flexible, and appropriate for the size of the canvas. On a small tile, a wide paper towel may be too clumsy. On a large canvas, a tiny palette knife may make the process feel like mowing a lawn with nail clippers.
Color Ideas for Swipe Acrylic Pour Painting
Color selection can make or break a pour. Swipe painting benefits from contrast because cells and lacing need visibility. Combine light, medium, and dark values rather than choosing five colors with the same intensity.
Ocean Swipe
Use turquoise, phthalo blue, navy, pearl white, and a white swipe. The result can resemble waves, foam, and tropical water. Add a little metallic gold for a sandy glow.
Galaxy Swipe
Use black, violet, deep blue, magenta, silver, and a pearl white swipe. Tilt minimally so the cells stay clustered like stars. A few tiny splatters after drying can enhance the cosmic feel.
Fire Swipe
Use red, orange, yellow, copper, and black. Swipe with white or gold for flame-like lacing. Be careful with too much black, which can overpower warm colors quickly.
Botanical Swipe
Use greens, soft pinks, cream, and gold. Swipe from one corner outward to create petal-like movement. This works beautifully on round panels.
Common Swipe Pour Problems and How to Fix Them
The Colors Turn Muddy
Muddy color usually comes from over-tilting, over-swiping, or combining complements that mix into brown or gray. Use fewer colors, plan your palette, and stop touching the painting earlier than your inner perfectionist wants.
No Cells Appear
If no cells appear, the paint may be too thick, the swipe layer may be too heavy, or the colors may have similar density. Try thinning the swipe color slightly, using more contrast, or testing a small amount of silicone oil or cell activator.
The Painting Cracks While Drying
Cracking or crazing often happens when the top layer dries faster than the paint underneath. Avoid very thick puddles, direct fans, heat guns, strong airflow, or moving the painting too soon. A level drying area and slow, even drying are your best friends.
Cells Stretch Too Much
If beautiful cells appear and then become long noodles, you may be tilting too aggressively. Tilt only enough to cover the canvas and improve composition. Once the design looks good, put it down and back away like the painting is a sleeping cat.
Bare Spots Show Up
Bare spots can happen if the canvas was not fully covered with a base coat or if too much paint ran off the edges. Keep a small cup of base color nearby for touch-ups. You can also use a gloved finger to guide paint over corners.
Drying, Curing, and Sealing Your Swipe Painting
Swipe acrylic pour paintings may feel dry on the surface before they are dry underneath. Thin pours can dry within a day or two, while thicker pours may need several days or longer. Keep the painting level, protected from dust, and away from fans, air-conditioning vents, pets, curious children, and adults who say, “I just want to touch one corner.”
Once the painting is fully dry and cured, you can seal it with an acrylic varnish, gloss medium, resin, or another appropriate finish. Make sure the surface is clean and free of silicone residue before sealing. If silicone oil was used, the painting may need gentle cleaning after it cures because varnish may resist oily spots.
Creative Variations to Try
Once you understand the basic swipe technique, you can experiment with composition. Try a center swipe, where the swipe color runs through the middle and is pulled outward in both directions. Try a corner swipe for a dramatic diagonal flow. Use negative space by leaving part of the canvas mostly white or black, then swiping color through only one area. You can also combine swipe acrylic pouring with ring pours, puddle pours, chain pulls, or stencil shapes.
Another exciting variation is the wrecked swipe, where the artist swipes first, then drags a skewer, comb, or palette knife through selected areas. This creates movement and breaks up predictable lines. Use this technique sparingly. A few marks can add energy; too many can make the piece look like it lost an argument with a fork.
Beginner Tips for Better Swipe Acrylic Pour Paintings
- Practice on small canvases or tiles before using expensive panels.
- Write down your paint ratios so successful results can be repeated.
- Use a limited palette until you understand how colors interact.
- Make sure all paints have similar consistency unless you are intentionally testing density effects.
- Swipe with a light hand and avoid repeated passes over the same area.
- Keep the drying surface level for the entire drying period.
- Take photos while wet because the design may shift slightly as it dries.
Why Swipe Acrylic Pour Painting Is So Addictive
Swipe acrylic pour painting is addictive because it offers fast visual reward with endless variation. Every pour is part painting, part chemistry experiment, and part emotional support mess. You can plan carefully and still be surprised. You can make mistakes and discover that the “mistake” is the most interesting part of the piece.
It is also accessible. You do not need to draw perfect hands, paint realistic portraits, or understand Renaissance perspective. You need curiosity, color sense, and the courage to drag a paper towel through wet paint while hoping for the best. That is a surprisingly poetic life skill.
Personal Studio Experiences With Swipe Acrylic Pour Painting
The first time many artists try swipe acrylic pour painting, they underestimate two things: how much paint will move and how strongly the painting will test their self-control. A fresh swipe pour looks alive. Cells open, colors stretch, and lacing appears in places you did not expect. The natural instinct is to keep adjusting it. One more tilt. One more swipe. One tiny fix. Then suddenly the crisp ocean foam becomes a vague blue smoothie. Experience teaches the golden rule of fluid art: know when to stop before the painting files a complaint.
A helpful beginner experience is to start with an 8-by-10-inch canvas and a simple ocean palette: white base, turquoise, navy, sky blue, and a white swipe. Mix slightly more paint than you think you need, because running out mid-pour creates a special kind of studio panic. Pour the blues in loose horizontal bands, add a thin white swipe line at the top, and pull a damp paper towel downward with almost no pressure. If the consistency is right, small white cells will begin appearing over the blue within seconds. It feels like watching waves form from a weather report you personally approved.
Another lesson comes from metallic paint. Metallic gold, bronze, and pearl colors can look spectacular in a swipe, but they often behave differently from standard acrylics because of pigment weight and shimmer particles. In one test, a gold swipe over purple and teal created elegant lacing at first, then slowly sank into the lower colors and became subtle after drying. The painting was still beautiful, but the drama softened. The takeaway is simple: metallics are divas. Invite them, enjoy them, but do not assume they will follow the script.
Swipe tools also change the mood of a painting. A damp paper towel creates soft, cloudy, organic transitions. A plastic card makes a sharper modern look. A silicone spatula gives smoother coverage but may remove too much paint if pressed firmly. After several attempts, many artists keep a small “swipe tool graveyard” nearby: cut-up plastic folders, old gift cards, palette knives, parchment strips, and suspiciously useful packaging pieces. Fluid art turns ordinary trash into studio equipment, which is both practical and mildly concerning.
The biggest practical experience is learning to respect drying time. A painting may look stable after a few hours, but the lower layers can still be wet. Moving it too soon can shift the design, wrinkle the surface, or create cracks later. Covering the piece with a raised dust tent and leaving it alone for several days gives better results. This is not glamorous, but neither is finding cat hair permanently embedded in a perfect cell cluster.
Over time, swipe acrylic pour painting becomes less about chasing perfect cells and more about directing movement. The best pieces often have contrast, breathing room, and a focal area where the eye can rest. Cells are exciting, but composition is what makes the artwork feel finished. A successful swipe pour does not need to be packed edge to edge with fireworks. Sometimes one elegant sweep across negative space says more than a canvas shouting in twelve colors.
Conclusion
Swipe acrylic pour painting is one of the most rewarding fluid art techniques for beginners and experienced artists alike. It combines color theory, paint consistency, movement, and happy accidents in a way that feels both creative and playful. With the right pouring medium, a level surface, a light swipe, and a little patience, you can create cells, lacing, waves, blooms, and abstract designs that look far more complicated than the process actually is.
The best way to improve is to test, observe, and keep notes. Try different swipe tools, adjust paint ratios, experiment with color contrast, and learn how your materials behave as they dry. Some pours will be frame-worthy. Some will be “educational.” Both count. In swipe acrylic pour painting, every canvas teaches something, even if the lesson is simply: never trust red and green alone in a cup together.