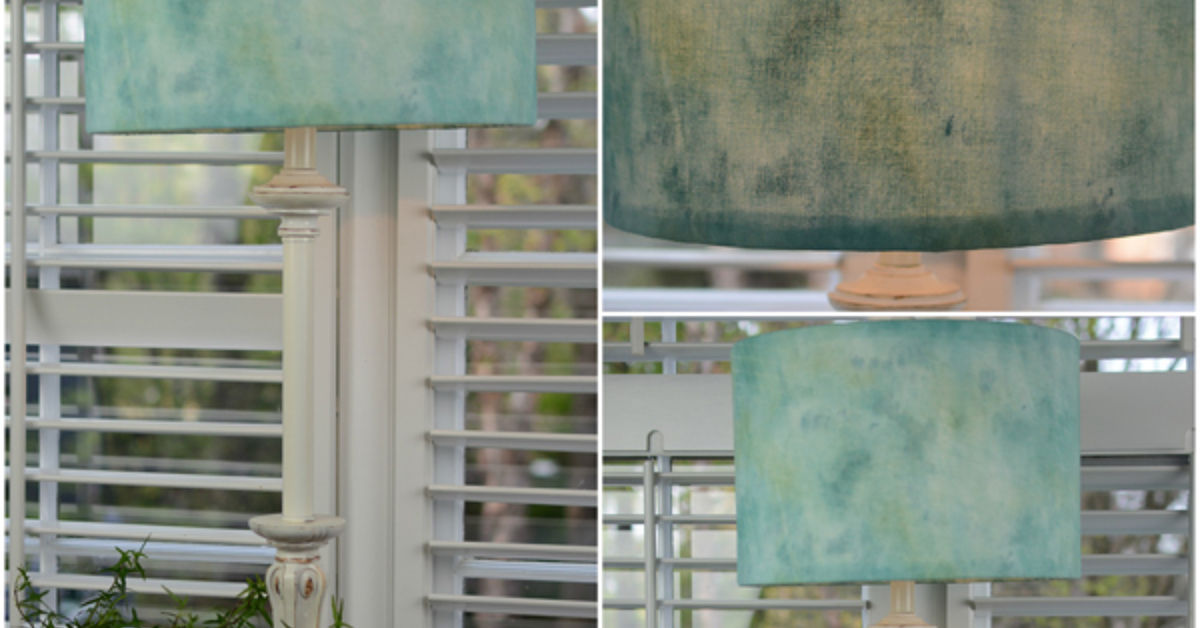
A plain lamp shade is practical, dependable, and a, a few translucent colors and one relaxed afternoon can turn that beige basic into a glowing piece of coastal decor.
This sea glass inspired lamp shade project recreates the soft greens, watery blues, cloudy whites, and occasional amber tones of glass polished by waves. Instead of attaching heavy pieces of real sea glass, the design uses lightweight translucent paper and decoupage medium. The finished shade looks colorful when the lamp is off and becomes especially beautiful when illuminated, as overlapping pieces create deeper tones and gentle variations.
Better still, this is a beginner-friendly DIY lamp shade makeover. There is no rewiring, glass cutting, or mysterious power tool lurking in the garage. If you can cut an irregular oval and use a paintbrush without gluing it permanently to your sleeve, you are qualified.
Why a Sea Glass Inspired Lamp Shade Works
A lamp shade does more than hide a light bulb. Its shape, material, and opacity affect how light spreads throughout a room. Fabric and hardback shades soften horizontal glare, create ambient illumination, and add color or texture even when the lamp is switched off. Drum shades are particularly useful for DIY projects because their relatively straight sides make patterns easier to plan and apply. he Beauty Is in the Imperfection
Authentic sea glass is rarely uniform. Its appeal comes from cloudy surfaces, softened edges, tiny scratches, and colors that seem to change in different light. A successful sea glass lamp shade should feel equally relaxed. The individual shapes do not need to match, and the colors should not be distributed with military precision.
In fact, a few uneven edges and overlapping pieces make the shade more convincing. Think “treasure discovered at low tide,” not “bathroom tile installed by a perfectionist with a laser level.”
A Coastal Look Without Turning the Room Into a Theme Park
Coastal decor can become overly literal when every surface contains anchors, starfish, ropes, shells, and signs explaining exactly where the beach is. A sea glass inspired lamp shade offers a quieter approach. The watery palette suggests the shoreline without requiring a decorative wooden seagull to supervise the living room.
The shade can fit coastal, cottage, modern, bohemian, transitional, and even minimalist interiors. The final style depends on the colors, lamp base, and density of the pattern.
Materials and Tools
- One white or ivory hardback drum lamp shade in good condition
- Translucent tissue paper, glassine, or lightweight vellum
- Seafoam green, aqua, pale blue, turquoise, milky white, and amber colors
- Matte or satin water-based decoupage medium
- A soft, flat craft brush or foam brush
- Sharp scissors
- Pencil and plain paper for making test shapes
- Small bowl or disposable palette
- Wax paper or a washable work mat
- Clean, dry cloth or lint roller
- Painter’s tape
- An LED bulb that complies with the lamp manufacturer’s specifications
Choose a structurally sound shade without cracks, peeling liner material, scorch marks, or loose fittings. A makeover can improve an unattractive shade, but it cannot negotiate peace with damaged electrical hardware.
Choosing the Best Sea Glass Color Palette
Classic Beach Glass
Use approximately 40 percent seafoam green, 30 percent pale aqua, 20 percent cloudy white, and 10 percent amber. This palette feels natural, collected, and slightly vintage.
Deep Ocean Blue
Combine turquoise, cobalt, navy, and small areas of pale gray. Keep the darkest blue pieces separated so they do not block too much light. This version works well with white walls, brass lamp bases, and dark wood furniture.
Soft Coastal Neutral
Choose frosted white, pale sage, smoky blue, sand, and a tiny amount of muted green. The result is subtle enough for a bedroom, reading corner, or entryway where bright turquoise might arrive before the rest of the furniture is emotionally prepared.
Sunset Shore
Mix amber, peach, dusty rose, lavender, and soft blue. Although these are less typical sea glass colors, they create a warm glow and pair beautifully with natural wood or terracotta accessories.
How to Make a Sea Glass Inspired Lamp Shade
Step 1: Inspect the Lamp and Shade
Unplug the lamp and remove the shade. Check the socket, cord, plug, harp, fitter, and finial. Do not continue using a lamp with cracked insulation, loose electrical parts, darkened sockets, or signs of overheating. Decorative work should remain decorative; electrical repairs belong with a qualified professional.
Read the wattage or bulb limitation printed on the socket or fixture label. Never exceed that limit. Bulbs and fixtures can create enough heat to ignite nearby combustible materials, particularly when the wrong bulb type or wattage is used. tep 2: Clean the Shade
Use a lint roller, clean paintbrush, or dry microfiber cloth to remove dust. Avoid saturating a paper-backed shade with water. If the surface is slightly stained, test a barely damp cloth on a hidden area and allow the shade to dry completely.
A clean surface helps the decorative medium spread evenly. Dust trapped under translucent paper has an impressive ability to look like a fossil once the lamp is turned on.
Step 3: Cut the Faux Sea Glass Pieces
Cut the translucent paper into rounded, irregular shapes measuring roughly 1 to 3 inches across. Vary the proportions. Some pieces can be almost circular, while others can be long, narrow, or triangular with softened corners.
Avoid cutting dozens of identical ovals. Real sea glass does not emerge from the ocean wearing a matching uniform. Create a mixture of small filler pieces, medium shapes, and a few large focal pieces.
For a more natural frosted appearance, crumple tissue paper very gently, flatten it, and then cut the shapes. The faint wrinkles scatter light and create subtle texture.
Step 4: Plan the Pattern Before Gluing
Lay the shade on its side over a protected work surface. Arrange several paper pieces without adhesive. Begin with the largest shapes, spacing them around the shade, and then fill the gaps with smaller pieces.
Allow selected edges to overlap by approximately one-quarter inch. The overlapping areas will appear darker when illuminated, much like stacked pieces of colored glass. Avoid placing every dark color in one area, or the finished shade may look as though a small storm cloud has moved in permanently.
Photograph the arrangement before removing the pieces. This provides a useful reference when the decoupage medium enters the scene and everything suddenly becomes slippery.
Step 5: Attach the First Layer
Working on a small area, brush a thin coat of decoupage medium onto the outside of the shade. Position one translucent piece over the wet area. Starting at the center, gently smooth it outward using a clean brush.
Apply another very thin coat over the paper. Do not scrub repeatedly, as wet tissue can tear. Small wrinkles are acceptable and often improve the handmade glass effect.
Continue around the shade, rotating it as you work. Keep the top and bottom trim relatively clean unless you intend to cover them later with ribbon or bias tape. Lampshade makeovers commonly use fabric, paper, paint, trim, and decoupage techniques to personalize otherwise basic shades. tep 6: Build Translucent Color
Once the first layer is in place, step back and inspect the distribution. Add smaller pieces where the design feels empty. Overlap pale aqua with green to create turquoise, or place amber over milky white to create a warm honey color.
Limit most areas to one or two layers. Thick clusters can become opaque, preventing the lamp from producing the soft glow that makes the project worthwhile. The goal is luminous variation, not protective armor.
Step 7: Add a Frosted Finish
After the paper pieces are attached, use a clean brush to apply one thin, even coat of matte decoupage medium over the decorated surface. A matte finish reduces excessive shine and helps imitate glass that has been softened by sand and water.
Specialty glass paints and frosted finishes use the same general visual principle: a semi-translucent coating diffuses light while allowing color to remain visible. On real glass shades, manufacturers typically recommend clean surfaces, light overlapping coats, proper spraying distance, and adequate ventilation. Do not use a glass-only spray product on a fabric or paper shade unless its manufacturer specifically approves that surface. tep 8: Let the Shade Cure Thoroughly
Place the shade upright in a clean, dust-free location. Follow the drying and curing directions for the exact medium used. A surface that feels dry may still be soft underneath, so avoid reinstalling it immediately.
Do not accelerate drying with a hair dryer, heat gun, oven, radiator, or direct contact with the lamp bulb. This is a craft project, not a cooking competition.
Step 9: Test the Finished Shade
Reinstall the shade only after it is completely dry. Use an LED bulb that fits the lamp and remains within the fixture’s labeled limits. Residential LED bulbs use considerably less electricity than traditional incandescent bulbs, and much less of their energy is released as heat. Even so, LEDs still produce heat, so clearance and manufacturer instructions remain important. n on the lamp for a short supervised test. Confirm that the shade sits securely, no decorative material hangs inward toward the bulb, and no unusual odor, softening, discoloration, or excessive heat develops.
An Alternative Method for a Real Glass Lamp Shade
If the lamp has a removable clear glass globe or glass shade, a specialty translucent sea glass or frosted glass coating can provide a smoother finish. Remove the glass component from the fixture, wash it, dry it thoroughly, and wipe away dust before applying the product.
Spray outdoors or in a properly ventilated work area, away from flames, sparks, and other ignition sources. Follow the label rather than borrowing instructions from a random craft video recorded beside an open candle. Product directions commonly call for shaking the can thoroughly, holding it several inches from the surface, and applying multiple light, overlapping coats. s alternative is appropriate only for removable glass parts and products labeled for that application. Do not spray the socket, wiring, bulb, switch, plug, or assembled electrical fixture.
Common Mistakes and How to Fix Them
The Shade Looks Too Dark
Dark colors or excessive overlap may be blocking light. Add pale or milky pieces around the darker areas to balance the design. If the medium has not cured, carefully remove a few heavy layers. Another option is to use the shade on a lamp intended mainly for mood lighting rather than reading.
The Tissue Paper Wrinkled
A few wrinkles help create texture. Large ridges or bubbles can be eased outward with a clean brush while the medium is still wet. Once dry, stubborn bubbles can sometimes be pierced with a fine pin and pressed flat with a tiny amount of medium.
The Colors Look Random
Repeat each major color in at least three areas around the shade. This simple design trick creates rhythm. One amber piece can look accidental; three amber pieces look like a decision made by a confident adult.
The Edges Are Lifting
Brush a small amount of medium beneath the raised edge, press it gently into place, and apply a thin topcoat. Avoid pouring on more product, which may create a visible glossy patch.
The Finished Surface Looks Too Shiny
After the existing layers have cured, apply a compatible matte topcoat in a very thin layer. Always test it on leftover translucent paper before coating the entire shade.
How to Style the Finished Lamp
A sea glass inspired lamp shade looks especially good on simple lamp bases. White ceramic, clear glass, brushed brass, pale wood, matte black, and weathered gray all allow the colorful shade to remain the focal point.
For a bedside lamp, use a restrained palette with seafoam, white, and soft blue. In a living room, add deeper turquoise and cobalt for more visual impact. An amber-heavy version can warm up a dark entryway or complement leather furniture.
Repeat one or two colors elsewhere in the room through a pillow, throw, vase, framed print, or small tray. Avoid matching every accessory exactly. A room should feel coordinated, not as if the turquoise objects formed a committee.
Realistic Project Experience: What Making the Shade Is Actually Like
The first surprise in this project is how quickly a restrained color palette can become a paper avalanche. Once the translucent sheets are spread across the table, every shade of blue begins making a persuasive case for inclusion. The smartest approach is to choose four core colors before cutting anything. Extra colors can remain nearby, but they should be treated as guests rather than permanent residents.
During a typical build, the arrangement stage takes longer than the gluing. A pattern can look balanced while lying flat and suddenly appear crowded once it wraps around a shade. Rotating the shade frequently solves this problem. It also prevents all the most attractive pieces from ending up on the front while the back receives the decorative equivalent of leftovers.
The first few attached pieces may look underwhelming. This is normal. A single translucent green shape on a white shade does not immediately whisper “romantic shoreline.” It may whisper “someone dropped lettuce on the lamp.” The effect develops as the colors repeat and overlap. After approximately one-third of the shade is covered, the design usually begins to feel intentional.
Another common experience is the sudden urge to eliminate every wrinkle. Resist it. Perfectly smooth tissue can look more like printed plastic than weathered glass. Tiny creases, uneven edges, and changes in opacity create depth once the bulb is illuminated. The trick is distinguishing charming texture from a bubble large enough to have its own ZIP code.
The most useful checkpoint occurs before the final topcoat. Place a battery-operated light or flashlight inside the uninstalled shade and examine the pattern from several directions. This reveals dark clusters, empty patches, visible brush marks, and awkward color combinations before they become permanent. It is much easier to add a pale blue filler piece at this stage than to negotiate with a fully cured finish later.
Drying time can test the patience of enthusiastic makers. The shade may look ready after an hour, but reinstalling it too soon can leave fingerprints, dents, or tacky areas. Letting the finish cure overnight is usually the calmer choice. Put the shade somewhere protected from pet hair, dust, and curious fingers. Cats, in particular, may interpret an upright lamp shade as premium new seating.
The best moment arrives when the shade is finally installed and illuminated. In daylight, the pattern reads as a cheerful coastal mosaic. At night, the overlapping colors deepen, pale areas glow, and the small imperfections become far less noticeable. What seemed slightly uneven on the worktable often looks layered and organic under warm light.
The project also tends to change how people view thrift-store lamps. Once an ordinary shade can be transformed with lightweight materials, an unfashionable lamp stops looking like clutter and starts looking like a useful base with unfortunate styling decisions. That shift is one of the most satisfying parts of upcycling: the object was not hopeless; it was merely waiting for better colors.
Final Thoughts
A sea glass inspired lamp shade delivers the relaxing colors of the coast without requiring an oceanfront address or a jar containing 400 shells. The project is inexpensive, adaptable, and forgiving enough for beginners. Translucent paper creates color, overlapping layers add depth, and a matte finish supplies the soft weathered appearance associated with beach glass.
Keep the decoration lightweight, work only on an unplugged lamp, follow the fixture’s bulb restrictions, and use a compatible LED bulb. With those practical details handled, the remaining instructions are pleasantly simple: cut imperfect shapes, layer beautiful colors, and stop before the lamp shade begins resembling an aquarium gift shop.