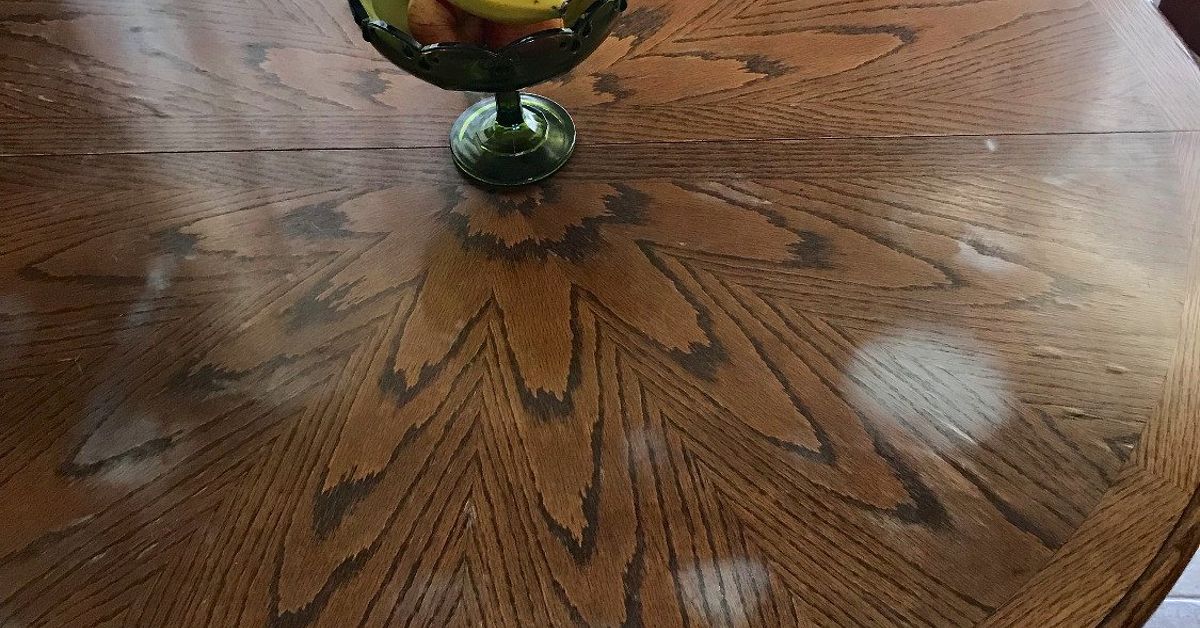
Few household mysteries are as annoying as the pale, cloudy ring that appears after someone sets a hot mug, pizza box, casserole dish, or takeout container on a beautiful wooden table. One minute your table is looking like a responsible adult owns it. The next, it has a ghostly white mark that seems to whisper, “Coasters were invented for a reason.”
The good news is that removing white heat marks from your table top is often possible without sanding, stripping, or dramatically announcing that the table is ruined. In many cases, the mark is not deep damage to the wood itself. It is moisture trapped in the finish, a cloudy reaction in wax or lacquer, or a heat-stressed topcoat that needs gentle coaxing back to normal.
This guide explains why white heat stains happen, how to test your table safely, which home remedies are worth trying, and when it is time to stop rubbing toothpaste on furniture like a confused dentist and call a refinishing professional.
What Causes White Heat Marks on a Table Top?
White heat marks usually appear when heat opens the pores of a wood finish and allows moisture to become trapped beneath the surface. The stain looks cloudy, milky, or white because light is scattering through that moisture-filled or heat-damaged finish layer. This is why the mark often shows up after a hot plate, mug, laptop, serving bowl, or cardboard takeout box sits directly on the table.
The important detail is color. A white or pale mark usually means the damage is near the surface. A dark brown, black, or gray stain often means moisture has penetrated deeper into the wood or the finish has failed more seriously. White heat marks are the “maybe we can fix this over coffee” kind of problem. Dark stains are more like “bring tools, patience, and possibly snacks.”
White Heat Marks vs. Water Rings
White heat marks and white water rings are cousins. They are not always identical, but many of the same methods work because both often involve trapped moisture in the finish. Heat marks tend to appear after hot items. Water rings usually come from wet glasses, vases, or spills. If the mark is white, hazy, and sitting on a finished table top, start with the gentlest methods below.
Before You Start: Identify the Finish and Test First
Before treating a white heat mark, pause for a small but heroic act: test in a hidden spot. Table finishes vary widely. A modern polyurethane finish may tolerate gentle heat and mild polishing. Shellac, lacquer, wax, oil, antique finishes, painted surfaces, and veneer can react differently. A method that saves one table may make another look like it lost a bar fight.
Choose an inconspicuous area, such as the underside of the table edge or a back corner. Try a tiny amount of the method you plan to use. Wait a few minutes and check for softening, color change, dullness, stickiness, or finish removal. If anything looks suspicious, stop.
Supplies You May Need
- Soft microfiber cloths
- Clean white cotton towel
- Hair dryer
- Clothes iron with steam turned off
- Non-gel white toothpaste
- Baking soda
- Mayonnaise or petroleum jelly
- Olive oil and white vinegar
- Furniture polish or paste wax suitable for your finish
Step 1: Clean the Table Surface Gently
Start by cleaning the table. Dust, grease, wax buildup, and yesterday’s invisible syrup incident can interfere with stain removal. Use a dry microfiber cloth first. If needed, slightly dampen a cloth with water and a drop of mild dish soap, wipe the area lightly, then dry it completely with another cloth.
Do not soak the wood. Do not use harsh scrub pads. Do not attack the table with an all-purpose cleaner unless the product label says it is safe for that specific finish. White heat marks are annoying, but removing the finish around them is a plot twist nobody requested.
Method 1: Use a Hair Dryer for Fresh White Heat Marks
A hair dryer is one of the safest first methods for removing white heat marks from a table top. The idea is simple: controlled warmth may help evaporate trapped moisture without overheating the finish.
How to Do It
- Set the hair dryer to low or medium heat.
- Hold it several inches above the white mark.
- Move it continuously from side to side.
- Check the mark every 30 to 60 seconds.
- Stop if the finish becomes sticky, shiny in a strange way, or too hot to touch comfortably.
This method works best on fresh marks. If someone just moved the hot mug and the cloudy spot is still new, grab the hair dryer before the stain settles in and starts paying rent.
Method 2: Try the Iron and Towel Method Carefully
The iron method is popular because it can work surprisingly well on white heat rings. However, it must be done carefully. Too much heat can make the finish worse, flatten sheen, or create a permanent burn mark. The trick is to use gentle heat, a barrier cloth, and short contact times.
How to Do It Safely
- Place a clean white cotton towel over the heat mark.
- Set the iron to low heat with steam turned off.
- Press the iron on the towel for just a few seconds.
- Lift the iron and towel to inspect the mark.
- Repeat only if the mark is improving.
Never leave the iron sitting on the table. Never use steam. Never use a printed towel that could transfer dye. Think of this method as a polite handshake with heat, not a wrestling match.
Method 3: Use Toothpaste and Baking Soda for Stubborn Marks
Non-gel white toothpaste can help polish away cloudy surface marks because it is mildly abrasive. Baking soda adds a little extra cleaning power. This method is best for finished wood surfaces with light white marks, not raw wood, fragile antiques, or high-gloss finishes that scratch easily.
How to Make the Paste
Mix one part non-gel white toothpaste with one part baking soda. Add a tiny drop of water only if needed to create a soft paste. Apply a small amount to the stain with a soft cloth and rub gently with the grain for 20 to 30 seconds.
Wipe the paste away with a slightly damp cloth, then dry immediately. If the area looks dull afterward, buff lightly with furniture polish or a finish-safe wax.
Important Warning
Do not use gel toothpaste, whitening toothpaste, charcoal toothpaste, or anything that sounds like it belongs in a futuristic dental commercial. These can contain ingredients that may discolor or scratch the finish.
Method 4: Apply Mayonnaise or Petroleum Jelly Overnight
Mayonnaise is more than a sandwich negotiator. Its oil content can sometimes help displace moisture trapped in a wood finish. Petroleum jelly works in a similar way by sitting on the mark and slowly conditioning the cloudy area.
How to Use This Method
- Spread a thin layer of mayonnaise or petroleum jelly over the white mark.
- Let it sit for several hours or overnight.
- Wipe away completely with a soft cloth.
- Buff the area with a clean cloth.
This is a low-effort method, which is ideal if your personality type is “I want the table fixed, but I also want to watch one more episode.” It may not work instantly, but it is gentle enough to try before harsher approaches.
Method 5: Use Vinegar and Olive Oil for Light Rings
A mixture of white vinegar and olive oil is often used for light water rings and surface cloudiness. The vinegar helps cut through residue, while the oil improves the look of a dry or dulled finish. This method is not magic, but it can make minor marks less noticeable.
Simple Formula
Mix equal parts white vinegar and olive oil. Dip a soft cloth into the mixture, then rub gently with the grain. Wipe away excess oil with a clean cloth and buff the area until it feels dry, not greasy.
Use this sparingly. Too much oil can leave a sticky film that attracts dust, fingerprints, and judgmental glances from visiting relatives.
Method 6: Use a Commercial White Ring Remover Cloth
Commercial white ring remover cloths are designed for finished, sealed wood furniture. They can help remove heat rings, water marks, alcohol stains, and light surface blemishes. These products are convenient because they are made specifically for this problem, but directions matter.
Read the label before use, test first, and avoid using them on unfinished wood, severely damaged finishes, or antique pieces unless the manufacturer says it is safe. If the cloth removes the mark but leaves the surface looking uneven, finish with a gentle polish or wax approved for your table.
When DIY Methods Do Not Work
If the white heat mark does not improve after several gentle attempts, the finish may be damaged more deeply. At that point, more rubbing is not always better. It can create a shiny patch, dull spot, or visible swirl marks around the stain.
Consider professional help if the table is antique, expensive, veneered, lacquered, shellacked, or emotionally important. A professional refinisher can evaluate whether the top needs spot repair, rubbing out, re-waxing, re-coating, or full refinishing.
Signs You Should Stop and Call a Pro
- The white mark turns dark.
- The finish becomes sticky or soft.
- The surface starts losing color.
- The table has veneer that may lift or bubble.
- The piece is antique or collectible.
- The stain remains after multiple gentle methods.
How to Prevent White Heat Marks in the Future
Prevention is easier than repair, and it does not require turning your dining room into a museum. Use coasters, trivets, placemats, and heat-resistant pads under mugs, pans, pizza boxes, laptops, and serving dishes. A folded towel is better than nothing, but a proper trivet is safer for hot cookware.
Keep the table clean and polished according to the finish type. Paste wax can add a protective layer to some finished wood surfaces, while modern polyurethane tables may only need routine cleaning and occasional polish. Always follow the product directions and avoid layering random oils, waxes, and sprays until the surface feels like a salad dressing experiment.
Common Mistakes to Avoid
Using Too Much Heat
Heat caused the problem, so it must be used cautiously as a repair tool. A hair dryer or iron can help release moisture, but overheating can make the finish cloudy, sticky, or burned.
Scrubbing With Abrasive Pads
Steel wool, scouring pads, and rough sponges can scratch the finish. If you need abrasion, use only mild options like toothpaste or baking soda paste, and rub gently.
Skipping the Hidden Test
Testing feels boring until it saves your table. Different finishes react differently, and a hidden test can prevent visible damage.
Mixing Cleaning Chemicals
Do not mix bleach, ammonia, peroxide, vinegar, or commercial cleaners randomly. Wood furniture care should not become a chemistry class with consequences.
Real-Life Experience: What Actually Works on White Heat Marks
In everyday home care, the best approach to removing white heat marks from your table top is patience plus escalation. Start gentle, observe closely, and only move to stronger methods if the mark is not improving. Many people panic when they see a white ring and immediately reach for the most dramatic fix. That is understandable. Tables are expensive, and nobody wants their dining room centerpiece to look like it was attacked by a haunted teacup.
In practice, fresh heat marks often respond best to the hair dryer method. For example, if a hot coffee mug leaves a pale circle on a finished wood desk, low steady heat may reduce the mark within minutes. The key is movement. Keep the dryer moving, avoid blasting one spot, and touch the surface occasionally. Warm is fine. Hot enough to make you say “ow” is not fine.
Older white marks can be more stubborn. That is where mayonnaise, petroleum jelly, or the toothpaste-and-baking-soda method may help. The oil-based methods are slower but forgiving. They are useful when the stain looks cloudy rather than scratched. Apply a thin layer, let it rest, wipe thoroughly, and buff. Sometimes the improvement is subtle at first, then more visible after the finish dries and the area is polished.
Toothpaste paste is better for marks that seem to sit right on the surface. Use very light pressure. One common mistake is rubbing too hard in a circular motion, which can leave a dull halo bigger than the original stain. Always work with the grain when possible. If you see improvement, stop early. Furniture repair has a funny rule: the moment you think, “Just one more aggressive rub,” you are probably about to create a new problem.
The iron method can be effective, but it deserves respect. It works best when the table has a durable finish and the white mark is caused by trapped moisture. Use a white towel, low heat, no steam, and short bursts. Lift and check often. If nothing changes after a few tries, do not keep increasing the heat. The goal is to save the finish, not audition for a cooking show called “Will It Burn?”
Another experience-based tip: treat the whole table top visually after removing the mark. Even when the stain disappears, the repaired area may look slightly cleaner or shinier than the surrounding surface. A gentle polish or wax, used correctly, can help even out the sheen. Clean the entire table, buff it evenly, and step back under natural light. Many “remaining stains” are actually uneven shine, not leftover damage.
Finally, prevention matters more than any repair hack. Keep attractive coasters nearby, not hidden in a drawer where good intentions go to retire. Use trivets for serving dishes. Never place hot pizza boxes directly on finished wood; the trapped steam and heat can create large cloudy patches. If you use a laptop on a wood table, place it on a mat to prevent heat buildup. These small habits protect the finish and save you from future furniture rescue missions.
Conclusion
Removing white heat marks from your table top is usually a matter of understanding what caused the cloudiness and choosing the safest repair method. Start by cleaning the surface and testing in a hidden spot. Then try gentle heat with a hair dryer, careful use of an iron and towel, oil-based treatments like mayonnaise or petroleum jelly, or a mild toothpaste-and-baking-soda paste.
Most white heat marks are surface-level finish problems, which means they can often be improved without sanding or refinishing. Still, valuable, antique, or delicate tables deserve extra caution. When in doubt, stop early and ask a professional. A slightly visible ring is easier to fix than a finish that has been scrubbed, overheated, and emotionally betrayed.