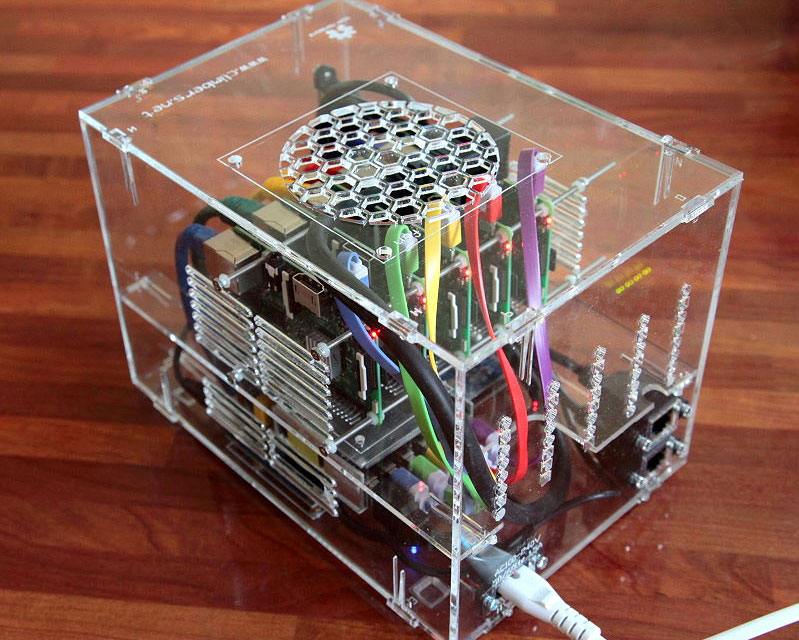
There are two kinds of people who build a Raspberry Pi cluster: the practical nerd and the curious nerd. In many cases, they are the same person wearing different socks. A Raspberry Pi cluster looks impressive on a desk, in a rack, or stuffed into a 3D-printed case that makes visitors ask, “What exactly is that?” But the real magic is not just in the stack of tiny computers. It is in what the stack teaches you about networking, storage, automation, containers, distributed workloads, and the fine art of cable management under emotional pressure.
If you have ever wondered how a Raspberry Pi cluster works, what it is actually good for, and whether building one is worth the trouble, the answer is yeswith a few asterisks and at least one Ethernet switch. This guide breaks down both the how and the what of a Raspberry Pi cluster build. You will learn what a cluster really is, which parts matter most, how to set one up without creating a spaghetti monster, and what kinds of real-world tasks make the whole project worthwhile.
What a Raspberry Pi Cluster Actually Is
A Raspberry Pi cluster is a group of Raspberry Pi boards connected so they can work together. Usually, one node acts as the control or head node, while the others serve as worker or compute nodes. In plain English, one Pi becomes the organizer, and the rest become the busy little overachievers.
This does not mean the Pis magically transform into one giant supercomputer with combined memory and instant warp speed. That is one of the biggest myths around cluster computing. A cluster shines when the workload can be split across multiple machinesweb services, containers, APIs, task runners, classroom labs, edge workloads, and some kinds of distributed computing. If your dream is to turn four Pis into one monster gaming rig or a budget AI training server that scares enterprise data centers, your dream may need adult supervision.
That distinction matters because a Raspberry Pi cluster is less about raw brute force and more about orchestration, learning, redundancy, and horizontal scaling. It is the difference between hiring one bodybuilder to move a piano and hiring four organized movers with a plan. The second option is usually smarter, and fewer walls get damaged.
Why Build a Raspberry Pi Cluster?
The best reason to build a Raspberry Pi cluster is that it teaches modern infrastructure concepts on hardware you can actually touch. Cloud platforms are great, but they can feel abstract. A Pi cluster gives you a low-cost lab where you can see the nodes, label them, power them, reboot them, and occasionally lecture them when one refuses to boot.
For beginners, a cluster is a fantastic way to learn Linux administration, SSH, networking, Docker, Kubernetes, Ansible, service discovery, load balancing, and shared storage. For hobbyists and homelab fans, it becomes a fun platform for self-hosted apps, testing microservices, running lightweight CI/CD jobs, and experimenting with edge computing. For educators, it can centralize many student systems into one manageable environment. And for makers, it is one of the few computing projects where the case can be almost as exciting as the software.
Real-world examples prove the point. People have built compact four-node desk clusters, classroom clusters with dozens of Pis, rack-mounted Pi servers, portable Pi clusters in bags, and custom carrier-board systems using Compute Modules. The hardware is flexible enough to support a surprising range of goals, from teaching code to testing Kubernetes to hosting lightweight web workloads.
What Hardware You Really Need
1. Raspberry Pi Boards
You can build a cluster from standard Raspberry Pi boards like the Pi 4 or Pi 5, or from Compute Module hardware if you want a denser, cleaner build. For most hobbyists, standard Pi boards are the easiest place to start because they are familiar, self-contained, and simple to replace.
If the goal is learning Kubernetes, Docker, or service orchestration, three to five nodes are a sweet spot. That is enough to understand multi-node behavior without needing a second mortgage for accessories. If you want a more polished, space-efficient build, Compute Module-based platforms can reduce cable clutter and make the whole setup look less like a networking accident.
2. A Gigabit Network Switch
A cluster lives and dies by the network. Each node needs Ethernet, and you should strongly prefer wired networking over Wi-Fi. Yes, Wi-Fi works for many things. No, it is not the right foundation for a serious cluster unless your goal is to study disappointment scientifically.
A small unmanaged Gigabit switch is fine for many builds. A managed switch becomes more useful if you want VLANs, monitoring, or cleaner network design. Some advanced cluster designs use a head node with a second Ethernet interface to connect both the internal cluster network and the outside LAN.
3. Power Delivery
Power is one of the least glamorous and most important parts of the build. Many cluster guides eventually rediscover the same truth: power distribution is harder than it first appears. A few nodes can be powered with high-quality USB-C or USB power supplies, but larger clusters quickly become messy if every board has its own wall adapter.
That is why Power over Ethernet, or PoE, is so attractive. With the right PoE-capable Raspberry Pi setup and switch, one Ethernet cable can handle both data and power. Cleaner wiring, fewer power bricks, less muttering. For small starter builds, standard USB power is still perfectly reasonable. Just do not cheap out on supplies. Underpowered boards create flaky behavior that wastes hours and makes you question your life choices.
4. Storage and Boot Strategy
You have a few options here. The simplest is to use a microSD card in every node. That works, especially for learning. However, SD cards are not always ideal for long-term reliability, especially under heavier write loads.
A more advanced setup uses a head node plus network boot for the compute nodes. In that design, the worker Pis boot over the network and pull their operating systems from shared storage. This can simplify management and reduce dependence on individual SD cards. Some builds also attach SSD storage to one or more nodes over USB 3.0, which is a good move when you need more durable or faster storage for containers, logs, or shared data.
5. Cooling and a Case
Clusters get warm. They also collect cables with the enthusiasm of a junk drawer. A proper case, frame, or tray helps with airflow, serviceability, and your future sanity. That can mean a stacked acrylic case, a 3D-printed rack, a custom metal enclosure, or a compact cluster carrier board.
Heatsinks help. Fans help more. A case that keeps boards organized and labels visible helps most of all when you are troubleshooting node number four at midnight and all the boards look suspiciously identical.
How to Build a Raspberry Pi Cluster Step by Step
Step 1: Decide What the Cluster Is For
Before buying anything, decide what the cluster will do. A cluster meant for learning Kubernetes is different from one meant for MPI experiments, classroom use, or lightweight hosting. Your use case determines RAM needs, storage strategy, network complexity, and whether you really need more than three nodes.
Step 2: Choose a Head Node and Worker Nodes
Most clusters use one head node that handles administration, provisioning, or shared services. The worker nodes run the actual workloads. Name each node clearly. Use hostnames that make sense. “pi-one,” “pi-two,” and “pi-three” are not elegant, but they are infinitely better than trying to remember which green board has the smug blinking light.
Step 3: Install a 64-Bit Operating System
If you plan to run containers seriously, use a 64-bit operating system. That matters because many container images are designed for 64-bit ARM environments. A 64-bit Raspberry Pi OS or Ubuntu build is usually the right starting point. This keeps your software options wider and reduces the odds of finding out, halfway through a deployment, that the image you need does not support your setup.
Step 4: Configure Networking and SSH
Give each node a stable identity. That means static IP addresses or reliable DHCP reservations, consistent hostnames, and SSH access. Make sure every node can talk to every other node. Test connectivity early. A cluster that cannot communicate is just a collection of introverts on a switch.
Step 5: Assemble the Hardware Cleanly
Mount the boards in your case or frame, connect Ethernet cables, attach cooling, and sort power delivery. Label cables now, not later. “Later” is a fictional place where organized people live. Clean assembly is not just for looks. It makes maintenance, cooling, and debugging much easier.
Step 6: Add Shared Storage or Network Boot if Needed
Starter clusters can skip this. More advanced builds benefit from shared storage, SSD-backed services, or network boot. A head node with external SSD storage can serve boot images, shared directories, or cluster data. This is where your cluster starts feeling less like a stack of hobby boards and more like a tiny infrastructure lab.
Step 7: Install the Cluster Software
Now comes the fun part. For lightweight orchestration, K3s is a popular choice because it is designed for resource-constrained environments and is easier to set up than full-sized Kubernetes. Docker or containerd-based workflows also make sense for simpler setups. If you want classic parallel computing, you can explore MPI. If you want reproducible automation, Ansible deserves a place in the toolbox.
A smart beginner path is this: get the nodes working, install container tooling, add K3s, deploy one tiny test service, and only then add fancy extras like load balancers, dashboards, ingress, or monitoring. Do not begin with seventeen moving parts unless your real hobby is troubleshooting YAML.
Step 8: Deploy a Real Workload
A cluster becomes meaningful when it runs something useful. That could be a simple web app, a Home Lab dashboard, a media-related service, a CI runner, a distributed build job, an educational code sandbox, or an edge application that benefits from multiple small nodes. Start with something modest and observable. If it can be tested in a browser, even better.
What a Raspberry Pi Cluster Is Actually Good For
Kubernetes and container labs: This is probably the most popular modern use case. A Pi cluster is an affordable way to learn node scheduling, deployments, services, ingress, rolling updates, and storage behavior in a real multi-node environment.
Self-hosted services: Lightweight web apps, dashboards, internal tools, DNS filtering, home automation support services, and personal developer infrastructure can all make sense on a cluster when designed appropriately.
Education: Clusters are excellent teaching tools. Instructors can centralize hardware, reduce desk clutter, and let students connect remotely to their assigned Pi environments.
Edge computing experiments: Because Raspberry Pi-class systems are small, efficient, and deployable outside traditional data centers, they are useful for exploring edge-style workloads closer to sensors, devices, or local users.
Distributed computing and automation: Some parallel or batch-style tasks can be divided across nodes, especially when the goal is learning rather than maximum enterprise performance.
What a Raspberry Pi Cluster Is Not Good For
Now for the healthy reality check. A Pi cluster is not the best tool for everything.
It is not ideal for heavy databases with demanding write patterns unless you know exactly how you are handling storage and redundancy. It is not the right answer for large AI training jobs, GPU-heavy workflows, or applications that require huge shared memory pools. It is also not a cheat code for single-threaded software. If one process cannot be split up, adding more Pis may add only more electricity, more heat, and more opportunities for dramatic blinking.
And while clusters look cost-effective at first, accessories add up. Cases, cables, cooling, storage, HATs, switches, power gear, and replacement cards all nibble at your budget. The final build can still be worth it, but the cheapest part is usually the fantasy version you imagined before pricing everything out.
Real Builds Show the Pattern
Across many documented Pi cluster builds, the same pattern shows up again and again. A working cluster usually combines a clear purpose, thoughtful power design, wired networking, manageable storage, and some form of orchestration. The prettiest builds are often not the biggest ones. They are the ones where every cable, node, and airflow path has a reason to exist.
Some builders favor compact “bramble” style clusters with just a few nodes for development and testing. Others go bigger with classroom or demonstration systems. There are rack-mounted examples built for colocated hosting, portable examples designed for trade shows, and custom carrier-board builds that turn Compute Modules into tidy little server trays. Even the most elaborate clusters usually solve the same three practical problems: power, networking, and software management.
That is the hidden lesson inside the flashy photos. Building a Raspberry Pi cluster is not mainly about stacking hardware. It is about designing a small distributed system that stays understandable when something goes wrong. And something always goes wrong. That is not a flaw. That is the curriculum.
Field Notes: What the Experience of Building One Feels Like
Building a Raspberry Pi cluster is one of those projects that starts with confidence and ends with perspective. At first, it seems simple: buy a few Pis, add a switch, flash some cards, install software, done. That illusion usually lasts until you have all the parts on the desk and realize you are not building one computer. You are building a tiny society of computers, and societies are famously difficult to organize.
The first surprise is physical. One Raspberry Pi feels tiny. Four or five of them, plus power supplies, Ethernet cables, cooling, storage, and a case, somehow become a small ecosystem. The second surprise is that the cluster starts teaching lessons before you even install software. You learn which cables are too stiff, which power adapters get suspiciously warm, which cases look gorgeous online but trap heat like a toaster, and why labeling matters more than your pride wants to admit.
Then the software lessons begin. A single Pi can be forgiving. A cluster is less sentimental. If one node has a slightly different configuration, different package version, different SSH key issue, or different hostname format, the whole build starts acting like a band with one musician playing jazz and the others playing marching music. That is why automation becomes so addictive. Once you feel the joy of changing all nodes with one playbook instead of repeating the same commands by hand, there is no going back.
There is also a strange satisfaction in watching a real workload spread across several tiny boards. It does not matter if the task is modest. Seeing services schedule, nodes report healthy status, and traffic move through a system you assembled yourself feels deeply rewarding. It is part science project, part infrastructure training, part victory lap for patience.
At the same time, the experience is humbling. A Raspberry Pi cluster makes bottlenecks visible in a very honest way. You quickly learn that storage speed matters, network design matters, cooling matters, and software architecture matters even more. It is a wonderful antidote to the lazy idea that computing problems are solved just by adding hardware. Sometimes the real fix is a better deployment model, smarter storage, or fewer moving parts.
Perhaps the best part of the whole experience is that the cluster grows with you. It can begin as a three-node experiment for learning K3s and end up as a long-term homelab platform, classroom demo, edge testbed, or self-hosted sandbox. You might replace SD cards with SSDs, move to PoE, redesign the case, add monitoring, or migrate to Compute Modules. The cluster becomes less of a one-time build and more of a living lab.
That is why Raspberry Pi clusters remain so appealing. They are not always the cheapest way to get raw compute, and they are certainly not the simplest way to run a service. But they are one of the best ways to understand how modern distributed systems really behave. They turn abstract infrastructure concepts into physical, blinking, slightly warm reality. And honestly, that is half the fun.
Conclusion
A Raspberry Pi cluster build shows both how and what in the most hands-on way possible. It shows how clustered systems are assembled: with nodes, networking, power, storage, automation, and careful planning. It also shows what a cluster is actually for: distributed services, orchestration, learning, edge workloads, teaching, and experimentationnot miracle-level performance for every random task under the sun.
If you want a project that looks cool, teaches real infrastructure skills, and gives you an excuse to buy more Ethernet cables than any normal person should own, a Raspberry Pi cluster is a fantastic build. Start small, keep the wiring clean, use a 64-bit OS, choose realistic workloads, and let the project teach you what the cloud has been hiding behind glossy dashboards all along.