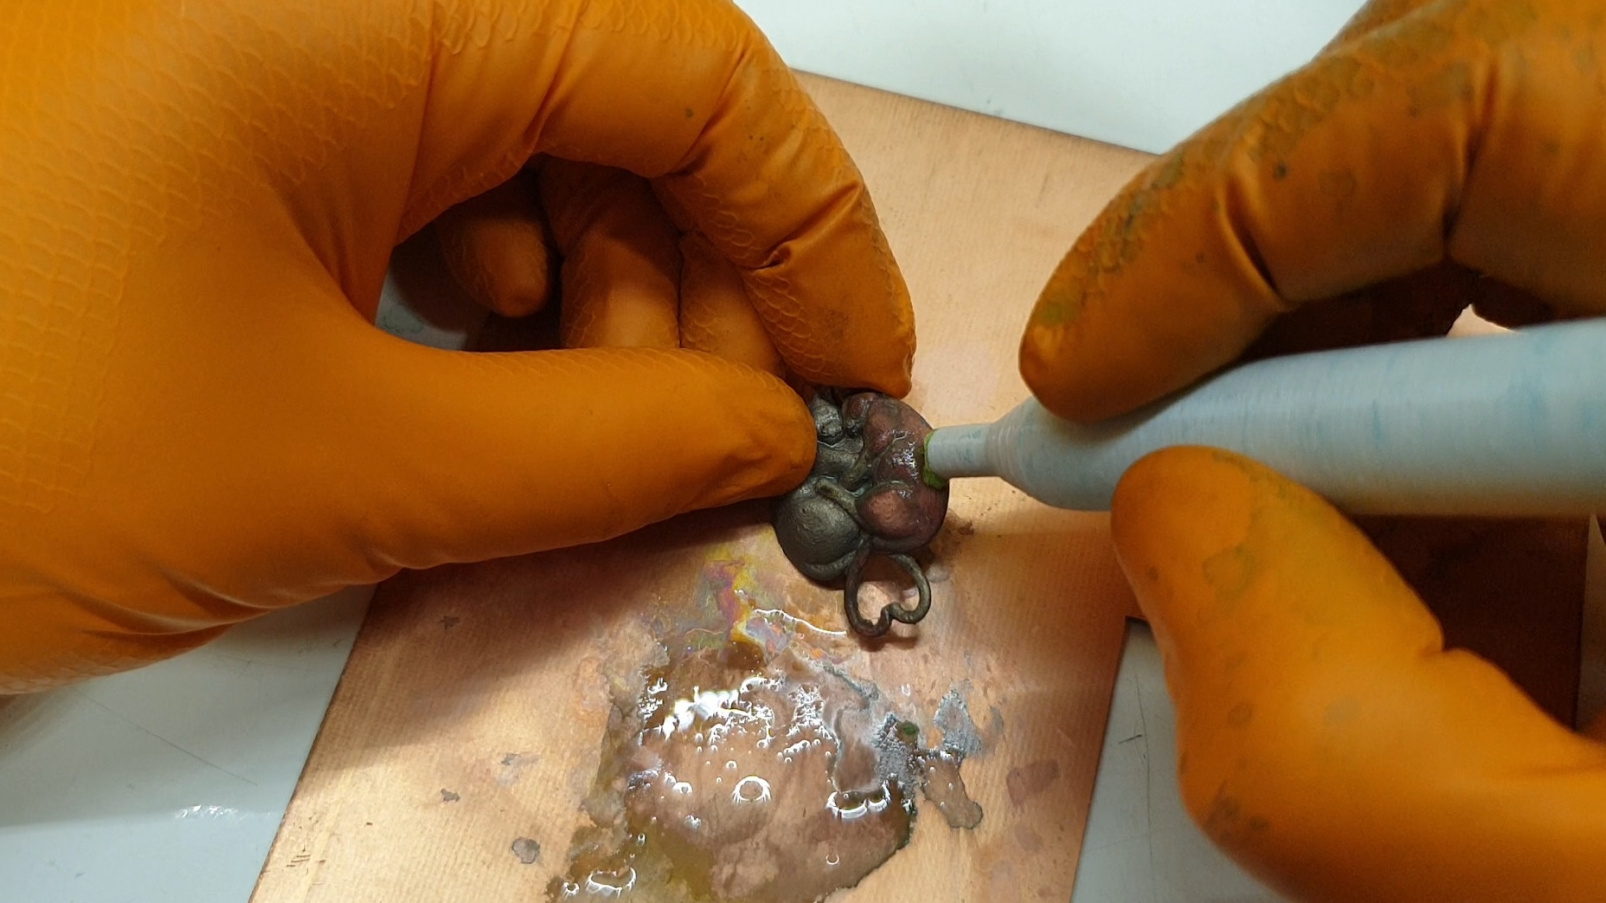
Electroplating sounds simple until the object in front of you has corners, holes, curves, threads, odd little pockets, and the personality of a crumpled paperclip. In theory, you put a conductive object into an electrolyte bath, connect it to a DC power supply, add an anode, and persuade metal ions to form a shiny new coating. In practice, complex objects behave like they are auditioning for a reality show called Everything That Can Plate Unevenly, Will.
That is where an electroplating marker earns its place on the workbench. Think of it as a small brush-plating tool shaped like a pen or marker. Instead of dunking the whole object into a tank, you bring the electrolyte, anode, and electrical contact directly to the area you want to plate. It is selective, controlled, surprisingly satisfying, and much easier to aim than a full plating bath when you only need to repair a worn spot, add copper to a trace, touch up a decorative surface, or experiment with localized metal deposition.
This guide explains how an electroplating marker works, what parts it needs, how to use it safely, and why it can be a clever solution when traditional plating turns into a slippery science project.
What Is an Electroplating Marker?
An electroplating marker is a handheld tool used for selective electroplating. It usually contains or holds a conductive anode, an absorbent tip or sleeve, a wire connection to the positive side of a DC power supply, and a plating solution that wets the tip. The object being plated connects to the negative side of the circuit and becomes the cathode.
When the wet marker tip touches the workpiece, current flows through the electrolyte. Metal ions in the solution reduce onto the surface, forming a thin metallic layer. Instead of coating everything in a bath, the marker deposits metal where you move the tip. It is basically electroplating with handwriting skills.
Electroplating Marker vs. Traditional Bath Plating
Traditional bath plating immerses the entire part in an electrolyte tank. It is ideal for uniform coatings on simple shapes or large production runs. But when objects have deep recesses, mixed materials, fine details, or areas that must remain uncoated, bath plating can become complicated fast. You may need careful masking, custom fixtures, agitation, controlled chemistry, and a generous amount of patience.
An electroplating marker takes a different approach. It works more like brush plating, where the anode is wrapped in an absorbent material and moved across the surface. This allows targeted plating without needing to submerge the entire object. For repairs, prototypes, jewelry touch-ups, model parts, tool restoration, and electronics experiments, that precision can be more useful than a big tub of chemistry.
Why Plating Complex Objects Is So Difficult
Complex objects cause problems because electroplating is not only about chemistry. It is also about electricity, surface preparation, geometry, and fluid movement. If one of those misbehaves, the final coating may look patchy, burnt, powdery, thin, or just plain rude.
Current Density Is Not Even Everywhere
Electroplating depends on current density, or how much current reaches a given surface area. Sharp corners, edges, and raised areas often attract more current than recessed spots. That means edges may plate faster, while holes and inside corners lag behind. The result can be a coating that is thick where you do not need it and thin where you do.
With a marker, you can focus directly on the low-coverage areas. Instead of asking the whole object to cooperate in a bath, you give attention to one spot at a time. It is the electrochemical version of saying, “No, no, we are going to fix this corner first.”
Recesses Trap Air and Solution
Deep grooves, blind holes, threads, and small cavities can trap bubbles. Since bubbles block contact between the electrolyte and the surface, they prevent plating in those areas. In a bath, agitation helps, but it may not fully solve the problem on complicated shapes.
A marker lets you wet, rub, and re-wet the target area manually. The movement helps refresh the solution and remove tiny bubbles from the surface. This is especially helpful when working around small mechanical parts, decorative relief, or PCB features.
Masking Can Become a Tiny Nightmare
If you only want to plate one part of an object, traditional plating requires masking everything else. Masking flat surfaces is manageable. Masking a sculpted object, threaded part, or assembled component can feel like wrapping a burrito with tweezers.
Selective plating reduces the need for elaborate masking. You still may need tape, lacquer, wax, or other barriers for clean edges, but you are not forced to protect every square millimeter from a full bath.
How an Electroplating Marker Works
The basic science is straightforward. The workpiece is connected to the negative terminal of a DC power source. The marker’s internal electrode or conductive core is connected to the positive terminal. The marker tip is saturated with electrolyte containing dissolved ions of the metal you want to deposit.
When the tip touches the surface, the circuit is completed. Metal ions in the electrolyte gain electrons at the workpiece and become solid metal. The marker tip acts as a portable plating zone. Move it slowly and evenly, and the coating grows where the solution and electricity meet.
The Main Parts
A simple electroplating marker usually includes a handle, a conductive anode, an absorbent tip, wiring, and plating solution. The anode may be graphite, carbon, platinum-coated material, stainless steel for certain processes, or a compatible metal depending on the plating chemistry. For many hobby experiments, graphite rods are popular because they are conductive, easy to shape, and relatively resistant to many solutions.
The absorbent tip is important. It must hold electrolyte while preventing the bare anode from scraping or shorting against the workpiece. Felt, cotton, fiberglass sleeving, or purpose-made brush-plating covers may be used. The tip should stay wet but not drip everywhere like a leaky science fountain.
The Power Supply
A current-limited DC power supply is strongly preferred. Many plating problems come from too much current too quickly. Excessive voltage can cause dark deposits, burning, hydrogen bubbling, poor adhesion, and a finish that looks more like soot than metal.
For small marker plating, start low and increase gradually only if the deposit is too slow. The right setting depends on the solution, metal, surface area, tip size, and movement speed. Commercial pen-plating solutions often provide recommended voltage ranges, and those instructions should be followed carefully.
Materials and Tools You May Need
For a practical electroplating marker setup, gather a nonconductive handle or marker body, a conductive anode rod or strip, absorbent tip material, insulated wire, alligator clips or banana plugs, a current-limited DC power supply, compatible plating solution, distilled water for rinsing, gloves, eye protection, paper towels, and containers for cleanup.
You also need good surface-preparation supplies. These may include mild detergent, isopropyl alcohol, fine abrasive pads, degreaser, cotton swabs, masking tape, and clean cloths. Surface preparation is not glamorous, but it decides whether the plated metal sticks or flakes off like a bad sunburn.
Choosing the Plating Solution
Use a plating solution designed for the metal you want to deposit. Copper solutions are common for electronics and base layers. Nickel solutions are used for durability and appearance, but nickel compounds can cause allergic reactions and require careful handling. Gold, silver, zinc, and tin solutions are also available, though some chemistries are strictly professional territory.
Avoid improvised chemistry unless you understand the risks. Never use cyanide-based plating solutions in a home or casual workshop. Read the safety data sheet for every chemical, work with ventilation, and treat used solution as chemical waste rather than sink-friendly blue water.
How to Make a Simple Electroplating Marker
The goal is to build a tool that holds a wet electrolyte tip around a conductive anode while keeping your hand insulated from the electrical and chemical contact area. The design does not need to look fancy. It just needs to be safe, controllable, and easy to clean.
Step 1: Build the Handle
Use a plastic marker body, a small plastic tube, or a 3D-printed handle. The handle should keep the conductive anode centered and insulated. Leave enough anode exposed at the tip for wrapping with absorbent material, but not so much that it can accidentally touch the workpiece directly.
Step 2: Install the Anode
Insert a graphite rod, carbon rod, or appropriate anode material through the handle. Attach a wire securely to the back end of the anode. A mechanical clamp, crimp, or conductive fastener can work, depending on the material. Make sure the connection is solid. A loose connection causes inconsistent current, heat, and language unsuitable for polite company.
Step 3: Wrap the Tip
Wrap the exposed anode with felt, cotton, or brush-plating sleeve material. The wrap should be snug and absorbent. It should hold solution against the surface while preventing metal-to-metal contact between anode and workpiece. Secure it with chemical-resistant thread, a small band, or a removable collar.
Step 4: Add the Electrical Leads
Connect the marker wire to the positive terminal of the power supply. Connect the workpiece to the negative terminal. For small objects, an alligator clip is often enough. For larger parts, use a firm connection on a clean, conductive area. Poor electrical contact is one of the most common reasons plating fails.
Step 5: Test on Scrap First
Before touching the real part, test the marker on a scrap piece of similar metal. This helps you dial in voltage, movement speed, solution wetness, and surface preparation. If the test deposit is dark, powdery, or rough, reduce the current, clean better, move the tip more evenly, or check the solution instructions.
How to Use an Electroplating Marker
Start by cleaning the workpiece thoroughly. Oils, fingerprints, oxide, dirt, and polishing compound can stop adhesion. Wash the part, degrease it, lightly abrade if appropriate, rinse with distilled water, and avoid touching the prepared surface with bare fingers.
Moisten the marker tip with plating solution. It should be wet enough to conduct but not dripping excessively. Turn on the power supply at a low setting. Touch the tip to the surface and move it in slow, overlapping strokes. Keep the tip moving so one spot does not overheat or burn. Re-wet the tip as needed.
Watch the surface. A good deposit usually builds gradually and evenly. If you see aggressive bubbling, black streaks, or a chalky texture, pause and adjust. After plating, rinse the part with distilled water and dry it gently. Depending on the metal and purpose, you may polish, seal, or add another layer.
Example: Touching Up a Copper Area
Suppose you are repairing a worn copper contact or adding copper to a small conductive area. After cleaning and masking nearby surfaces, connect the workpiece to the negative lead and the copper-compatible marker to the positive lead. Use a copper electrolyte intended for plating, keep the tip wet, and move in small circles or strokes. Several thin passes are better than one aggressive pass. The result should be a controlled copper build-up without submerging the entire object.
Example: Working Around Odd Shapes
For a decorative part with raised lettering or a mechanical component with tight corners, the marker allows you to plate selectively around details. Instead of hoping a bath reaches every recess evenly, you can target the edges, grooves, and worn high spots. This is not magic, but it does feel like a cheat code when bath plating would require complicated fixtures.
Common Mistakes and How to Avoid Them
Skipping Surface Preparation
Electroplating is brutally honest about dirty surfaces. If the surface is oily, oxidized, or contaminated, the coating may peel or refuse to form evenly. Clean first, plate second. Your future self will thank you.
Using Too Much Voltage
More power does not automatically mean better plating. Too much current can create burnt deposits, excessive bubbling, and poor adhesion. Start low, move steadily, and build the coating in multiple passes.
Letting the Tip Dry Out
A dry tip breaks the electrochemical path and can scratch the surface. Keep the tip moist with fresh solution. If the deposit becomes streaky, check whether the tip is drying, contaminated, or worn.
Touching the Bare Anode to the Workpiece
If the bare anode touches the cathode directly, you can create a short circuit. The absorbent wrap is not decoration; it is insulation, solution carrier, and peacekeeper. Inspect it often.
Safety Notes for Electroplating Marker Projects
Electroplating uses electricity and chemicals, so treat it with respect. Wear chemical-resistant gloves and eye protection. Work in a ventilated area. Keep food and drinks away from the bench. Label all containers. Do not mix chemicals casually. Do not pour used plating solutions down the drain unless local regulations and the product instructions clearly allow it.
Nickel compounds can be sensitizers. Copper salts can irritate skin and are harmful to aquatic life. Acids and cleaners can burn. Even “small” hobby quantities deserve adult-level caution. If you are working with unfamiliar chemistry, read the safety data sheet before opening the bottle, not after something has fizzed, stained, or escaped.
When an Electroplating Marker Is the Right Tool
An electroplating marker is ideal when you need localized plating, small repairs, controlled experiments, or access to awkward geometry. It is useful for electronics work, restoration, model making, jewelry touch-ups, prototype finishing, and adding conductive layers to small prepared areas.
It is not the best choice for thick, uniform coatings over large surfaces. It also will not rescue a badly prepared surface or replace professional plating for critical aerospace, medical, food-contact, or load-bearing parts. For those jobs, professional shops use controlled chemistry, tanks, testing, waste management, and process documentation for a reason.
Real-World Experience: What You Learn After Using One
The first lesson from using an electroplating marker is that patience plates better than enthusiasm. Beginners often crank the power supply up because they want instant shine. The marker responds by producing dark smudges, bubbles, and a finish that says, “Congratulations, you made metallic toast.” Lower current, cleaner surfaces, and slower passes almost always produce better results.
The second lesson is that the tip matters more than expected. A loose wrap gives uneven contact. A dirty wrap drags contamination across the surface. A dry wrap makes the deposit patchy. After several passes, the tip may collect oxides, residue, or tiny particles, so rinsing or replacing the cover can improve the finish dramatically. Treat the tip like a paintbrush: clean it, shape it, and do not use the same one for every chemical under the sun.
The third lesson is that complex objects are not equally complex everywhere. A curved part may plate beautifully on the outside but fight you in the inside corner. A threaded part may accept plating on the peaks but resist it in the valleys. A small decorative casting may look simple until the marker reveals every pit and scratch. Working in sections helps. Plate one feature, rinse, inspect, and continue. The marker rewards observation.
The fourth lesson is that masking is still useful. Selective plating reduces masking, but it does not eliminate it. If you need crisp borders, use tape, lacquer, wax, or another compatible barrier. The marker can wander, solution can creep, and your hand can slip. A little masking turns a nervous operation into a controlled one.
The fifth lesson is that plating is only as good as the layer underneath. Copper can be a helpful base layer for other finishes, but it will not hide deep scratches unless you build and polish it properly. Nickel can add wear resistance and shine, but it needs the right preparation and safe handling. Gold looks luxurious, but if the underlayer is poor, it simply becomes expensive proof that shortcuts are visible.
The sixth lesson is that documentation helps more than memory. Write down the solution used, voltage, current behavior, tip material, cleaning method, and number of passes. When a test works beautifully, you will want to repeat it. When it fails, notes help you identify the villain. Was the surface greasy? Was the tip too dry? Was the voltage too high? Was the metal incompatible? Without notes, every session becomes a fresh mystery novel.
Finally, an electroplating marker teaches respect for small-scale manufacturing. A thin metal film may look simple, but it depends on chemistry, electricity, cleanliness, timing, and touch. That is why the tool is so satisfying. It turns plating from an all-or-nothing dunk tank process into something closer to drawing, repairing, and sculpting with metal. For makers, restorers, and electronics experimenters, that control is the real shine.
Conclusion
Making an electroplating marker is a practical way to handle the awkward truth of plating: complex objects are hard. Full immersion plating can struggle with recesses, uneven current density, trapped bubbles, and fussy masking. A marker-style brush-plating tool gives you a smaller, smarter plating zone that can reach the places a bath treats unfairly.
The key is to build the tool safely, use compatible chemistry, prepare surfaces carefully, keep the tip wet, and work slowly. Done well, an electroplating marker can touch up worn areas, add localized copper or nickel, support electronics experiments, and make small finishing jobs far less intimidating. It will not replace professional plating for every job, but for targeted work on complicated shapes, it is one of those tools that makes you wonder why you did not build one sooner.
Note: This article is written for educational and editorial purposes. Always follow product instructions, safety data sheets, and local disposal rules when working with electroplating chemicals.