If you have ever looked at a Photoshop file and seen 47 layers named Layer 1 copy 3 final FINAL really-final, welcome home. Learning how to merge layers in Photoshop is one of those foundational skills that sounds simple, but it can save you time, reduce clutter, and prevent your project from turning into a digital junk drawer.
At its best, merging layers helps you organize a design, simplify a composite, and prepare a file for export. At its worst, it can permanently flatten work you wanted to keep editable. In other words, it is powerful, useful, and just mischievous enough to deserve respect.
This guide breaks down exactly how to merge layers in Photoshop, when to do it, when to avoid it, and how to protect your sanity while doing it. You will also learn the difference between Merge Layers, Merge Visible, Merge Down, and Flatten Image, plus a few smarter alternatives for non-destructive editing.
What Does It Mean to Merge Layers in Photoshop?
In Photoshop, layers let you keep different elements of a project separate. Text can live on one layer, a photo on another, a color adjustment on a third, and a retouching pass on yet another. That separation is what makes Photoshop flexible.
When you merge layers, Photoshop combines selected layers into one. After that, those separate pieces no longer behave independently. So if you merge a text layer with a photo layer, for example, that text usually stops being editable as live text. If you merge an adjustment layer with the image beneath it, the adjustment becomes part of the pixels. Translation: your file gets cleaner, but your freedom shrinks a little.
That is why understanding how to merge layers in Photoshop is not just about clicking a menu command. It is about choosing the right command for the right moment.
Merge Layers vs. Merge Visible vs. Flatten Image
Before you start merging like an overconfident kitchen remodeler with a sledgehammer, you need to know which command does what.
Merge Layers
This option combines only the layers you select. It is the most precise choice when you want to clean up a document without affecting everything else.
Merge Down
This merges the active layer with the compatible layer directly below it. It is handy when you know exactly which two layers belong together, such as a duplicate retouch layer and the base image beneath it.
Merge Visible
This command merges all layers that are currently visible in the Layers panel. Hidden layers stay out of the merge. It is useful when you want to create a cleaner working version of the visible content without touching elements you intentionally hid.
Flatten Image
This is the nuclear option. Flatten Image collapses the document into a single layer. Great for final output copies. Not so great when a client emails 14 minutes later asking if the button can be “a little more blue and also somehow friendlier.”
How to Merge Layers in Photoshop Step by Step
Method 1: Merge Selected Layers
If you want the cleanest, safest, most intentional workflow, start here.
- Open your Photoshop document.
- Go to the Layers panel.
- Select the layers you want to combine. Hold Ctrl on Windows or Command on Mac to select multiple non-adjacent layers. Use Shift to select a range.
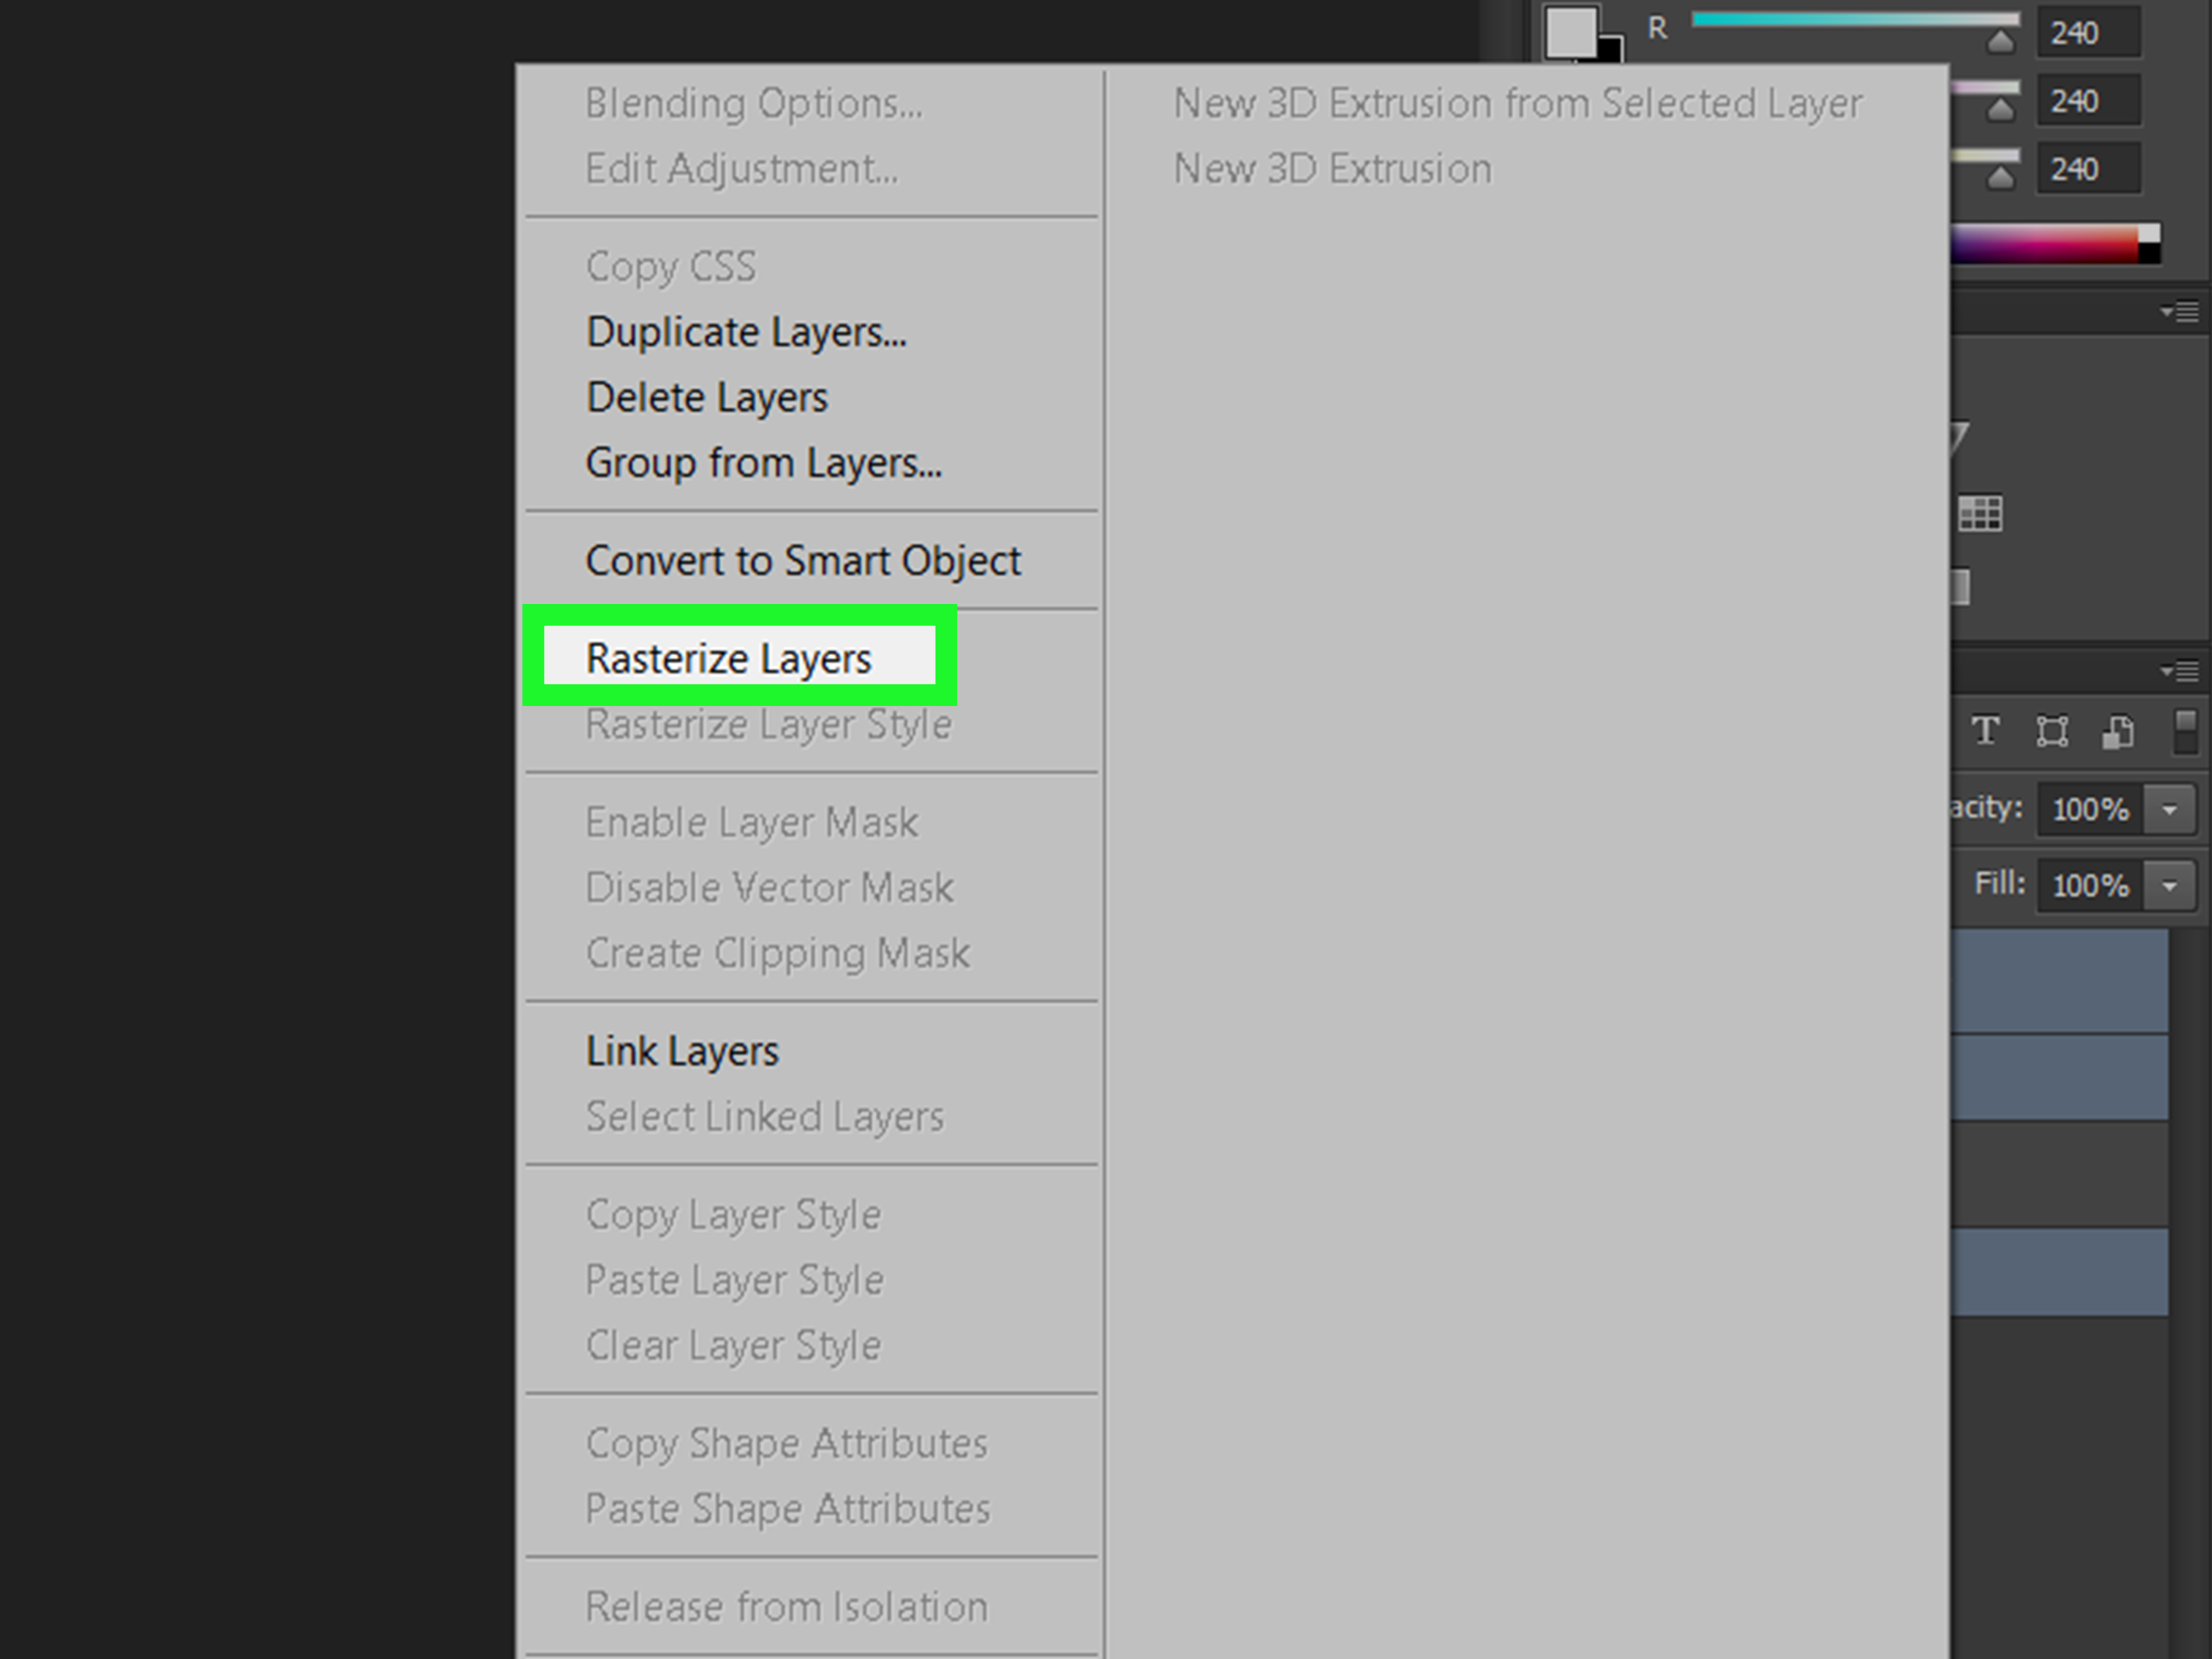
- Right-click one of the selected layers and choose Merge Layers, or go to Layer > Merge Layers.
- You can also use the shortcut Ctrl+E on Windows or Command+E on Mac when the right layers are selected.
This method is best when you are combining related content, such as multiple paint strokes, shape elements, or photo layers that no longer need to stay separate.
Method 2: Merge Visible Layers
Need to combine everything you can currently see, while keeping hidden layers untouched? Photoshop has a button for that.
- In the Layers panel, make sure only the layers you want included are visible.
- Hide any layers you do not want merged by clicking the eye icon.
- Go to Layer > Merge Visible.
This is a good move when you are creating a cleaner version of a busy composition, especially if you still want to preserve hidden backup layers, alternate concepts, or optional graphic elements.
Method 3: Create a Stamped Visible Layer
Now we are entering elite workflow territory. A stamped visible layer creates a new merged layer at the top while leaving your original layers intact underneath. In plain English, it gives you the convenience of a merged layer without immediately sacrificing editability.
Use the shortcut Shift+Alt+Ctrl+E on Windows or Shift+Option+Command+E on Mac.
This is one of the smartest ways to work when you want to sharpen, add finishing effects, apply high-pass detail, test a global tweak, or prep a near-final version without flattening your whole document. If Photoshop workflows had a “have your cake and eat it too” button, this would be it.
Method 4: Merge Down
If you are working one layer at a time and want to combine the active layer with the one directly beneath it, use Merge Down. This is especially common in detailed retouching or compositing when you finish one stage and want to simplify the stack.
Just be careful. Merge Down is efficient, but it is also the kind of shortcut that can quietly erase editability if you are not paying attention.
When You Should Merge Layers
Merging layers is useful, but the timing matters. In most cases, it makes sense when:
- You are done editing a group of layers and no longer need them separate.
- Your Layers panel looks like it is applying for its own ZIP code.
- You want to reduce visual clutter and make navigation easier.
- You need a simpler file for export or handoff.
- You are creating a stamped composite layer for final effects.
- You are preparing a version for printing, delivery, or archival output.
For example, if you built a product ad with ten shadow layers, three highlight layers, and two texture overlays just to style one bottle, merging those finished effect layers into one grouped result can make the document dramatically easier to manage.
When You Should Not Merge Layers
Photoshop veterans learn this lesson the hard way: just because you can merge layers does not mean you should.
Avoid merging too early when:
- You may need to edit text later.
- You are still testing adjustment layers or masks.
- You are working with Smart Objects.
- You expect client revisions.
- You are building templates or reusable design systems.
- You have not saved an editable PSD copy.
If you merge an adjustment layer or fill layer into an image layer, those edits become permanent pixel changes. If you merge type into a raster layer, you lose the convenience of editing the wording, font, size, or spacing later. That may not matter for a final export, but it definitely matters when someone says, “Can we change the headline from Summer Sale to Summer Savings Spectacular?”
A Smarter Alternative: Convert Layers to a Smart Object
If your goal is to move, scale, or transform multiple layers as one object without destroying editability, consider converting them to a Smart Object instead of merging them.
- Select the layers you want to keep together.
- Right-click and choose Convert to Smart Object.
This packages the selected layers into one container-like layer. You can transform that Smart Object as a single unit, but still open it later and edit the original contents. It is one of the best non-destructive tricks in Photoshop, especially for mockups, composites, UI layouts, and designs that may be revised later.
Think of it as putting your layers into a well-labeled folder instead of blending them into one irreversible smoothie.
Common Problems When Merging Layers in Photoshop
Problem 1: Text Is No Longer Editable
If you merged a type layer with a raster layer, Photoshop likely converted the result into pixels. The fix is simple but slightly annoying: go back to an earlier version, or restore from your History panel if the action was recent.
Problem 2: Adjustment Layers Became Permanent
This happens when you merge adjustment or fill layers with the image beneath them. The look may be correct, but the flexibility is gone. A better approach is to keep an editable PSD and only merge a duplicate or stamped layer when needed.
Problem 3: Hidden Layers Did Not Join the Merge
That is normal with Merge Visible. Hidden layers are intentionally excluded. If you want them included, make them visible first or select them directly and use Merge Layers.
Problem 4: The File Looks Fine but Edits Feel Locked
You may have flattened the image or merged layers too early. This is why experienced Photoshop users save versioned files such as project-editable.psd and project-final-export.psd. It sounds boring until it saves your weekend.
Best Practices for Merging Layers Without Regret
- Save an editable version first. Always keep a layered PSD before flattening or aggressively merging.
- Name your layers. Merging unnamed chaos is still chaos, just in fewer pieces.
- Use groups before merging. Sometimes the issue is organization, not layer count.
- Use stamped layers for final effects. It gives you flexibility and control.
- Choose Smart Objects for transform-heavy work. This preserves the ability to revise later.
- Flatten only at the end. Flatten Image is usually for delivery copies, not active working files.
Advanced Uses: Composites, Focus Stacks, and Photo Blends
Understanding how to merge layers in Photoshop becomes even more valuable in advanced workflows.
Photo Composites
When building a composite, you may stack subject cutouts, backgrounds, shadows, glow effects, and color grades on separate layers. As the project matures, merging finished effect layers can make the file more manageable. Just do it strategically, not impulsively.
Focus Stacking
Photographers often load multiple images as layers, align them, and blend detail from each one. In those cases, layer-based workflows matter because the merge usually comes after alignment and masking, not before.
Retouching and Sharpening
A stamped visible layer is a favorite for final-pass sharpening, dodging and burning tests, or texture adjustments. You get the merged look you need without throwing away the structure underneath.
Real-World Experiences With Merging Layers in Photoshop
If you spend enough time in Photoshop, merging layers stops being a technical command and starts feeling like a judgment call. The first few times people learn it, they usually use it the way new drivers use the gas pedal: enthusiastically, slightly too early, and with consequences.
One of the most common experiences is the “I cleaned up my file and accidentally removed my future options” moment. A designer builds a social media graphic, merges the headline with the background because the composition looks finished, and then gets a message asking for a last-minute sale date change. Suddenly, that tidy merged layer feels less like progress and more like a trap with rounded corners.
Another familiar scenario happens in photo editing. You finish a portrait retouch, add a few dodge-and-burn layers, maybe an adjustment layer or two, and then decide the document is getting heavy. So you merge. Everything looks great. Victory music plays. Then you realize the skin tone needs another tweak, or the client wants less contrast, or the lipstick color should be softer. At that point, an editable layer stack becomes priceless.
That is why many experienced Photoshop users develop a two-file habit. One file stays fully layered and editable. The other is the “working delivery” version where stamped layers, merges, and export prep happen. It is not glamorous, but it is incredibly practical. Think of it like cooking with mise en place: the extra organization feels unnecessary until you are halfway through and suddenly very grateful.
There is also a performance angle. On large PSDs, especially composite-heavy files, merging certain finished sections can make navigation smoother and reduce panel clutter. That can genuinely improve workflow. But seasoned users usually merge with intention, not panic. They ask, “Am I done with this section?” before they collapse it.
Smart Objects also tend to change how people think about merging. Once you realize you can package multiple layers together and still edit the contents later, you stop treating merge commands like your only cleanup option. That shift is huge. It turns Photoshop from a one-way road into something more flexible and forgiving.
In practical terms, the best experience usually comes from using the right level of commitment. Need a temporary combined layer for sharpening or color grading? Create a stamped visible layer. Need to transform several layers together? Use a Smart Object. Need to simplify a finished cluster of elements? Merge selected layers. Need a final output copy for delivery? Flatten that duplicate file and ride off into the sunset.
The people who become truly comfortable with Photoshop are not the ones who never make mistakes. They are the ones who build safety nets around normal mistakes. They save versions. They duplicate documents. They name layers. They resist flattening anything important at 1:57 a.m. while fueled entirely by iced coffee and misplaced confidence.
So yes, learning how to merge layers in Photoshop is a basic skill. But learning when to merge, when not to, and what to preserve is what makes the workflow feel professional.
Conclusion
Knowing how to merge layers in Photoshop can make your projects cleaner, faster, and easier to manage. The trick is using the right command for the job. Merge Layers works well for selected elements, Merge Visible helps consolidate what is on screen, and Flatten Image is best saved for final-output copies. When you want the merged look without sacrificing flexibility, a stamped visible layer or Smart Object is often the better move.
The short version? Merge with purpose, not impatience. Photoshop rewards careful workflows, and your future self will appreciate every editable layer you choose to keep.