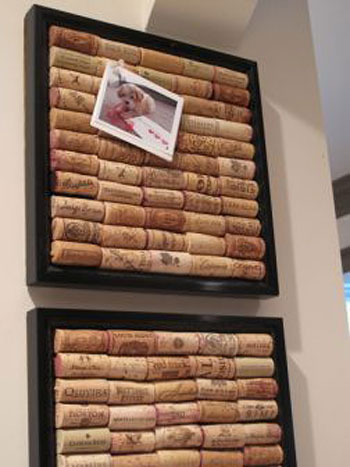
A wine cork bulletin board is one of those DIY projects that makes you feel clever before you even plug in the glue gun. It turns small, ordinary corks into a useful message center for notes, photos, reminders, recipes, coupons, study schedules, and the occasional dramatic sticky note that says “DO NOT FORGET THIS.” Best of all, it looks warmer and more personal than a plain store-bought cork board.
This project is also wonderfully forgiving. Your corks do not need to match perfectly. In fact, the different logos, shades, textures, and sizes are part of the charm. A wine cork bulletin board can look rustic, modern, farmhouse, coastal, vintage, or artsy depending on the frame, pattern, and finish you choose. It is a practical craft, a small home organization upgrade, and a conversation piece rolled into one tidy rectangle.
Below is a complete, beginner-friendly guide to making a wine cork bulletin board, including materials, layout ideas, gluing tips, mounting advice, mistakes to avoid, and real-life experience notes from the messy-but-fun side of DIY.
Why Make a Wine Cork Bulletin Board?
A DIY wine cork bulletin board gives old corks a second life. Instead of sitting in a drawer like tiny souvenirs from dinners, holidays, and “I’ll craft with these someday” moments, corks become a useful home decor item. The finished board can help organize daily life in an entryway, kitchen, office, dorm room, craft room, or family command center.
Another big benefit is customization. You control the size, shape, frame color, cork pattern, hanging direction, and final style. Want a small board for keys and appointment cards? Easy. Want a large board above a desk for inspiration photos and project notes? Also easy. Want a heart-shaped board for a gift? Slightly more dramatic, but still possible.
Because cork is naturally soft enough to hold push pins, it works well for a message board. Wine corks are thicker than standard cork sheets, so they create a chunky, dimensional surface. That depth gives the board texture and makes it feel more like handmade wall art than a basic office supply.
Materials You’ll Need
Before you begin, gather everything in one place. Nothing ruins the crafting mood faster than discovering your glue sticks have vanished into the same mysterious universe as missing socks.
Basic Supplies
- Clean wine corks, recycled corks, or craft corks
- A picture frame, shadow box frame, tray, or shallow wooden box
- Cardboard, plywood, hardboard, or foam board backing
- Hot glue gun and glue sticks
- Ruler or measuring tape
- Pencil
- Craft knife or small saw for trimming corks
- Cutting mat
- Sandpaper
- Picture hanger, sawtooth hanger, or D-rings
- Push pins or decorative tacks
Optional Decorative Supplies
- Paint or wood stain for the frame
- Painter’s tape
- Wood trim for filling gaps
- Fabric or scrapbook paper for the backing
- Small labels, hooks, or mini clips
- Clear protective topcoat for the frame
For corks, you can use natural corks, synthetic corks, or a mix. Natural corks usually have a softer, more organic look. Synthetic corks can be more uniform and colorful. If you do not have a collection at home, craft stores often sell bags of corks. You can also ask restaurants, event venues, or adult family members whether they save corks for crafts. The project is about upcycling, not about needing to buy bottles of anything.
How Many Corks Do You Need?
The number of corks depends on the size of your frame and the layout. A small 8-by-10-inch board may need around 50 to 80 corks. A medium 11-by-14-inch board may need around 100 to 150 corks. A larger 16-by-20-inch board may need 180 to 250 or more, especially if the corks are arranged tightly.
The easiest way to estimate is to lay the corks inside the frame before gluing. Do not guess from across the room with heroic confidence. Cork math is sneaky. Arrange the corks, count the rows, and add at least 10 extra corks for trimming, mistakes, and awkward edge gaps.
Step-by-Step: How To Make A Wine Cork Bulletin Board
Step 1: Choose the Right Frame
Start with a frame that has enough depth to hold the corks. A shadow box, tray, or deep picture frame works especially well. If you use a regular picture frame, remove the glass and check that the corks sit securely inside the frame without sticking out too awkwardly.
Wood frames are easy to paint, stain, or distress. Metal frames can look modern but may be trickier to glue against. Thrift stores are great places to find old frames for this project. The frame does not need to be perfect. A few scratches can become “rustic character,” which is DIY language for “we are not sanding this for three hours.”
Step 2: Prepare the Backing
Your corks need a firm surface underneath them. Cut a piece of cardboard, thin plywood, foam board, or hardboard to fit inside the frame. If the frame already has a sturdy backing, you may be able to use it as is.
For a more polished look, cover the backing with fabric or decorative paper before adding the corks. This is useful if tiny gaps show between corks. Neutral linen, black cardstock, kraft paper, or patterned scrapbook paper can add style without stealing attention from the cork design.
Step 3: Clean and Sort the Corks
Wipe corks with a dry cloth to remove dust. If any corks feel sticky or stained, clean them gently with a damp cloth and let them dry completely. Do not glue damp corks, because moisture can weaken the bond and create a musty smell later.
Sort corks by size, color, and design. Put shorter corks in one pile, longer corks in another, and interesting printed corks in a “show-off pile.” This makes pattern planning easier. If your corks vary a lot in length, you can trim them, but it is often easier to hide slightly uneven pieces near the edges.
Step 4: Plan the Cork Pattern
This is the most important design step. Place the corks inside the frame without glue. Try different layouts until the board feels balanced.
Popular wine cork bulletin board patterns include:
- Horizontal rows: simple, clean, and beginner-friendly.
- Vertical rows: neat and modern, especially for narrow boards.
- Brick pattern: staggered rows that hide small size differences.
- Herringbone pattern: stylish and eye-catching, but requires more trimming.
- Checkerboard pattern: alternating horizontal and vertical corks for texture.
- Border-and-fill pattern: corks around the edge first, then a different pattern in the center.
If this is your first wine cork board, choose horizontal rows or a checkerboard pattern. Herringbone looks gorgeous, but it can turn a relaxing afternoon craft into a tiny geometry exam.
Step 5: Trim Corks for the Edges
Once the layout is set, you may notice small gaps along the sides. You can solve this in three ways: trim corks to fit, add thin wood trim, or adjust the pattern. Trimming corks gives the cleanest custom fit, but it requires care.
Place the cork on a cutting mat, mark the cut line with pencil, and use a sharp craft knife or small saw. Cut slowly, keeping fingers away from the blade. If you are younger or inexperienced with sharp tools, ask an adult to help with this step. Lightly sand the cut edge so it sits flat.
Step 6: Glue the Corks Down
Heat the glue gun according to the manufacturer’s directions and work in small sections. Lift one cork at a time, apply a line of hot glue to the back, and press it firmly onto the backing. Hold it for a few seconds before moving to the next cork.
Start in one corner or along one edge and continue row by row. Keep checking that the corks remain straight. Hot glue sets quickly, which is both helpful and mildly rude when you realize one cork is crooked. If a cork shifts, fix it immediately before the glue hardens.
For extra strength, add a small dab of glue between neighboring corks where they touch. This helps the cork surface act like one solid panel instead of a crowd of individual corks trying to leave the party early.
Step 7: Let the Board Dry Fully
Even though hot glue sets quickly, give the board time to cool and cure. Let it rest flat for at least 30 minutes. If you added wood glue or a heavier adhesive, let it dry overnight. Do not hang the board too soon, especially if it is large and heavy.
After drying, tug gently on a few corks to check the bond. If any feel loose, lift them carefully and reglue. Remove glue strings with your fingers or tweezers. A hair dryer on low heat can also help soften stubborn glue threads, but use it lightly.
Step 8: Add Hanging Hardware
Attach a sawtooth hanger, D-rings, or picture wire to the back of the frame. For small boards, a sawtooth hanger usually works fine. For larger boards, use stronger hardware and wall anchors if needed.
Measure the center point before attaching the hanger. A crooked board can make even the most organized command center look like it is quietly sliding into chaos. Use a level when hanging it on the wall.
Step 9: Style and Use Your Board
Now the fun begins. Add push pins, mini notes, photos, recipe cards, calendars, ticket stubs, fabric swatches, postcards, or small inspiration images. Use the board as a family message center, office planner, kitchen recipe station, craft room idea board, or dorm room photo display.
For a cleaner look, limit the board to one purpose. For example, make it a weekly meal planning board, a school assignment board, or a “things I must not lose” board. If you pin everything from grocery lists to mystery screws, the board will still work, but it may become a decorative junk drawer with excellent texture.
Design Ideas for a Better-Looking Wine Cork Board
Paint the Frame
A painted frame can completely change the mood of the board. Black feels modern. White feels fresh and farmhouse. Navy adds a classic touch. Gold makes the corks look surprisingly fancy. If you want a vintage look, dry-brush a lighter paint over a darker base and sand the corners gently.
Mix Cork Directions
Alternating cork directions creates movement. Try two corks horizontal, two vertical, then repeat. This checkerboard style helps hide small differences in cork length and makes the board look intentional.
Use Special Corks as Accents
If some corks have interesting logos, dates, or patterns, place them where they will be visible. You can create a subtle center stripe, border, or scattered accent effect. This adds personality without making the board look too busy.
Add a Mini Shelf or Hooks
For an entryway board, attach a small shelf or hooks below the frame for keys, sunglasses, or mail. Keep the added weight reasonable and make sure the frame is mounted securely. A cork board should organize your life, not leap off the wall with your keys attached.
Common Mistakes to Avoid
Using Too Little Glue
A tiny dot of glue may not hold a cork long term. Use a solid line or generous dab on the back of each cork. If the board will be used often, glue between corks as well.
Skipping the Dry Layout
Always test the pattern before gluing. Corks vary in size, and a layout that looks perfect in your imagination may leave a strange gap at the bottom. Dry fitting saves time and frustration.
Choosing a Weak Backing
Thin paperboard can bend under the weight of the corks. Use sturdy backing, especially for medium and large boards. If the backing flexes before you glue anything, it will not magically become stronger later.
Hanging It With Weak Hardware
Wine cork boards can be heavier than they look. Choose hanging hardware based on the finished weight. Use wall anchors for drywall if you cannot hang the board on a stud.
Safety Tips for This DIY Project
Hot glue can burn skin, so keep fingers away from fresh glue and work on a protected surface. Craft knives and small saws should be used slowly and carefully. Younger crafters should ask an adult to handle cutting and hanging. Work in a well-ventilated area if painting, staining, or using strong adhesives.
Also, choose push pins carefully if the board will hang in a room used by small children or pets. Decorative tacks look cute, but they should be stored and used responsibly. A beautiful DIY board is less impressive when the dog decides a thumbtack is a snack. Spoiler: no one wins.
Where To Use a Wine Cork Bulletin Board
A wine cork bulletin board works in more places than you might expect. In a kitchen, it can hold recipes, grocery lists, and weekly menus. In a home office, it can organize deadlines, business cards, and project notes. In a bedroom, it can display photos, quotes, and small keepsakes. In a craft room, it can hold sketches, color palettes, and fabric samples.
It also makes a thoughtful handmade gift. You can personalize it by using a frame that matches the recipient’s decor or by arranging corks in a meaningful pattern. For a housewarming gift, pair it with a set of pretty push pins. For a teacher, student, or remote worker, add a small calendar and note cards.
Maintenance: How To Keep It Looking Good
Dust the board occasionally with a microfiber cloth or soft brush. Avoid soaking the corks with water. If a cork comes loose, reglue it with hot glue or craft adhesive. If the frame gets scuffed, touch it up with paint or stain.
To prevent clutter, clear the board once a month. Remove old notes, expired coupons, and mystery papers that no longer spark joy or even recognition. A bulletin board should help you see what matters, not become a museum of forgotten errands.
Extra Experience Notes: What I Learned Making a Wine Cork Bulletin Board
The first thing you learn when making a wine cork bulletin board is that corks are not as identical as they look. Some are longer, some are wider, some are softer, and some seem determined to be difficult for no reason. That is why the dry layout matters so much. When you spread the corks inside the frame before gluing, you start to see which ones belong along the edges, which ones should be featured in the center, and which ones should quietly retire to the “maybe later” pile.
Another experience-based tip: do not rush the pattern. It is tempting to start gluing the moment the first row looks good, but the last row is where problems often appear. A board can begin perfectly and end with a gap just wide enough to annoy you every time you walk past it. The best fix is to test the full layout first, then take a quick photo with your phone. That photo becomes your map when you start removing corks one by one to glue them down.
Hot glue is convenient, but it rewards preparation. Keep extra glue sticks nearby, because running out halfway through is the crafting equivalent of a flat tire. Use a piece of cardboard under the glue gun to catch drips. Press each cork firmly, but do not slide it around too much. Sliding creates glue smears and can shift nearby corks. If glue strings appear, ignore them until the end. Trying to remove every string while working slows everything down and turns the project into a battle with invisible spiderwebs.
Frame choice also matters more than expected. A shallow frame can work, but a deeper frame makes the finished board feel sturdier and more finished. If the corks rise slightly above the frame, that can look charming, especially for a rustic board. But if they stick out too far, the board may look bulky. Before gluing, place a few corks inside the frame and view it from the side. That quick check can save you from building something that looks like a tiny cork mattress.
Trimming corks is the step where patience pays off. Natural cork can crumble if you force the blade, so gentle pressure works better than aggressive chopping. If a cut edge looks rough, sand it lightly and place that side toward the frame. Most people will never notice. DIY projects are full of tiny imperfections that only the maker sees, usually while standing six inches away and judging the board like it is entering a national competition.
The most satisfying moment is hanging the finished board and using it immediately. A few photos, a handwritten note, a small calendar, or a favorite quote can bring it to life. The board stops being just a craft project and becomes part of the room. It holds reminders, memories, ideas, and small daily details. That is the real appeal of a wine cork bulletin board: it is useful, personal, and a little imperfect in the best possible way.
If you make another one, try changing the pattern. A simple row layout is excellent for a first attempt, but a checkerboard or herringbone pattern can make the second board feel completely different. You can also make smaller versions as gifts, mini kitchen boards, or desk organizers. Once you realize corks can become something this practical, it becomes dangerously easy to look at every empty frame and think, “I could cork that.”
Conclusion
Learning how to make a wine cork bulletin board is simple, affordable, and surprisingly satisfying. With a sturdy frame, clean corks, a smart layout, and enough glue to make your craft drawer nervous, you can create a custom message board that is both decorative and useful. The project works for beginners, allows plenty of creativity, and gives old corks a fresh purpose.
Whether you hang it in a kitchen, office, bedroom, or entryway, a wine cork bulletin board adds warmth and organization to everyday life. It is the kind of DIY project that looks handmade in a good way: textured, personal, practical, and full of character. Plus, every time someone compliments it, you get to say, “Thanks, I made it,” which is basically the unofficial trophy of crafting.