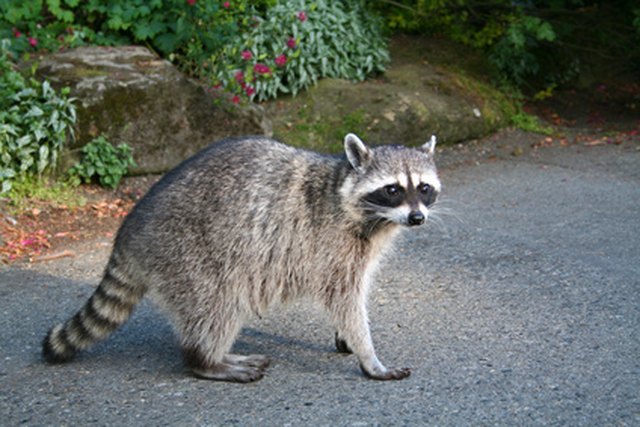
A raccoon costume can survive without elaborate boots, a movie-quality mask, or hours of professional makeup. But without that famous striped tail? You may simply look like someone who losto make a raccoon tail for a costume is easier than it looks. A good DIY raccoon tail needs only three things: a recognizable ringed pattern, enough volume to look fluffy, and an attachment method that stays put while you walk, dance, trick-or-treat, or dramatically raid the snack table.
This guide focuses on a soft, stuffed faux-fur tail because it offers the most convincing result, but you will also find no-sew alternatives, sizing tips, attachment ideas, common mistakes to avoid, and practical experience notes that can save a first-time costume maker from creating what can only be described as a striped fabric sausage.
What Makes a Costume Tail Look Like a Raccoon Tail?
The visual shortcut is simple: gray or gray-brown fur, a bushy shape, and several dark rings. You do not need museum-level zoological accuracy. In costume design, recognizable shapes and color contrasts usually matter more than reproducing every detail of the real animal.
A convincing costume version typically starts wider at the base, narrows gradually, and ends in a rounded tip. The tail should have visible dark bands rather than tiny, fussy stripes. From across a room, bold rings read as “raccoon” much faster.
For a child, a finished tail around 16 to 22 inches long is often practical. An adult costume can usually handle a tail around 24 to 30 inches. These are flexible costume-making ranges rather than strict rules. The best length is one that suits the wearer’s height while remaining safely above the floor.
Choose Your Raccoon Tail Construction Method
Method 1: Sewn Faux-Fur Tail
This is the best choice for a plush, dimensional result. Faux fur naturally creates volume and hides minor sewing imperfections. In other words, it is unusually forgiving fabricas long as you do not accidentally give it a haircut while cutting it.
Method 2: No-Sew Faux-Fur or Fleece Tail
A fabric adhesive can replace most stitching for a temporary costume. Fleece is particularly beginner-friendly because it does not shed like long-pile faux fur. Fabric adhesives remain a practical option for costume construction, while hard ridges from excessive hot glue can make soft fabric projects stiff or uncomfortable. : Yarn or Fabric-Scrap Tail
For a lightweight school costume or last-minute Halloween project, bundles of gray and black yarn can be braided, wrapped, brushed, or tied around a soft core. The result is less realistic but inexpensive and easy to customize.
Materials for a Sewn DIY Raccoon Tail
- Gray, silver, charcoal, or gray-brown faux fur
- Black faux fur, fleece, or another method for creating dark rings
- Polyester fiberfill or other lightweight stuffing
- Paper for making a pattern
- Fabric marker, chalk, or pencil for marking the backing
- Sharp scissors or a craft blade suitable for fabric backing
- Sewing clips or pins
- Strong polyester thread
- Hand-sewing needle or sewing machine
- Comb, pet slicker brush, or blunt needle for freeing trapped fur
- Webbing, elastic, a fabric loop, or sew-on hook-and-loop fastener for attachment
Faux fur has a directional surface called the nap. Before cutting, stroke the material in both directions. One direction will usually look smoother and more natural. Keep that direction consistent on matching pattern pieces. Sewing resources for napped and faux-fur fabrics repeatedly emphasize checking pile direction before cutting. ake a Raccoon Tail for a Costume Step by Step
Step 1: Decide on the Tail Size
Measure from the point where the tail will attach to the costume down toward the back of the legs. Stop well before the floor. A costume tail should complement the outfit, not become a fuzzy emergency brake.
For a medium adult tail, try a paper pattern approximately 26 inches long and 6 to 8 inches wide at its broadest point. Remember that the finished tail will become narrower after sewing and stuffing.
Step 2: Draw a Simple Tapered Pattern
Fold a large sheet of paper lengthwise. Starting at the fold, draw half of a long, gently curved tail shape. Make the base moderately wide, create a subtle outward curve through the middle, and taper toward a rounded tip.
Cut the folded paper and open it. You now have a symmetrical full-tail template. Alternatively, use the half-pattern directly on folded fabric.
A slight curve usually looks more natural than a perfectly straight tube. Avoid an extreme hook unless you plan to add internal support. Soft stuffing alone cannot be expected to perform advanced tail choreography.
Step 3: Plan the Raccoon Rings
You have several ways to create the characteristic bands:
- Use pre-striped faux fur: the fastest polished option when the pattern and colors suit your costume.
- Piece together gray and black sections: the most durable way to create crisp rings.
- Add black fabric bands: useful for fleece or short-pile fabric.
- Apply compatible fabric color: convenient for a one-night costume, although heavy application can stiffen long fur.
For a pieced tail, divide the paper pattern into several broad crosswise sections. Number every section before cutting it apart. Alternate gray and black materials, remembering to add seam allowance where sections will be joined.
Four or five dark bands are usually enough to create a strong raccoon effect. Slight variations in width often look more organic than ruler-perfect stripes.
Step 4: Cut the Faux Fur Correctly
Place the faux fur with its backing facing upward. Trace the pattern on the backing and check the nap direction before making the first cut.
The most important faux-fur cutting trick is to cut mainly through the backing rather than chopping straight through the pile. A craft blade can separate the backing, or scissors can be used with short, shallow snips. Cutting deeply through the fibers can leave a blunt, freshly mowed edge and create far more loose fluff. irrored tail pieces. If you are piecing colored sections, assemble the stripe sections first so that you end up with one complete front and one complete back.
Step 5: Join the Ring Sections
Place neighboring stripe sections right sides together. Push or comb the fur away from the seam line so as little pile as possible becomes trapped in the stitches.
Sew each crosswise seam and open the piece to check the result. Use a blunt needle, comb, or similar tool to tease trapped fibers gently out of the seam. This small finishing step makes the color transitions appear much more natural. Experienced faux-fur sewing guides commonly recommend keeping pile away from seam allowances and freeing fibers after stitching. Sew the Two Tail Sides Together
Place the two completed tail pieces with right sides facing each other. Match the ring seams so the bands continue around the tail as neatly as possible.
Pin or clip generously. Faux fur can shift while being sewn, so additional clips are not excessive; they are emotional support for your seam.
Sew around the long edges and rounded tip, leaving the base open. A seam allowance of approximately 1/2 inch is comfortable for many beginner projects. For machine sewing, select a needle suitable for the weight and backing of your specific fabric and test the stitch on a scrap first. Needle choice should match fabric construction and weight rather than relying on one universal setting. Turn the Tail Right Side Out
Reach through the open base and slowly turn the tail. A wooden spoon handle or another smooth, blunt tool can help push out the tip, but do not jab aggressively. The goal is “fluffy woodland accessory,” not “fabric puncture experiment.”
Once turned, shake the tail and comb the surface. Pull any trapped pile out of the long side seams.
Step 8: Add Stuffing
Add polyester fiberfill in small amounts. Begin at the tip and work toward the base.
Do not pack the tail until it feels like a baseball bat. A raccoon tail looks better when it remains soft and slightly flexible. Light stuffing also reduces the strain on the attachment point.
For a fuller silhouette, add enough stuffing to separate the two fabric sides without making the tail rigid. You can make the base slightly firmer because it carries the weight of the rest of the tail.
Step 9: Add a Secure Attachment
The attachment method matters almost as much as the tail itself. A beautiful tail that falls off every twelve steps becomes a floor decoration.
A sewn fabric or webbing loop is one of the simplest options. Stitch a sturdy loop securely into the open base, close the opening, and slide a belt through the loop.
Sew-on hook-and-loop fastener is another useful removable option. One side can be attached to the tail and the matching side to a belt, waistband panel, or dedicated costume garment. Rounding sharp corners on garment fastener pieces can improve comfort and reduce snagging. ren’s costumes, avoid exposed sharp hardware. Whatever attachment you choose, test it by walking, sitting, turning around, and gently tugging the tail before wearing the costume in public.
Step 10: Fluff and Shape the Finished Tail
Brush the fur gently so the nap settles in a consistent direction. Free any fibers caught in seams. Check that the stripes remain visible from several feet away.
If the tail looks too cylindrical, redistribute the filling. Move some toward the broader middle section and remove a little near the tip. A small amount of asymmetry often makes a handmade animal tail look more lively.
How to Make a No-Sew Raccoon Tail
No sewing machine? No problem. Use fleece for the easiest version or a short-pile faux fur that is manageable with adhesive.
- Draw and cut two identical tapered tail shapes.
- Add contrasting black bands before assembling the sides.
- Place the two tail pieces with the finished sides facing outward.
- Bond the edges with an adhesive specifically intended for fabric, leaving an opening at the base.
- Allow the adhesive to cure according to the manufacturer’s instructions.
- Add light stuffing.
- Close the base around a strong fabric attachment loop.
Use adhesive sparingly and test it on scraps. Too much glue can soak through fabric, create stiff areas, or become visible. Adults should supervise children when a project involves sharp cutting tools or heated adhesives.
Easy Ways to Customize Your DIY Raccoon Tail
Make It More Realistic
Choose mixed gray, brown-gray, silver, and charcoal tones instead of flat cartoon colors. Keep the stripes slightly irregular and use a plush pile with enough movement to create a bushy silhouette.
Make It More Cartoon-Like
Use high-contrast black and light gray bands. Make the tail larger than realistic proportions and exaggerate the curve. This style works especially well with animal onesies, mascot costumes, and playful cosplay.
Make It Lightweight
Use fleece or low-pile fabric and only a small amount of filling. Lightweight tails are more comfortable for children and easier to attach to simple waistbands.
Make It Removable
Attach the tail to a separate belt rather than permanently sewing it to pants. This makes bathroom breaks, storage, transportation, and costume changes dramatically easier. Glamorous? Perhaps not. Practical? Extremely.
Common Mistakes to Avoid
Cutting Straight Through the Fur
Deep scissor cuts can remove the long fibers at the edges and create a chopped appearance. Work primarily from the backing whenever possible.
Ignoring the Nap Direction
Two pattern pieces with pile flowing in opposite directions can reflect light differently and appear mismatched, even when they came from the same fabric.
Overstuffing the Tail
Too much filling creates a stiff tube instead of a soft, bushy tail. Add stuffing gradually.
Using a Weak Attachment
The base experiences repeated movement as the wearer walks. Reinforce it, especially when using heavy long-pile fur.
Making the Tail Too Long
A dramatic floor-length tail may look impressive in a photograph, but costume accessories that drag can contribute to trips and falls. Consumer costume-safety guidance recommends a proper fit that does not drag on the ground. Visibility is also important for costumes worn outdoors after dark. Synthetic Fur Near Open Flames
Keep costumes away from candles and other ignition sources. For Halloween use, consider the fire-safety characteristics of costume materials and follow current product care and safety instructions. U.S. consumer-safety guidance has long emphasized reducing costume contact with candles and other fire sources. l Experience Notes: What Making a Costume Tail Usually Teaches You
A first attempt at making a raccoon tail often reveals that the sewing itself is not the hardest part. The real challenge is managing volume. A paper pattern that appears enormous on a table can shrink visually once the seam allowance is sewn and the tail is stuffed. That is why making a quick paper or scrap-fabric prototype is surprisingly useful. Ten minutes spent testing the shape can prevent an hour spent wondering why your majestic raccoon accessory has become a furry pencil.
Another practical lesson is that faux fur rewards patience. Rushing the cutting stage creates most of the mess. When the backing is cut carefully instead of slicing through the entire pile, the edges remain fuller and cleanup becomes much easier. Even then, some shedding is normal during construction. Keeping a trash container nearby and cleaning the work area afterward is worthwhile, especially before the loose fibers migrate to every black shirt you own. Faux-fur sewing guides also recommend cleaning the sewing area and machine after working with shedding pile fabrics. acement is another area where experience changes the approach. Beginners sometimes make many narrow rings because they focus on detail while looking at the tail from twelve inches away. Once the costume is worn, those tiny bands can visually merge. Wider, stronger bands usually read better from normal viewing distance. Before sewing, lay the pieces on the floor and step several feet away. If the pattern still instantly says “raccoon,” it is doing its job.
Stuffing also requires restraint. It is tempting to keep adding filling because the tail initially seems too soft. Then, quite suddenly, it becomes rigid enough to qualify as sporting equipment. The more reliable method is to insert small tufts, distribute them with your fingers, and stop periodically to hold the tail vertically. A successful costume tail should have shape while retaining movement.
The attachment point deserves more attention than most tutorials make it seem. A tail may weigh very little in your hand, yet repeated swinging creates stress at the base. A small decorative stitch or a tiny dab of glue may survive a mirror selfie but fail during an evening of walking. A reinforced fabric loop attached to a belt is often easier to troubleshoot because the belt carries the load rather than a thin section of costume fabric.
Wear testing is equally valuable. Put on the complete costume before the event and spend a few minutes doing ordinary things: sit in a chair, walk through a doorway, climb a step, turn quickly, and use the restroom. This glamorous rehearsal catches surprisingly practical problems. A tail may need to sit slightly higher to avoid being trapped when the wearer sits down, or the attachment may need more flexibility so the tail moves rather than pulling on the waistband.
Finally, handmade costume accessories rarely need absolute perfection. Faux fur hides tiny seam inconsistencies remarkably well, and a slightly irregular curve can look more natural than a mathematically perfect tube. The goal is not to manufacture a biological replica. The goal is to create a comfortable, recognizable accessory that survives the event and makes the entire costume more fun.
Conclusion
Learning how to make a raccoon tail for a costume is a manageable project even for a beginner. Start with a simple tapered pattern, respect the direction of the faux-fur pile, cut through the backing carefully, create bold contrasting rings, sew or bond the sides securely, and add stuffing gradually. Finish with a reinforced attachment that keeps the tail comfortable and safely above the ground.
The best part is that the same basic technique can be adapted for foxes, cats, wolves, lemurs, fantasy creatures, mascots, and countless cosplay designs. Once you understand the surprisingly serious science of constructing a fluffy fabric tube, an entire kingdom of costume tails opens before you.
Note: This article was developed by synthesizing practical guidance from 10–15 reputable U.S. sewing, craft, wildlife, product, and consumer-safety resources, including the U.S. Consumer Product Safety Commission, Smithsonian’s National Zoo, Animal Diversity Web, JOANN, Michaels, SINGER, Brother USA, Aleene’s, VELCRO Brand, Seamwork, Mood Fabrics, WeAllSew, Craftsy, and The Spruce Crafts. The finished instructions were independently rewritten and organized specifically for a DIY raccoon costume-tail project.
“meta_title”: “How to Make a Raccoon Tail for a Costume”,
“meta_description”: “Make a fluffy DIY raccoon tail with faux fur, stuffing, bold rings, and a secure attachment using these easy sewing and no-sew tips.”,
“sapo”: “A striped raccoon tail can transform a simple gray outfit into an instantly recognizable costume. This detailed DIY guide explains how to choose materials, draft a tapered tail pattern, cut faux fur without ruining the pile, create bold raccoon rings, sew or glue the pieces, add the right amount of stuffing, and attach the finished tail securely. You will also find a no-sew method, customization ideas, common mistakes to avoid, costume-safety advice, and practical lessons that can help first-time makers achieve a fluffier, cleaner, more comfortable result.”,
“keywords”: [
“how to make a raccoon tail for a costume”,
“DIY raccoon tail”,
“raccoon costume tail”,
“faux fur costume tail”,
“homemade raccoon costume”,
“no-sew raccoon tail”,
“DIY animal tail”
]
}