A cake roll looks like the kind of dessert that should arrive with dramatic music, a spotless apron, and perhaps a small round of applause. The spiral is elegant, the filling looks bakery-level, and the finished slice says, “Yes, I absolutely know what I’m doing.” The good news? You do not need pastry school, a marble countertop, or a personality built entirely around buttercream. You just need the right technique.
A cake roll, also called a jelly roll, Swiss roll, roll cake, or sponge roll, is made from a thin, flexible sponge cake baked in a shallow pan, rolled while warm, cooled in that shape, filled, and rolled again. The magic is not complicated, but timing matters. Roll too late and the cake may crack. Overbake it and the sponge may dry out. Add too much filling and your dessert may try to escape like a whipped cream burrito.
This guide shows you how to make a cake roll in 5 steps, with practical tips for avoiding cracks, choosing the best filling, slicing cleanly, and making the finished dessert look impressive without turning your kitchen into a powdered sugar snowstorm.
What Is a Cake Roll?
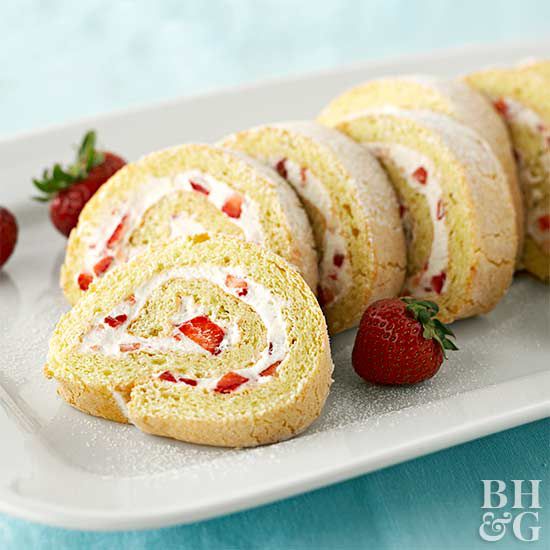
A cake roll is a thin sheet cake wrapped around a filling. The outside is usually a light sponge cake, while the inside may be filled with whipped cream, jam, buttercream, cream cheese frosting, mousse, lemon curd, ganache, or even softened ice cream. When sliced, each piece reveals a beautiful spiral pattern.
The best cake rolls are soft, moist, and flexible. Unlike a dense butter cake, a sponge cake relies heavily on whipped eggs for lift and structure. That airy texture helps the cake bend instead of break. Think of it as yoga for dessert: flexible, graceful, and much more fun when chocolate is involved.
Ingredients You Need for a Classic Cake Roll
For a basic vanilla cake roll, you only need a short list of pantry-friendly ingredients. This makes the dessert feel fancy without requiring a scavenger hunt through specialty baking aisles.
For the Sponge Cake
- 4 large eggs, room temperature
- 3/4 cup granulated sugar
- 1 teaspoon vanilla extract
- 3/4 cup all-purpose flour
- 1 teaspoon baking powder
- 1/4 teaspoon salt
- 2 tablespoons milk or water
- Powdered sugar, for dusting
For the Filling
- 1 cup heavy whipping cream, cold
- 2 tablespoons powdered sugar
- 1/2 teaspoon vanilla extract
- 1/3 to 1/2 cup strawberry jam, raspberry preserves, lemon curd, or chocolate spread
Helpful Equipment
- 10×15-inch jelly roll pan or similar rimmed baking sheet
- Parchment paper
- Clean, lint-free kitchen towel
- Electric mixer
- Offset spatula
- Wire cooling rack
- Serrated knife
Step 1: Prepare the Pan and Make the Sponge Batter
Start by preheating your oven to 350°F. Line a jelly roll pan with parchment paper, letting the edges hang slightly over the sides if possible. Lightly grease the parchment so the cake releases cleanly. This is not the moment to trust your pan’s “nonstick” label with your whole heart. Parchment is cheap insurance.
Next, beat the eggs and sugar together until the mixture becomes thick, pale, and slightly increased in volume. This step matters because whipped eggs help create the soft, bendable structure that makes a cake roll possible. If the batter looks light and ribbon-like when it falls from the beaters, you are on the right path.
In a separate bowl, whisk together the flour, baking powder, and salt. Gently fold the dry ingredients into the egg mixture. Do not attack the batter like it owes you money. Folding carefully keeps the air inside the sponge, and that air is what gives the cake its delicate texture. Stir in the vanilla and milk or water just until combined.
Step 2: Bake the Cake in a Thin, Even Layer
Pour the batter into the prepared pan and spread it evenly from corner to corner with an offset spatula. A level batter layer helps the cake bake evenly and roll neatly. If one side is thick and the other side is thin, your spiral may look like it has been through an emotional journey.
Bake the cake for 10 to 13 minutes, or until the top springs back lightly when touched and the edges begin to pull away from the pan. Because cake roll sponge is thin, it bakes quickly. Keep a close eye on it during the final minutes. Overbaking dries the cake, and dry cake is the number one guest at the cracking party.
While the cake bakes, lay a clean kitchen towel flat on your counter and dust it generously with powdered sugar. The sugar helps prevent sticking and gives the outside a pretty finish. For chocolate cake rolls, cocoa powder can be used instead of powdered sugar so the outside stays beautifully dark.
Step 3: Roll the Cake While It Is Warm
This is the most important step in learning how to make a cake roll. As soon as the cake comes out of the oven, loosen the edges with a thin knife if needed. Carefully invert the cake onto the prepared towel. Peel off the parchment paper slowly.
If the edges feel dry or crisp, trim them lightly with a sharp knife. Crisp edges are more likely to crack when rolled. Now, starting from one short end, roll the warm cake up with the towel inside. The towel keeps the cake from sticking to itself while it cools in a spiral shape.
Place the rolled cake seam-side down on a wire rack and let it cool completely. This usually takes about 45 minutes to 1 hour. Rolling the cake while warm “trains” it to hold the curve, which makes the final roll much easier. Yes, your cake has now entered obedience school, and it is doing very well.
Step 4: Add the Filling and Re-Roll the Cake
Once the cake is fully cool, gently unroll it. Do not flatten it aggressively; just open it enough to spread the filling. If a tiny crack appears, stay calm. Cake rolls are forgiving, especially once filled, chilled, dusted, and sliced. Dessert does not need perfection. Dessert needs confidence and a good plate.
Spread a thin layer of jam, preserves, lemon curd, chocolate spread, or another flavor base over the cake, leaving about 1/2 inch around the edges. Then add whipped cream or frosting in an even layer. Avoid overfilling. A generous filling sounds exciting until it squeezes out the sides like a dessert volcano.
Re-roll the cake without the towel, using the original curve as your guide. Roll slowly and evenly, keeping the spiral snug but not smashed. Place the cake seam-side down on a serving plate or wrap it in plastic wrap to help it hold its shape.
Step 5: Chill, Decorate, and Slice
Chill the cake roll for at least 1 hour before slicing. Chilling firms the filling and helps the spiral stay clean. For whipped cream, mousse, or cream cheese fillings, refrigeration is especially important. Perishable desserts should not sit out at room temperature for long periods, so keep the cake chilled until close to serving time.
Before serving, decorate the cake roll with powdered sugar, cocoa powder, ganache, whipped cream, fresh berries, chocolate curls, toasted nuts, or a drizzle of caramel. A simple dusting of powdered sugar looks classic and takes about ten seconds, which is exactly the kind of kitchen math we support.
For clean slices, use a serrated knife and wipe the blade between cuts. Let the knife do the work with a gentle sawing motion. If the filling is very soft, chill the roll a little longer before slicing.
Best Cake Roll Filling Ideas
The beauty of a cake roll is that one basic method can become dozens of desserts. Once you understand the technique, you can change the flavor to match holidays, birthdays, brunches, or your current emotional need for chocolate.
Classic Strawberry Cream Cake Roll
Spread strawberry jam over the cooled sponge, then top it with vanilla whipped cream. Finish with powdered sugar and fresh strawberries. This version is bright, simple, and perfect for spring or summer gatherings.
Chocolate Swiss Roll
Add cocoa powder to the sponge batter and fill the cake with whipped cream or chocolate mousse. Top with ganache for a bakery-style finish. It is rich without being too heavy, and it looks dramatic on a dessert table.
Lemon Cream Cake Roll
Use lemon curd and lightly sweetened whipped cream for a tangy, refreshing dessert. Add lemon zest to the sponge for extra flavor. This is a great choice after a big meal because it tastes bright and clean.
Pumpkin Spice Cake Roll
Add pumpkin puree and warm spices such as cinnamon, ginger, nutmeg, and cloves to the sponge. Fill with cream cheese frosting. This version is a fall favorite and practically demands a cozy sweater.
Ice Cream Cake Roll
Fill the cooled cake with softened ice cream, then wrap and freeze it until firm. Slice straight from the freezer after letting it sit briefly at room temperature. It is a fantastic make-ahead dessert for birthdays and summer parties.
Common Cake Roll Problems and How to Fix Them
Why Did My Cake Roll Crack?
Cracking usually happens because the cake was overbaked, cooled too long before rolling, or rolled too tightly. To prevent cracks, roll the cake while it is still warm, use a towel or parchment to guide it, and avoid drying it out in the oven. Small cracks can be hidden with powdered sugar, frosting, ganache, or strategically placed berries. Nobody needs to know. The berries have signed a confidentiality agreement.
Why Is My Cake Sticky?
A slightly tacky sponge is normal, especially when rolled warm. Powdered sugar, cocoa powder, or a clean towel helps prevent sticking. If the cake is very sticky, it may be underbaked or trapped in too much steam. Make sure the cake springs back lightly before removing it from the oven.
Why Did the Filling Squeeze Out?
Too much filling or filling that is too soft can slide out as you roll. Use a thinner layer, chill whipped cream or mousse before spreading, and leave a border around the edges. After rolling, wrap the cake and chill it seam-side down so it sets neatly.
Why Does My Spiral Look Uneven?
An uneven spiral can happen when the batter is not spread evenly, the cake is rolled from the wrong side, or the filling is thicker in some areas. Spread the batter level before baking and apply the filling in a smooth, consistent layer. Remember, even an imperfect spiral still tastes like cake, which is a very strong argument in its favor.
Make-Ahead and Storage Tips
Cake rolls are excellent make-ahead desserts. In fact, many slice better after chilling for several hours. You can bake and roll the sponge a few hours before filling it, or assemble the whole cake roll the day before serving.
Store a filled cake roll in the refrigerator, tightly wrapped or covered, for up to 3 days depending on the filling. Whipped cream and cream cheese fillings should stay refrigerated. If using ice cream, store the roll in the freezer and wrap it well to prevent freezer burn.
For the freshest texture, decorate shortly before serving. Powdered sugar can dissolve into moist toppings over time, and fresh fruit looks best when added close to the moment the cake hits the table.
Food Safety Notes for Cake Rolls
Because cake roll batter usually contains eggs, avoid tasting raw batter. Bake the sponge thoroughly and wash hands, bowls, beaters, and work surfaces after handling raw eggs. If your filling includes whipped cream, cream cheese, custard, mousse, or ice cream, keep the finished cake refrigerated. Perishable desserts should be chilled within two hours and kept cold until serving.
These steps are simple, but they matter. A beautiful cake roll should impress your guests, not introduce them to a stomachache with frosting.
of Real-Life Cake Roll Experience and Practical Lessons
The first thing many home bakers learn about cake rolls is that the dessert looks more intimidating than it actually is. The second thing they learn is that the towel matters. A thin, clean, lint-free kitchen towel is easier to roll with than a thick terry towel, which can leave texture marks and make the roll bulky. Parchment can also work well, especially for bakers who dislike the idea of laundry becoming part of dessert preparation.
One helpful experience-based tip is to prepare everything before the cake comes out of the oven. Have the towel dusted, the cooling rack ready, and the counter cleared. Cake rolls are not difficult, but they do not enjoy waiting around while you search for powdered sugar behind six bags of chocolate chips. The warm-roll step works best when it happens immediately.
Another lesson is that room-temperature eggs make a difference. They whip more easily and help create a lighter sponge. If you forget to take eggs out early, place them in a bowl of warm water for a few minutes before cracking them. It is a small step, but it can improve the texture of the cake.
When spreading batter in the pan, do not ignore the corners. Many beginners leave the corners thin because they focus on the middle. Thin corners bake faster and can become dry, which makes rolling harder. Use an offset spatula to push the batter evenly into all corners before baking. A smooth, even layer gives you a better-looking spiral later.
Cooling patience is another big lesson. It is tempting to unroll the cake early because you want to see if the magic worked. Resist. Let the cake cool completely in its rolled shape before adding whipped cream or frosting. Warm cake melts filling, and melted filling creates a slippery situation that no dessert plate deserves.
For beginners, jam plus whipped cream is one of the easiest filling combinations. Jam adds flavor without needing extra preparation, and whipped cream keeps the dessert light. Cream cheese frosting is sturdier and excellent for pumpkin or red velvet cake rolls, but it should be spread thinly. The filling should support the spiral, not stage a takeover.
Decoration is where you can relax. If the roll cracks, cover it with ganache. If the ends look messy, trim them and call it “chef’s privilege,” which means you get to eat the evidence. If the spiral is slightly off-center, place the prettiest slices on top of the serving platter and watch everyone admire your work anyway.
After making cake rolls a few times, the process becomes familiar: bake thin, roll warm, cool fully, fill lightly, chill before slicing. That rhythm is the secret. Once you trust it, a cake roll becomes one of the best desserts for entertaining because it can be made ahead, customized easily, and served in beautiful slices. It is impressive without being fussy, elegant without being fragile, and just dramatic enough to make people think you spent all day in the kitchen. You do not have to correct them.
Conclusion
Learning how to make a cake roll in 5 steps is mostly about timing and confidence. Prepare the pan, whip a light sponge batter, bake it in a thin layer, roll it while warm, fill it after cooling, and chill it before slicing. Once you master that simple sequence, you can create endless versions with fruit, chocolate, citrus, pumpkin spice, cream cheese, mousse, or ice cream.
A cake roll is the rare dessert that feels fancy but stays friendly. It rewards careful technique, but it also forgives small mistakes. Cracks can be covered, uneven ends can be trimmed, and a little powdered sugar can make almost anything look intentional. Serve it at a holiday meal, birthday party, brunch, or casual weekend dinner, and you will have a dessert that looks like it came from a bakery window.
Note: This article is written for web publication and is based on widely accepted U.S. baking and food-safety practices. Always refrigerate cake rolls with perishable fillings and avoid tasting raw egg-based batter.