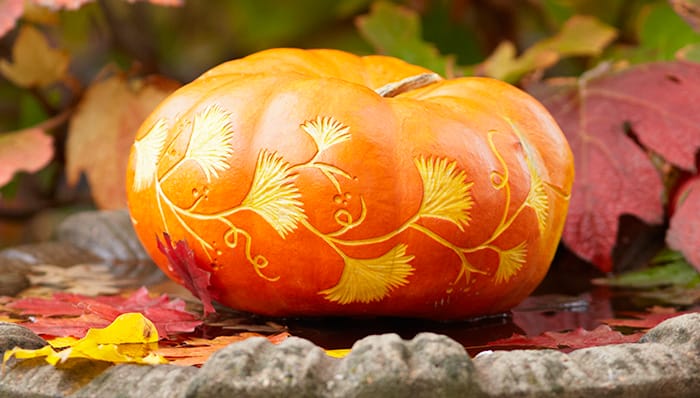
Fall decorating has a funny way of turning perfectly normal people into pumpkin collectors. One minute you are buying “just one” pumpkin for the porch, and the next minute your front steps look like a tiny harvest festival with commitment issues. If you want a pumpkin design that feels elegant, seasonal, and a little more grown-up than the classic triangle-eyed grin, learning how to etch leaves into pumpkins is the perfect weekend project.
Pumpkin etching is different from traditional pumpkin carving. Instead of cutting all the way through the pumpkin wall, you scrape away the outer skin to reveal the pale flesh underneath. The result is softer, more detailed, and wonderfully autumnal. Leaf designs work especially well because their veins, curves, stems, and organic shapes look beautiful when etched into a pumpkin’s surface. They can be rustic, modern, spooky, farmhouse-chic, or “I casually made this while sipping cider,” even if you were actually wrestling a stencil with one hand and pumpkin pulp with the other.
This guide explains how to etch leaves into pumpkins step by step, including the best tools, pumpkin selection tips, design ideas, preservation tricks, and beginner-friendly advice. Whether you are making a centerpiece, porch display, Halloween decoration, Thanksgiving accent, or fall mantel arrangement, this project gives you a high-impact look without requiring professional carving skills.
What Does It Mean to Etch a Pumpkin?
To etch a pumpkin means to remove only the top layer of the rind instead of cutting through the entire shell. The orange skin is peeled, scraped, gouged, or lightly carved away to expose the lighter flesh below. When the pumpkin is lit from inside, the etched areas glow gently because the remaining wall is thinner than the untouched rind.
This technique is sometimes called scraping, shaving, surface carving, or half-carving. It is ideal for detailed designs because you do not need to worry as much about weak sections collapsing. With full carving, tiny details can break off if the cuts are too close together. With etching, you can create thin leaf veins, layered borders, acorns, vines, berries, and delicate stems without turning your pumpkin into a structural engineering exam.
Why Leaf Designs Look So Good on Pumpkins
Leaves and pumpkins are a natural match. Pumpkins already belong to the visual vocabulary of fall, and leaf patterns add movement, texture, and a handmade touch. A maple leaf gives a bold, classic autumn look. Oak leaves feel woodland and traditional. Ferns add softness. Eucalyptus leaves create a cleaner, modern farmhouse feel. Ivy and vine patterns can wrap around the pumpkin like they grew there on purpose.
Leaf etching is also forgiving. Real leaves are not perfectly symmetrical, so your design does not need to be perfect either. A slightly wobbly line can look charming rather than wrong. That is excellent news for anyone whose hand-lettering looks like it was done during an earthquake.
Supplies You Need
You can make a beautiful etched leaf pumpkin with simple tools, but a few specialty items make the job easier and cleaner.
Basic Supplies
- One fresh pumpkin with a smooth side
- Real leaves, printed leaf templates, or hand-drawn leaf patterns
- Painter’s tape or straight pins
- Washable marker, dry-erase marker, or transfer paper
- Pushpin, awl, or needle tool
- Linoleum cutter, craft knife, or small wood-carving gouge
- Small spoon, scraper, or pumpkin scoop
- Paper towels or a damp cloth
- Battery-operated tea light, LED puck light, or glow stick
Optional But Helpful Tools
- Rotary tool with an engraving bit
- Fleshing tool for thinning the pumpkin wall
- Petroleum jelly for sealing etched areas
- Vinegar-water or diluted bleach solution for cleaning
- Newspaper, cardboard, or a drop cloth for the work area
- Small paintbrush for brushing away pumpkin shavings
A rotary tool is useful if you want crisp, fast lines, but it is not required. A simple linoleum cutter can do beautiful work. In fact, hand tools often give leaf designs a warmer, more natural texture. Power tools make the process faster; hand tools make it quieter. Choose your fall personality.
How to Choose the Best Pumpkin for Etching
The best pumpkin for etching leaves has a firm rind, a stable base, and at least one smooth surface large enough for your design. Avoid pumpkins with soft spots, deep cuts, mold, or bruises. A pumpkin that already feels mushy at the store is not going to become sturdier once you bring it home. Pumpkins are many things, but self-healing furniture is not one of them.
Look for a pumpkin that sits flat and does not rock. A wobbly pumpkin is harder to etch safely, especially if you are using sharp tools. For detailed leaf patterns, choose a medium or large pumpkin with a flatter face. Tall pumpkins are great for vertical vine patterns, while round pumpkins work well for wreath-style leaf designs that circle the stem or wrap around the middle.
White pumpkins and pale pumpkins can also be etched, though the contrast may be subtler. Orange pumpkins usually give the most dramatic result because the pale etched flesh stands out clearly against the darker outer rind.
Step-by-Step Guide: How To Etch Leaves Into Pumpkins
Step 1: Clean and Dry the Pumpkin
Start by wiping the pumpkin with a damp cloth to remove dirt and field dust. If the pumpkin is especially dirty, wash it gently with mild soap and water, then let it dry completely. Moisture makes tape less cooperative and can encourage early spoilage, so do not rush this step.
Place the pumpkin on a sturdy table covered with newspaper, cardboard, or a drop cloth. Good lighting matters. You need to see the leaf lines clearly, and your pumpkin deserves better than being carved in mysterious kitchen shadows.
Step 2: Decide Whether to Hollow It Out
You can etch a pumpkin with or without hollowing it first. If you want the design to glow from within, cut an opening in the bottom or back and scoop out the pulp and seeds. Cutting from the bottom helps preserve the stem and creates a cleaner display because the pumpkin can sit over a small LED light.
If you are making a decorative pumpkin that will not be lit, you can skip hollowing. An uncut pumpkin often lasts longer because fewer surfaces are exposed to air. For porch decor, mantel displays, and Thanksgiving centerpieces, surface etching on an intact pumpkin can be a smart choice.
Step 3: Pick Your Leaf Pattern
There are three easy ways to create your leaf design. First, use real leaves as templates. Press a maple, oak, or sweetgum leaf flat, tape it to the pumpkin, and trace around it. Second, print simple leaf outlines from a template and resize them to fit your pumpkin. Third, draw leaves by hand using a washable marker.
For beginners, choose larger leaves with simple outlines. Maple leaves look impressive, but their many points can take patience. Oak leaves are easier because their rounded lobes are forgiving. Long eucalyptus or willow-style leaves are excellent for a graceful, modern pattern.
Step 4: Transfer the Design
Tape your leaf template onto the pumpkin. Because pumpkins are curved, you may need to cut small slits around the paper so it bends smoothly. Use a pushpin, awl, or needle tool to poke tiny holes along the outline of the leaf. Space the holes close enough that you can follow the shape once the paper is removed.
For larger, simpler leaves, you can trace the outline directly with a washable marker. If you are using real leaves, hold them firmly against the pumpkin and trace around the edges. Do not worry if the outline is not perfect. Nature invented irregular edges long before craft bloggers did.
Step 5: Outline the Leaf
Use a craft knife, linoleum cutter, or small gouge to lightly score the outline of the leaf. Keep your cuts shallow. You are not trying to cut through the pumpkin wall. Your goal is to break the outer rind so the skin can be scraped away cleanly.
Work slowly around points, curves, and stems. If a line starts to drift, correct it gradually instead of making a deep panic cut. Pumpkin etching rewards patience. It does not reward dramatic knife gestures.
Step 6: Scrape Away the Outer Skin
Once the outline is scored, begin removing the orange skin inside the leaf shape. Use a gouge, linoleum cutter, or rotary tool to scrape away the rind. For a smooth look, pull the tool in the same direction with light, even strokes. For a rustic look, vary the stroke direction slightly to create natural texture.
Do not dig too deeply at first. You can always remove more pumpkin flesh, but you cannot put it back unless you have discovered a craft miracle. The etched area should look pale and slightly moist, not hollow or fragile.
Step 7: Add Leaf Veins and Details
Leaf veins are where the design comes alive. Use a small V-shaped cutter, needle tool, or engraving bit to create a center vein from the stem to the tip. Then add smaller veins branching outward. Keep the vein lines shallow and clean.
For realistic leaves, make the veins slightly uneven. For a graphic, modern style, keep them symmetrical and bold. You can also etch only the veins and leave the rest of the leaf unshaded for a minimalist look.
Step 8: Vary the Depth for a Glowing Effect
If you plan to light the pumpkin, vary the depth of your etching. Areas scraped more deeply will glow brighter. Shallow areas will appear softer and darker. This creates dimension, especially on large leaves. Try making the center of the leaf slightly brighter and the edges more subtle.
Test the glow by placing an LED light inside the pumpkin and turning off the room lights. If the design does not glow enough, scrape a little more from the inside wall behind the etched area or deepen the surface etching carefully.
Step 9: Clean the Edges
Brush away shavings with a dry paintbrush or wipe the pumpkin gently with a damp cloth. Clean edges make the difference between “handcrafted autumn decor” and “pumpkin attacked by a nervous squirrel.”
If marker lines remain, remove them with a damp paper towel. For stubborn marks, use a small amount of rubbing alcohol on a cotton swab, but avoid soaking the etched flesh.
Step 10: Seal and Display
To help slow drying, lightly rub petroleum jelly over the etched areas. Use only a thin layer. If you plan to use a real candle, skip petroleum jelly and choose an LED light instead. Battery-operated lights are safer, cleaner, and less likely to cook your pumpkin from the inside.
Place your finished pumpkin somewhere cool, dry, and protected from direct sun and heavy rain. A covered porch, entryway table, mantel, or dining room centerpiece works beautifully. If the weather is warm, refrigerating the pumpkin overnight can help extend its display life.
Leaf Etching Design Ideas
Single Statement Leaf
Etch one large maple or oak leaf across the front of a medium pumpkin. This style is bold, simple, and ideal for beginners. Add veins for detail and place a small LED light inside for a soft glow.
Leaf Garland Pumpkin
Create a ring of small leaves around the pumpkin’s middle, almost like a carved wreath. Alternate leaf shapes for a natural look. This design works well on wide pumpkins and makes a beautiful Thanksgiving centerpiece.
Falling Leaves Pattern
Scatter leaves diagonally from the top left to the bottom right of the pumpkin. Use different sizes to create movement. This pattern looks effortless, even though you will know exactly how many times you repositioned the stencil.
Vines and Leaves
Draw curling vines around the pumpkin and add small leaves along the stems. This is a lovely option for cottage-style fall decor. The vines can wrap around the pumpkin, making the design interesting from every angle.
Monogram With Leaves
Etch an initial in the center and surround it with leaves. This idea works well for weddings, fall parties, Thanksgiving place settings, or a personalized front porch display.
Common Mistakes to Avoid
Etching Too Deep Too Soon
Deep cuts can weaken the pumpkin wall and make the design look messy. Start shallow, test the look, and deepen only where needed.
Using a Pumpkin With Too Many Ridges
Deep ridges make it harder to transfer and etch detailed leaf shapes. Choose a smoother pumpkin for your first attempt.
Skipping the Cleaning Step
Dirt and moisture can shorten the life of your pumpkin. A clean, dry surface also helps templates stay in place.
Choosing Designs That Are Too Tiny
Tiny leaves can blur together once etched. Larger shapes give you cleaner results and more room for vein details.
Using Real Candles Carelessly
Real candles create heat and can dry the pumpkin faster. They also bring fire risk, especially near dried leaves, porch decor, fabric, or curious pets. LED lights are the smarter choice.
How to Make an Etched Pumpkin Last Longer
Etched pumpkins can last several days to more than a week depending on temperature, freshness, and how deeply they are carved. To extend their life, begin with a firm pumpkin and avoid carving too early before your event.
After etching, keep the pumpkin in a cool place. Warm temperatures encourage decay, while freezing temperatures can damage the pumpkin tissue. Avoid direct sunlight, wet porch steps, and areas where rain can collect under the pumpkin. If you used a hollowed pumpkin, dry the inside with paper towels before displaying it.
You can also mist the pumpkin lightly with water if the etched areas begin to dry, then pat it gently. Some crafters use a vinegar-water solution or diluted bleach solution to reduce mold, but choose based on how you plan to dispose of the pumpkin later. If the pumpkin will be composted or offered to animals, avoid harsh chemical treatments.
Can You Etch Artificial Pumpkins?
Yes, you can etch artificial pumpkins if they are made for carving. Craft pumpkins are a great choice if you want decor you can reuse year after year. They are cleaner, lighter, and less likely to turn into porch soup after a warm weekend.
However, artificial pumpkins behave differently from real pumpkins. Instead of moist flesh beneath the skin, you are cutting into foam or plastic. Use a craft knife or rotary tool carefully, and always follow the manufacturer’s safety instructions. Artificial pumpkins also work well with painted leaf designs if you prefer a no-mess option.
Safety Tips for Pumpkin Etching
Always work on a stable surface and keep your non-cutting hand away from the tool path. If children are helping, let them choose leaves, tape templates, scoop seeds, or brush away shavings while an adult handles sharp tools. Pumpkin carving kits with small serrated tools can be safer than kitchen knives because they are designed for controlled cuts.
If using a rotary tool, wear eye protection and work slowly. Pumpkin shavings may be soft, but they still enjoy flying dramatically. Keep cords away from wet surfaces and never leave tools where children can grab them.
For lighting, use battery-operated candles, LED puck lights, fairy lights, or glow sticks. They provide beautiful illumination without open flames. Your pumpkin will look magical, and your porch will not audition for a fire-safety documentary.
Creative Ways to Display Etched Leaf Pumpkins
Etched leaf pumpkins look beautiful on their own, but grouping them makes the display even better. Try arranging three pumpkins of different sizes on your porch steps. Etch a large leaf on the biggest pumpkin, a vine pattern on the medium pumpkin, and tiny scattered leaves on the smallest pumpkin.
For a dining table centerpiece, place an etched pumpkin on a wooden tray with mini gourds, pinecones, dried wheat, and battery-operated fairy lights. For a mantel, use white pumpkins with simple etched eucalyptus leaves for a soft, neutral look. For Halloween, mix leaf etching with bats, moons, or stars to create a woodland-night theme.
You can also use etched pumpkins for fall weddings, school harvest parties, office decor, or Thanksgiving buffets. They feel festive without being too spooky, which makes them perfect for the long stretch from September through November.
Experience Notes: What Actually Helps When Etching Leaves Into Pumpkins
The biggest lesson from making etched leaf pumpkins is that the pumpkin itself matters more than you think. A smooth pumpkin is easier to work with, especially when transferring leaf templates. Deep grooves may look charming at the pumpkin patch, but they can turn a simple maple leaf into a topographical map. If you want a clean design, spend an extra minute choosing a pumpkin with a broad, flat face.
Another helpful experience: real leaves are beautiful, but they can be fussy as templates. Fresh leaves curl, dry leaves crack, and some leaves refuse to lie flat because apparently they have artistic opinions. If you want the look of real leaves, press them overnight inside a heavy book first. For easier tracing, print simple leaf outlines and use real leaves nearby as inspiration for vein patterns.
When etching, shallow passes are your best friend. Beginners often try to remove all the rind at once, which can gouge the pumpkin and create uneven patches. A better method is to score the outline first, scrape lightly, then go back for a second pass. This gives you more control. Think of it like peeling a vegetable, not digging a tunnel.
Lighting also changes everything. A leaf design that looks pale and subtle in daylight can become gorgeous at night with an LED inside. Test the pumpkin in a dark room before deciding you are finished. If some areas do not glow, thin them slightly from the inside or scrape the surface a bit more. Just do this gradually. One enthusiastic scrape can turn a glowing leaf into an accidental window.
For the cleanest results, keep a damp cloth and a dry brush nearby. The damp cloth removes marker lines and sticky pulp residue, while the dry brush clears shavings from vein details. Wiping too often with a wet cloth can soften the flesh, so use moisture sparingly.
If you are making several pumpkins for an event, etch the most detailed pumpkin last. Your hands will be steadier after practicing on simpler designs. Start with oak leaves or long oval leaves, then move on to maple leaves once you understand how the tools behave. Maple leaves are the divas of the leaf world: stunning, dramatic, and full of points that demand attention.
Finally, do not aim for machine-perfect symmetry. The charm of etched leaf pumpkins comes from their handmade texture. A slightly uneven vein or organic edge makes the design feel natural. Place the finished pumpkin near mums, dried corn stalks, lanterns, or a plaid throw, and it will look intentional. Fall decor is forgiving. Add enough cozy texture, and almost anything becomes “rustic.”
Conclusion
Learning how to etch leaves into pumpkins is a simple way to create fall decor that feels artistic without being complicated. With a fresh pumpkin, a leaf template, a few carving tools, and a little patience, you can transform an ordinary gourd into a glowing seasonal centerpiece. The technique is easier than full carving, more detailed than painting, and flexible enough for Halloween, Thanksgiving, or everyday autumn decorating.
Start with a smooth pumpkin, choose bold leaf shapes, work in shallow layers, and use LED lights for a safe, beautiful glow. Whether you make one statement pumpkin or a whole porch display, etched leaf pumpkins bring a warm, natural charm to fall. And if your first leaf looks a little crooked, just call it windblown. Autumn is on your side.
Note: For the safest and longest-lasting display, supervise children during the project, use sharp tools carefully, and choose battery-operated lights instead of open flames.