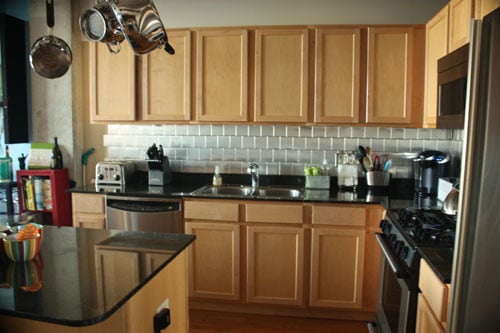
If your kitchen is giving “landlord special” when you were hoping for “sleek modern chef cave,” a stainless steel stick-on wall tile backsplash can be a very satisfying fix. It is one of those rare DIY upgrades that looks fancier than it is, installs faster than traditional tile, and does not require you to become emotionally attached to grout. Better yet, many stainless steel peel-and-stick backsplash options really do land around the $100 mark for a small to medium backsplash area, which makes this project feel less like a renovation and more like a clever plot twist.
The appeal is obvious. Stainless steel reflects light, works with almost any cabinet color, and gives your kitchen that crisp, hardworking look people associate with custom remodels and restaurant-style finishes. But this is not a “slap it on and hope for the best” project. The difference between a backsplash that looks polished and one that looks like it lost an argument with a tape measure comes down to prep, layout, and patience.
In this guide, I will walk you through how to plan, install, and finish a budget-friendly DIY backsplash using stainless steel stick-on wall tile. You will also learn where this material shines, where it can get fussy, and how to keep your finished wall looking sharp instead of smudgy and sad.
Why a Stainless Steel Stick-On Backsplash Makes Sense
A traditional tile backsplash can be gorgeous, but it also tends to demand more time, more money, and more tools. A peel-and-stick backsplash is the shortcut that does not necessarily look like a shortcut, especially if you choose a clean stainless steel finish and install it carefully. It is a favorite for budget kitchen makeovers, rental-friendly refreshes, and weekend DIY projects because it skips mortar, grout, and a lot of mess.
Stainless steel also brings some practical perks. It looks clean, wipes down easily, and plays nicely with modern, industrial, farmhouse, and even transitional kitchens. If your cabinets are white, navy, black, walnut, or greige, stainless steel will not start drama. It is basically the neutral blazer of backsplash materials.
There is one honest caveat, though: the “$100 backsplash” usually refers to the core material cost for a modest area, not every single tool you might need. If you already own the usual DIY basics like a tape measure, level, utility knife, and screwdriver, keeping the project near $100 is realistic. If you need to buy every tool from scratch, your backsplash may politely wander past that budget line.
What You Need for the Project
Materials
- Stainless steel stick-on wall tile or peel-and-stick metal backsplash panels
- Painter’s tape
- Mild degreaser or dish soap and warm water
- Microfiber cloths
- Silicone caulk in clear, white, or a color that matches your tile edges
- Optional trim or edge pieces for a more finished look
Tools
- Tape measure
- Level
- Utility knife and straightedge
- Scissors or metal snips, depending on the tile style
- J-roller or grout float for pressing tiles firmly
- Pencil or fine-tip marker
- Screwdriver for outlet covers
- Work gloves if you are cutting metal pieces
A Simple Budget Breakdown
For a backsplash of roughly 8 to 10 square feet, a stainless steel peel-and-stick tile pack can often be found around the $100 range. From there, your remaining cost depends on what is already in your toolbox. If you need only a small tube of caulk and some painter’s tape, the total can stay pleasantly close to the headline number.
- Tile: about $90 to $100
- Caulk and tape: about $10 to $15
- Optional trim: varies
- Total with basic tools already owned: often around $100 to $115
If your kitchen backsplash area is larger, the cost climbs quickly, so measure first and shop second. Hope is not a valid unit of measurement.
Before You Peel a Single Inch: Prep Matters More Than You Think
The adhesive on stick-on wall tile is not magical. It likes surfaces that are flat, smooth, clean, dry, and boring in the best possible way. If the wall is dusty, greasy, textured, or uneven, the tiles may lift at the edges, show bumps, or refuse to line up properly.
Step 1: Clean the Wall Like You Mean It
Kitchen walls collect grease in a way that feels almost personal. Wash the backsplash area thoroughly with a mild degreaser or warm water and dish soap. Rinse if needed, then dry the surface completely with a clean cloth. Do not install over damp walls. Adhesive and hidden moisture are not friends.
Step 2: Fix the Obvious Wall Problems
If the wall has nail holes, flaking paint, deep seams, or lumpy texture, fix those issues first. Fill holes, sand high spots, and make sure the wall is smooth. Peel-and-stick backsplash tile will not hide serious imperfections. In fact, it can highlight them like an overenthusiastic stage spotlight.
Step 3: Measure the Area Carefully
Measure width by height to get your square footage. If the backsplash wraps around corners or includes small sections between windows or cabinets, break it into rectangles and add the totals together. Buy a little extra to account for cuts, mistakes, and the inevitable “I thought this piece would fit” moment.
Step 4: Dry-Fit Your Layout
This step separates smooth projects from frustrating ones. Lay out your tiles on the countertop or another flat surface before peeling anything. Check how the pattern lands at both ends and around outlets. You want to avoid a tiny sliver of tile in a highly visible corner if possible. A dry layout helps you spot that problem before adhesive enters the chat.
How To Install a Stainless Steel Stick-On Wall Tile Backsplash
- Turn off power and remove outlet covers.
If your backsplash includes outlets or switches, shut off power at the breaker first. Remove the faceplates so you can tile neatly around them. This is not the glamorous part of the makeover, but it is the part that keeps the makeover from becoming a cautionary tale.
- Mark a level starting line.
If your countertop is perfectly level, you may be able to use it as your guide. If it is not, use a level to mark a straight reference line for the first row. The first row matters a lot. If it goes crooked, the rest of the backsplash will enthusiastically follow.
- Test the first tile before removing the backing.
Place the tile where it will begin and confirm the position. For some layouts, starting at a clean corner works best. For others, especially where symmetry matters, starting from a centered line gives a more balanced final look. Choose the method that avoids awkward skinny cuts in the most visible areas.
- Peel and stick slowly.
Remove the backing from the first tile and place it carefully along your guide. Press from the center outward to reduce trapped air. Once it is on, it may not be eager to move, so do not rush this part. Peel-and-stick tile is forgiving only until the adhesive fully bonds.
- Press firmly with a roller or grout float.
Use a J-roller or grout float to apply even pressure across the surface. This helps the adhesive make full contact and reduces bubbles or weak spots. Think of it as the firm handshake of backsplash installation.
- Cut pieces for edges and outlets.
Measure twice, mark once, and cut carefully. Some stainless steel tiles can be trimmed with metal snips, while others may call for a specific cutting tool depending on the construction. Wear gloves because cut edges can be sharp. For outlet openings, make a template on paper or cardboard first if the shape is complicated. It is much easier to fix a paper mistake than a tile mistake.
- Continue row by row.
Keep checking alignment as you go. Wipe off fingerprints as needed so you can see seams clearly. Step back every few tiles to make sure the pattern still looks even. Close-up confidence can be deceptive.
- Finish with trim or caulk.
Once the tiles are in place, add trim if your product line offers matching pieces, or run a thin bead of silicone caulk along the countertop line and exposed edges. This gives the backsplash a cleaner look and helps block moisture from sneaking behind the panels.
- Reinstall outlet covers.
After the adhesive has had time to settle, reinstall the faceplates. If the tile thickness causes a slight gap, outlet spacers can help the cover sit properly.
What About the Area Behind the Stove?
This is where you need to stop being a bargain hunter for one minute and become a label reader. Not every peel-and-stick backsplash product is appropriate for every heat zone. Some manufacturers specify that the material must be a minimum distance from burners or direct heat. If your backsplash sits close to a gas range or high-heat cooking surface, check both the tile instructions and your appliance guidance before installing.
In plain English: if the product is rated for a backsplash but not for intense direct heat, do not test its courage with a roaring burner. Stainless steel itself handles heat better than many faux tile materials, but the adhesive system still has limits. If your stove area runs hot, a dedicated stainless steel backsplash panel or another more heat-robust material may be the smarter move in that specific section.
How To Make a Budget Backsplash Look More Expensive
Choose a simple pattern
Stainless steel already has visual punch, so you do not need a wildly complicated pattern. Clean subway-style lines, brushed finishes, and larger panels often look more polished than tiny, hyper-detailed mosaics in a small kitchen.
Keep the seams straight
This is the whole game. A budget backsplash with crisp lines can look custom. An expensive backsplash with wandering seams can look homemade in the wrong way. Use your level, dry-fit often, and do not rely on vibes.
Finish the edges
Exposed raw edges are the quickest way to make the project look unfinished. Trim pieces, edge strips, or even neat caulk lines can elevate the whole wall.
Do not skip the cleaning wipe-down
Stainless steel loves showing fingerprints. Give the finished backsplash a final buff with a soft microfiber cloth so it looks intentional, not freshly wrestled.
Common Mistakes To Avoid
- Installing over grease: The adhesive may fail, and your backsplash may start peeling like a bad sunburn.
- Ignoring wall texture: Bumps and seams can telegraph right through thin stick-on tile.
- Skipping the dry layout: This is how you end up with weird edge cuts you could have avoided.
- Rushing outlet cuts: Slow, careful cuts look clean. Fast cuts look like regret.
- Using the wrong product near high heat: Always check the manufacturer’s instructions.
- Forgetting edge sealing: Moisture near sinks and counters is persistent. Seal the vulnerable lines.
How To Clean and Maintain Stainless Steel Stick-On Tile
Day-to-day cleaning is simple. Use a soft cloth with mild dish soap and warm water, then dry the surface to avoid streaks. For greasy splatter, wipe with the grain if the finish is brushed. Avoid steel wool, abrasive scrubbers, bleach-heavy cleaners, and harsh powders that can scratch or dull the finish.
If you get smudges or light staining, a gentle stainless steel cleaner or a little baking soda paste on a soft cloth can help. Just keep it non-abrasive. The goal is “sleek modern kitchen,” not “I polished this wall with a Brillo pad and a grudge.”
Is This a Good DIY Project for Beginners?
Yes, with one important condition: you have to enjoy detail work at least a little. This is a beginner-friendly kitchen upgrade because it avoids wet saws, mortar, and grout haze, but it still rewards precision. If you can measure carefully, keep a line straight, and resist the temptation to rush, you can absolutely handle this project.
It is especially good for small kitchens, apartment kitchens, laundry room wet bars, RVs, and coffee nooks where you want a modern backsplash without a full renovation. The project is quick enough for a weekend and dramatic enough to make your countertops look like they got promoted.
What This Project Actually Feels Like in Real Life
Here is the part most tutorials skip: the experience of installing a $100 stainless steel stick-on backsplash is a weirdly emotional little journey. It starts with confidence. You stand in your kitchen, coffee in hand, looking at your wall like a visionary. You have your tile, your tape measure, your playlist, and the deeply optimistic belief that this will take “maybe an hour.” That belief is adorable.
Then comes the cleaning stage, where you discover that kitchen walls can hold an astonishing amount of invisible grime. You wipe once. The cloth turns gray. You wipe again. The cloth turns slightly more judgmental. By the time the wall is truly clean, you start to understand why prep gets so much attention in home improvement guides. It is not glamorous, but it is the foundation of everything that follows.
The first tile is the most stressful. You peel the backing slowly, line it up, hover for a second, then commit. There is always a tiny moment where you wonder if you have just changed your life or made a very shiny mistake. But once that first piece goes on straight, the whole project becomes fun. Not easy exactly, but satisfying in a very specific, very adult way.
You start noticing little victories. The seam lines match. The reflected light makes the countertop look cleaner than it did ten minutes ago. The wall suddenly has depth and purpose. Even a small strip of stainless steel tile can make the kitchen feel more finished, like the room finally remembered what it wanted to be.
There are also the fiddly moments. Outlet cutouts can test your patience. Corners may require tiny adjustments. You may peel, reposition, and mutter a few words not suitable for a family design blog. That is normal. This is one of those projects where the last 10 percent requires half the concentration. But when you slow down and handle the details carefully, it pays off.
The best part comes at the end, when you reinstall the outlet covers, wipe down the stainless steel, and step back. The kitchen looks brighter. The wall behind the counter looks intentional instead of forgotten. And because stainless steel reflects both light and surrounding finishes, even older cabinets can suddenly seem more updated. It is not magic, but it is close enough for a Saturday afternoon.
There is also a special thrill in knowing you did not spend thousands of dollars to get that effect. You solved a design problem with planning, patience, and a box of stick-on tile. That is peak DIY energy. You will probably point at the backsplash every time someone visits and casually say, “Oh, that? I did it myself,” even if nobody asked. Frankly, you earned that moment.
And maybe that is why this project remains so appealing. It is not just about covering a wall. It is about changing how the kitchen feels without taking the room apart. It is about making the space look cleaner, sharper, and more current with a relatively small investment. For around $100 in materials, that is a pretty excellent trade.
Conclusion
If you want a budget kitchen makeover that looks crisp, modern, and surprisingly high-end, a stainless steel stick-on wall tile backsplash is one of the smartest DIY options on the table. The key is not speed. It is preparation. Clean the wall thoroughly, plan the layout before peeling, cut carefully around outlets and edges, and use a heat-appropriate product where cooking temperatures are a factor. Do that, and your DIY backsplash can look far more expensive than its price tag suggests.
In other words, this is not just a cheap fix. It is a strategic one. And when done well, it proves a beautiful home upgrade does not always require a contractor, a week of demolition, or a wallet in emotional distress.