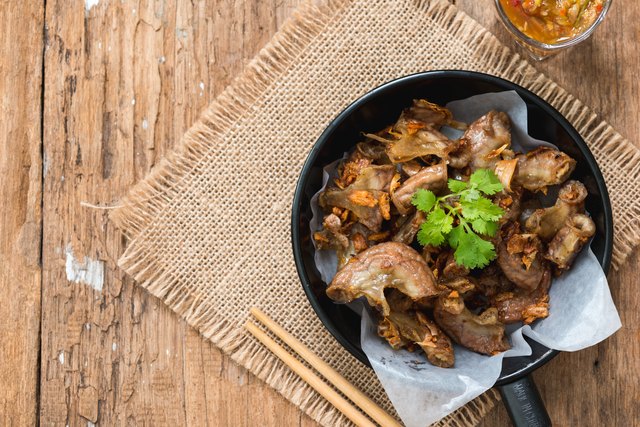
Cleaning chitterlings is not a casual “rinse and hope for the best” kitchen project. Chitterlings, often called chitlins, are pig intestines, and they have a proud place in Southern, soul food, and holiday cooking traditions. They also come with a reputation: bold flavor, strong aroma, and a cleaning process that can test both patience and nose strength. Let’s be honestif chitterlings had a perfume, nobody would wear it to brunch.
Still, when cleaned and cooked properly, chitterlings can become tender, savory, and deeply comforting. The key word is properly. Because they are raw pork intestines, they can carry harmful bacteria, including Yersinia enterocolitica, which is especially risky for babies, toddlers, older adults, pregnant people, and anyone with a weakened immune system. That means cleaning chitterlings is not only about removing grit, fat, and debris. It is also about controlling cross-contamination, protecting your kitchen, and cooking them thoroughly.
This guide explains how to clean chitterlings safely, step by step, using practical kitchen methods and food-safety principles. Whether you grew up watching someone clean chitlins at the sink or you are staring at a frozen bucket for the first time wondering what life choices brought you here, this article will walk you through the process with clarity, caution, and just enough humor to survive the smell.
What Are Chitterlings?
Chitterlings are the small intestines of pigs. In American cooking, they are most commonly associated with Southern cuisine and soul food, especially around holidays and family gatherings. They are usually boiled slowly until tender, then seasoned with onions, garlic, vinegar, hot sauce, peppers, bay leaves, and other aromatics. Some cooks fry them after boiling, while others serve them soft and brothy with cornbread, greens, rice, or potatoes.
The reason chitterlings require careful cleaning is simple: intestines naturally contain residue, odor, and bacteria. Commercial processing removes much of the waste, but raw chitterlings still need detailed home preparation. Even “pre-cleaned” chitterlings should be inspected and cleaned again. The label may say pre-cleaned, but your eyes, hands, and common sense still need to clock in for work.
Why Cleaning Chitterlings Safely Matters
Raw chitterlings can spread germs to hands, counters, sinks, utensils, cutting boards, dish towels, cabinet handles, refrigerator doors, and nearby foods. A tiny splash of contaminated water can turn a clean kitchen into a microbial obstacle course. That is why safe chitterling preparation begins before you even open the package.
One major concern is Yersinia infection, also known as yersiniosis. This illness is often linked to raw or undercooked pork products. Symptoms may include diarrhea, fever, stomach pain, vomiting, and in some cases severe abdominal pain. Infants and young children are at higher risk because germs can move from a cook’s hands to bottles, pacifiers, toys, high chairs, and little fingers that somehow touch everything in the house within seven seconds.
The best approach is to treat raw chitterlings like a high-risk raw meat product. Keep them away from children, keep them away from ready-to-eat foods, and clean every surface they touch. Do not prepare salad, fruit, bread, desserts, or baby food in the same area until the kitchen has been washed and sanitized.
Supplies You Need Before Cleaning Chitterlings
Before you begin, gather everything you need. Once your hands are covered in raw chitterling business, you do not want to go digging through drawers for a missing knife or paper towel roll.
Basic Cleaning Supplies
- Large bowl or clean food-safe tub
- Disposable gloves
- Sharp paring knife or kitchen scissors
- Colander
- Paper towels
- Trash bag or lined waste bowl
- Dish soap
- Bleach or approved kitchen sanitizer
- Separate cutting board, if needed
- Large pot for pre-boiling and cooking
Optional Ingredients for Odor Control
- White vinegar or apple cider vinegar
- Lemon juice
- Salt
- Onions
- Garlic
- Bay leaves
- Red pepper flakes or hot sauce
Vinegar, salt, lemon, and aromatics can help reduce odor and improve flavor, but they do not replace proper cleaning, sanitizing, and cooking. A splash of vinegar is helpful; it is not a magic wand. If vinegar killed every foodborne germ instantly, health departments would be run by salad dressing.
Step 1: Prepare Your Kitchen Like a Pro
Before opening the chitterlings, clear your workspace. Remove fruit bowls, bread, clean dishes, baby bottles, toys, mail, phones, and anything else that does not need to be near raw pork. Chitterlings require focus and space. This is not the time to multitask with cupcakes cooling on the counter.
Wash your hands with soap and warm water for at least 20 seconds. Put on disposable gloves if you prefer, but remember that gloves are not a substitute for handwashing. Gloves can spread germs just like bare hands if you touch faucets, phones, cabinet handles, or your face.
Set up a “raw zone” and a “clean zone.” The raw zone is where you inspect and clean the chitterlings. The clean zone is where cooked food, seasonings, clean utensils, and serving dishes stay safely away from raw juices.
Step 2: Thaw Chitterlings Safely
If your chitterlings are frozen, thaw them in the refrigerator, not on the counter. Countertop thawing lets the outside warm up while the inside stays frozen, creating a perfect bacteria buffet. Thawing in the refrigerator takes longer, but it keeps the meat at a safer temperature.
Place the package in a leak-proof pan or bowl on the lowest refrigerator shelf. This prevents raw juices from dripping onto other foods. Depending on the size of the package, thawing may take a day or more. If you must speed things up, use a sealed bag in cold water and change the water every 30 minutes. Cook immediately after thawing with the cold-water method.
Step 3: Pre-Boil Before Cleaning
Many public-health recommendations suggest buying pre-cooked chitterlings when possible. If using raw chitterlings, one smart safety step is to boil them for 5 minutes before cleaning and cooking. This pre-boil helps reduce harmful germs before you handle the chitterlings closely.
To pre-boil, place the raw chitterlings in a large pot and cover them with water. Bring the water to a rolling boil and boil for 5 minutes. Carefully drain them in a colander. Keep your face away from the steam because the aroma will introduce itself with confidence.
After draining, rinse the pot, sink, and colander area carefully. Wash your hands thoroughly. Then continue with detailed cleaning.
Step 4: Inspect Each Piece Carefully
Place a small batch of chitterlings in a bowl or tub. Do not try to clean the entire mountain at once unless you enjoy chaos. Working in smaller batches makes it easier to see what you are doing and reduces the chance of missing debris.
Pick up one piece at a time. Look for excess fat, straw-like particles, dark spots, grit, waste residue, and tough membranes. Some pieces may be folded, twisted, or turned inside out. Open them gently and inspect the inside. Chitterlings are not shy; they require hands-on attention.
Use your fingers, kitchen scissors, or a small knife to remove unwanted material. Trim away heavy fat, but do not obsess over every tiny bit. Some fat contributes flavor, while too much can make the final dish greasy and unpleasant. The goal is clean, not surgically redesigned.
Step 5: Rinse Under Running Water
After removing visible debris, rinse each piece under cool running water. Keep the water pressure moderate to reduce splashing. High-pressure water can spread raw juices around your sink and nearby surfaces. Think gentle stream, not car wash.
As you rinse, run water through the folds and inside channels. Rub the pieces between your fingers to loosen anything stuck to the surface. Place cleaned pieces into a separate clean bowl. Do not put cleaned chitterlings back into the bowl that held raw, uncleaned pieces.
Some cooks soak chitterlings in cool water with a little vinegar or salt after rinsing. This can help with odor and texture, but it should be brief. Soaking too long in salty water can affect flavor, and soaking alone does not make chitterlings safe. The real safety team is still cleaning, separating, sanitizing, and cooking.
Step 6: Repeat Until the Water Runs Clear
Cleaning chitterlings often takes multiple rinses. Drain cloudy water, refill the bowl with clean cool water, swish the chitterlings, inspect again, and drain. Repeat until the water looks clear and the pieces feel clean.
There is no universal number of rinses because chitterlings vary by brand and processing quality. “Pre-cleaned” chitterlings may need two or three rounds. Less processed ones may need several more. Trust your eyes. Trust your nose a little, but not too muchchitterlings naturally have a strong smell even when clean.
Step 7: Clean and Sanitize Everything
Once the chitterlings are cleaned, wash your hands with soap and water. Remove gloves carefully if using them, then wash your hands again. Clean the sink, faucet handles, counters, bowls, knives, scissors, cutting boards, and any surfaces that may have been touched.
First, wash surfaces with hot soapy water to remove grease and residue. Then sanitize. A common household sanitizing solution is 1 tablespoon of unscented liquid chlorine bleach mixed with 1 gallon of water. Apply it to hard surfaces, let it sit briefly, and allow surfaces to air-dry. Never mix bleach with vinegar, ammonia, or other cleaners. Your kitchen needs sanitation, not a chemistry emergency.
Use fresh towels or paper towels. If you used dishcloths, wash them in hot water. Sponges can hold bacteria, so consider using disposable paper towels during chitterling preparation or sanitizing your sponge afterward.
Step 8: Cook Chitterlings Thoroughly
After cleaning, chitterlings must be cooked thoroughly. Place them in a large pot with fresh water or broth. Add onions, garlic, bay leaves, crushed red pepper, vinegar, black pepper, celery, bell pepper, or your preferred seasonings. Bring to a boil, then reduce to a simmer.
Chitterlings usually need several hours of slow cooking to become tender. Stir occasionally and add more liquid if needed. They are done when they are soft, flavorful, and easy to bite. Tough chitterlings are a sign they need more time, not more wishful thinking.
Use clean utensils after the chitterlings are cooked. Do not use the same spoon, cutting board, or plate that touched raw chitterlings unless it has been washed and sanitized. Cross-contamination after cooking can undo all your careful work.
Common Mistakes When Cleaning Chitterlings
Cleaning Too Much at Once
Large batches are overwhelming. Work in small sections so you can inspect every fold. Chitterlings reward patience and punish rushing.
Letting Children Near the Prep Area
Children should stay out of the kitchen while raw chitterlings are being cleaned. If possible, have someone else care for babies and toddlers during preparation. Wash hands and fingernails thoroughly before touching children, bottles, pacifiers, or toys.
Using the Same Sink for Everything Without Sanitizing
The sink can become contaminated quickly. Do not rinse lettuce, fruit, herbs, or ready-to-eat food in the same sink until it has been cleaned and sanitized.
Thinking Vinegar Replaces Cooking
Vinegar can help with smell and taste, but it does not replace heat. Chitterlings still need to be cooked thoroughly.
Trusting “Pre-Cleaned” Too Much
Pre-cleaned chitterlings save time, but they still need inspection, rinsing, and safe handling. “Pre-cleaned” means easier; it does not mean “open package and throw a parade.”
How to Reduce the Smell of Chitterlings
The smell of chitterlings is famous for a reason. To reduce odor, start with thorough cleaning. Removing excess fat and residue makes a big difference. Pre-boiling also helps. During cooking, add onions, garlic, vinegar, lemon, bay leaves, celery, or peppers. Ventilate the kitchen by opening windows and using an exhaust fan.
Some cooks simmer a small pot of vinegar and water nearby, while others place bowls of baking soda in the kitchen to absorb odors. These tricks may help, but the best odor control is cleanliness, fresh water, and good ventilation. Also, warn guests before they walk in. A surprise chitterling aroma can make people reconsider every decision that led them to your front door.
How to Store Cleaned or Cooked Chitterlings
If you clean chitterlings but do not cook them immediately, refrigerate them in a covered container and cook them as soon as possible. Do not leave them sitting at room temperature. Raw pork products should be kept cold until cooking.
Cooked chitterlings should be refrigerated within two hours. Store them in shallow airtight containers so they cool quickly. Eat leftovers within a few days, or freeze them for longer storage. Reheat leftovers until steaming hot. When in doubt, throw it out. Chitterlings are not the place to gamble with “it probably smells fine.” They started with a strong smell, so your safety radar needs more than vibes.
Best Seasonings for Chitterlings After Cleaning
Clean chitterlings are a blank canvas with attitude. Classic seasoning options include onion, garlic, salt, black pepper, crushed red pepper, vinegar, hot sauce, bay leaves, smoked turkey, celery, and bell pepper. Some cooks add potatoes to the pot to absorb flavor and mellow the aroma. Others prefer a spicy broth with extra vinegar and hot sauce at the table.
The secret is balance. Chitterlings have a rich, earthy flavor, so acid and aromatics help brighten the dish. Vinegar cuts richness. Onions add sweetness. Garlic adds depth. Pepper brings warmth. Hot sauce brings the party.
Experience-Based Tips for Cleaning Chitterlings
After you have cleaned chitterlings once, you understand why experienced cooks often treat the process like a serious family operation. Nobody wanders into the kitchen casually. There is a plan. There are assigned bowls. There is usually one person who knows exactly what “clean enough” looks like and another person who is only trusted to chop onions.
The first practical lesson is to start earlier than you think. Chitterlings take time to thaw, pre-boil, clean, rinse, sanitize, and cook. If dinner is at 6 p.m., starting at 4 p.m. is not ambition; it is denial wearing an apron. Begin in the morning or even prep the day before if your schedule allows. The calmer you are, the more thorough you will be.
The second lesson is to protect your workflow. Set up three stations: uncleaned, cleaned, and trash. Keep them separate. Use one hand for handling raw pieces and the other for moving bowls or turning on water if possible. Better yet, use paper towels to touch faucet handles, then discard them. This may feel fussy, but it keeps germs from traveling around the kitchen like they bought a bus pass.
The third lesson is that your nose will adjust, but your guests’ noses may not. Good ventilation is not optional. Open windows, turn on the vent hood, and take out trash quickly. Do not let trimmings sit in the kitchen. Tie the trash bag tightly and move it outside. A small bowl of vinegar near the stove can help, but removing waste fast helps more.
The fourth lesson is to buy the best quality you can find. Cheaper chitterlings may cost less upfront but can require much more cleaning. Pre-cleaned or partially cleaned brands often save time and reduce stress. They still need careful inspection, but they can shorten the job. Read labels, check packaging, and buy from stores with good meat-handling practices.
The fifth lesson is to clean as you go. Do not wait until the end to face a battlefield of bowls, cloudy water, knives, gloves, wrappers, and mysterious splashes. Wash and sanitize in stages. When one batch is finished, reset your area before starting the next. Future-you will be grateful, and future-you is the person stuck scrubbing the sink at midnight.
The sixth lesson is to respect tradition while respecting safety. Many families have strong opinions about whether to use vinegar, salt, lemon, potatoes, onions, or hot sauce. Those flavor traditions matter. Food is memory. Food is culture. Food is somebody’s auntie saying, “Move, baby, you’re doing it wrong,” with love in her voice. But safety rules are not insults to tradition. They help keep the tradition alive without sending anyone to urgent care.
The seventh lesson is to cook until tender, not until the clock says so. Some chitterlings soften faster than others. Simmer gently, check texture, and season gradually. If the broth gets too strong, add water. If the flavor tastes flat, add aromatics, acid, and pepper. If the texture is rubbery, keep cooking. Chitterlings do not respond well to impatience.
Finally, remember that cleaning chitterlings is a skill. The first time may feel slow and awkward. The second time, you will be more organized. By the third time, you may develop opinions about brands, vinegar ratios, and who is allowed near your sink. That is when you know you have entered the chitlins circle of wisdom.
Conclusion
Learning how to clean chitterlings is part food preparation, part safety practice, and part cultural tradition. The process takes time, but it is straightforward when broken into steps: thaw safely, pre-boil if using raw chitterlings, inspect each piece, remove debris and excess fat, rinse carefully, separate raw and clean items, sanitize surfaces, and cook thoroughly.
The biggest rule is to take chitterlings seriously. Keep children away from the prep area, wash your hands often, avoid splashing raw juices, and clean every surface that comes into contact with raw chitterlings. Flavor matters, but safety comes first. Once the cleaning is done, you can focus on the good part: slow simmering, deep seasoning, and serving a dish that carries history, family, and a whole lot of personality.
Chitterlings are not a shortcut food. They are a patient cook’s food. Treat them with care, season them with confidence, and give yourself enough time. Your kitchen may smell dramatic for a while, but the final dish can be rich, tender, and memorablethe kind of meal that makes people talk, laugh, debate, and ask who cleaned the chitlins this year.