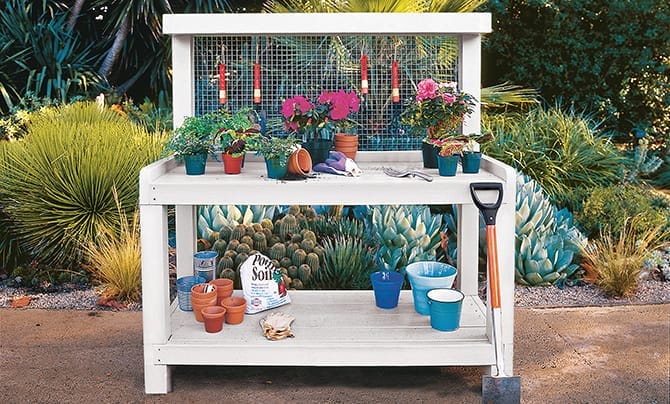
A potting bench is the garden’s version of a kitchen island: part workstation, part storage hub, part “why did I ever kneel in the dirt like a medieval turnip farmer?” Once you have a dedicated place to repot herbs, start seeds, sort tools, wash pots, and stash the mysteriously multiplying collection of plant tags, gardening becomes cleaner, faster, and a lot more enjoyable.
The good news is that learning how to build a potting bench does not require a professional woodworking shop or a heroic beard. With basic lumber, a saw, a drill, screws, and a weekend, you can build a sturdy garden workstation that fits your patio, shed, greenhouse, deck, or backyard corner. This guide walks you through a practical DIY potting bench design with a work surface, lower shelf, optional back rail, hooks, and room for upgrades like a soil bin or sink.
Why Build a Potting Bench Instead of Buying One?
Store-bought potting benches can be attractive, but building your own gives you three big advantages: custom size, stronger materials, and smarter storage. Many ready-made benches are designed to look charming in a product photo, not necessarily survive years of wet soil, spilled fertilizer, and the occasional bag of compost dropped with the elegance of a bowling ball.
A DIY potting bench lets you choose durable wood, set the height to match your body, add shelves where you actually need them, and make the bench wide enough for your favorite trays and containers. It can also double as an outdoor serving station, barbecue prep table, seed-starting zone, or plant hospital for dramatic houseplants that “just need more light.”
Best Size for a DIY Potting Bench
A practical potting bench is usually about 48 inches wide, 24 inches deep, and 36 inches tall. That height feels similar to a kitchen counter and helps reduce bending while you work. If you are tall, consider 38 inches. If you prefer sitting while potting, lower the surface or pair it with a comfortable stool.
For small patios, a 36-inch-wide bench may be enough. For serious gardeners, a 60-inch bench gives you space for seed trays, a bucket of potting mix, hand tools, labels, and a cup of coffee that you will definitely forget is there until it tastes like basil dust.
Materials You Will Need
This simple potting bench plan uses common boards available at most home improvement stores. Cedar is a favorite because it resists rot naturally and looks beautiful outdoors. Redwood is another excellent option. Pressure-treated lumber can be used for structural areas, but avoid old reclaimed treated wood of unknown origin, especially around edible gardening supplies. If budget is the priority, exterior-grade pine or fir can work when sealed properly.
Suggested Lumber List
- Four 2×4 boards for legs and main framing
- Two 2×4 boards for side rails and back supports
- Five to seven 1×4 or deck boards for the work surface
- Five to seven 1×4 boards for the lower shelf
- Two 1×6 boards for the upper shelf or back ledge
- One sheet of galvanized metal, outdoor tile, or scrap laminate for an optional easy-clean worktop
Hardware and Supplies
- Exterior-grade screws, 2 1/2-inch and 1 1/4-inch
- Waterproof wood glue
- Sandpaper, 80-grit and 120-grit
- Outdoor wood sealer, stain, or paint
- Hooks for hand tools
- Optional casters rated for outdoor use
- Optional plastic bin or removable tote for potting soil
Tools
- Tape measure
- Pencil
- Speed square
- Circular saw or miter saw
- Drill and driver bits
- Clamps
- Level
- Safety glasses and work gloves
Step 1: Choose the Right Location
Before cutting a single board, decide where the potting bench will live. A good location is level, convenient, and close to water. Near a hose bib is ideal because seedlings, pots, and tools always seem to need rinsing. If you plan to start seeds, choose a spot with bright light but not punishing afternoon heat. Under a covered porch, beside a shed, or inside a greenhouse will help the bench last longer.
Make sure the ground is stable. A wobbly potting bench is annoying at best and a seedling-launching catapult at worst. If the bench will sit on soil or gravel, place patio blocks under the legs. If it will sit on a deck, add rubber feet or locking casters to prevent sliding.
Step 2: Cut the Legs and Frame Pieces
For a 48-inch-wide bench, cut four legs from 2×4 lumber at 36 inches each. Cut the front and back rails at 48 inches. Cut the side rails at 21 inches if you want a bench about 24 inches deep after accounting for board thickness and overhang.
You will need rails for the top frame and lower shelf frame. In simple terms, you are building two rectangles: one rectangle at the top to support the work surface and one lower rectangle to support the shelf. The legs connect those rectangles into a strong table-like structure.
Step 3: Build the Side Frames
Lay two legs on a flat surface. Place one side rail near the top, about 3 inches below the leg tops, and another side rail about 8 inches above the bottom of the legs. Check that everything is square, then attach the rails using exterior screws and wood glue. Repeat for the other side.
Clamps are helpful here. Without clamps, boards tend to wander around like toddlers in a candy aisle. Take your time, keep the edges flush, and drill pilot holes to reduce splitting. Pilot holes are especially useful when working with cedar or near the end of any board.
Step 4: Connect the Front and Back Rails
Stand the two side frames upright and connect them with the front and back rails. Attach the top front rail first, then the top back rail. Add the lower front and lower back rails to create the shelf frame. Use a level and square as you go. A potting bench does not need piano-level precision, but it should not look like it survived a small earthquake.
For extra strength, add a center support under the work surface. Cut a 21-inch 2×4 and install it from front to back in the middle of the top frame. Add another center support for the lower shelf if you plan to store heavy bags of compost, potting mix, or ceramic containers.
Step 5: Install the Work Surface
Place 1×4 boards or deck boards across the top frame. Leave a small gap between boards so water and soil can fall through instead of sitting on the surface. A gap of about 1/8 inch to 1/4 inch works well. Screw each board into the frame with exterior screws.
If you want a cleaner surface, cover part of the worktop with galvanized metal, stainless steel, outdoor tile, or a removable plastic cutting board. A metal worktop is easy to wipe down after mixing soil, while wood gives the bench a warmer, classic garden look. Another clever option is to leave a rectangular opening in the top and drop in a removable plastic bin for potting mix.
Step 6: Add the Lower Shelf
Install slats across the lower frame to create a shelf. This is where the bench becomes truly useful. Use it for bags of soil, empty pots, watering cans, trays, gloves, and the mysterious hand trowel you buy every spring because last year’s disappeared into another dimension.
As with the top, leave small gaps between boards for drainage and airflow. Outdoor storage areas should dry quickly. Trapped moisture is one of the main reasons garden furniture fails early.
Step 7: Build a Back Rail or Hutch
A back rail keeps items from falling behind the bench and gives you a place to hang tools. The simplest version uses two vertical 2×4 supports attached to the rear legs and one or two horizontal boards across the back. Add hooks for pruners, scissors, twine, gloves, and small hand tools.
For more storage, build a shallow upper shelf. Cut two side brackets, attach them to the back supports, and screw a 1×6 board across the top. This shelf is perfect for seed packets, labels, small pots, and decorative jars. Just do not overload it with heavy items unless you add strong brackets.
Step 8: Sand, Seal, and Protect
Sand every surface that hands might touch. Round over sharp corners with sandpaper to prevent splinters. Pay special attention to the front edge of the worktop, because that is where your wrists and forearms will rest while potting.
Apply an exterior wood sealer, stain, or paint. Cedar can be left unfinished, but sealing it helps preserve the color and slows weathering. Painted potting benches look charming, especially in cottage gardens, but use exterior paint and allow it to cure fully before piling on damp pots and soil.
Smart Upgrades for a Better Potting Bench
Add a Soil Bin
A removable soil bin is one of the most useful potting bench upgrades. Cut an opening in the worktop and drop in a plastic tote with a lid. You can scoop potting mix directly from the bench and close the lid when you are finished. This keeps soil dry and discourages pests.
Add a Sink or Wash Tub
If your bench sits near a hose, consider adding a small sink, enamel basin, or salvaged stainless-steel sink. It does not need full plumbing. A basin can drain into a bucket, gravel bed, or utility area, depending on local rules and what you are rinsing. Use it for washing pots, soaking seed trays, or cleaning muddy tools.
Add Casters
Outdoor locking casters make the bench easier to move for cleaning, entertaining, or winter storage. Choose casters rated for the total weight of the bench plus supplies. A bench loaded with soil bags becomes heavy quickly.
Add Pegboard or Slatted Tool Storage
A back panel with pegboard or horizontal slats keeps tools visible. Gardeners lose fewer tools when tools have obvious homes. This is not magic, but it feels close.
Potting Bench Design Tips That Actually Matter
First, keep the work surface deep enough for standard seed trays. A depth of 22 to 24 inches is comfortable for most gardeners. Second, do not skip drainage gaps. Potting benches deal with wet containers, loose soil, and watering cans; water needs somewhere to go.
Third, plan storage by frequency of use. Everyday tools should hang at eye level. Heavy soil bags belong on the lower shelf. Seed packets and labels should stay in a dry box. Fertilizers and garden chemicals should be stored safely, clearly labeled, and away from children and pets.
Fourth, think beyond spring. In summer, the bench may hold harvest baskets. In fall, it can become a bulb-planting station. In winter, it can store dormant pots or serve as a holiday greenery workbench. A good DIY potting bench earns its footprint all year.
Common Mistakes to Avoid
One common mistake is building the bench too low. A short bench may look cute, but your back will file a formal complaint after one afternoon of repotting tomatoes. Another mistake is using interior screws. Outdoor projects need exterior-rated fasteners because moisture can rust regular screws and stain the wood.
A third mistake is skipping the finish on budget lumber. Pine and fir can perform well outdoors when protected, but raw boards will absorb water, swell, crack, and age quickly. Finally, avoid creating a solid lower shelf with no drainage. It will collect dirt and moisture, which is basically an invitation for mildew to move in and start paying rent in spores.
Simple Cut List for a 48-Inch Potting Bench
- Four legs: 2×4 at 36 inches
- Four long rails: 2×4 at 48 inches
- Four side rails: 2×4 at 21 inches
- Two center supports: 2×4 at 21 inches
- Top slats: 1×4 boards at 48 inches
- Lower shelf slats: 1×4 boards at 48 inches
- Back supports: 2×4 boards at 24 to 36 inches above the worktop
- Upper shelf: 1×6 board at 48 inches
This cut list is flexible. If your space is narrow, reduce the width. If you want a deeper bench, increase the side rails. The best potting bench is the one that fits your garden and your habits, not the one that wins a measuring contest.
Experience Notes: What You Learn After Using a Potting Bench
The first thing you notice after building a potting bench is how much less chaotic gardening feels. Before the bench, potting often happens wherever there is a flat surface: the patio floor, the deck steps, an old chair, the edge of a raised bed, or the kitchen table if you enjoy living dangerously. After the bench, everything has a landing place. The trowel hangs on a hook. The potting mix sits in a bin. Empty nursery pots stack underneath. Suddenly, repotting one basil plant does not require a full archaeological dig through the garage.
The second lesson is that height matters more than style. A beautiful bench that is too low becomes a decorative backache. A plain bench at the right height becomes your favorite garden tool. Counter height is comfortable for most standing tasks, especially filling containers, thinning seedlings, and dividing perennials. If two people will use the bench, choose a height that works reasonably well for both, or add a sturdy anti-fatigue mat for the shorter gardener.
Another real-world discovery: shelves need categories. Without categories, the lower shelf becomes a wooden cave of old seed trays, cracked saucers, mystery fertilizers, and one glove from every pair you have ever owned. Use bins or crates. One bin for small pots, one for labels and twine, one for seed-starting supplies, and one for “I do not know what this is, but it looks important.” Even that last bin is better than chaos.
Weather teaches lessons too. If the bench lives in the open, the finish matters. Rain will find every screw hole and every end grain. Sealing the bench before heavy use is much easier than trying to rescue it later. End grain absorbs moisture fastest, so brush extra sealer on the bottoms of legs and exposed board ends. If possible, lift the legs off bare soil with pavers, feet, or casters. Wood lasts longer when it is not sitting in wet dirt.
The best surprise is how often the bench gets used for non-potting jobs. It becomes a flower-arranging table, tomato-sorting station, outdoor coffee counter, tool repair spot, and emergency buffet during backyard gatherings. Add a quick wipe-down surface and the same bench that handled compost in the morning can hold lemonade in the afternoon. That is the quiet genius of a DIY potting bench: it is not just garden furniture. It is outdoor infrastructure with charm.
Conclusion
Learning how to build a potting bench is one of the most rewarding DIY garden projects because it solves several problems at once. It gives you a comfortable work surface, organized storage, better tool access, and a cleaner way to handle messy planting jobs. Build it from cedar for long-lasting beauty, budget lumber for affordability, or reclaimed materials for character. Add a lower shelf, hooks, a soil bin, casters, or a sink depending on how you garden.
Most importantly, design the bench around real use. Make it the right height. Give it drainage. Put heavy supplies low and daily tools within reach. Seal it well. Then enjoy the small luxury of having a dedicated gardening workstation that makes every pot, seedling, and Saturday project feel a little more organizedand a lot less like wrestling a bag of soil on the ground.