There are two kinds of embedded developers: those who own a drawer full of debug probes, and those who own one debug probe, three questionable USB cables, and a deep belief that “surely this old board can be repurposed.” The project known as an ESP32 SWD flasher for nRF52 chips lives beautifully in that second category. It takes an affordable ESP32 development boardthe Swiss Army knife of Wi-Fi-enabled tinkeringand turns it into a practical tool for talking to Nordic Semiconductor’s nRF52 microcontrollers through the Serial Wire Debug interface.
At first glance, this sounds like a party trick. After all, professional tools like SEGGER J-Link, CMSIS-DAP probes, nRF52 development kits, and Nordic command-line utilities already exist. They are polished, supported, fast, and unlikely to make your bench look like a spaghetti dinner. But that is exactly why the ESP32 approach is interesting. It is not trying to replace a production-grade programmer. It is showing that with the right software, a couple of GPIO pins, and a browser-based interface, a common IoT board can become a surprisingly useful nRF52 flash programmer.
The result is part embedded engineering lesson, part hardware-hacking convenience tool, and part reminder that the best tool is sometimes the one already collecting dust on your desk.
What Is an ESP32 SWD Flasher?
An ESP32 SWD flasher is software running on an ESP32 board that communicates with a target microcontroller over Serial Wire Debug, commonly shortened to SWD. SWD is an Arm debugging and programming interface used by many Cortex-M microcontrollers, including Nordic’s nRF52 family. Instead of using the larger JTAG interface, SWD typically needs only two signal lines, SWDIO and SWDCLK, plus ground and target power reference. Fewer wires means fewer chances to connect something backward, although experienced makers know that “fewer” does not mean “zero.”
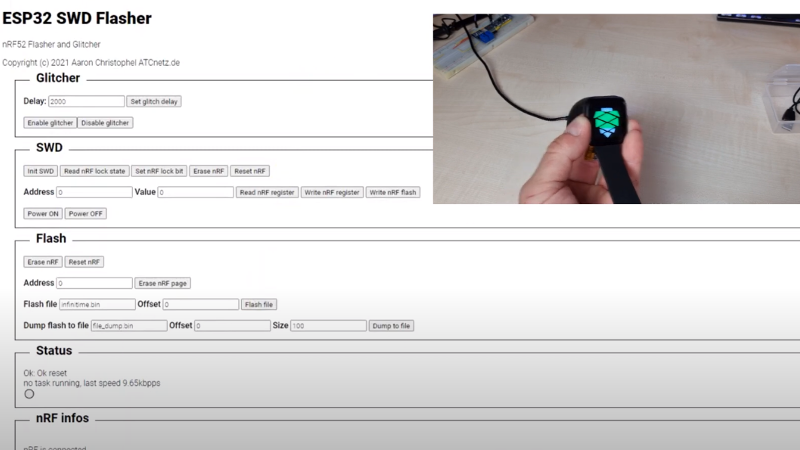
The open-source ESP32 nRF52 SWD project made this idea especially approachable. The ESP32 acts as the control device, driving SWD commands through GPIO pins and exposing a simple web interface. In practical terms, a user can connect the ESP32 to an nRF52 board, open the ESP32-hosted page in a browser, and read or write flash memory on the target chip. That is a neat trick for a chip better known for Wi-Fi sensors, smart home gadgets, and countless “temporary” projects that somehow become permanent installations.
The project was widely noticed because it made the ESP32 feel like a pocket-sized firmware rescue tool. Need to reflash a custom nRF52832 board? Want to experiment with a bare nRF52840 module? Have an old BLE gadget on the bench and permission to analyze it? The ESP32 SWD flasher gives hobbyists and researchers another path besides buying a dedicated probe immediately.
Why nRF52 Chips Matter
The nRF52 series is a popular family of Nordic Semiconductor Bluetooth Low Energy system-on-chips. Boards and products based on nRF52832, nRF52833, and nRF52840 show up in wearables, keyboards, sensors, smart locks, tracking devices, medical-adjacent gadgets, maker boards, and industrial wireless nodes. They are liked because they combine low power consumption, capable Arm Cortex-M cores, strong BLE support, and enough flash and RAM for real applicationsnot just blinking an LED while pretending to be a product roadmap.
The nRF52840, for example, is especially common in maker and professional ecosystems because it offers Bluetooth Low Energy, USB support, more memory than earlier parts, and broad compatibility with modern embedded software stacks. Developers can build with Nordic’s nRF Connect SDK, Zephyr RTOS, Arduino cores, CircuitPython, or vendor-specific frameworks. This flexibility is fantastic, but it also means firmware loading and recovery workflows vary widely from board to board.
Some boards ship with a USB bootloader. Others expose a 10-pin SWD header. Some expose tiny pads that seem designed by someone with excellent eyesight and no mercy. Bare modules may expose only what the PCB designer remembered to break out. In that world, a low-cost SWD flasher can be genuinely useful.
How Serial Wire Debug Works in Plain English
Serial Wire Debug is a compact debug protocol created for Arm-based microcontrollers. Think of it as a side door into the chip, but a legitimate one: it is how development tools halt the CPU, inspect memory, program flash, reset the device, and debug firmware. Instead of needing many JTAG signals, SWD uses a bidirectional data line and a clock line.
For the nRF52 family, SWD can access memory-mapped resources when the device allows it. That access is what makes flash programming possible. A debug probe does not magically “copy a file” into the chip like dragging a PDF onto a flash drive. It speaks a structured protocol, negotiates access through the debug port, manipulates registers, erases flash pages, writes data, and verifies the result. It is less “copy and paste” and more “tiny robot librarian with a soldering iron.”
A dedicated probe such as a J-Link, CMSIS-DAP device, or Raspberry Pi Debug Probe handles that protocol with polished firmware and host-side tools. The ESP32 version does something more homespun: it bit-bangs the SWD signals using general-purpose I/O pins. Bit-banging means software manually toggles pins to create a protocol waveform. It is not glamorous, but it is wonderfully educational. You see very quickly that a debug probe is not magic; it is timing, voltage discipline, and protocol implementation wearing a plastic case.
Why Use an ESP32 Instead of a Dedicated Debug Probe?
The honest answer is: you often should use a dedicated debug probe. If you are building firmware every day, debugging breakpoints, using RTT logs, flashing dozens of boards, or supporting a product in production, a proper J-Link, CMSIS-DAP probe, or Nordic development kit will save time and reduce uncertainty. Professional tools exist for good reasons.
However, the ESP32 SWD flasher has a different kind of appeal. It is inexpensive, common, wireless-capable, hackable, and easy to integrate into improvised workflows. If the target task is occasional flashing rather than full interactive debugging, the ESP32 approach can be enough. It also makes sense for field recovery, classroom demos, hardware security labs, and one-off maker projects where buying another tool feels excessive.
The browser interface is another clever advantage. Because the ESP32 can host a small web UI, the user does not necessarily need a complete desktop flashing setup for basic operations. That makes the tool feel more like a compact appliance than a traditional command-line programmer. Is it faster than a professional probe? Usually no. Is it more charming than a professional probe? Absolutely. Debug probes rarely have personality. ESP32 projects often arrive wearing a Hawaiian shirt.
Basic Hardware Concept
The normal flashing setup is simple in principle. The nRF52 target needs SWDCLK, SWDIO, ground, and suitable power or target voltage reference. The ESP32 drives the SWD clock and data lines using configured GPIO pins. Both boards must share ground. The target should be powered correctly, typically at 3.3 volts for many nRF52 boards, though designers should always check the exact board and chip requirements.
That last sentence matters. Many flashing failures are not software failures. They are wiring failures wearing software’s jacket. Common problems include swapped SWDIO and SWDCLK, no shared ground, unstable target power, long jumper wires, missing pull-ups where a board expects them, accidental 5-volt exposure, or a target board that is asleep, locked, damaged, or not actually the chip you thought it was. The multimeter is not optional; it is the adult in the room.
On a tidy bench, the wiring looks almost elegant. In real life, it often resembles a spider learning electronics. Still, the signal list is short enough that beginners can understand what is happening, and that is part of the beauty of SWD.
Software Workflow: From ESP32 to nRF52
The original project expects the ESP32 firmware to be built and uploaded with a modern embedded workflow such as Visual Studio Code and PlatformIO. Once the ESP32 firmware is installed, the board can host the interface used to manage the target nRF52. The workflow usually involves configuring Wi-Fi credentials, selecting or adjusting pin assignments, uploading the web interface files, connecting the target board, and then using the browser interface to perform read or write operations.
This is different from the typical Nordic workflow. In a standard nRF52 setup, developers often use nRF Connect for VS Code, nRF Util, nrfjprog, Zephyr’s west command, or SEGGER tools. Those tools are tightly integrated with board definitions, build systems, and debug probes. The ESP32 flasher sits outside that ecosystem. It is more like a specialized bridge: useful, clever, and slightly mischievous, but not a full development environment.
For best results, firmware files should be prepared carefully. A raw binary must be written to the correct flash offset. A HEX file may contain address information, but support depends on the tool. Bootloaders, SoftDevices, application partitions, UICR settings, and merged images can change what “flash the firmware” actually means. On Nordic chips, firmware layout is not a place for optimistic guessing. Guessing is how boards become tiny coasters.
AP-Protect: The Security Feature Everyone Notices Eventually
No serious article about nRF52 flashing can ignore AP-Protect, Nordic’s access port protection mechanism. AP-Protect is designed to prevent a debugger from reading or writing protected device memory and registers. In production, this is important. Products may contain private keys, proprietary firmware, user data, or security-sensitive configuration. Leaving debug access open on a finished device is like locking your front door and leaving a ladder under the window with a note that says “please be ethical.”
Nordic’s newer documentation explains that AP-Protect behavior can involve both hardware configuration and firmware-side handling, depending on the chip revision and SDK configuration. In normal development, unlocking a protected device generally requires a recovery operation that erases flash. That tradeoff is intentional: the owner can regain access to the chip, but protected firmware is not casually readable through the debug port.
The ESP32 nRF52 SWD project gained extra attention because it also referenced research into fault-injection attacks against protected nRF52 devices. This is an important security topic, but it should be treated responsibly. Reading, bypassing, or extracting firmware from devices you do not own or do not have permission to test is not acceptable. For legitimate engineers, the lesson is clear: debug protection is necessary, but hardware security is a system-level discipline. Production devices need secure firmware, physical design awareness, key management, update strategy, and realistic threat modelingnot just one checkbox in a build configuration.
Where This Tool Fits in a Real Bench Setup
The ESP32 SWD flasher is best understood as a handy bench utility, not a universal replacement for professional equipment. It shines when you need to flash a target occasionally, inspect a device in an authorized research setting, recover a board, or learn how SWD works at a lower level. It is also useful for makers who already own several ESP32 boards and want to avoid buying a dedicated probe for one weekend project.
It is less ideal when you need high-speed flashing, source-level debugging, breakpoints, trace, RTT logging, automated production programming, or deep IDE integration. For those tasks, tools like J-Link, CMSIS-DAP probes, Nordic DK onboard debuggers, and official Nordic command-line utilities remain better choices. A professional probe is boring in the best possible way: it just works, again and again, without demanding a dramatic monologue from the USB port.
That said, the ESP32 approach offers one thing professional tools rarely provide: transparency. Because it is open-source and built from accessible hardware, it helps developers understand the layers between “click flash” and “firmware appears on the chip.” That understanding pays off later when debugging custom boards, diagnosing failed programming runs, or designing production test fixtures.
Practical Examples
Example 1: Recovering a Custom BLE Sensor Board
Imagine a small BLE temperature sensor built around an nRF52832. The board has no USB connector and only tiny SWD pads on the back. The first firmware image works, but the second image disables logging and appears to crash before advertising. A standard debug probe would be the cleanest solution, but an ESP32 flasher can be enough to erase and rewrite the application if the board is not protected. The developer connects SWDIO, SWDCLK, ground, and target power reference, opens the ESP32 web interface, and reflashes the known-good binary. The sensor lives again, and the developer pretends this was the plan all along.
Example 2: Programming a Bare nRF52840 Module
Bare modules are wonderful until you need to program them. A module without a USB bootloader needs SWD access for initial firmware loading. An ESP32 SWD flasher can help write a bootloader or application image during early experiments. Once a USB bootloader is installed, future updates may become easier through drag-and-drop UF2, serial DFU, or another board-specific method. In this case, the ESP32 is the ladder used to install the staircase.
Example 3: Teaching SWD Without Hiding the Details
In a classroom or workshop, the ESP32 method is excellent for teaching. Students can see that SWD requires specific pins, timing, target voltage awareness, flash erase operations, and memory addressing. A commercial probe makes flashing feel effortless, which is great for productivity but not always great for learning. The ESP32 version exposes enough of the machinery to make the concept stick.
Common Mistakes and How to Avoid Them
The first common mistake is assuming every nRF52 board can be flashed the same way. Some boards include bootloaders, some use external flash, some reserve memory regions, and some require merged images. Always confirm the exact chip, board design, bootloader, and expected firmware format.
The second mistake is ignoring voltage. ESP32 development boards often run their logic at 3.3 volts, which is compatible with many nRF52 targets, but never assume. A target powered incorrectly may fail silently, reset repeatedly, or die in a small puff of regret. Check the schematic, measure the rails, and avoid connecting 5-volt signals to pins that do not tolerate them.
The third mistake is using long, loose jumper wires and expecting pristine signal integrity. SWD is relatively forgiving compared with high-speed interfaces, but messy wiring can still cause intermittent errors. Keep wires short, share ground properly, and avoid routing SWD lines through a nest of switching power noise.
The fourth mistake is confusing “flashing” with “debugging.” A flasher writes firmware. A debugger lets you halt code, step instructions, inspect variables, and use IDE features. The ESP32 tool is clever, but it is not the same as a full-featured J-Link workflow.
Security and Ethics: Use the Tool the Right Way
Tools that can read and write microcontroller flash deserve respect. Used properly, they help repair devices, learn embedded systems, validate security assumptions, and recover prototypes. Used improperly, they can cross legal and ethical lines quickly. The responsible rule is simple: only access devices you own or have explicit permission to test.
For product teams, this project is also a reminder to treat debug interfaces as part of the attack surface. Disable debug access in production, understand AP-Protect behavior for your exact silicon revision, verify protection during manufacturing, and design PCBs so exposed pads do not casually invite tampering. Security is not achieved by hiding the SWD pads under a sticker that says “warranty void.” Stickers are not cryptography, no matter how stern the font looks.
Why This Project Is So Appealing
The appeal of the ESP32 nRF52 SWD flasher is not only cost. It is the philosophy behind it. Embedded development often feels divided between polished professional tools and chaotic maker improvisation. This project sits in the fun middle: technically serious, but approachable; useful, but not overpackaged; powerful, but understandable.
It also highlights how flexible the ESP32 remains. People use it for Wi-Fi sensors, Bluetooth gateways, audio experiments, display drivers, home automation, robotics, test fixtures, and now even SWD flashing. That flexibility comes from a combination of affordable hardware, accessible SDKs, community support, and enough GPIO capability to make unusual ideas practical.
For nRF52 developers, the project is a reminder that SWD is not a mysterious black box. It is a protocol. Once you understand the protocol, the target memory map, the protection state, and the electrical basics, the debugging ecosystem becomes less intimidating. You may still buy a professional probeand you probably should if you do this oftenbut you will understand what the probe is doing on your behalf.
Experience Notes: What It Feels Like to Use an ESP32 as an nRF52 Flasher
The first experience most people have with an ESP32 SWD flasher is a mix of delight and suspicion. Delight, because the idea works at all. Suspicion, because any tool built from jumper wires and browser tabs feels like it might demand a sacrifice of capacitors. The key is to treat the setup like a real programming fixture, not a loose experiment. Label the wires, keep the target stable, and document which ESP32 pins are assigned to SWDIO and SWDCLK. Future-you will not remember. Future-you is busy blaming past-you.
One practical lesson is that power matters more than beginners expect. A target board that browns out during erase or write operations can appear locked, dead, or haunted. Before blaming the firmware, verify that the nRF52 has clean power and that the ESP32 ground is tied to the target ground. If the board is battery-powered, consider whether the battery can supply enough current during programming. If it is powered externally, confirm the voltage at the chip, not just at the supply output.
Another lesson is that file format discipline prevents headaches. Developers often keep several firmware outputs in a build folder: ELF, HEX, BIN, UF2, merged HEX, signed images, bootloader images, and old test builds named things like final_v3_REAL_final.hex. The ESP32 flasher is only as smart as the image you give it. Know whether you are writing an application alone, a bootloader, a SoftDevice-era layout, or a complete merged image. Flashing the right bytes to the wrong address is still wrong, even if the progress bar looked confident.
Using the tool also changes how you think about dedicated probes. After watching an ESP32 bit-bang SWD into an nRF52, a J-Link feels less like a magic wand and more like a very refined version of the same basic idea. That understanding is valuable. When a professional probe fails, you become better at asking useful questions: Is the target powered? Is SWD enabled? Is AP-Protect active? Are the pins correct? Is reset held low? Is the board revision different? Is the firmware layout compatible?
For hobbyists, the biggest benefit may be confidence. The ESP32 flasher encourages experimentation with bare modules and custom boards. It lowers the psychological cost of trying Nordic BLE chips outside a polished development kit. For professionals, it may not replace the official toolchain, but it can inspire small internal utilities, portable recovery tools, or manufacturing fixtures built around inexpensive hardware. Sometimes the best engineering outcome is not the tool itself, but the new mental model it gives you.
The final experience note is about patience. SWD over an improvised ESP32 setup may not be blazing fast, and troubleshooting can take time. But the payoff is satisfying: a board that looked unreachable suddenly accepts firmware, a mystery module becomes programmable, and an ordinary ESP32 earns a new label in the parts drawer. Not bad for a chip that was probably purchased in a five-pack because the shipping cost felt emotionally unreasonable.
Conclusion
The ESP32 turned handy SWD flasher for nRF52 chips is a clever example of embedded resourcefulness. It uses a low-cost Wi-Fi microcontroller to speak SWD, program Nordic nRF52 flash, and make firmware recovery more approachable for makers, researchers, and developers. It does not eliminate the need for professional debug probes, and it should be used responsibly, especially around protected devices. But as a learning tool and occasional bench companion, it is hard not to admire.
In the bigger picture, this project teaches a valuable lesson: embedded systems become less mysterious when we understand the interfaces underneath the tools. SWD, AP-Protect, flash layouts, bootloaders, and debug probes are not separate universes. They are connected pieces of the same workflow. The ESP32 flasher simply makes those connections visibleand does it with a board many of us already have within arm’s reach.
Note: Publishable body-only HTML prepared without embedded source links or content reference markers.