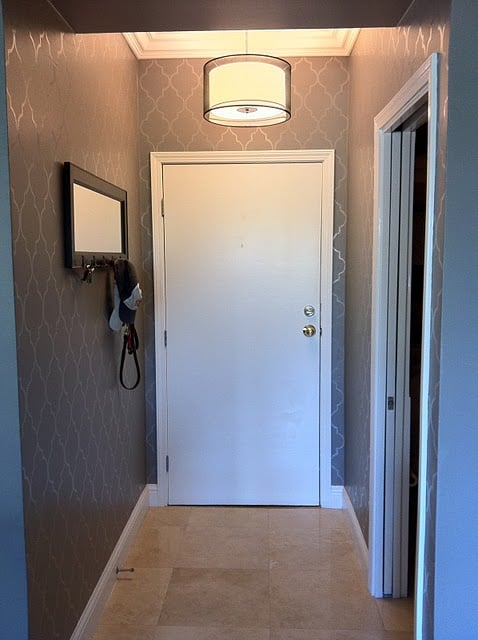
Note: This article is written for web publishing and is based on practical wall-stenciling guidance, paint-prep best practices, and real DIY home-improvement experience.
Wallpaper is gorgeous. It can make a powder room feel like a jewel box, turn a hallway into a boutique hotel moment, and make guests say, “Wait, did you hire someone?” Unfortunately, wallpaper can also be expensive, fussy, and slightly dramaticlike a diva with paste. That is where DIY stenciled faux wallpaper strolls in wearing paint clothes and a confident grin.
Stenciled faux wallpaper gives you the patterned-wall look without rolls of paper, seam anxiety, or the terrifying realization that your “removable” wallpaper has formed a lifelong bond with the drywall. With a reusable wall stencil, a little paint, a steady hand, and the patience of someone assembling flat-pack furniture without crying, you can create a custom accent wall that looks designer but costs much less than traditional wallpaper.
Whether you want a subtle tone-on-tone pattern in a bedroom, a bold botanical wall in a bathroom, or a vintage tile-inspired design in a laundry room, this guide walks you through the process from planning to cleanup. We will cover tools, paint choices, layout tricks, common mistakes, and the real-life lessons that keep your beautiful wall from becoming a crime scene in latex paint.
What Is DIY Stenciled Faux Wallpaper?
DIY stenciled faux wallpaper is a decorative painting technique that uses a repeating stencil pattern to mimic the look of wallpaper. Instead of applying paper to the wall, you paint a base color, place a stencil over the surface, and apply a second color through the cutout design. When repeated across the wall, the pattern creates the illusion of wallpaper.
The technique works especially well for accent walls, small rooms, powder rooms, nurseries, home offices, entryways, and furniture backs. It can look crisp and modern, soft and vintage, playful and cottage-inspired, or dramatic and high-end. The best part is that you control the colors, scale, finish, and intensity. Wallpaper says, “Here is the pattern.” Stenciling says, “Let us customize this little masterpiece.”
Why Choose Stenciled Faux Wallpaper Instead of Real Wallpaper?
Traditional wallpaper has its place. It is beautiful, durable, and available in endless patterns. But stenciled faux wallpaper has several advantages for budget-conscious decorators, renters with permission to paint, and homeowners who like changing their mind every few years.
It Costs Less
A quality wall stencil typically costs far less than multiple rolls of designer wallpaper. You will also need paint, painter’s tape, a roller or stencil brush, and a few prep supplies, but most DIYers already own some of these items. Better yet, the stencil can be reused for other rooms, furniture, craft projects, or that one cabinet door you suddenly decide needs personality at 10:47 p.m.
It Is Easier to Change Later
When you are tired of the look, you can paint over it. No steaming, scraping, adhesive residue, or dramatic vows never to decorate again. A good primer and a fresh coat of paint usually handle the reset.
It Allows Total Color Control
Wallpaper comes in preselected colorways. Stenciling lets you pair warm white with greige, navy with metallic gold, sage with cream, blush with terracotta, or charcoal with soft beige. You can match existing décor instead of forcing your room to negotiate with a roll of paper.
It Works in Awkward Spaces
Walls with angles, built-ins, small nooks, and odd corners can make wallpaper installation tricky. Stencils are flexible. You can bend them slightly into corners, use smaller stencil sections near trim, and touch up imperfect areas with a small artist brush.
Best Rooms for Stenciled Faux Wallpaper
While you can stencil almost any interior wall, some rooms are especially good candidates. A powder room is a classic choice because the small square footage creates big impact without turning the project into a three-day shoulder workout. A bedroom accent wall behind the bed can mimic luxury wallpaper without the cost. A home office can benefit from a subtle geometric or botanical pattern that looks polished on video calls.
Entryways, mudrooms, laundry rooms, and dining nooks also work beautifully. These spaces are often small enough to finish in a weekend but visible enough to make the project feel worthwhile. If your wall has heavy orange-peel texture, deep cracks, or moisture issues, fix those problems first. Stencils perform best on smooth, clean, dry walls.
Tools and Materials You Will Need
The right tools make wall stenciling much easier. You do not need a professional studio, but you do need more than blind optimism and a roller from 2009 that has hardened into a fossil.
- Reusable wall stencil in your chosen pattern
- Interior wall paint for the base coat
- Interior paint for the stencil color
- Dense foam roller or stencil brush
- Paint tray or paper plate
- Painter’s tape or low-tack tape
- Level, laser level, or plumb line
- Pencil or chalk for light guide marks
- Drop cloth
- Paper towels or cardboard for offloading paint
- Small artist brush for touch-ups
- Damp cloth or baby wipes for quick mistakes
- Optional repositionable spray adhesive
A dense foam roller is usually faster for large allover patterns. A stencil brush gives more control for detailed designs, corners, shading, and smaller motifs. Many DIYers use both: roller for the main wall, brush for tricky edges.
How to Choose the Right Stencil Pattern
The stencil pattern determines the mood of the room. Before buying one, look at the size of the wall, the furniture in the space, and the amount of visual energy you want. A large damask or botanical print can feel elegant and dramatic. A small repeating motif feels charming and traditional. A geometric stencil creates a modern wallpaper look but requires extra attention because crooked lines are less forgiving than organic shapes.
If you are a beginner, avoid overly complicated patterns with tiny bridges, dozens of fragile cutouts, or extreme precision requirements. Organic patterns such as vines, leaves, florals, Moroccan-inspired shapes, or loose tile motifs are more forgiving. They hide small variations better than razor-straight grids. In other words, flowers are kind. Diamonds remember everything.
Choosing Paint Colors for Faux Wallpaper
Color can make your stenciled wall whisper or shout. For a soft wallpaper effect, choose colors that are close together, such as warm white over beige, pale gray over white, or sage over muted green. This tone-on-tone approach is ideal for bedrooms, nurseries, and calm spaces.
For a bold accent wall, choose higher contrast: navy over white, black over cream, emerald over pale green, or terracotta over blush. Metallic paint can add glamour, but use it sparingly unless you want your dining room to look like it is preparing for a disco career.
Paint finish matters, too. Flat or matte paint hides wall imperfections and creates a soft designer look. Satin or eggshell is easier to clean, especially in busy areas. Semi-gloss can highlight texture and mistakes, so use it carefully. For most DIY stenciled faux wallpaper projects, eggshell or matte is a safe and stylish choice.
Step-by-Step Guide: How to Create DIY Stenciled Faux Wallpaper
Step 1: Prepare the Wall
Start with a clean, smooth wall. Remove dust, cobwebs, outlet covers, and any mysterious smudges that nobody in the house will admit creating. Patch holes, sand rough spots, and wipe the surface with a damp cloth. If your wall has stains or uneven color, use primer before painting.
Let the wall dry completely. Paint and moisture are not friends. They are more like coworkers who communicate only through passive-aggressive emails.
Step 2: Apply the Base Coat
Paint the wall with your chosen base color. Allow it to dry fully according to the paint manufacturer’s instructions. If you apply tape or stencil adhesive too soon, fresh paint may lift. Waiting is not glamorous, but neither is repairing peeled paint at midnight.
If the base color is drastically different from the original wall color, apply two coats for even coverage. Your stencil pattern will look much better over a consistent background.
Step 3: Plan the Layout
Decide where the pattern should begin. Many DIYers start at the center of the wall and work outward so the pattern looks balanced. Others start near the ceiling or in the most visible corner. The best choice depends on the stencil design and wall layout.
Use a level or laser level to mark a light vertical guideline. This first line is crucial. If the first stencil repeat is crooked, the rest of the wall will follow it like a parade with bad directions.
Step 4: Secure the Stencil
Position the stencil along your guide marks and secure it with painter’s tape. For extra crisp edges, lightly mist the back of the stencil with repositionable spray adhesive, let it become tacky, and press it onto the wall. Use adhesive sparingly and work in a ventilated area.
Smooth the stencil gently from the center outward to reduce gaps. The closer the stencil sits against the wall, the less chance paint has to sneak underneath and create fuzzy edges.
Step 5: Load and Offload the Paint
This is the most important rule of stenciling: use less paint than you think you need. Load your foam roller or stencil brush, then offload most of the paint onto paper towels, cardboard, or the ridged section of your paint tray. The roller should feel almost dry.
Yes, almost dry. It will feel wrong. Your brain will say, “Surely we need more paint.” Do not listen. Your brain also thought bangs were a good idea that one summer.
Step 6: Apply Paint in Light Layers
Use gentle pressure and build coverage gradually. Roll or dab over the stencil openings without forcing paint into the edges. Several light passes create a cleaner design than one heavy pass. Heavy paint causes bleeding, smears, and regret.
Lift one corner occasionally to check your progress. If the pattern looks too faint, add another light layer. If paint is bleeding, stop and offload more paint before continuing.
Step 7: Reposition and Repeat
Carefully peel the stencil away from the wall. Align it with the previous repeat using the stencil’s registration marks or the edges of the painted pattern. Tape it in place and repeat the process.
Work slowly and check alignment often. Stenciling speeds up once you get into a rhythm, but do not rush the first few repeats. They set the structure for the whole wall.
Step 8: Handle Corners, Ceilings, and Trim
Edges are the fiddly part. For corners, bend the stencil gently into the crease and secure only the section you are painting. Use a stencil brush instead of a roller for better control. Around trim, ceilings, outlets, and windows, tape off protected areas and paint carefully.
Some stencils come with smaller ceiling or border pieces. If yours does not, you can use part of the main stencil or carefully cut a duplicate stencil into smaller sections. Do not cut your only stencil unless you are absolutely sure. Stencil surgery is not reversible.
Step 9: Touch Up Imperfections
After the wall dries, inspect it in natural and artificial light. Small bleeds can be fixed with a tiny artist brush and the base wall color. Missing parts of the pattern can be touched up with the stencil color.
Do not obsess over every microscopic flaw. Hand-stenciled walls are supposed to look artisanal, not printed by a robot with trust issues. From normal viewing distance, tiny imperfections usually disappear into the overall pattern.
Common Mistakes to Avoid
Using Too Much Paint
This is the number-one mistake. Excess paint seeps under the stencil and blurs the design. Always offload paint first. A nearly dry roller is your best friend.
Skipping Wall Prep
Dust, grease, bumps, and holes all show through a stenciled pattern. Clean and patch the wall before you begin. The wall does not need to be museum-perfect, but it should not look like it survived a tiny indoor meteor shower.
Ignoring Alignment
Use guide marks, registration points, and a level. Even organic patterns need some structure. Step back frequently to check the wall from a distance.
Choosing a Pattern That Is Too Difficult
Beginners should avoid hyper-detailed geometric designs unless they enjoy emotional growth through home décor. Start with a forgiving pattern and build confidence.
Cleaning the Stencil Too Oftenor Not Enough
You usually do not need to wash the stencil after every repeat. However, if paint buildup begins affecting the edges, clean it gently with warm water and mild soap. Let it dry before continuing.
Design Ideas for DIY Stenciled Faux Wallpaper
For a classic look, try a white base with a pale gray damask stencil in a dining room. For a coastal bathroom, use a soft blue base with white palm or wave motifs. For a vintage tile effect, stencil a repeating Moroccan or Spanish-inspired pattern behind a vanity or laundry sink.
In a child’s room, consider stars, animals, clouds, or whimsical florals. In a modern home office, go for a subtle geometric design in greige and cream. For a dramatic powder room, pair black walls with a metallic bronze or champagne stencil. The pattern does not need to cover every wall. One well-placed accent wall often has more impact than an entire room of pattern competing for attention like toddlers at snack time.
How Long Does a Stenciled Wall Take?
A small accent wall may take a few hours once the base coat is dry. A powder room could take a day, especially if there are corners, fixtures, doors, and windows. A large room may take a full weekend or longer.
The stencil size, pattern complexity, wall texture, and your comfort level all affect the timeline. Build in breaks. Your arms, eyes, and patience will appreciate it. Stenciling while tired is how patterns drift, tape gets forgotten, and someone ends up whispering, “Maybe wallpaper was not the villain.”
How Durable Is Stenciled Faux Wallpaper?
A stenciled wall can last for years when done with quality interior paint on a properly prepared surface. In high-traffic areas, choose a washable paint finish such as eggshell or satin. For bathrooms, make sure the room has ventilation and avoid stenciling directly inside wet shower zones.
Cleaning is simple. Dust with a soft cloth or wipe gently with a damp sponge. Avoid harsh scrubbing, especially if you used matte paint. If the wall gets damaged, you can touch up the pattern with leftover paint and the stencil.
Budget Breakdown
The cost of DIY stenciled faux wallpaper varies, but it is often budget-friendly compared with traditional wallpaper. A reusable stencil may cost around the price of one affordable wallpaper roll, while paint samples or quarts can cover many stencil projects. If you already own painter’s tape, a tray, and a roller, the total cost drops even more.
The biggest investment is time. Stenciling is not difficult, but it rewards patience. Think of it as slow decorating. Put on music, pour coffee, and accept that you are about to spend quality time with a wall.
Extra Experience: What DIY Stenciled Faux Wallpaper Teaches You
The first thing you learn from creating DIY stenciled faux wallpaper is that confidence and caution must work together. At the start, the blank wall feels intimidating. You tape up the stencil, load the roller, and suddenly every home-improvement decision you have ever made flashes before your eyes. But once the first clean repeat appears, the fear turns into excitement. It feels like magic, except the wand is a foam roller and your robe is an old T-shirt with paint on the sleeve.
One of the most useful experiences is learning to trust the “almost dry” technique. Beginners naturally want more paint because more paint seems like more coverage. In stenciling, more paint is usually more chaos. The best results come from restraint. You offload the roller until it looks nearly useless, then build the pattern slowly. This lesson applies to more than walls. Sometimes the secret to a polished result is not doing more; it is doing less with better control.
Another real-world lesson is that wall stenciling reveals how imperfect most rooms are. Ceilings are not always level. Corners are not always square. Trim may wander slightly. Older homes especially have personalities, and some of those personalities are crooked. Instead of fighting every flaw, you learn to adjust. You shift the stencil a fraction, use a brush near the ceiling, touch up a corner, and keep going. The finished wall looks intentional because the overall pattern matters more than one tiny irregular spot.
Patience also becomes part of the project. Stenciling is repetitive, and that repetition can be calming if you let it. There is a rhythm: tape, roll, peel, align, repeat. After a while, you stop thinking about the whole wall and focus only on the next section. That makes the project feel manageable. It is similar to painting a room, assembling a gallery wall, or organizing a closet: progress happens one small decision at a time.
The most satisfying moment comes when you step back after the final touch-up. Up close, you may still notice a faint bleed, a slightly lighter repeat, or a tiny place where the roller slipped. But from across the room, the wall becomes one beautiful pattern. It has depth, charm, and evidence of human hands. It does not look mass-produced. It looks personal.
Stenciled faux wallpaper is also a great project for people who want a high-impact makeover without a full renovation. You do not need to demolish anything, hire a contractor, or learn plumbing. You need paint, time, and a willingness to forgive small imperfections. The project teaches you that style does not always require a big budget. Sometimes the best room transformation begins with a stencil, a Saturday, and the bold decision to stop staring at beige walls like they personally offended you.
Conclusion
DIY stenciled faux wallpaper is one of the smartest ways to add pattern, personality, and custom style to a room without the cost or commitment of traditional wallpaper. It is affordable, flexible, and surprisingly beginner-friendly when you use the right tools and techniques. The key is simple: prepare the wall well, choose a forgiving stencil, use very little paint, align carefully, and take your time.
The finished result can look like boutique wallpaper, hand-painted tile, vintage fabric, or modern designer wallcovering. Better yet, it reflects your taste because you choose the colors and pattern. If you are ready to refresh a room, start with one accent wall and a stencil you genuinely love. Your wall may not be perfect, but it will be yoursand that is the charm of DIY.