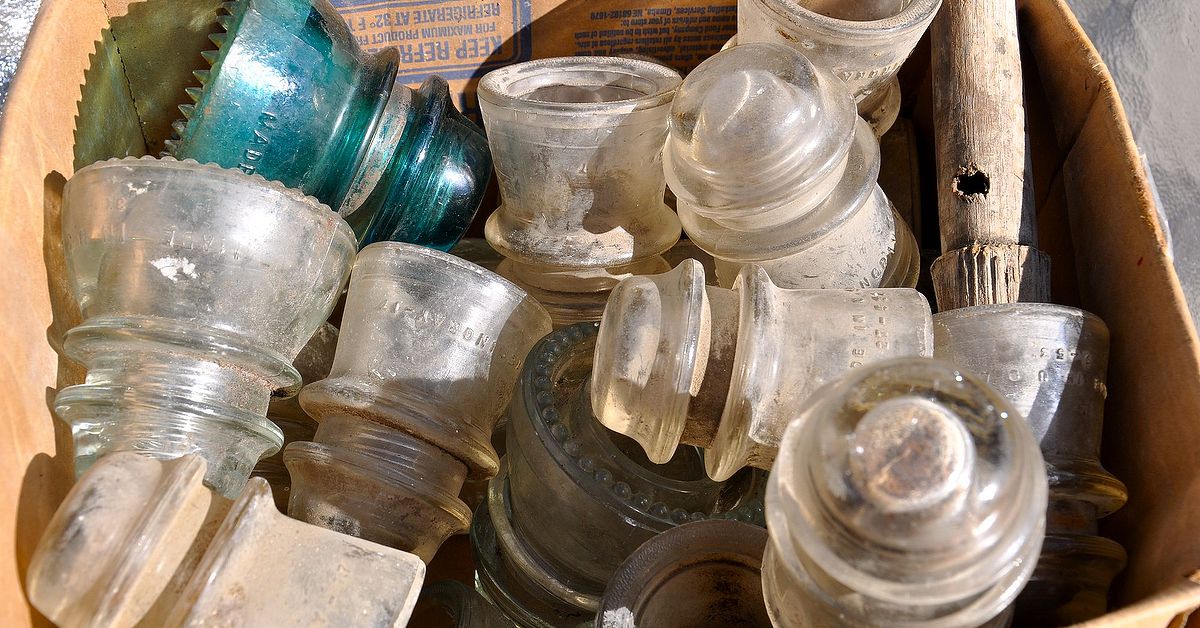
There are two kinds of people at flea markets: people who walk past a box of old glass insulators without blinking, and people who stop, gasp, and whisper, “I can absolutely turn these into tiny succulent planters.” If you are in the second group, welcome. Your people are here, and yes, we have potting grit under our fingernails.
Reusing glass insulators for succulent planting is one of those DIY projects that checks nearly every satisfying box. It is affordable, charming, space-saving, eco-friendly, and just unusual enough to make guests ask, “Wait, what is that?” These once-practical pieces of electrical history were originally used on telegraph, telephone, and power lines to keep wires separated from wooden poles. Today, their thick glass, rounded shape, aqua-green color, and vintage personality make them perfect candidates for small-space garden art.
But here is the catch: succulents may be famous for being low-maintenance, but they are not indestructible. They are more like tiny camels wearing formalwear. They store water beautifully, but they hate sitting in soggy soil. Since most glass insulators do not have drainage holes, this project needs a little planning. Done right, a glass insulator succulent planter can become a miniature sculpture. Done wrong, it becomes a transparent swamp with a very dramatic plant funeral.
This guide walks you through how to choose, clean, design, plant, display, and care for reused glass insulators as succulent planters, with practical tips for both beginners and seasoned DIY gardeners.
Why Glass Insulators Make Beautiful Succulent Planters
Vintage glass insulators have a built-in advantage: they already look like art. Their curved glass bodies catch sunlight, their embossed lettering adds texture, and their old industrial purpose gives them a story. A plain plastic nursery pot says, “I came from aisle seven.” A glass insulator says, “I may have once helped connect a frontier telegraph line, and now I host a tiny echeveria named Barbara.”
They are also compact, which makes them ideal for windowsills, shelves, patio tables, wall-mounted displays, and small apartments. Because many succulents grow slowly and tolerate shallow planting spaces, a glass insulator can work well for small varieties, cuttings, offsets, and short-term arrangements.
The Best Succulents for Glass Insulators
Not every succulent is right for this project. Avoid large, deep-rooted, fast-growing plants that need more room than the insulator can provide. Instead, choose compact succulents that stay tidy and tolerate shallow containers.
Good choices include:
- Sempervivum, also called hens and chicks, for outdoor displays and rustic garden arrangements.
- Haworthia, especially small rosette types that prefer bright indirect light.
- Small echeveria, for that classic flower-like succulent shape.
- Sedum cuttings, especially trailing varieties for a soft spillover effect.
- Crassula cuttings, such as compact jade plant starts.
- Graptopetalum or graptosedum offsets, which root easily and look lovely in small containers.
For the highest chance of success, start with small plants or rooted cuttings rather than mature succulents. Think of the insulator as a studio apartment, not a five-bedroom farmhouse.
What You Need for This DIY Glass Insulator Planter
The supply list is simple, but each item matters. Because glass insulators are small and usually lack drainage, you want materials that keep the root zone airy and prevent excess moisture from lingering.
Materials
- One clean vintage glass insulator
- Small succulent, offset, or rooted cutting
- Fast-draining cactus or succulent potting mix
- Perlite, pumice, poultry grit, or coarse mineral amendment
- Small spoon, chopstick, or narrow planting tool
- Soft brush or old toothbrush for cleaning
- Mild dish soap
- Microfiber cloth
- Optional: activated charcoal for odor control in decorative arrangements
- Optional: copper wire, macrame cord, or a small stand for display
- Optional: top dressing such as small gravel, crushed granite, or decorative stone
Avoid using ordinary garden soil. It is usually too dense for succulents in containers and may hold far too much moisture. For glass insulator planting, the goal is not rich soil. The goal is breathable soil. Succulents are not asking for a spa mud wrap.
Step 1: Choose the Right Glass Insulator
Start by inspecting the insulator carefully. Many vintage glass insulators are sturdy, but chips, cracks, and sharp edges are common. Tiny imperfections can add character, but large cracks can make the piece unsafe or unstable.
Look for an insulator with:
- A wide enough opening to fit a small root ball or cutting
- No major structural cracks
- A stable shape that can sit safely or be mounted securely
- No sharp broken glass around the rim
- A color and shape that suits your display style
Clear and aqua glass are especially popular because they glow beautifully in natural light. Purple, amber, cobalt, and green insulators can also make striking planters, though rarer collectible pieces may be better displayed as-is rather than planted.
Step 2: Clean the Glass Without Removing Its Charm
Old glass insulators often come with dust, mineral buildup, soil, cobwebs, or the mysterious residue of a century spent doing important outdoor things. Cleaning them is part of the fun, but do it gently.
Soak the insulator in warm water with a few drops of mild dish soap. Use a soft brush or old toothbrush to scrub around the ridges, lettering, and inner grooves. Rinse well and dry completely with a microfiber cloth.
If there is mineral haze, try a diluted vinegar soak for a short time, then rinse thoroughly. Avoid harsh abrasives, metal scrubbers, or aggressive scraping, especially on collectible or colored glass. The goal is clean vintage charm, not “I attacked this with a garage tool.”
Step 3: Think Carefully About Drainage
This is the most important part of the entire project. Succulents need air around their roots. When water sits in the bottom of a closed glass container, the soil can stay wet too long, and root rot may follow.
Drilling holes in glass insulators is possible in theory, but it is risky. Thick old glass can crack, chip, or shatter, especially if you are not experienced with glass drilling. If you choose to drill, use safety glasses, gloves, a diamond bit, water lubrication, and patience. However, for most home crafters, the safer option is to treat the insulator as a decorative cachepot or create a very carefully managed shallow planting.
Option A: Use the Insulator as a Decorative Outer Holder
This is the safest and most plant-friendly method. Plant the succulent in a tiny plastic nursery pot with drainage holes, then nestle that pot inside or above the glass insulator if the shape allows. When watering, remove the inner pot, water it at the sink, let it drain completely, and place it back.
This method keeps the vintage glass clean, reduces rot risk, and makes maintenance much easier. It is also ideal if you want to preserve a more valuable insulator.
Option B: Plant Directly, But Water Like a Minimalist
If you plant directly inside the glass, use a gritty succulent mix and water very sparingly. Do not rely on a thick layer of pebbles at the bottom as “drainage.” Pebbles may look tidy, but they do not magically remove water from a closed container. In fact, water can still remain trapped where roots do not want it.
A small amount of decorative stone on top is fine, but the real solution is a fast-draining mix, a tiny plant, bright light, and careful watering.
Step 4: Mix the Right Soil
A good succulent mix should feel loose and gritty, not heavy and muddy. For this project, you can use a commercial cactus and succulent mix, then improve it with extra mineral material.
A simple DIY blend is:
- Two parts cactus or succulent potting mix
- One part pumice, perlite, poultry grit, or crushed granite
- Optional: a small pinch of horticultural charcoal for decorative closed-bottom displays
The mix should fall apart easily when squeezed after moistening. If it clumps like brownie batter, it is too dense. If it drains quickly and feels airy, your succulent roots will be much happier.
Step 5: Plant the Succulent
Now comes the satisfying part. Add a small amount of dry succulent mix to the bottom of the insulator. If planting directly, use a spoon or folded paper funnel to guide the mix into the narrow opening.
Remove the succulent from its nursery pot and gently shake away excess soil. Trim any dead or mushy roots with clean scissors. Place the plant into the opening and use a chopstick or narrow tool to tuck soil around the roots.
Do not bury the crown of the plant. Succulent leaves should sit above the soil line, not down in the damp zone. Add a thin layer of top dressing if desired, but keep it light. Overpacking the surface can slow evaporation.
After planting, wait a few days before watering, especially if roots were disturbed. This gives small root wounds time to callus and lowers the risk of rot.
Step 6: Display Your Glass Insulator Succulent Planter
Glass insulators look wonderful in groups. Try arranging three or five together on a sunny windowsill, mixing different heights and colors. Odd-number groupings usually feel more natural and visually balanced.
You can also wire them into hanging planters. Copper wire pairs beautifully with aqua glass, giving the display a warm industrial look. Wrap wire securely around the groove or lip of the insulator, twist it tightly, and create a handle or hanging loop. Test the strength before adding soil and plants. Gravity is not impressed by your aesthetic vision.
Other display ideas include:
- Mounting insulators on a reclaimed wood board
- Placing them in a vintage metal plant stand
- Using them as table centerpieces for garden parties
- Adding them to a cottage-style porch shelf
- Combining them with old bottles, jars, and lanterns for a flea-market garden vignette
Light, Water, and Care Tips
Most succulents need bright light, but glass can intensify heat. A sunny windowsill may be perfect in winter and too harsh in summer. Watch your plant. If it stretches toward the light, it needs more brightness. If leaves scorch, wrinkle, or turn pale, move it back slightly.
Water only when the mix is completely dry. For direct-planted glass insulators, use a teaspoon, squeeze bottle, or small spouted watering can. Add just enough water to moisten the root area, not enough to create a puddle at the bottom. If you can see water pooled through the glass, you used too much.
Indoor glass insulator succulent planters may need water only every two to four weeks, depending on light, temperature, plant type, and soil mix. Outdoor planters may dry faster, but rain can quickly overwater them. If displaying outdoors, keep them under a covered porch or move them during storms.
Common Mistakes to Avoid
Using Too Much Water
Overwatering is the classic succulent mistake. These plants would rather be a little thirsty than live in soggy soil. When in doubt, wait.
Choosing the Wrong Plant
Large aloe, agave, cactus, or jade plants will quickly outgrow a glass insulator. Stick with small offsets, cuttings, and compact rosettes.
Planting in Regular Potting Soil
Standard potting soil often stays wet too long. Always use a gritty succulent blend.
Putting Pebbles in the Bottom and Calling It Drainage
Pebbles can be decorative, but they are not a substitute for a drainage hole. In a closed glass container, water still has nowhere to go.
Hanging Without Testing
Glass plus soil plus plant equals weight. Test wire, hooks, knots, and wall mounts before displaying the planter overhead.
Creative Variations for Your DIY Insulator Planter
Once you have made one glass insulator succulent planter, you may suddenly need twelve. This is normal. Upcycling has a way of multiplying like zucchini in July.
Mini Propagation Station
Use the insulator as a dry propagation holder for succulent leaves or small cuttings. Place a shallow layer of gritty mix inside and lay leaves on top until roots appear. Mist very lightly or water sparingly once roots develop.
Rustic Wall Garden
Attach several insulators to a reclaimed board using wire or brackets. Add small succulents and mount the board near a bright window or on a protected patio wall.
Wedding or Party Favors
Small glass insulator planters make memorable table decorations. Pair each one with a simple tag explaining the history of glass insulators and basic care instructions.
Seasonal Porch Display
Mix glass insulators with pumpkins in fall, pinecones in winter, or fresh herbs in spring. Succulents play surprisingly well with seasonal decor, especially when you keep the plant itself out of wet weather.
When to Repot or Refresh the Arrangement
Because glass insulators are small, the soil can compact over time and roots may run out of space. Refresh the planter every six to twelve months if the plant is growing actively. Remove the succulent, shake away old mix, trim dead roots, and replant with fresh gritty soil.
Signs it is time to refresh include yellowing leaves, a sour smell, persistent moisture, white mineral crust, or a plant that has become top-heavy. If the succulent outgrows the insulator, celebrate. You did not fail; you raised a plant teenager. Move it to a larger pot with drainage and reuse the insulator for a new cutting.
Extra Experience: What I Learned Reusing Glass Insulators for Succulent Planting
The first thing you learn when planting succulents in glass insulators is that “cute” and “practical” occasionally wrestle in the driveway. The insulator is adorable. The succulent is adorable. The combination is adorable. But the container is also small, heavy, curved, and usually drainage-free, which means you must approach the project like a gardener and a tiny engineer.
My best experience has been using glass insulators for small rooted cuttings rather than full nursery plants. A chunky echeveria from a garden center may look perfect for five minutes, but once you try to tuck its root ball into the opening, you realize you are negotiating with a plant that brought luggage. Small offsets are much easier. They settle in faster, look proportional, and do not demand more space than the glass can offer.
I also learned that direct planting works best when the soil is almost comically gritty. If the mix looks like something a normal houseplant would enjoy, it is probably too rich. I like a blend with plenty of pumice or perlite because it dries faster and keeps the roots from suffocating. In a container with no drainage hole, every ingredient needs to help moisture move away from the roots.
Watering is where most people get into trouble. The glass is transparent, which is both helpful and judgmental. Helpful because you can see whether water is pooling at the bottom. Judgmental because if you overwater, the evidence sits there staring at you. A squeeze bottle is far better than a regular watering can. It lets you place a tiny amount of water exactly where it belongs. I water less than I think I should, then wait. Succulents reward patience more than enthusiasm.
For display, I prefer grouping insulators rather than using one alone. Three aqua glass planters on a wood shelf create a better visual rhythm than a single lonely insulator trying to carry the whole room. Mixing clear, aqua, and pale green glass adds depth without looking chaotic. If you add copper wire, the combination feels warm, vintage, and handmade without becoming too fussy.
One practical lesson: do not hang a planted glass insulator until you have tested the hanger with extra weight. Soil is heavier after watering, and glass does not bounce. Use strong wire, secure twists, and a hook mounted into something solid. If the planter is going outdoors, protect it from wind. A swinging glass planter may sound whimsical until it meets a brick wall.
The most satisfying part of this project is the contrast. You take an object once used for utility lines and turn it into a living display. It still has function, but now that function is quieter: holding a tiny plant, catching light, and making a corner of the room feel more personal. That is the heart of good DIY. It is not just about saving money or keeping something out of the landfill. It is about seeing possibility where someone else saw junk.
Conclusion
Reusing glass insulators for succulent planting is a charming DIY project for anyone who loves vintage decor, small-space gardening, and clever upcycling. The key is to respect both parts of the project: the old glass and the living plant. Choose a clean, stable insulator, use a small succulent, plant in gritty fast-draining mix, and water with restraint. If you are worried about drainage, use the insulator as a decorative holder for a tiny pot instead of planting directly.
With a little care, these miniature planters can turn shelves, windowsills, porches, and garden corners into sparkling displays of history and greenery. They are proof that old objects do not have to retire quietly. Sometimes they just need a succulent haircut and a sunny window.
Note: This article was written for web publishing and synthesizes practical information from U.S.-based gardening, extension, historical, and DIY references. Source links and citation artifacts have been intentionally omitted from the article body for clean publication formatting.