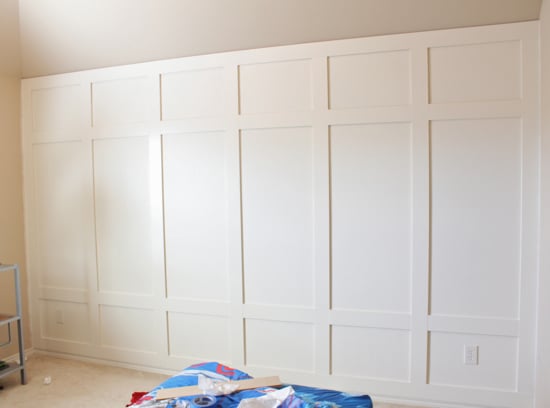
If your boy’s bedroom walls look like they’ve been training for the World Cup (but with toy trucks and rogue sneakers), a DIY paneled wall might be the best “why didn’t I do this sooner?” upgrade. It adds instant architecture, makes the room feel finished, andbonusgives you a little more forgiveness when life happens at full speed.
This guide pulls together the best real-world lessons from classic board-and-batten and paneled-wall builds (including the beloved Remodelaholic-style grid look) and turns them into one fun, practical plan. No fluff, no “just hire a crew” energy. Just you, a level, and the sweet smell of fresh caulk.
What “Paneled Wall” Means (and Why It Works So Well in a Kid’s Room)
In most modern DIYs, a “paneled wall” is a board-and-batten wall treatment or a trim-built grid that mimics classic wainscoting. You’re basically adding clean, raised lines to drywall to create rectangles (or squares) that look customlike the room got a glow-up and a promotion.
For a boy’s room, this is a power move because it:
- Adds durability: scuffs blend in better when the wall has dimension.
- Creates a feature wall without busy patterns that age fast.
- Plays nice with themes: dinosaurs, space, sports, LEGO… paneling doesn’t argue.
- Boosts resale vibes: it reads “built-in detail,” not “temporary phase.”
Pick Your Style: Modern Grid vs. Classic Board-and-Batten
Before you buy a single board, decide what look you’re going for. The two most popular options:
Option A: Full-Wall “Picture-Frame” Grid (Remodelaholic-Inspired)
This is the signature paneled-wall look: a frame around the wall and a clean grid of rectangles inside it. It feels tailored and modernespecially if you skip ornate trim and keep the lines simple.
Option B: Half-Wall Board and Batten (Wainscoting Style)
This is the classic approach: a horizontal top rail and vertical battens below (sometimes with a cap ledge). It’s fantastic for kids because the lower “wear zone” gets the protectionand the upper wall stays open for art, shelves, or wallpaper.
Plan the Layout Like a Calm Person (Even If You’re Not)
The biggest difference between “custom carpenter” and “DIY but make it obvious” is layout. Take 20 minutes now so you don’t spend 2 hours later muttering, “How is this wall wider on Tuesdays?”
Step 1: Choose the Height
For half-wall wainscoting, a common range is about one-third of the wall heightoften around 32–36 inches. For full-wall grids, go floor-to-ceiling for maximum impact, especially behind a bed.
Step 2: Decide Your “Box” Proportions
In a boy’s room, taller rectangles tend to feel cleaner and more grown-up than tiny squares. A great default: larger middle panels with a shorter row near the top and bottom. It reads structured without feeling fussy.
Step 3: Use a Spacing Formula (Yes, We’re Doing Math)
Here’s the simplest way to keep spacing balanced:
- Measure the wall width in inches.
- Subtract the total width of all vertical battens you’ll install (including the two outer battens).
- Divide what’s left by the number of spaces between battens.
Pro tip: Cut a scrap wood “spacer” to your calculated gap width and use it repeatedly during install. It keeps everything consistent and saves your sanity.
Materials & Tools (AKA: Your Shopping List With a Purpose)
You can build this with real wood, but many DIYers love MDF for interior paneling because it’s smooth, stable, and budget-friendly. Pre-primed material can save time, especially when you’re painting trim-grade finishes.
Materials
- MDF or primed pine boards/strips (common widths: 1×2, 1×3, 1x4plus wider boards for base/top rails)
- Construction adhesive
- Finish nails or brad nails (length depends on board thickness)
- Paintable caulk
- Lightweight spackle/wood filler
- Primer (especially if raw MDF edges are exposed)
- Durable paint (satin or semi-gloss is a kid-room hero)
Tools
- Stud finder
- Level (or laser level if you want to feel powerful)
- Tape measure + pencil
- Miter saw (or miter box for slower, quieter hero mode)
- Nail gun (optional but wildly helpful)
- Caulk gun
- Sandpaper / sanding block
DIY Paneled Wall Tutorial: Step-by-Step
1) Prep the Wall (Yes, This Includes Real Life Stuff)
Remove outlet covers, protect floors, and patch obvious dents. If your wall is heavily textured and you want crisp lines, consider smoothing the surface first (thin hardboard or skim coating can help).
2) Paint the Wall First (Trust the People Who Learned the Hard Way)
Paint the base wall color before installing trim. You’ll get cleaner edges and spend less time cutting in around battens later. If you’re using a bright white, now is the moment to commit.
3) Mark Studs, Height, and Level Lines
Find studs and mark them lightly. Then draw your top line (for half-wall) or your frame boundaries (for full grid) using a level/laser. If the floor isn’t perfectly level (spoiler: it probably isn’t), the level line is your visual truthfollow it.
4) Install the Outer Frame (Full Grid) or the Base + Top Rail (Half Wall)
For a Remodelaholic-inspired full-wall grid, start by framing the wall edges firsttop, bottom, and sidesso everything inside has a clean boundary. For half-wall board-and-batten, install the base board (or replace the baseboard with a thicker one), then install the top horizontal board at your marked height.
Use construction adhesive on the back of each piece and nail into studs where possible.
5) Add the Vertical Battens (Keep Them Plumb, Not “Close Enough”)
Start with corner/edge battens, then work across using your spacer block to keep gaps consistent. Check each batten with a level before nailing. Measure batten height at each positionwalls and floors love being slightly “creative,” especially in older homes.
6) Build the “Boxes” (Full Grid Only)
Once the verticals are up, decide where your horizontal pieces will go to create rectangles. A popular, kid-room-friendly layout is a shorter row near the top and bottom with taller panels in the center. Cut each horizontal piece to fit snugly between vertical battens, glue, nail, repeat… and try not to dance into wet adhesive.
7) Handle Outlets and Window Trim Without Crying
For outlets: turn off power, remove covers, and plan your battens so they don’t land right on top of a box if you can avoid it. If you must, carefully notch boards so everything sits flat and the cover plate can still fit.
For window trim: if your paneling meets casing, you may need to scribe (trace the profile) so the board fits cleanly. A compass/pencil scribe and a jigsaw can make surprisingly professional joints when done patiently.
8) Fill Nail Holes, Caulk Seams, Then Sand Smooth
This is where “DIY” becomes “did you hire someone?” Fill nail holes with spackle/wood filler. Caulk every seam where trim meets wallespecially inside corners and along edges. After it dries, sand lightly for that furniture-grade finish.
9) Prime and Paint for a Durable, Kid-Proof Finish
MDF edges drink paint like a thirsty cactus. Prime any raw edges and spots first. Then paint your final color with a small roller for smooth surfaces. Satin or semi-gloss is ideal in a boy’s room because it wipes clean without looking like a shiny gym floor.
Design Ideas for a Boy’s Room Paneled Wall
Go Tone-on-Tone (The “Grows With Him” Strategy)
Paint the paneling the same color as the wall but in a different sheen. It adds texture without screaming for attentionand it still looks cool when he’s 7, 12, or “practically an adult.”
Two-Tone With a Bold Upper Wall
Keep the lower paneling bright white, then go moody up top: deep navy, forest green, charcoal, or even a dusty denim. It gives the room depth and makes the paneling pop.
Wallpaper Above (Yes, It Can Look Amazing)
Board and batten below + wallpaper above is a classic combo. Pick something playful but not too babyishspace constellations, subtle stripes, maps, or geometric prints that feel modern.
Add Function: Hooks, Ledges, and “Drop Zone” Wins
A cap ledge on top of half-wall paneling can double as a shelf for framed art or small collectibles. Add a row of hooks for backpacks, headphones, or jerseys. Suddenly the wall is doing chores too.
Cost, Timeline, and Realistic Expectations
A simple MDF-grid paneled wall can be surprisingly affordable, especially if you DIY cuts and install. Material costs vary by region and board choice, but many projects land in the “weekend + paint dry time” range.
Here’s the honest breakdown:
- Single accent wall: often 1–2 days of work (plus drying/curing time)
- Whole room: a few days, mostly because measuring + caulking multiplies
- Biggest cost drivers: primed boards, thicker lumber, new baseboards, and paint quality
Common Mistakes (So You Don’t Accidentally Invent a New Angle)
Skipping the “Paint First” Step
Painting around installed battens is like trying to frost a cake through a chain-link fence. Paint first, then touch up later.
Assuming Floors Are Level
They’re not. Measure each batten location for height, especially on long walls or in older homes.
Not Planning Baseboard Thickness
Battens that stick out past thin baseboards can look unfinished. Either replace baseboards with thicker stock, add a “built-up” base, or plan a detail that makes the transition intentional.
Underestimating Caulk’s Emotional Support Role
Caulk hides gaps, softens shadows, and makes trim look like it belongs. Use paintable caulk, keep a damp rag nearby, and tool the bead neatly.
Conclusion: Your Boy’s Room, But With “Wow” Built In
A DIY board-and-batten paneled wall is one of those upgrades that looks high-end but is absolutely doable with basic tools and patience. Plan a balanced layout, keep everything level and plumb, and don’t rush the finishing steps. When the last coat of paint dries, the whole room feels calmer, sharper, and more “designed”even if there’s still a LEGO hiding in your sock.
Extra: Real-World “Experience” Notes (The Stuff Tutorials Don’t Always Admit)
Let’s talk about the part of a paneled wall tutorial that doesn’t show up in the glamour photos: the human experience. The measuring. The second-guessing. The mysterious moment when you swear the tape measure is lying to you. These are the most common lessons DIYers share after building a paneled wall for a kid’s roomespecially a Remodelaholic-style grid that goes big and bold.
First: you will discover that walls are rarely square. Not “rarely” like “once in a while.” Rarely like “almost never.” The fix isn’t complicated, but it does require the mindset of a chill scientist. You measure each batten location. You accept tiny variations. You choose level lines that look right to the eye. If one panel ends up a quarter-inch wider than another, the wall won’t collapseand no one will notice once the room has furniture, art, and a child launching himself onto the bed like an action hero.
Second: prepping and painting can take longer than installing boards. The trim goes up fast, especially if you’ve got a nailer and a plan. But filling nail holes, caulking seams, sanding, priming raw MDF edges, and painting multiple coats? That’s where the time goes. The good news is that those “boring” steps are the entire reason the project looks professional. The bad news is you can’t skip them unless you enjoy staring at tiny gaps forever (and you will stare at them forever).
Third: if this is a boy’s room, think about durability like a designer and a parent. Satin and semi-gloss finishes clean better than flat paint. Darker colors hide scuffs, but lighter colors make rooms feel bigger. If you’re torn, consider a two-tone approach: crisp, wipeable paneling on the bottom and a softer, moodier color up top. It looks intentional and it handles real life better.
Fourth: you will almost certainly have a moment where you realize the battens look “off”… and then you’ll realize you’re judging them under harsh overhead lighting at 11:47 p.m. This is a known phenomenon. Step back. Turn on a lamp. Sleep. In the morning, 90% of the time, it looks great. In the other 10%, it needs a little caulk. (It’s always caulk.)
Fifth: your kid will have opinions. Strong ones. If you can, involve him in one decisionpaint color, panel height, or which wall becomes the accent. When kids feel ownership, they’re more likely to treat the room like a place they live in (not a place they test gravity in). Also, it’s genuinely fun to watch a child’s confidence spike when he realizes the room is changing because of a plan, not because a new poster appeared overnight.
Finally: the best part of a paneled wall is how it changes the whole room’s “tone”. A plain drywall box can feel temporary, like you haven’t decided what this space is yet. Paneling gives the room instant structurelike it’s ready to grow up, even if the resident still believes socks belong on the floor. And that’s the magic: you build something classic, and the room stays flexible for whatever “phase” comes next.