The Commodore Amiga 600 has always had a strange talent for causing arguments. In 1992, some Amiga fans saw it as a compact little upgrade with built-in IDE, PCMCIA, color composite output, and a cute keyboard that looked like it had been put through a shrink ray. Others saw it as an Amiga 500 Plus in a smaller case, minus the numeric keypad, arriving just before the much more powerful Amiga 1200 walked in and stole the spotlight like a smug younger sibling.
Three decades later, the story has changed. The Amiga 600 is now one of the most charming retro computers to restore, modify, and rescue from the electronic afterlife. It is small, practical, friendly to CompactFlash hard drive upgrades, and surprisingly capable when properly maintained. That is why a dead Amiga 600 coming back to life after a chip swap feels less like a repair and more like a tiny beige resurrection.
This particular kind of Amiga 600 repair is especially interesting because the failure does not always look dramatic. There may be no smoke, no bang, and no theatrical capacitor explosion. Instead, the machine may simply refuse to display composite video, act unstable, or appear dead enough to make the owner whisper, “Well, that is going on the parts shelf.” But with careful diagnosis, a recap, cleaning, and a smart replacement of the Sony video encoder circuitry, a dead-looking A600 can boot again and behave like it has been waiting 30 years for someone with flux, patience, and a healthy fear of lifted pads.
Why the Amiga 600 Is Worth Saving
The Amiga 600 was released as Commodore’s compact home computer near the end of the original 68000-based Amiga era. At its heart is a Motorola 68000 processor running at roughly 7 MHz, supported by Commodore’s Enhanced Chip Set. The machine typically shipped with 1 MB of Chip RAM, expandable to 2 MB through the trapdoor slot, and it included a 44-pin internal IDE connector for a 2.5-inch hard drive. That last feature is one reason the A600 has become such a favorite among modern retrocomputing fans: a CompactFlash or SD-to-IDE adapter can make it feel far more convenient than floppy-only systems.
The A600 also includes a PCMCIA Type II slot, which opened the door to memory cards, network cards, and file-transfer options when paired with the right drivers. In the early 1990s, that slot was not exactly the hottest selling point for many home users. Today, however, it is part of the machine’s appeal. Retro hobbyists love anything that helps old computers talk to modern storage, networks, and accessories without requiring a séance.
Still, the A600 has one big weakness: age. More specifically, its surface-mount electrolytic capacitors are now old enough to have opinions about the weather, and many of them have leaked. Capacitor leakage is not just messy; it is corrosive. It can eat traces, damage nearby components, creep under ICs, and turn a repair job from “quick recap” into “why is there green fuzz under this chip?”
The Common Villain: Leaky Capacitors
Many Amiga 600 repair stories begin with the same culprit: failing SMD electrolytic capacitors. Unlike the older Amiga 500, which used more through-hole electrolytic capacitors, the A600 relies heavily on surface-mount parts. In the early 1990s, this helped make the board smaller and more modern. Decades later, it gives restorers something to complain about while reaching for isopropyl alcohol and a fiberglass pen.
When these capacitors leak, the damage can spread into nearby circuits. The reset circuit is a common trouble spot. If the reset timing is wrong, the machine may not boot properly, or it may sit at a black screen even when other parts of the system are alive. A smart diagnostic process starts with the basics: inspect the board, check for shorts on the power rails, clean corrosion, replace the worst capacitors, and test with known-good ROMs or diagnostic tools such as DiagROM or Amiga Test Kit.
That process matters because a black screen does not automatically mean the custom chips are dead. In an Amiga, a black screen can be caused by reset issues, missing clocks, faulty RAM, ROM problems, bad power, corroded traces, damaged sockets, or video output failure. In other words, the machine is not dead; it is speaking Amiga, and Amiga is a language with many dialects of stubbornness.
The Video Encoder Problem
The Amiga 600’s analog video section is one of the most fascinating parts of this repair. The machine uses a Sony CXA1145 video encoder, a chip found in several pieces of consumer electronics from the same era. Its job is to take the Amiga’s RGB video signals and generate composite video. In the A600, the surrounding filter and delay-line circuitry is important for producing the final signal.
Here is where things become annoying in a very 1990s hardware way. The CXA1145 design depends on external filter components. On the Amiga 600 motherboard, those components include small metal-can filter and delay-line parts near the video encoder area. Unfortunately, that area is vulnerable to capacitor leakage. Once corrosive electrolyte reaches those filter components, it can damage them internally. Cleaning the board helps remove corrosion, but if the fluid has already wicked into the filter cans, the damage may be permanent.
The result can be a machine that passes diagnostic tests and boots normally through RGB output, yet still has no composite video or RF output. To an owner using only the composite jack, that looks like a dead computer. To a repairer with the right cable and test gear, it looks like a video encoder section asking for attention.
The Clever Fix: Swap the Chip, Avoid the Filter Nightmare
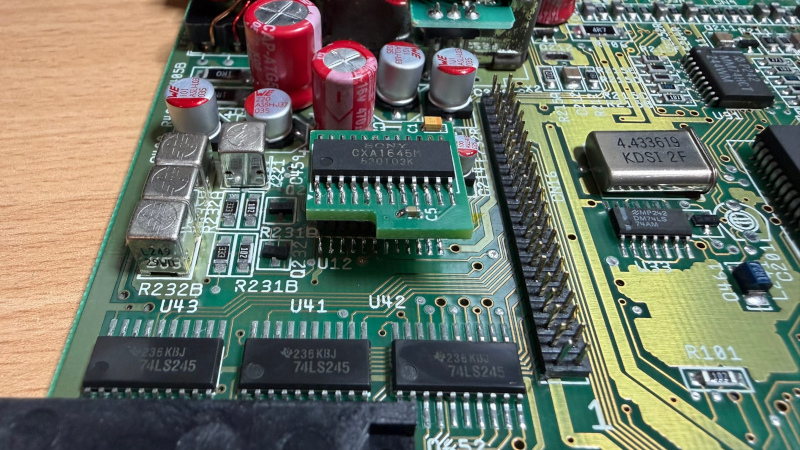
The elegant part of the repair is the chip swap. Instead of trying to source and replace the original external filter and delay-line components, the repair replaces the original Sony CXA1145 with a newer related Sony encoder such as the CXA1645 or CXA2075. These newer chips are attractive because they handle more of the filtering internally and can reduce dependence on the fragile external filter network that commonly fails on Amiga 600 boards.
This is not a simple “pull chip, drop chip, high-five cat” modification. The newer Sony encoder is close to the original in concept, but it is not perfectly pin-compatible. A proper fix may use a small adapter board, a socketed module, or careful rewiring to map the newer chip to the old footprint. A well-designed daughterboard can make the repair reversible, which is a major advantage on rare vintage hardware. If something goes wrong or a better solution appears later, the board has not been butchered into a tiny archaeological crime scene.
In a strong repair approach, the original CXA1145 is removed with hot air and proper shielding. The pads are cleaned carefully. A connector or adapter is soldered into the original footprint. The new chip sits on a small PCB that reroutes the signals and adds any missing buffering needed for the A600’s audio or video behavior. The machine can then regain composite video output without relying on the damaged original filter cans.
Why This Repair Is More Than a Parts Swap
The phrase “chip swap” sounds easy, but anyone who has worked on old Amiga motherboards knows better. Surface-mount removal on a 30-plus-year-old PCB requires care. Pads can lift. Corrosion can weaken traces. Heat can deform nearby plastic connectors. Excess force can turn a fixable board into a donor board faster than you can say, “I probably should have used more flux.”
A good Amiga 600 chip swap repair depends on three things: diagnosis, technique, and restraint. Diagnosis prevents the repairer from replacing a video encoder when the real issue is reset timing, power instability, or a missing ROM. Technique keeps the PCB intact during hot-air work. Restraint prevents unnecessary modifications that make the board harder to maintain later.
The best restorations are not just about making the computer work today. They are about making sure the next owner can understand what was done. Clean solder joints, documented changes, reversible adapters, and careful component selection are part of responsible retrocomputing. These machines are not being manufactured anymore, which means every avoidable mistake removes one more original board from the world.
A Practical Diagnostic Path for a Dead Amiga 600
1. Start With Visual Inspection
Before applying power, inspect the board under good light. Look for leaked capacitors, green or black corrosion, missing components, broken ports, cracked solder joints, and damaged traces. The A600 is compact, so corrosion can spread into dense areas quickly. Pay special attention to the reset circuit, audio/video section, power input area, and around the custom chips.
2. Check for Shorts
Use a multimeter to check for obvious shorts between the main power rails and ground. Old corrosion can create conductive paths, and powering a badly contaminated board is an excellent way to turn a repair into a smoke test. Smoke tests are exciting, but so are house fires, and neither is a recommended troubleshooting strategy.
3. Replace Failed Capacitors
A full recap is often necessary on an Amiga 600. Many restorers replace all electrolytic capacitors, clean the affected areas, and inspect for damaged pads. Some prefer quality electrolytics; others choose tantalum or polymer replacements where appropriate. The key is not simply replacing parts, but also neutralizing and removing residue left by the old ones.
4. Test Reset and Boot Behavior
If the reset circuit is unstable, the machine may not start correctly. Replacing the reset capacitor and testing the timer circuit can bring a black-screen board back to life. Diagnostic ROMs are useful because they can help separate CPU, RAM, ROM, and display issues.
5. Separate RGB Failure From Composite Failure
The Amiga’s RGB output and composite output do not fail in exactly the same way. A machine may work perfectly through RGB while composite is dead. Testing multiple outputs prevents a false diagnosis. If RGB is good but composite and RF are absent, the video encoder and its filter network become prime suspects.
6. Consider the CXA1145 Replacement
If the video encoder area has corrosion damage and the filter components are compromised, replacing the CXA1145 with a newer Sony chip on an adapter can be a clean solution. This is advanced work, not a first soldering project. The repair requires proper tools, surface-mount experience, and respect for fragile vintage boards.
What Makes the Amiga 600 So Repair-Friendly Today?
Ironically, the A600’s original reputation has helped it become beloved. It was once criticized for being too small, too late, and too similar to the A500 Plus. Now those traits make it appealing. Its small footprint fits modern desks. Its IDE interface makes storage upgrades simple. Its PCMCIA slot gives hobbyists more options. Its ECS chipset runs a huge library of classic Amiga software. And because it was once overlooked, rescuing one feels especially satisfying.
The repair community has also matured. There are modern memory expansions, CompactFlash adapters, diagnostic ROMs, replacement keyboard membranes, reproduction cases, open hardware projects, and countless restoration notes. A dead Amiga 600 no longer has to be mysterious. It can be approached methodically, documented properly, and returned to useful life.
The Bigger Lesson: Old Computers Usually Fail in Boring Ways
People often imagine dead vintage computers failing because of rare custom chips. Sometimes that happens, and when it does, everyone becomes very quiet and starts searching auction sites at 2 a.m. More often, however, the actual problem is ordinary: leaking capacitors, corroded traces, bad sockets, cracked solder joints, dirty connectors, weak power supplies, or failed reset components.
The Amiga 600 chip swap story is exciting because it combines both worlds. The failure begins with a common aging problem, but the fix requires understanding how a specific analog video circuit works. It is not just “replace all capacitors and hope.” It is targeted, informed repair. That is the sweet spot of retro hardware restoration: part detective work, part electronics, part patience, and part not dropping a tiny resistor into the carpet dimension.
Experience Notes From the Repair Bench
Anyone who has worked on a dead Amiga 600 knows the first emotional stage is optimism. You open the case, see a compact motherboard, and think, “This looks manageable.” Five minutes later, you notice capacitor leakage near the audio/video area, corrosion around the connectors, and a reset circuit that behaves like it has had too much coffee. That is when optimism becomes negotiation.
The best experience-based advice is to slow down. Do not start by attacking the biggest chip on the board. Start with cleaning, inspection, and measurement. A soft brush, high-purity isopropyl alcohol, cotton swabs, and magnification can reveal more than a dozen guesses. Look for dull solder, blackened vias, lifted pads, and green residue creeping under components. If the board smells faintly fishy, that is usually capacitor electrolyte saying hello from 1992.
When removing SMD capacitors, many experienced repairers prefer controlled methods that reduce pad stress. Twisting capacitors off the board is controversial and risky, especially on corroded pads. Hot air, low-melt solder, or careful two-iron techniques can work, but each requires practice. The goal is not to win a speed contest. The goal is to preserve copper. Copper is your friend. Lifted copper is your friend moving to another country and not answering emails.
After recapping, do not assume the machine is finished. Test it in stages. Check reset behavior, boot with a diagnostic ROM if possible, run memory tests, verify keyboard input, test floppy or Gotek access, and compare RGB versus composite output. On an Amiga 600, composite failure can hide behind an otherwise healthy machine. That is why the video encoder area deserves special attention.
If you perform the Sony encoder swap, prepare before heating anything. Photograph the board. Mark orientation. Shield nearby plastic connectors with copper tape or Kapton. Use flux generously. Clean the footprint thoroughly after removing the original chip. Inspect every pad under magnification before installing the adapter. If using a socketed daughterboard, confirm continuity before first power-on. The few extra minutes spent checking signals can prevent hours of dramatic troubleshooting later.
There is also an emotional reward to this work that is hard to explain to someone who has never revived an old computer. When an Amiga 600 boots after a careful repair, it does not just display a screen. It validates every cautious measurement, every cleaned trace, every moment spent wondering whether that via really connects where the schematic says it should. The machine goes from silent plastic wedge to living computer again. The floppy clicks, the screen appears, and suddenly the bench feels less like a repair station and more like a small museum with solder fumes.
That is why a chip swap fixing a dead Amiga 600 matters. It is not only about one Sony video encoder replacing another. It is about preserving a compact, quirky, historically awkward, surprisingly lovable computer that still has something to do. In the world of retrocomputing, that is a perfectly good reason to heat up the soldering station.
Conclusion
The Amiga 600 may have arrived at an awkward moment in Commodore history, but time has been kind to it. Today, it is a practical and collectible retro computer with strong upgrade potential and a loyal repair community. A dead A600 is often not truly dead; it is usually waiting for careful inspection, capacitor replacement, trace repair, and sometimes a clever chip swap in the analog video section.
Replacing the original Sony CXA1145 video encoder with a newer compatible Sony chip on a well-designed adapter is a smart solution when capacitor leakage has destroyed the surrounding filter circuitry. It avoids nearly impossible-to-source parts, keeps the repair tidy, and can restore composite video to a machine that might otherwise be dismissed as broken. Done properly, the repair is a great example of modern retrocomputing at its best: respectful, reversible, technically informed, and just a little bit heroic.
Note: This article is for educational and editorial purposes. Vintage computer repairs involving surface-mount chips, hot air, power rails, and corroded boards should be performed with proper tools, ESD precautions, and soldering experience.