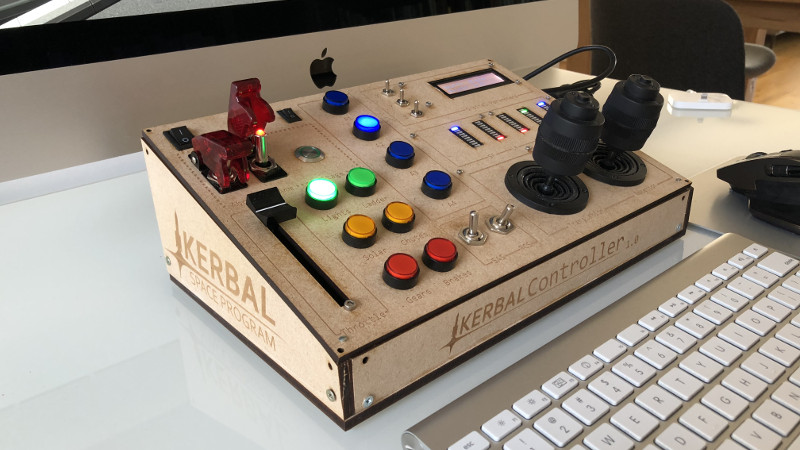
Kerbal Space Program has a magical way of turning ordinary people into amateur rocket scientists, accidental explosion curators, and deeply emotional fans of small green astronauts. One minute you are adjusting a fuel tank. The next, you are whispering encouragement to a command pod tumbling through the upper atmosphere like a washing machine full of fireworks. A better Kerbal Space Program controller does not make you immune to bad staging decisions, but it does make every launch, docking attempt, rover drive, and emergency abort feel far more intentional.
At its simplest, a Kerbal Space Program controller is a custom hardware panel that replaces keyboard shortcuts with real switches, buttons, joysticks, sliders, knobs, LEDs, and displays. Instead of tapping keys like you are writing a panicked email to Mission Control, you flip a guarded switch for staging, push a physical abort button, trim throttle with a slider, and watch telemetry glow on a tiny screen. It is part flight deck, part maker project, and part excuse to label something “Do Not Press” and then absolutely press it.
Building a better KSP controller means thinking beyond “more buttons.” The best designs combine reliable input, readable feedback, ergonomic layout, durable wiring, and software that behaves predictably when your Mun lander is descending sideways. The goal is not just to look cool, although looking cool is legally required by the space nerd constitution. The real goal is to reduce confusion, improve immersion, and give players a tactile cockpit that matches the game’s wonderful blend of comedy and surprisingly serious orbital physics.
Why Build A Custom Kerbal Space Program Controller?
Kerbal Space Program is built around spacecraft design, realistic aerodynamic behavior, orbital maneuvers, science progression, and mission planning. The stock keyboard and mouse setup works well, but KSP asks players to manage many different kinds of actions: pitch, yaw, roll, throttle, staging, SAS, RCS, landing gear, lights, brakes, map view, camera changes, action groups, docking controls, time warp, and sometimes a frantic prayer to the Kraken. A dedicated controller lets each command live where your hands expect it to be.
The appeal is both practical and emotional. A throttle lever gives launch a sense of ceremony. A guarded staging switch makes accidental booster separation less likely. Separate attitude and translation controls make docking feel less like typing and more like piloting. LED indicators can show fuel, electric charge, SAS status, or warning conditions. A display can show altitude, apoapsis, periapsis, speed, or mission time. Suddenly, your desk becomes a miniature space center, minus the NASA budget and with more snack crumbs.
For beginners, the controller can make KSP less intimidating because key functions are visible. For experienced players, it creates faster workflows and deeper immersion. For makers, it becomes a satisfying electronics project that blends Arduino-style microcontrollers, USB Human Interface Device behavior, serial communication, panel design, soldering, 3D printing, and software mapping. In other words, it is a project where failure is educational, smoke is discouraged, and every successful test feels like a booster landing.
Start With The Mission Profile
A better Kerbal Space Program controller begins with a question: what missions will this panel actually support? A controller built mainly for launches needs throttle, staging, abort, SAS, RCS, action groups, and status lights. A controller for docking needs precision translation, rotation controls, target mode awareness, and small input adjustments. A rover controller benefits from steering, brakes, lights, camera controls, and maybe a speed limiter. A full cockpit-style console tries to do everything, which is fun until your wiring diagram looks like spaghetti after re-entry.
The smartest approach is modular design. Build a primary flight panel first, then add modules later. A launch module can include throttle, staging, abort, SAS, RCS, gear, lights, brakes, and action group buttons. A docking module can use two joysticks: one for rotation and one for translation. A telemetry module can handle LCD or OLED displays, LED bars, and warning indicators. A navigation module can include map, maneuver node, time warp, and camera controls. This keeps the project manageable and lets you improve it over time instead of creating a desk-sized monument to unfinished ambition.
Choosing The Right Controller Brain
The microcontroller is the heart of the build. Many KSP controller projects use Arduino-compatible boards, Teensy boards, or similar USB-capable microcontrollers. The key detail is USB behavior. If the board can act as a USB keyboard, joystick, or gamepad, it can send inputs directly to the computer in a way KSP understands. Boards based on native USB microcontrollers are especially convenient because they can behave as Human Interface Devices without extra hardware.
For a simple button box, an Arduino Leonardo, Micro, compatible ATmega32U4 board, or modern USB-capable Arduino can send keyboard presses. A Teensy board is popular for more advanced joystick-style input because it can support multiple axes, many buttons, and flexible USB device modes. An Arduino Mega offers lots of input pins and is useful for large panels, but USB HID support may require additional firmware or a communication plugin depending on the approach. For ambitious telemetry displays, serial communication between KSP and the controller becomes important.
There are two main software paths. The first is HID-only input: buttons and switches appear to the computer as keyboard keys or joystick buttons. This is reliable, simple, and works without modifying the game. The second is two-way communication through a KSP plugin or external interface: the controller sends commands and receives telemetry such as fuel levels, altitude, velocity, and vessel status. Two-way communication is more powerful, but it adds maintenance risk because game versions, plugins, operating systems, and libraries can change. In Kerbal terms, HID is a sturdy flea rocket; telemetry integration is an interplanetary transfer window with snacks packed.
Buttons, Switches, Joysticks, And Throttle Controls
A great KSP controller feels deliberate. Momentary pushbuttons are ideal for action groups, SAS toggles, map view, camera changes, and menu commands. Toggle switches work well for functions with an obvious on/off state, such as lights, gear, brakes, RCS, or solar panels. Guarded switches are perfect for staging and abort because they make destructive commands feel properly dramatic. Rotary encoders can handle time warp, camera zoom, menu navigation, or trim. Sliders and potentiometers are natural choices for throttle and fine control.
Joysticks deserve special attention. A standard analog thumb joystick uses two potentiometers, one for each axis, making it useful for pitch and roll or translation control. For spacecraft docking, a dual-stick setup can be excellent: one stick controls rotational attitude, while the other controls translation with RCS. This mirrors the mental split between pointing the ship and moving the ship. It also reduces the “why am I drifting into the solar panel?” problem, which every docking pilot knows personally.
Throttle can be a slider, lever, or large rotary control. A linear slider is compact and easy to read. A lever feels more cinematic. A rotary knob saves panel space. Whatever you choose, give it clear markings for zero, half, and full throttle. KSP launches often require quick throttle cuts and careful adjustments, so the control should be smooth, stable, and positioned where your hand can find it without looking.
Telemetry: The Difference Between A Button Box And A Cockpit
A basic KSP controller sends commands. A better KSP controller also talks back. Telemetry turns the panel from a fancy keyboard into a living cockpit. LEDs can show resource levels, mode states, warnings, or staging readiness. Bar graphs can represent liquid fuel, oxidizer, monopropellant, electric charge, or throttle. A small LCD or OLED screen can display mission time, altitude, vertical speed, apoapsis, periapsis, orbital velocity, surface velocity, biome, target distance, or docking alignment data.
The trick is deciding what information is useful at a glance. Too much telemetry becomes dashboard soup. Prioritize the values that change decisions during flight. During launch, altitude, apoapsis, throttle, fuel, and staging status matter. During orbit, apoapsis, periapsis, orbital speed, and maneuver node timing matter. During landing, radar altitude, vertical speed, fuel, and gear status matter. During docking, relative velocity, target distance, alignment, RCS status, and monopropellant matter. Your controller should not simply duplicate the entire screen; it should surface the numbers you need when Jeb is smiling too confidently.
Designing A Layout That Makes Sense Under Pressure
Good layout is more important than raw button count. Put emergency controls in obvious places. Group related controls together. Keep flight-critical controls away from casual commands. Label everything clearly. Use physical separation, switch guards, different button shapes, or different heights to prevent mistakes. The abort button should not feel identical to the lights button unless you enjoy explaining to your Kerbals why the launch escape system fired during a night landing.
A practical layout might place the throttle on the left, flight controls in the center, staging and abort on the upper right, utility switches along the lower edge, and telemetry displays across the top. Docking controls can be separated into a dedicated section with rotation and translation sticks. Action group buttons can be arranged in a row, numbered and backlit if possible. Time warp controls should be accessible but not easy to trigger accidentally.
Panel readability matters too. Use high-contrast labels, engraved acrylic, printed legends, vinyl decals, or laminated paper under a clear overlay. Label switches with game terms: SAS, RCS, GEAR, LIGHTS, BRAKES, STAGE, ABORT, AG1 through AG10. For extra flavor, add mission-control labels like “Main Bus,” “Launch Commit,” or “Snack Containment.” Humor is welcome, but clarity wins. A joke label is funny once; a clear label saves a lander every time.
Wiring Without Summoning The Kraken
Wiring is where many controller projects either become reliable hardware or decorative desk art. Plan your input matrix before soldering. For a small panel, each button can connect directly to a digital input with internal pull-up resistors enabled in software. The button then connects the pin to ground when pressed. This method is simple and dependable. For larger panels, a button matrix or I/O expanders can reduce pin usage, but they add complexity.
Debouncing is essential. Mechanical switches do not change state perfectly; they bounce for a few milliseconds, creating multiple false presses. In a text editor, that might type extra letters. In KSP, it might stage twice, which is how boosters achieve emotional independence. Debounce inputs in software by waiting for a stable reading, using a library, or implementing a non-blocking timer. Hardware debouncing with resistors and capacitors can help too, but software debouncing is usually enough for game controllers.
Use connectors where possible. JST plugs, Dupont connectors, screw terminals, or ribbon cables make maintenance easier. Label wires. Add strain relief. Keep analog lines away from noisy power wiring if you are using LEDs or displays. Share grounds properly. Test every input before closing the enclosure. Future you will be grateful when one action group button fails and you do not have to open the case like an archaeologist excavating a cursed satellite.
Software Mapping And KSP Configuration
The controller software should translate physical actions into clean, predictable game inputs. In HID mode, buttons can send keyboard shortcuts, joystick buttons, or gamepad controls. This is easy to configure inside KSP’s input settings. A switch can send a key press when toggled, while a momentary button can send a short press and release. Analog throttle can map to a joystick axis if the microcontroller presents itself as a game controller.
One important design choice is whether toggle switches should represent real state or simply send commands. For example, if a physical switch is labeled LIGHTS and stays up when lights are on, it feels intuitive. But if the game state changes through another input, the switch and game can become out of sync. Two-way telemetry can solve this, but HID-only panels need careful thinking. For some functions, momentary buttons are safer because they do not pretend to know the game state. For others, such as a master arm switch, physical state is part of the fun.
Create a test sketch before writing final firmware. Print serial output for each input. Verify analog ranges. Add dead zones to joysticks so tiny electrical noise does not cause drift. Smooth throttle readings with light filtering, but do not overdo it or the control will feel laggy. Keep the code readable, especially if you plan to add displays later. The best controller firmware is boring in the finest way: it works, it restarts cleanly, and it does not improvise during ascent.
Enclosure Options: From Shoebox Prototype To Mission Control
The enclosure determines whether the project feels like a prototype or a cockpit. A cardboard mockup is a great first step because it lets you test spacing before cutting anything permanent. Plywood is affordable, easy to work, and forgiving. Acrylic looks sleek and can be laser-cut with precise labels. 3D printing works well for modular panels, switch guards, joystick mounts, and custom bezels. Aluminum panels are durable and beautiful, though harder to fabricate without the right tools.
Angle the front panel slightly for comfort. Leave room inside for wiring, connectors, and future repairs. Design access panels so you can open the case without removing every knob. Consider rubber feet or a weighted base so the controller does not slide during dramatic throttle movements. If you add LEDs, plan for diffusion so the panel glows instead of attacking your eyes like a tiny blue supernova.
Common Mistakes To Avoid
The first mistake is building too large too soon. A giant all-in-one console sounds amazing until you realize you need to solder 147 connections and troubleshoot a switch named “Mystery Ground.” Start with core controls, then expand. The second mistake is ignoring ergonomics. A controller can look beautiful and still be uncomfortable if the throttle is too far away or the docking joystick is wedged next to a row of sharp toggle switches.
The third mistake is relying on fragile plugin support without a fallback. Plugins can be powerful, but HID input should remain usable even if telemetry breaks. The fourth mistake is under-labeling. You may remember every button today, but in three months you will stare at the panel like it was designed by a committee of raccoons. The fifth mistake is skipping testing. Test inputs individually, then in groups, then inside KSP, then during a low-stakes mission. Do not debut your new controller on a crewed Duna landing unless you enjoy educational tragedy.
A Practical Example Build
Imagine a balanced first serious KSP controller. It uses a USB-capable microcontroller, a linear throttle slider, two analog joysticks, ten action group buttons, toggle switches for SAS, RCS, gear, lights, and brakes, a guarded stage button, a guarded abort switch, a rotary encoder for time warp, and a small display for altitude and apoapsis. The panel is made from laser-cut acrylic or plywood, with clear labels and removable bottom access.
The left side contains throttle and engine-related controls. The center has attitude and translation sticks. The right side has staging, abort, and action groups. The top row shows telemetry with LEDs for resource warnings. The firmware presents the device as a joystick for analog axes and buttons, while optional serial communication feeds the display. If telemetry fails, the buttons and axes still work. That combination makes the build practical, immersive, and maintainable.
This design is not the biggest possible controller, but it is better because it supports real gameplay. It helps with launches, orbital maneuvers, docking, landing, and rover use without burying the player in unused switches. It also leaves room for upgrades: a second display, fuel bar graphs, a landing radar module, a maneuver node keypad, or a separate rover console. Great maker projects are never truly finished; they merely enter stable orbit.
Experience Notes: What It Feels Like To Use A Better KSP Controller
The first experience that stands out is how much a physical throttle changes launch. On a keyboard, throttle is a command. On a controller, throttle is a ritual. You slide it forward, engines spool up, clamps release, and suddenly your questionable asparagus-staged tower of ambition feels like a real vehicle. Even when the rocket begins bending in a way engineers call “bad,” the physical control makes the moment more readable. You are not just pressing keys; you are managing a machine.
Docking becomes more natural with separated rotation and translation controls. In normal keyboard play, it is easy to mix up attitude changes with lateral movement, especially under pressure. With dual sticks, your left hand can nudge the craft forward, backward, left, right, up, and down while your right hand manages pitch, yaw, and roll. The first few attempts may still involve bumping the target port with the confidence of a shopping cart, but the learning curve feels smoother. Small inputs become easier, and the relationship between motion and control becomes more physical.
Landing is another area where the controller earns its desk space. A slider throttle and visible vertical speed display can turn a chaotic descent into a controlled checklist. You watch altitude drop, trim throttle, keep the retrograde marker centered, and prepare the gear switch. When the legs touch down gently, the satisfaction is ridiculous. When they do not, at least you know exactly which hand betrayed you.
The biggest surprise is how much labels and lights reduce mental load. KSP missions can become busy fast. You may be tracking fuel, altitude, orbit, staging, maneuver timing, communication range, and whether the spacecraft still includes all parts originally advertised. A panel with dedicated controls removes some of that cognitive clutter. Instead of remembering the key for solar panels, you flip a switch. Instead of hunting for lights, you press a labeled button. Instead of wondering whether RCS is enabled, you see an indicator. Small improvements add up.
There is also a strong creative reward. Building the controller teaches practical skills: measuring panel layouts, choosing switches, reading analog inputs, debouncing buttons, mapping HID commands, soldering clean joints, designing enclosures, and troubleshooting calmly. The project rewards iteration. Maybe the first throttle jitters. Maybe one switch is upside down. Maybe the abort button works perfectly during testing and then reveals itself as a tiny red menace during a live mission. Each fix makes the device more personal.
Most importantly, a better Kerbal Space Program controller makes the game feel new again. KSP already turns failure into entertainment and physics into play. A custom controller adds touch to that loop. Every launch feels more ceremonial. Every docking feels more precise. Every emergency feels funnier because you physically caused it. The controller will not guarantee mission success, but it will make the attempt more memorable. And in Kerbal Space Program, a memorable failure is basically a successful science experiment with extra debris.
Conclusion
Building a better Kerbal Space Program controller is not about copying a real spacecraft cockpit or covering your desk with random switches. It is about designing a focused, reliable, satisfying control system that improves the way you play. Start with the missions you care about, choose a USB-capable microcontroller, use controls that match the task, keep the layout readable, debounce every switch, and add telemetry only where it helps decision-making. A good controller should feel like Mission Control and behave like a dependable tool.
The beauty of the project is that it can grow with your skills. A simple HID button box can become a dual-stick docking panel. A throttle controller can become a telemetry station. A plywood prototype can become a laser-cut cockpit. Every upgrade teaches something useful, and every test flight gives immediate feedback, sometimes in the form of a successful orbit and sometimes in the form of a booster gently leaving the mission to pursue independent artistic goals.
Note: This article is written as original, publication-ready HTML body content based on real Kerbal Space Program gameplay concepts, maker-controller practices, Arduino/Teensy HID methods, and common DIY simulator-panel design principles.