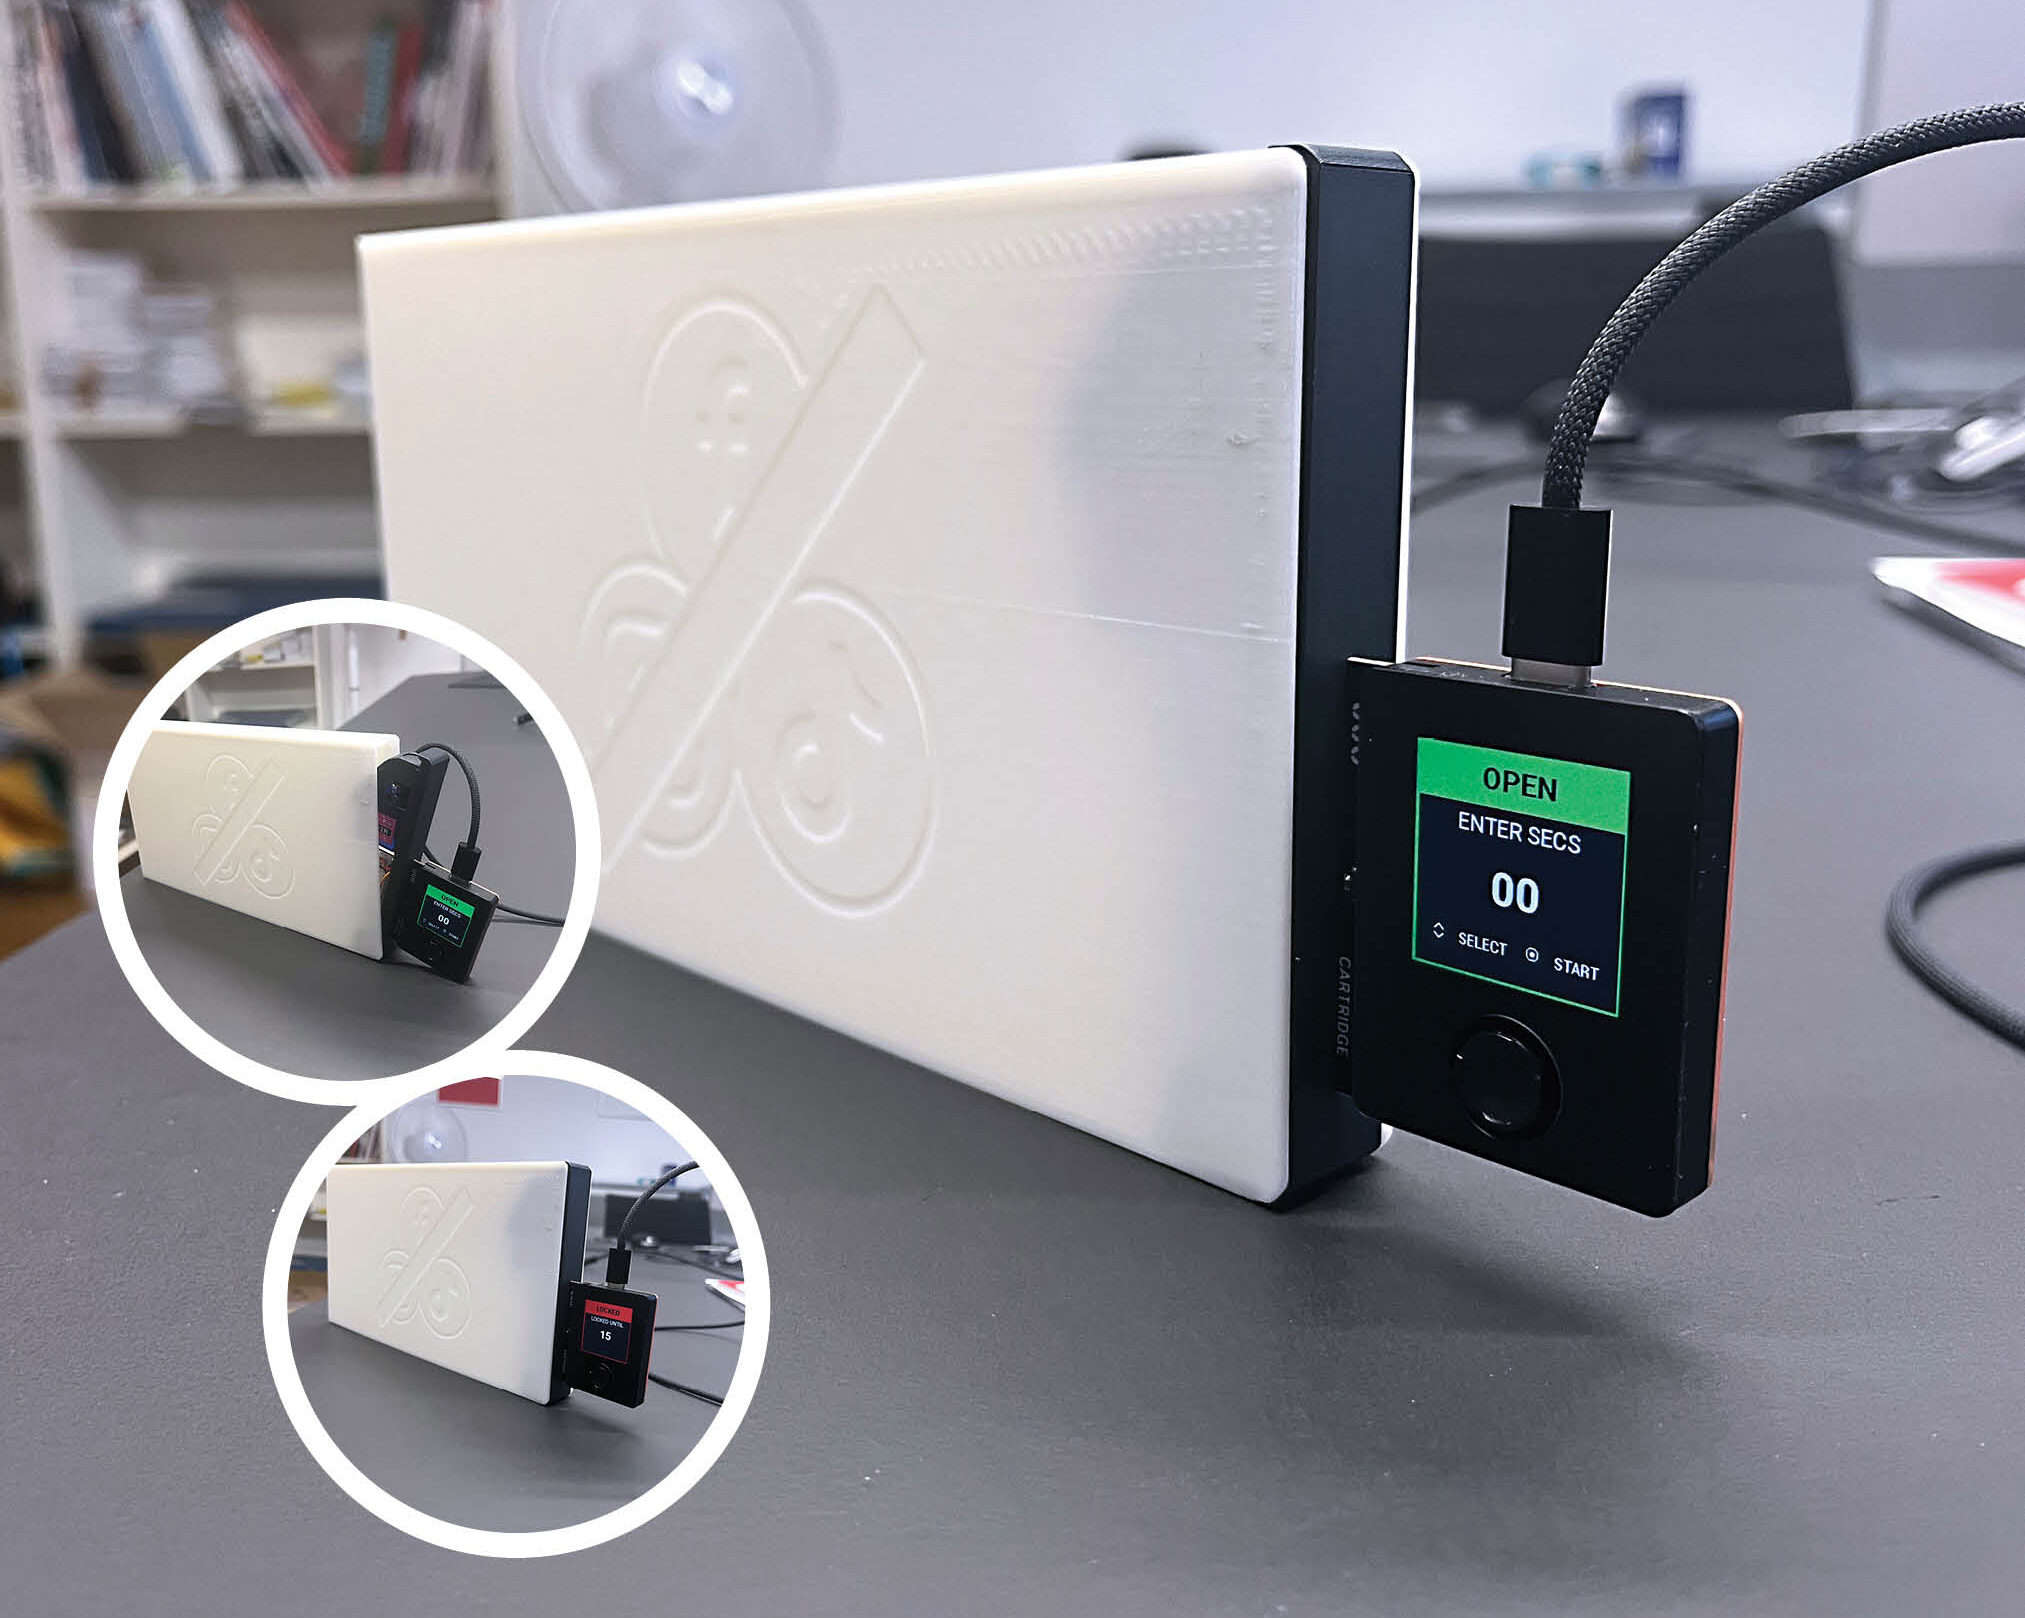
Most smartphone screen locks protect your data. This one protects your afternoon.
Your phone is a camera, map, wallet, music player, calendar, notebook, flashlight, and tiny rectangular portal through which strangers argue about breakfast cereal. It is extremely useful. It is also extremely good at turning “I’ll check one notification” into a 47-minute archaeological expedition through social media.
A DIY smartphone safe adds something ordinary digital-wellness tools cannot provide: physical distance. Instead of asking you to ignore a glowing device sitting six inches away, it places that device inside a timer-controlled enclosure. The lid locks, the countdown begins, and your phone temporarily becomes a museum exhibit.
The original Make: project uses a 3D-printed container, an Oxocard Connect, a connector cartridge, and an SG92R micro servo. The servo drives a compact screw mechanism that extends a bolt into the enclosure. Make: rates the project as moderately difficult, estimates one to two hours of assembly after printing, and lists an approximate project cost of $90–$100.
Important note: This project is a focus tool, not a burglary-resistant safe. A determined person with tools, programming knowledge, or a dramatic dislike of delayed gratification can defeat a plastic enclosure. The goal is to interrupt an automatic habit, not protect diamonds, classified documents, or Grandma’s secret cookie formula.
What Is a Timer-Controlled Smartphone Safe?
A smartphone safe is a small lockable box designed to hold a phone for a selected period. The user places the device inside, closes the lid, chooses a duration, and activates the lock. When the timer reaches zero, a servo retracts the bolt and releases the lid.
The design is more interesting than simply putting a padlock on a lunchbox. Its electronics remember the lock state and remaining time, so unplugging and reconnecting the controller does not automatically provide an escape route. That persistent memory turns a novelty box into a much more convincing commitment device.
The concept can support several everyday goals:
- Completing a focused work or study session
- Keeping phones away from the dinner table
- Creating a screen-free bedtime routine
- Reducing interruptions during conversations
- Running Pomodoro-style focus intervals
- Encouraging device-free family activities
Arduino makers have developed similar Pomodoro lock boxes using micro servos, LCD screens, buttons, and sensors. The recurring idea is simple: when software restrictions are too easy to dismiss, add a mechanical obstacle between the user and the distraction.
Why a Physical Screen Lock Can Work Better
Apple Screen Time and Android Digital Wellbeing already let users schedule downtime, pause distracting applications, and establish app limits. These tools are valuable, especially when configured with a separate passcode. However, the person setting the limit is often the same person who knows exactly how to override it. That is less like hiring a security guard and more like giving the cookie jar its own key.
A physical phone lock box changes the environment rather than depending entirely on willpower. The phone is no longer face-up on the desk, flashing previews, vibrating against a coffee mug, or quietly suggesting that now would be an excellent time to investigate a celebrity’s kitchen remodel.
Research discussed by the American Psychological Association has repeatedly connected digital interruptions with fragmented attention, distracted face-to-face interactions, and classroom learning difficulties. A smartphone can certainly support productive work, but its notifications and entertainment options also create a steady supply of attention switches.
The safe creates friction. Opening an app normally requires one tap. Reaching a phone inside a locked enclosure requires waiting for the timer, defeating the mechanism, or admitting that the “urgent” notification was probably not urgent enough to justify attacking a plastic box with a screwdriver.
Parts and Tools for the Build
The Make: version is centered on the Oxocard ecosystem, but the engineering principles can also be adapted to an Arduino, ESP32, Raspberry Pi Pico, or another microcontroller capable of generating a servo-control signal and saving persistent state.
| Component | Purpose |
|---|---|
| Oxocard Connect | Runs the timer interface and controls the lock |
| Connector Cartridge | Connects the controller to the servo and provides EEPROM storage |
| SG92R or similar micro servo | Moves the locking bolt |
| 3D-printed housing and lid | Contains the phone, electronics, hinge, and locking mechanism |
| USB power source | Powers the controller and servo |
| Plastic adhesive | Secures selected printed and electronic parts |
| Wire cutters and strippers | Prepares the servo cable |
| Soldering iron and solder | Creates reliable electrical connections |
| Fine sandpaper | Adjusts printed tolerances and smooths moving parts |
| Screwdriver | Mounts the servo and associated hardware |
The official project recommends PLA for the enclosure. Large housing pieces can be printed at a 0.2mm layer height, while detailed threaded components benefit from approximately 0.1mm layers and slower printing. Prusa’s general guidance also notes that 0.1mm is already a fine layer height for most practical detail, while dramatically thinner layers can add considerable printing time without an equally dramatic improvement.
How the Smartphone Safe Works
1. The Servo Creates Controlled Rotation
A hobby servo contains a motor, gearbox, position sensor, and control circuit. Unlike a basic DC motor that simply spins, a standard servo moves to a requested angular position. It normally uses three wires: power, ground, and a signal wire carrying command pulses.
In the Make: build, brown connects to ground, red connects to 5V, and yellow connects to IO pin 01. The controller sends a pulse-width modulation signal at approximately 50Hz. Hobby servos commonly expect this frequency, with changing pulse widths corresponding to different target angles.
2. Rotation Becomes Linear Bolt Movement
The most clever mechanical feature is the conversion of servo rotation into a short linear stroke. A modified servo horn turns a printed screw component. The matching bolt is restrained by rails, so it cannot rotate freely. As the screw turns, the bolt moves outward or inward.
The arrangement behaves like a nut traveling along a screw, except it uses a steep printed thread because a typical servo only rotates through roughly 180 degrees. In the original design, a thread pitch of approximately 4mm–5mm produces a bolt movement of roughly 2mm–2.5mm. That is not enough to launch a rocket, but it is plenty to block a lightweight lid.
3. Persistent Memory Prevents the Classic Unplug Trick
A simple timer stored only in normal working memory would be easy to defeat. Disconnect the power, restart the controller, and the countdown might reset. The Make: implementation avoids this weakness by saving the remaining duration and lock state in the cartridge’s 64kB EEPROM.
EEPROM is nonvolatile memory, meaning it can retain stored information after power is removed. The project writes its timer value to a selected memory location and reads it again during startup. Arduino documentation describes the same general capability: EEPROM can store small pieces of information that must survive a reset or loss of power.
This produces a better startup sequence:
- The controller powers on.
- The program reads the saved lock state.
- If the safe was open, the setup screen appears.
- If the safe was locked, the countdown resumes.
- When the remaining time reaches zero, the servo retracts the bolt.
Building the Enclosure and Lock
Print and Test Before Gluing
Print the container, lid, hinge components, bolt housing, servo screw, threaded bolt, and circuit-board holder. Orient threaded pieces carefully so their functional surfaces do not depend on rough support material.
Before adding electronics, repeatedly thread the screw and bolt together by hand. The parts should move without binding. Gently sand any rough ridges, blobs, or elephant-foot distortion. A servo is a small actuator, not a hydraulic press. If the bolt requires force from your fingers, the servo will probably respond with buzzing, jittering, or a tiny mechanical nervous breakdown.
Center the Servo Before Installation
Connect and command the servo before fastening the horn. This establishes a known starting angle. Once the servo reaches that position, attach the trimmed horn in the orientation required by the printed mechanism.
Skipping this step can leave the servo near the end of its travel. The software may then command it beyond the mechanism’s physical limit, creating noise, excessive current draw, damaged gears, or a bolt that confidently moves in the wrong direction.
Assemble the Bolt Mechanism
Insert the printed screw and threaded bolt into the lock housing. Turn the screw manually and confirm that the bolt extends and retracts smoothly. Mount the servo horn over the screw component, then secure the servo with its screws.
Test the mechanism again before attaching it permanently to the lid. The best time to discover a tolerance problem is while every part is still accessible. The worst time is after the super glue has achieved emotional and chemical commitment.
Wire the Electronics
Shorten the servo lead only when compact cable routing is important. Leaving the original cable intact makes the servo easier to reuse later. Tin the wire ends and connector pads before soldering, then make the three connections for 5V, ground, and signal.
Inspect for stray strands, weak joints, and accidental bridges. A multimeter continuity check is helpful. Mount the connector board and holder in the lid, route wires away from moving parts, and add strain relief so opening the lid does not pull directly on the solder joints.
Programming the Timer Interface
Begin with a minimal test program that alternates between locked and unlocked positions when a button is pressed. This separates mechanical debugging from timer debugging. When the servo responds correctly and the bolt travels freely, add the countdown logic.
A practical program should include:
- A setup mode for selecting the lock duration
- A clear command to begin the session
- Separate functions for locking and unlocking
- A countdown display in minutes and seconds
- Persistent storage for lock status and remaining time
- Safe initialization when no valid saved state exists
- A defined behavior after a power interruption
- Visual confirmation that the lock has opened
The Make: interface uses green graphics while the safe is open and red graphics while it is locked. The user adjusts the duration with a joystick, presses a button to begin, and watches the remaining time count down. Splitting the software into small functionssuch as reading memory, writing the timer, formatting the time, drawing the display, and commanding the servomakes future modifications far easier.
Useful Upgrades for a Better Smartphone Safe
Add a Responsible Emergency Release
A commitment device should create friction without creating danger. Consider adding a concealed mechanical release that requires a screwdriver, a breakable seal, or a deliberately annoying sequence of button presses. The override should be inconvenient enough to discourage casual cheating but available for genuine emergencies.
Do not lock away a phone when it is the only available way to call emergency services, receive critical medical alerts, authenticate an urgent work login, or communicate with someone who depends on you.
Add Ventilation and Avoid Charging Inside
Include ventilation slots and avoid charging a phone inside a tightly enclosed plastic safe. Lithium-ion devices can generate heat during charging, and safety organizations warn that damaged or defective cells may enter thermal runaway, producing intense heat and hazardous gases. Keep the box away from direct sunlight, heaters, bedding, and other environments that trap heat.
Support More Focus Modes
The controller could offer preset sessions such as 25-minute focus, 50-minute deep work, 90-minute study, dinner mode, movie mode, and bedtime mode. A statistics screen could track completed sessions without turning the safe itself into another attention-hungry gadget.
Add Phone Detection
A microswitch, pressure sensor, optical sensor, or ultrasonic distance sensor could verify that a phone is actually inside before locking. An Arduino Pomodoro box demonstrates how distance sensing can become part of the state machine, allowing the controller to react when the phone is inserted or removed.
Improve the Mechanical Design
Possible mechanical upgrades include a metal hinge pin, heat-set threaded inserts, captive screws, a replaceable servo bracket, thicker walls near the bolt, rubber feet, and soft internal padding. A translucent lid can show whether the phone is inside while still preventing access, although hiding the screen completely may be better for reducing temptation.
A Smartphone Safe Does Not Replace Digital Security
The phrase “better screen lock” is playful, but a timed box and a secure phone passcode solve different problems. The safe manages attention. The phone’s operating-system lock protects accounts, messages, photographs, financial information, and other sensitive data.
The Federal Trade Commission recommends enabling automatic locking and using at least a six-digit passcode. It also recommends installing software updates, backing up data, and enabling tools that can locate, remotely lock, or erase a missing phone. NIST guidance similarly treats lock-screen authentication, encryption, device management, and lifecycle security as essential protections for mobile devices.
Good practice therefore uses both layers:
- A strong passcode or biometric lock for data security
- Automatic screen locking after inactivity
- Current operating-system and application updates
- Regular backups
- Find-device and remote-erase features
- A physical smartphone safe when intentional separation is useful
Universities and security organizations also advise maintaining physical control of mobile devices, enabling encryption, and keeping unattended phones out of sight. A lightweight printed box should not be treated as secure storage in a public location.
Realistic Build and Use Experiences
The First Assembly Usually Teaches Tolerance, Not Patience
A realistic first build rarely works perfectly the instant the last screw is tightened. The enclosure may look excellent while the internal bolt feels slightly rough. That tiny amount of friction becomes important once the servo replaces your hand.
A typical builder may hear the servo buzz without seeing the bolt move. The natural reaction is to rewrite the program, reverse the signal, reinstall the editor, question the laws of physics, and stare suspiciously at the USB cable. The more likely cause is mechanical resistance. Removing the servo and moving the screw by hand usually reveals a rough thread, an undersized channel, or a bolt that rubs against one wall.
Several cycles of sanding and test-fitting can transform the mechanism. The goal is not a loose, rattling bolt. It is a smooth sliding fit with minimal sideways movement. Once that balance is achieved, the little servo suddenly looks much stronger because it is no longer spending all its effort fighting the print.
Short Sessions Are Better for the First Week
The first real test should not be an eight-hour digital exile. Start with 10 or 15 minutes while the safe remains within reach. Confirm that the countdown continues after a reset, the display remains readable, the power source is stable, and the servo reliably retracts the bolt.
Next, try a 25-minute work session. Place the phone inside, start the timer, and begin one clearly defined task. The most noticeable moment often comes during the first few minutes, when the hand reaches toward the usual phone location without any deliberate decision. That automatic movement is precisely what the box exposes.
After several sessions, the empty space on the desk becomes less strange. Checking behavior may not disappear, but it loses its easiest path. The safe does not supply motivation, write an essay, finish a spreadsheet, or make accounting exciting. It simply removes one highly polished escape hatch.
The Box Works Best With a Specific Rule
“Use my phone less” is vague. “Lock my phone for 30 minutes while I draft the introduction” is measurable. A smartphone safe works best when each session has a purpose and an end condition.
For example, a student might use one 25-minute session for reading and a second for notes. A remote worker might lock the phone during a 50-minute analysis block and retrieve it during a scheduled break. A family might place several phones in a larger version during dinner, provided everyone agrees to the rule and emergency access remains available.
Using the device as a punishment, especially without discussion, is less effective. Because a printed enclosure can be damaged or defeated, cooperation matters more than plastic thickness. Make: explicitly warns that a highly motivated child may bypass the lock through programming or brute force. A household agreement will usually outlast an arms race involving reinforced hinges and increasingly creative teenagers.
The Most Satisfying Upgrade Is Reliability
Decorative lighting, wireless controls, sound effects, and usage statistics are entertaining additions. Yet the most valuable improvements are usually boring: smoother threads, stronger cable strain relief, clearer status messages, stable memory handling, and a servo position that does not press continuously against a hard stop.
A reliable safe becomes part of a routine. An unreliable one becomes a shelf decoration with a tiny motor inside. Before adding features, run dozens of short lock-and-unlock cycles. Disconnect and reconnect the power. Test the emergency-release method. Check the enclosure for heat. Confirm that the phone fits with its case installed. These unglamorous tests are what turn a clever prototype into something people can use every day.
Conclusion: Build Friction Into the Habit
The DIY smartphone safe is a compact lesson in mechanical design, 3D printing, servo control, persistent memory, interface design, and human behavior. It turns an abstract goalspending less time on a phoneinto a physical action with a visible countdown.
Its greatest strength is not high security. It is honest inconvenience. The enclosure creates a pause between impulse and action, giving attention a chance to return to the book, project, meal, conversation, or gloriously uneventful patch of ceiling in front of you.
Build the mechanism carefully, test the electronics in stages, retain a responsible emergency option, and continue using the phone’s real security features. Then choose a manageable session, close the lid, start the timer, and enjoy the rare modern luxury of being temporarily unreachable by people who urgently need you to watch a 12-second video of a raccoon.