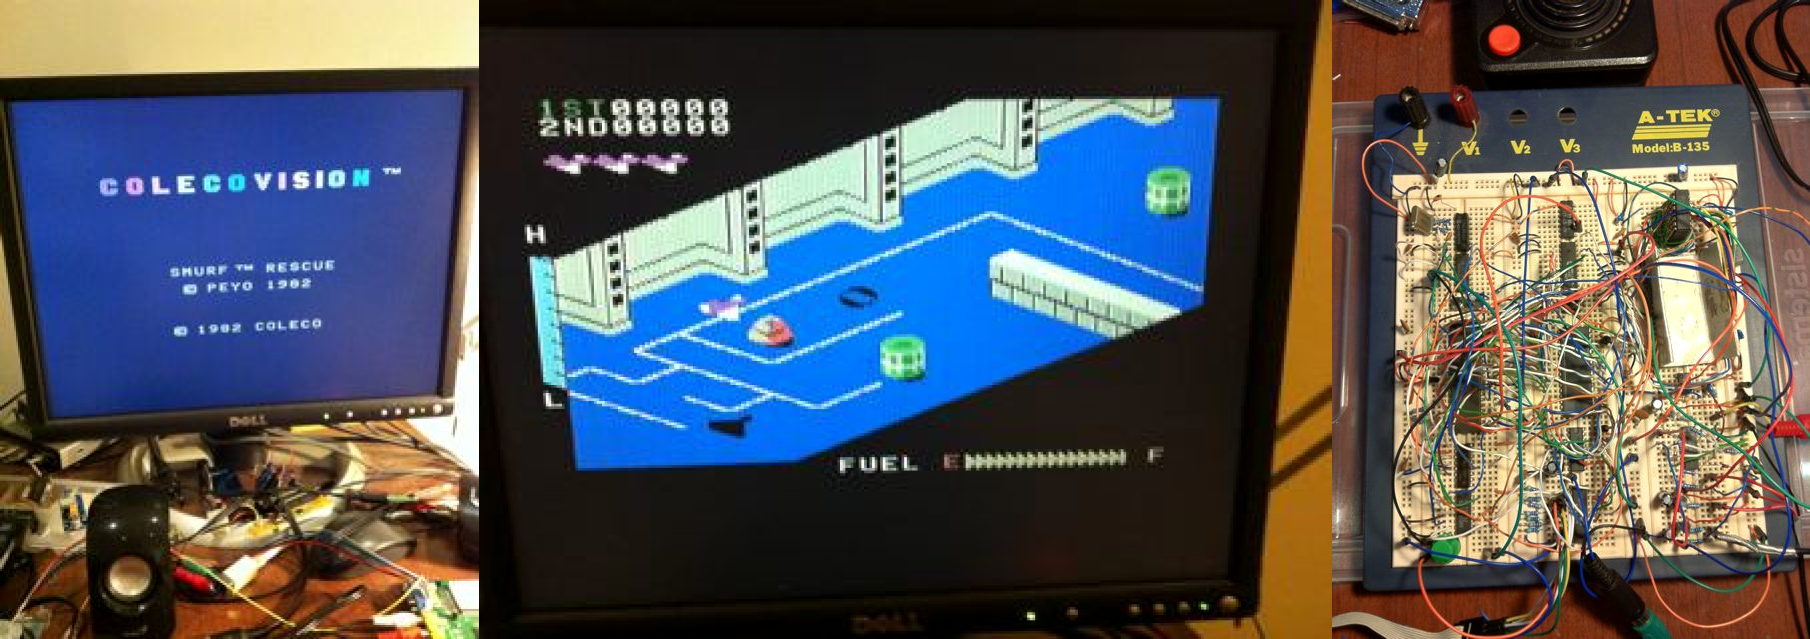
The phrase “Breadboard Colecovision” sounds like something a sleep-deprived engineer might mutter at 2:00 a.m. while surrounded by jumper wires, empty coffee cups, and one suspiciously warm voltage regulator. Yet it describes one of the coolest ideas in retro hardware: recreating the classic ColecoVision game console on a solderless breadboard. Not in an emulator. Not as a tiny single-board clone hidden under glossy plastic. A real, visible, wire-by-wire hardware recreation that lets the old console’s logic breathe in the open air.
The ColecoVision, released in the early 1980s, earned its reputation by bringing arcade-style games into the living room with more visual punch than many rivals of the time. Its architecture was built around familiar, off-the-shelf components: a Zilog Z80A CPU, a Texas Instruments video display processor, a TI sound generator, video RAM, system RAM, BIOS ROM, cartridge support, and controller input. That combination made it powerful enough to impress players and understandable enough to tempt modern retrocomputing fans into rebuilding it from scratch.
A breadboard ColecoVision project is therefore part history lesson, part electronics lab, and part “because we can” engineering theater. It turns a sealed consumer product into a readable circuit. Instead of treating the console as a magic black box, the builder can see the buses, chips, clocks, control lines, and memory paths that make a cartridge game come alive. It is retro gaming with the hood open.
What Is a Breadboard ColecoVision?
A breadboard ColecoVision is a functional recreation of the ColecoVision console assembled on solderless breadboards. Breadboards allow electronic circuits to be prototyped without soldering, using rows of connected tie points and jumper wires. For small circuits, they are beginner-friendly. For a full game console, they become a colorful spaghetti field where every wire has a job and one misplaced connection can turn Donkey Kong into abstract performance art.
The goal is not merely to “play ColecoVision games somehow.” Software emulators already do that beautifully. The goal is to reproduce the machine’s hardware behavior using real components or compatible replacements. A successful breadboard build can read original cartridges, generate video, output sound, and respond to joystick input. In other words, it behaves like a ColecoVision while looking like it escaped from an electronics textbook.
Why the ColecoVision Is a Great Breadboard Challenge
The ColecoVision is especially attractive to retro hardware builders because it sits in a sweet spot. It is complex enough to be interesting but not so complex that the project becomes completely unrealistic. Modern consoles are packed with custom chips, high-speed buses, dense surface-mount parts, encrypted firmware, and design decisions that laugh at breadboards. The ColecoVision belongs to an earlier era, when a game console could still be understood as a collection of recognizable logic blocks.
Its core processor, the Z80A, was widely used in home computers, arcade boards, and embedded systems. The video chip family was also used in machines such as the TI-99/4A and other early 1980s systems. The sound chip family appeared in several classic platforms. These shared parts make the ColecoVision a useful study subject for anyone interested in 8-bit computing, cartridge systems, memory mapping, video generation, and old-school digital design.
The Core Hardware Behind the Magic
Z80A CPU: The Console’s Traffic Cop
At the heart of the ColecoVision is a Z80A-compatible CPU running at roughly 3.58 MHz. By today’s standards, that is slower than a toaster with ambition. But in 1982, it was enough to coordinate game logic, communicate with the video chip, read controllers, access cartridge ROM, and make the system feel responsive. The CPU does not draw every pixel directly. Instead, it sends commands and data to specialized hardware, which is exactly why the console could deliver arcade-like visuals for its time.
Video Display Processor: The Picture Factory
The ColecoVision’s video system is built around a Texas Instruments VDP, commonly referenced in ColecoVision hardware discussions as the TMS9928A for NTSC systems. It works with dedicated video RAM and supports a 256-by-192 display, sprites, tiles, and a limited but charming color palette. This separation between CPU and video hardware matters. On a breadboard recreation, the builder must correctly connect data, address, control, clock, and video-related signals. One tiny mistake can produce a blank screen, garbage graphics, or the kind of psychedelic output that makes you wonder whether the console has discovered jazz.
Sound Generator: Three Tones and a Noise Channel
The ColecoVision’s audio comes from a programmable sound generator in the SN76489 family. It provides multiple tone channels and a noise channel, which is enough for music, bleeps, bloops, explosions, and the emotional range of early arcade sound effects. On a breadboard, routing the sound chip is often less visually dramatic than wiring video, but it is deeply satisfying when the first recognizable game sound comes out of a speaker.
RAM, ROM, and Cartridges
The original system used a small amount of general-purpose RAM, 16 KB of video RAM, an 8 KB BIOS ROM, and cartridges typically containing game ROM. This modest memory footprint is one reason the project is possible. However, “modest” does not mean “easy.” The memory map must be accurate, cartridge signals must be reliable, and timing must be close enough for commercial games to behave. A breadboard build may look informal, but the game software expects a disciplined machine underneath.
How a Breadboard ColecoVision Comes Together
A practical breadboard ColecoVision build usually begins with a system diagram rather than a pile of wires. The builder identifies the CPU, clock circuit, reset logic, address decoding, BIOS ROM, cartridge interface, RAM, video subsystem, sound chip, controller input, and power distribution. Then each section is tested as independently as possible. This is not the kind of project where you wire everything at once, flip the switch, and hope for applause. That approach usually earns smoke, silence, or both.
The CPU section comes first. If the processor is not clocking correctly or coming out of reset, nothing else matters. Next comes ROM access, then basic bus behavior, then video communication. The first meaningful milestone may be seeing the BIOS screen or any stable display output. The next victory is running a cartridge. The ultimate “chef’s kiss” moment is loading a real game and watching it respond to a joystick connected through the homemade interface.
Challenges Builders Run Into
Breadboards Are Convenient, Not Magical
Solderless breadboards are wonderful for experimentation, but they introduce resistance, capacitance, loose connections, and layout chaos. They are not ideal for fast or noisy digital circuits. The ColecoVision is slow compared with modern electronics, but it is still a computer. Long jumper wires can behave like tiny antennas. Power rails can sag. Ground connections can become unreliable. A line that looks connected may not be making solid contact. The breadboard does not care about your feelings.
Power Distribution Matters
Retro chips can be picky about clean power. A successful build needs careful decoupling capacitors near ICs, solid ground routing, and sensible rail organization. Builders often learn that “it powers on” is not the same as “it receives stable power everywhere.” When a system randomly crashes, displays broken sprites, or refuses to boot after moving one wire, power integrity should be on the suspect list.
Timing and Interrupts Can Be Sneaky
Game cartridges were written for the original hardware, not for a philosophical approximation of it. Timing differences, interrupt behavior, and port mappings can determine whether a game runs, freezes, or starts with confidence before immediately falling down the stairs. This is where recreating a console becomes more than connecting chips. It becomes detective work.
Cartridge Connectors Are Awkward Heroes
Original cartridges are central to the charm of the project, but connecting them to a breadboard is not elegant. A builder may need a salvaged connector, custom adapter, breakout board, or careful hand wiring. The cartridge slot becomes the bridge between 1980s plastic nostalgia and modern bench-top experimentation. It is also one of the places where mechanical reliability matters as much as electronic correctness.
Why Not Just Use an Emulator?
Emulators are fantastic. They preserve games, make testing easy, and let people enjoy classic systems without hunting for aging hardware. But a breadboard ColecoVision answers a different question. An emulator asks, “Can we reproduce the behavior?” A breadboard build asks, “Can we rebuild the machine?”
That difference matters. When you build the circuit, you understand why the system behaved the way it did. You see how the CPU talks to the VDP, why video RAM is separate, why address decoding matters, and why old consoles had quirks that modern software politely hides. The build becomes a physical explanation of the console.
Educational Value of a Breadboard ColecoVision
For students, hobbyists, and engineers, the breadboard ColecoVision is a rich learning platform. It teaches digital logic, bus architecture, memory mapping, timing, signal routing, power management, and debugging discipline. It also teaches patience, which is not listed on many schematics but should be.
Unlike a tiny microcontroller project where one chip does nearly everything, an 8-bit console exposes the divisions of labor. The CPU is not the video chip. The sound chip is not memory. The cartridge is not magic. Each subsystem has a role, and the builder must make them cooperate. That makes the project a wonderful bridge between beginner electronics and serious retrocomputing.
Modern Retrocomputing and the ColecoVision Community
The ColecoVision remains alive thanks to collectors, homebrew developers, preservationists, and hardware hackers. New games, flash cartridges, replacement parts, FPGA experiments, and clone projects have extended the console’s life far beyond its original commercial window. A breadboard recreation fits naturally into that culture. It is not just nostalgia; it is active technical exploration.
Projects like the KernelCrash recreation and later breadboard console experiments show that the ColecoVision is still a fertile playground for hardware-minded enthusiasts. They also prove that old machines can teach modern lessons. A console designed for cartridge games four decades ago can still challenge today’s builders to think carefully about architecture, constraints, and design elegance.
Practical Tips for Starting a Similar Project
Start Small
Do not begin by wiring a full console in one heroic weekend. Start with the CPU clock and reset circuit. Then add ROM. Then test address decoding. Then bring in video. Each small success reduces the mystery. Each small failure is easier to debug than a full-board disaster.
Use Short, Organized Wires
Pretty wiring is not just for social media. Shorter wires reduce noise and make troubleshooting easier. Color coding also helps: red for power, black for ground, one color for address lines, another for data lines, and so on. Future you will be grateful. Future you may even forgive present you for buying the cheap jumper wires.
Document Everything
Take notes, photos, and measurements. Label important sections. Keep a schematic nearby. A breadboard computer can change quickly, and the moment you say, “I’ll remember where that wire goes,” you have already lost. Documentation turns panic into process.
Use Known-Good Parts
Old chips can fail. Salvaged components can be mysterious. Breadboards can have bad contacts. Before blaming the entire design, verify the parts. A logic probe, multimeter, oscilloscope, ROM programmer, and patient testing routine can save hours of confusion.
Experiences Related to Breadboard ColecoVision
Working with a breadboard ColecoVision-style project feels different from most modern electronics builds. With a modern development board, you often plug in a USB cable, upload code, and watch a status LED blink like a tiny green intern. With a breadboard console, the experience is slower, messier, and more intimate. You are not asking a prebuilt board to perform. You are assembling the nervous system yourself.
The first emotional stage is optimism. The parts list seems understandable. A Z80, a video chip, a sound chip, memory, ROM, connectors, logic chips, capacitors, resistors, and wires. How bad could it be? Then the breadboards multiply. The jumper wires begin crossing like city traffic during rush hour. You discover that the phrase “address bus” sounds tidy on paper but becomes a rainbow octopus in real life.
The next stage is suspicion. A game does not boot. The screen stays blank. The reset line seems right, except when it does not. The CPU has a clock, but is it the correct clock? Is the ROM selected at the right address? Is the VDP responding? Did one wire miss by one row? Breadboarding teaches humility quickly. It also teaches that many “dead” circuits are only one connection away from life.
Then comes the first breakthrough. Maybe the video output stabilizes. Maybe a cartridge screen appears. Maybe the sound chip makes a recognizable chirp. It does not matter if the image is imperfect or the audio is rude. The machine has spoken. That moment is addictive because the success is physical. You did not simply configure software. You built a path for electrons to recreate a piece of gaming history.
A breadboard ColecoVision also changes the way you see old game consoles. After wrestling with bus timing, chip selects, and controller input, the original retail console starts to look less like a toy and more like a compact engineering compromise. Coleco’s designers had to balance cost, performance, manufacturability, game quality, and expandability. The plastic case may look simple, but the architecture inside was carefully chosen.
There is also a strange pleasure in visible computing. Modern devices hide everything. Phones are sealed slabs. Game consoles are quiet black boxes. A breadboard console is honest. You can point to the CPU. You can trace a line from the cartridge connector. You can see the video system sitting there, doing its job. It turns computation into something almost mechanical, even though nothing is moving except signals.
The best experience, however, is sharing the build with someone who remembers the original ColecoVision. They may arrive expecting a neat console and instead find a table covered in wires. Then the game starts. The familiar graphics appear. The joystick works. Suddenly the mess becomes magical. The project is no longer just a circuit; it is a time machine assembled from plastic boards and stubborn curiosity.
That is the real charm of Breadboard ColecoVision. It is not the most practical way to play classic games. It is not the easiest way to build a console. It is definitely not the cleanest thing you can put on a desk. But it is one of the most satisfying ways to understand how an 8-bit game system thinks. Every wire is a sentence in the story. Every bug is a clue. Every successful boot screen is a tiny standing ovation.
Conclusion
Breadboard ColecoVision is more than a retro electronics stunt. It is a hands-on tribute to a console that helped define early 1980s home gaming and a practical lesson in how classic digital systems worked. By recreating the ColecoVision with visible components, builders transform nostalgia into knowledge. They learn why the Z80 mattered, how the video and sound chips carried the experience, and why careful wiring can be the difference between Frogger and frustration.
For retro gamers, it is a fascinating way to appreciate the machine behind the memories. For electronics hobbyists, it is a serious challenge with real educational value. For everyone else, it is proof that sometimes the best way to understand the past is to rebuild it one jumper wire at a time.