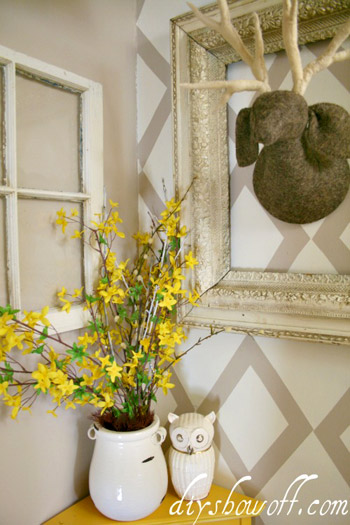
A blank stairway wall is often treated like the hallway equivalent of plain oatmeal: practical, harmless, and unlikely to inspire conversation. A diamond stenciled tan and white wall treatment changes that without demanding custom wallpaper, a contractor, or a suitcase full of cash. With a warm tan base, a creamy white pattern, careful measuring, and a little patience, an overlooked wall can become a tailored focal point that feels part classic harlequin, part modern geometric mural.
The original inspiration for this makeover was refreshingly simple: leftover paint, a homemade diamond template, painter’s tape, and a stair landing that needed personality. That low-cost spirit still works beautifully today. The main difference is that modern DIYers have more options for reusable stencils, low-tack tapes, compact foam rollers, and wall-safe adhesives. In other words, the project remains budget-friendly, but the odds of ending the afternoon muttering at a crooked diamond are much lower.
Why a Tan and White Diamond Wall Works
Diamond patterns create movement because the eye naturally follows their diagonal lines. On a staircase, those angles echo the upward direction of the steps, making the wall feel connected to the architecture rather than decorated as an afterthought. In an entryway, bedroom, powder room, or reading nook, the same pattern adds structure without requiring furniture or bulky wall art.
Tan and white are especially effective because the contrast is noticeable but not aggressive. Warm tan brings softness and depth, while white keeps the pattern crisp and airy. The pairing can lean farmhouse with distressed wood, transitional with black frames and brass lighting, or contemporary with simple furniture and matte finishes. Unlike a high-contrast black-and-white wall, it usually plays nicely with changing rugs, artwork, and seasonal accessories.
Stencil, Tape, or Both?
There are two reliable ways to create the design. A reusable diamond wall stencil is faster for a repeating motif and makes spacing easier. A homemade template combined with painter’s tape produces sharper geometric edges and allows you to customize the diamond proportions.
A hybrid method also works: trace the shape with a template, then tape along the pencil lines. Choose the method that matches your patience level. Be honest; the wall will eventually discover the truth.
Tools and Materials
- Interior latex or acrylic wall paint in warm tan and creamy white
- Primer for glossy, stained, patched, or dramatically darker walls
- A reusable diamond stencil or poster board for a homemade template
- Low-tack painter’s tape and optional repositionable stencil adhesive
- A small, dense foam roller or flat stencil brush
- Paint tray, liner, paper towels, and a damp microfiber cloth
- Tape measure, level, yardstick, and a sharp pencil
- Drop cloth, step stool, and a stair-rated adjustable ladder if needed
- A fine artist’s brush for touch-ups
For most smooth walls, an eggshell or matte base coat is forgiving and keeps glare from exaggerating minor imperfections. A satin finish can be easier to wipe clean, but it may reveal uneven roller marks or small paint bleeds.
Test the complete combinationbase color, stencil color, sheen, and application toolon a scrap board before committing to the wall. Five minutes with a sample can prevent several hours of repainting accompanied by language unsuitable for a family DIY blog.
Plan the Pattern Before Opening the Paint
Choose the Right Wall
A solid wall with few windows, doors, vents, or outlets is easiest. Stair landings and narrow transition spaces are excellent candidates because a painted pattern supplies visual interest without reducing floor space.
If the stairwell is unusually high, do not improvise with a dining chair balanced on a step. Use a properly configured adjustable ladder, rent suitable access equipment, or hire a professional for inaccessible areas. A beautiful wall is not improved by an emergency-room subplot.
Set the Diamond Scale
Large diamonds feel calmer and more contemporary, while smaller diamonds create a busier wallpaper effect. As a practical starting point, test shapes between 8 and 16 inches wide.
Tape paper mockups to the wall and view them from the doorway, the bottom of the stairs, and the landing. The ideal size should remain visible from a distance without making the wall look like it is wearing a tiny argyle sweater.
Find a Visual Starting Point
Measure the wall and mark a light vertical centerline with a level. Add a horizontal reference line to create a reliable starting point. Beginning near the visual center usually distributes partial diamonds more evenly along the edges.
On a staircase, however, the dominant sightline may be the baseboard or the angle of the steps rather than the mathematical center. Dry-fit several rows with the stencil and choose the arrangement that looks balanced from the most frequently used viewpoint.
How to Create the Diamond Stenciled Wall
1. Clean, Repair, and Protect the Area
Remove outlet covers, dust the wall, and wash away dirt or greasy residue with mild soap and water. Rinse lightly and allow the surface to dry completely.
Fill nail holes and cracks, sand the patches smooth, and wipe away all sanding dust. Protect the floor, railing, trim, and nearby furniture with drop cloths and painter’s tape. Good preparation is not glamorous, but neither is watching fresh paint detach from a forgotten handprint.
2. Apply the Tan Base Coat
Prime the wall where necessary, then apply the tan base color in thin, even coats. Cut in around the ceiling, trim, and corners with an angled brush. Roll the larger areas while maintaining a wet edge to avoid visible lap marks.
Allow the base coat to cure according to the paint manufacturer’s instructions. Dry to the touch does not always mean ready for tape. Applying tape or adhesive too soon can lift the new finish when the stencil is removed.
3. Make or Position the Diamond Template
For a homemade stencil, draw a symmetrical diamond on poster board or stencil plastic. Cut it cleanly with a craft knife on a protected work surface, using a metal ruler to keep the sides straight.
Place the first diamond at the chosen starting point, check its alignment with a level, and trace it lightly. Repeat using measured spacing or registration marks. Keep pencil pressure gentle so the lines do not show through the white paint.
For a reusable wall stencil, secure it with low-tack tape and, if permitted by the stencil manufacturer, a light mist of repositionable adhesive. Smooth the stencil flat, paying particular attention to the narrow tips of the diamonds.
4. Load the Roller Very Lightly
Pour a small amount of white paint into a tray. Load the foam roller and then remove most of the paint on folded paper towels. The roller should appear almost dry before it touches the stencil.
This feels wrong the first time, rather like ordering fries and receiving three fries, but it is the secret to clean edges. Excess paint is the most common reason color seeps beneath a stencil.
5. Apply Two Thin Coats
Roll or tap the paint over the stencil with light, controlled pressure. Do not force paint toward the edges. Two thin applications are safer than one heavy coat and are less likely to produce drips or fuzzy outlines.
If you are working with taped diamonds, brush or roll away from the tape edge rather than pushing paint directly into it. Work in manageable sections so you can monitor alignment and remove tape at the proper time.
6. Lift Carefully and Repeat
Peel the stencil straight away from the wall while the paint is still fresh. Check the back and wipe away accumulated paint before the next placement.
With taped diamonds, clean lines are often easier to achieve when the tape is removed while the final coat remains slightly wet. Pull the tape back slowly at an angle rather than jerking it directly away from the wall.
Follow your registration marks or measured guide lines and check every few placements with a level. A one-eighth-inch drift may seem harmless at first, but it can become a surprisingly adventurous journey across a long wall.
7. Complete the Edges and Corners
Finish the main field of full diamonds before tackling partial shapes along the ceiling, baseboards, and corners. Bend a flexible stencil gently into corners or mask the surrounding area and use only the needed section.
A small stencil brush often provides more control than a roller in tight areas. Do not chase microscopic perfection in corners that are barely visible. Concentrate on maintaining the visual flow of the overall pattern.
8. Touch Up After the Paint Dries
Once the pattern is dry, inspect it in natural daylight and from several feet away. Correct obvious white paint bleeds with the tan base color and a fine artist’s brush. Fill weak areas with a small amount of the white stencil paint.
Step back frequently while touching up. Tiny irregularities that appear enormous from six inches away often disappear completely at normal viewing distance.
Common Problems and Practical Fixes
Paint Is Bleeding Under the Stencil
Remove more paint from the roller, reduce pressure, and make sure the stencil is lying flat. On textured walls, a stencil brush used with a gentle vertical dabbing motion may offer better control than a foam roller.
The Pattern Is Beginning to Drift
Stop and recheck the nearest complete row with a level. Correct the spacing gradually across several diamonds instead of forcing one visibly distorted shape. Geometric patterns reward regular measuring and punish heroic guessing.
The Base Coat Is Lifting
The base paint may not have cured long enough, or the tape may be too aggressive. Switch to delicate-surface painter’s tape. If an edge appears stuck, score it carefully before peeling so the surrounding finish is not pulled away.
The White Paint Looks Too Stark
Pure white can appear harsh beside a warm tan. Consider a soft white, linen, ivory, or pale greige for a more relaxed result. Compare swatches during both daytime and evening because artificial lighting can dramatically change how neutral colors relate to one another.
The Wall Texture Is Softening the Edges
A heavily textured wall will not produce the same razor-sharp pattern as smooth drywall. Use less paint, work with a stencil brush, and embrace a slightly weathered finish. Trying to force perfect lines onto deep texture usually creates more bleeding, not less.
Styling the Finished Accent Wall
Let the wall do most of the talking. A narrow console, vintage window frame, simple mirror, or restrained gallery arrangement can add dimension without hiding the geometry.
Yellow, rust, olive, black, brass, and natural wood accents work particularly well with a tan-and-white palette. On a stair landing, a painted side table or sculptural light fixture can provide a cheerful contrast to the orderly pattern.
Repeat either the tan or white elsewhere in the spaceon trim, a rug, picture frames, or upholsteryto make the wall treatment feel intentional. Avoid adding several competing patterns at the same scale. A striped rug and diamond wall can coexist, but one should remain quieter. Otherwise, the room may begin negotiating its own optical-illusion contract.
Is a Stenciled Wall Better Than Wallpaper?
Stenciling is generally customizable, budget-friendly, and easy to paint over when your style changes. It also allows leftover paint to become useful instead of slowly developing an archaeological crust in the garage.
Wallpaper can provide finer details and perfectly consistent printing, but it often requires more material, careful pattern matching, and a more involved removal process. For homeowners who enjoy hands-on projects and can accept subtle handmade variation, a painted diamond wall offers excellent visual value.
Conclusion
A diamond stenciled tan and white wall treatment proves that a modest paint project can completely transform a neglected area. The winning formula is straightforward: prepare the surface, test the colors, establish dependable guide lines, keep the applicator nearly dry, and build the pattern with thin coats.
The process takes patience, but the result feels custom, polished, and far more expensive than the materials suggest. Better still, the colors are neutral enough to evolve with new artwork, furniture, rugs, and accessories for years to come.
Project Experience: What the Wall Teaches You
The first lesson from a diamond wall project is that preparation feels slow only until the pattern begins. It is tempting to skip the paper mockup, eyeball the first row, and trust that everything will somehow line up near the ceiling. That confidence usually lasts about four diamonds.
Spending an extra half hour testing the scale and marking reference lines can prevent hours of creative problem-solving later. A sample board is equally valuable because tan shades can shift from cozy beige to suspiciously peach under warm bulbs, while some white paints suddenly look blue beside warm neutrals.
The second lesson is that “almost dry” is the correct amount of paint for a stencil roller. Beginners often reload because the first pass looks faint. Then the paint creeps under the stencil and the diamond develops a fuzzy little halo.
A better approach is to build coverage gradually. The first coat establishes the shape; the second strengthens it. Once the rhythm becomes familiarload, offload, roll lightly, lift, wipe, and repositionthe project can become surprisingly meditative. You may even stop checking the clock, although your shoulders will continue filing hourly reports.
Alignment is another experience that changes as the wall grows. Up close, each diamond seems like an independent task. From across the room, the rows become a single composition. That is why stepping back matters.
A tiny imperfect edge is rarely important, but a row that slowly leans is visible immediately. Experienced stencilers pause every few placements, compare the diamond points with their guide line, and correct small errors before they multiply. The habit feels fussy at first and efficient later.
Stairwells add a practical lesson: access determines quality. When a project requires stretching, twisting, or balancing, precision disappears before enthusiasm does. Set up safe equipment at the beginning, keep tools in a stable tray, and work only within a comfortable reach.
For a tall stairwell, hiring a professional for the upper section is not surrender. It is an intelligent decision involving gravity, which has an undefeated record.
The most satisfying experience arrives after the tape is gone and the room is put back together. The pattern that looked loud halfway through often becomes calm once the furniture, trim, lighting, and artwork return. Warm tan gives the wall familiarity, while white diamonds add energy and definition.
Because the finish is applied by hand, slight variations create warmth rather than failure. The wall feels designed instead of mass-produced. Small differences in coverage can even soften the geometry, helping the pattern feel appropriate in a relaxed home rather than a mathematics classroom.
Finally, the project teaches restraint. Once one geometric wall succeeds, every flat surface may appear to volunteer for duty. Resist the urge to stencil the hallway, dresser, ceiling, dog bowl, and possibly the dog.
Let one feature wall establish the visual identity of the space. Save the leftover paint and stencil for a coordinating tray, plant stand, storage box, or framed panel. A repeated accent can connect the room; an entire house of diamonds may cause guests to walk diagonally.
Note: This guide expands the original low-cost reader redesign into a detailed, modern, and safety-conscious tutorial. Paint behavior, drying time, surface compatibility, and stencil-care instructions can vary, so always follow the directions supplied by the paint, tape, adhesive, and stencil manufacturers.