Some Halloween decorations politely whisper, “Boo.” A creepy doll head from a thrifted doll kicks open the attic door, stares into your soul, and asks why you never call. That is exactly why this DIY project works so well. It is inexpensive, weirdly charming, deeply unsettling, and almost guaranteed to become the decoration guests remember long after they forget your pumpkin-scented candle.
This guide shows you how to turn a secondhand doll into a creepy Halloween doll head prop using simple craft supplies, paint, texture, and a little dramatic flair. Whether you want a haunted doll head planter, a spooky shelf sitter, a porch prop, or a centerpiece for a Halloween party table, this project is flexible, budget-friendly, and delightfully strange.
The best part? You do not need to be a professional prop maker. You need a thrifted doll, a safe workspace, patience, and the courage to make eye contact with a plastic baby doll at 11:47 p.m. while holding a paintbrush. Normal Tuesday.
Why Thrifted Dolls Make Perfect Creepy Halloween Decor
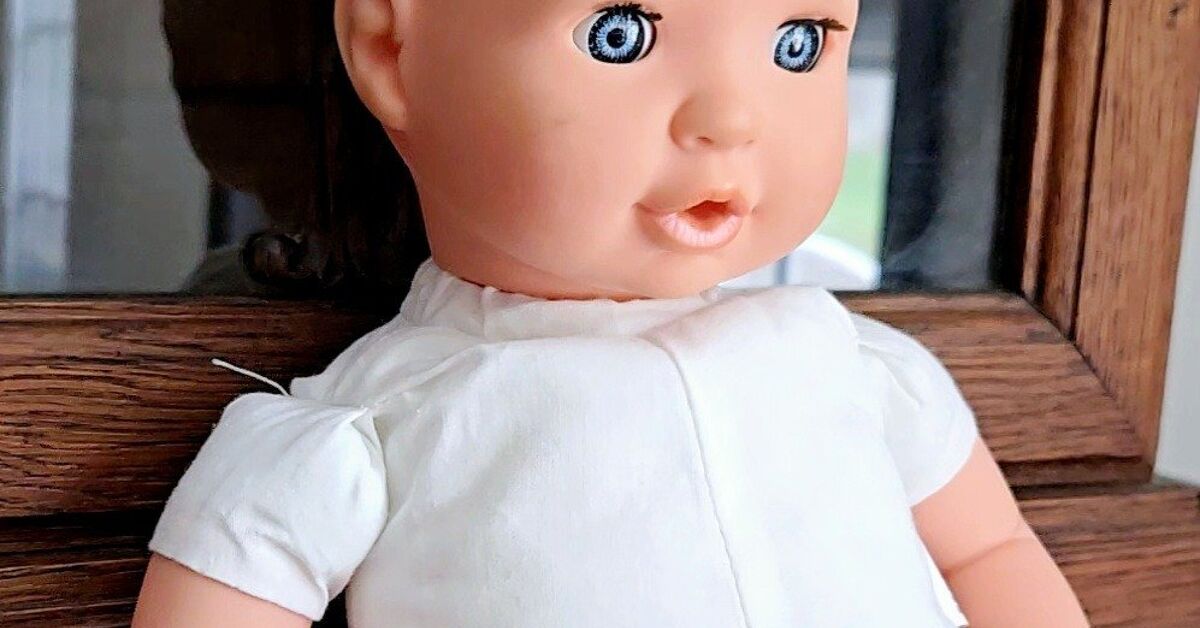
Thrift stores, yard sales, flea markets, and donation shops are treasure caves for DIY Halloween decor. Old dolls often have exaggerated eyes, glossy faces, stiff hair, cracked vinyl, missing shoes, faded clothing, or that mysterious “I have seen things” expression. In a regular nursery, that is unfortunate. In Halloween decorating, it is premium material.
Using a thrifted doll head is also a smart upcycling project. Instead of buying another mass-produced plastic decoration, you are giving an unwanted toy a spooky second act. Think of it as retirement, but with more cobwebs. Upcycled Halloween decorations also tend to look more unique because every doll has different facial features, hair texture, eye shape, and surface wear.
A creepy doll head can be styled in several ways: mounted on a candleholder, tucked into a wreath, transformed into a small planter, placed under a glass cloche, attached to a Halloween garland, or displayed in a dark corner where it can silently judge your snack choices. Because the base object already has personality, you do not need expensive supplies to create a strong visual effect.
Materials You Will Need
Gather your supplies before you begin. Nothing ruins a haunting mood like searching for sandpaper while your half-painted doll head rolls across the table like a tiny cursed bowling ball.
Basic Supplies
- One thrifted doll with a removable or cuttable head
- Mild dish soap or gentle cleaner
- Soft cloth, toothbrush, and cotton swabs
- Craft knife, utility knife, or small saw
- Fine-grit sandpaper or sanding sponge
- Plastic-safe primer or spray paint made for plastic
- Acrylic craft paint in white, gray, black, brown, red, green, or purple
- Small paintbrushes and sponge brushes
- Clear matte sealer
- Hot glue gun or strong craft adhesive
- Disposable gloves and protective eyewear
- Drop cloth, cardboard box, or covered work surface
Optional Creepy Extras
- Faux moss, preserved moss, or dried Spanish moss
- Mini succulents or faux plants
- Cheesecloth, gauze, lace, or tattered fabric
- Black tea or coffee for staining fabric
- Plastic spiders, tiny bones, beads, buttons, or doll eyes
- Battery-powered tea light
- Small candlestick, wood plaque, thrifted frame, or glass jar
- Gloss medium or clear nail polish for wet-looking details
Step 1: Choose the Right Thrifted Doll
Look for dolls made from vinyl, plastic, porcelain, or hard rubber. Baby dolls are especially effective because their round cheeks and oversized eyes become instantly creepy when aged, cracked, shadowed, or hollowed out. Porcelain dolls can look wonderfully gothic, but they are more fragile and may require gentler handling.
Before buying, inspect the doll. Avoid anything with mold, strong chemical odor, leaking batteries, or unknown sticky residue. Missing limbs are fine. Cloudy eyes are excellent. Tangled hair is useful. A slightly cracked face? Congratulations, you have found atmosphere.
If you want to make a planter, choose a doll head large enough to hold a small nursery pot, faux plant, or floral foam. If you want a shelf prop, smaller heads work beautifully in clusters. Three doll heads lined up on a mantel can say, “Welcome to our home,” in the exact opposite tone.
Step 2: Clean the Doll Head Thoroughly
Secondhand finds should be cleaned before crafting. For most hard plastic or vinyl dolls, wipe the surface with mild dish soap and warm water. Use a soft toothbrush around the ears, eyes, hairline, and neck opening. Cotton swabs help clean small creases without damaging the face.
Avoid soaking dolls with sleepy eyes, internal mechanisms, glued wigs, fabric bodies, or delicate porcelain. Water can get trapped inside and cause problems later. If the doll has a cloth body but you only need the head, remove the head first, then clean the hard surface separately.
Let the doll head dry completely. Paint and primer do not enjoy damp plastic. They will peel, bubble, or wrinkle in protest, and nobody needs that kind of drama unless it is intentional Halloween drama.
Step 3: Remove the Doll Head Safely
Many doll heads can be pulled off with firm pressure, especially if they are attached to a soft vinyl neck ring. If the head does not release easily, do not wrestle it like you are trying to win a carnival prize. Use a craft knife or utility knife to cut carefully around the neck seam.
Wear gloves and protective eyewear when cutting. Work slowly on a stable surface. If the plastic is thick, use small cuts rather than forcing the blade. For hard plastic dolls, a small hand saw or rotary tool may work better, but only use tools you are comfortable handling.
If you are making a doll head planter, cut an opening in the top of the head. Draw a circle first with a marker, then cut inside the line. The opening does not need to be perfect because moss, hair, or plants can hide the edge. In fact, a slightly jagged opening often looks more disturbing, which is the one time your imperfect cutting skills get applause.
Step 4: Sand and Prep the Surface
Lightly sand glossy vinyl or plastic so primer and paint can grip. You are not trying to carve a new face; just dull the shine. Focus on the cheeks, forehead, chin, and scalp. Wipe away dust with a clean cloth before painting.
If the doll has factory makeup, you can leave some of it visible for a haunted vintage look. Faded rosy cheeks under gray paint can create a bruised, ghostly effect. However, if the face is very shiny or slick, sanding and priming are important for a longer-lasting finish.
For spray painting, work outdoors or in a very well-ventilated area. Place the head inside a cardboard box or on a drop cloth to control overspray. Use light coats instead of one heavy blast. Heavy paint can run down the face like sad clown tears, which may be useful, but only if you planned it.
Step 5: Create the Creepy Base Coat
A good base coat sets the mood. For a ghostly doll head, use chalky white, pale gray, or bone-colored paint. For a swampy graveyard doll, try gray-green. For a burned attic relic, start with brown, black, and deep burgundy. Acrylic craft paint works well for hand-painted effects, while plastic-safe spray paint can quickly cover the entire head.
Apply the first coat lightly. Let it dry, then add a second coat if needed. Do not worry if the coverage looks uneven. Uneven paint can create age, decay, and texture. Halloween crafting is wonderfully forgiving because “distressed” is just a fancy word for “I dropped it, but made it fashion.”
For a porcelain-doll effect, keep the face pale and smooth, then add cracks with a fine brush. For a corpse-doll effect, sponge gray and green around the temples, under the eyes, and along the jawline. For a possessed-doll effect, darken the eye sockets and add glossy black pupils or tiny red dots.
Step 6: Add Aging, Shadows, and Disturbing Details
The secret to a convincing creepy Halloween doll head is layering. A flat white face looks unfinished. A face with shadows, stains, cracks, dry brushing, and tiny details looks like it has been living in a locked trunk since 1912 and would like to discuss your poor life choices.
Easy Aging Techniques
- Dry brushing: Dip a brush into gray or brown paint, wipe most of it off, then skim it over raised areas.
- Paint wash: Thin black or brown paint with water and let it settle into cracks, ears, lips, and neck creases.
- Sponge texture: Dab paint with a sponge to create mottled skin, mildew spots, or old porcelain staining.
- Fine cracks: Use a detail brush or permanent marker to draw thin irregular lines across the forehead and cheeks.
- Glossy accents: Add clear gloss to eyes, lips, or “tears” for an unsettling wet look.
Do not make every mark symmetrical. Real aging is random. Put more shadow under one eye than the other. Let one crack wander across the cheek. Add a brownish stain around the mouth. Tiny imperfections make the doll feel less like a craft project and more like something that definitely moved when you were not looking.
Step 7: Transform the Hair
Doll hair can be your best friend or your loudest enemy. If the hair is tangled, frizzy, or oddly stiff, wonderful. Halloween loves texture. You can tease the hair with a comb, dust it with gray paint, or stiffen it with hairspray. For a swampy look, work faux moss into the hairline. For a Victorian ghost look, stain lace or cheesecloth and wrap it around the scalp.
If the doll is bald, do not panic. A bald creepy doll head has its own unsettling charm. You can glue on moss, yarn, black feathers, dried flowers, fake spiderwebs, or a tiny witch hat. A clean bald head also works well for painted cracks and glowing eye effects.
For a doll head planter, the “hair” can be a plant. Faux succulents, black faux roses, dried twigs, and moss all look dramatic. If using a real plant, place it in a small removable pot or liner so moisture does not sit directly inside the doll head.
Step 8: Turn It Into a Planter, Prop, or Display Piece
Once the doll head is painted and sealed, decide how to display it. The easiest option is a shelf sitter: place the head on a stack of old books, a tray, or a thrifted saucer. Add cobwebs, a few plastic spiders, and a battery tea light behind it for eerie shadows.
For a planter, insert a small cup, nursery pot, or floral foam into the head opening. Surround the top with moss to hide gaps. Faux plants are best for long-term Halloween decor because they do not require drainage. If you use real succulents, keep watering minimal and remove the plant before watering when possible.
For a wall display, glue the doll head to a small plaque, thrifted frame, or wreath base. Add black ribbon, faux ivy, bones, miniature skulls, or torn fabric. This turns one thrifted doll into a dramatic piece of creepy wall art.
Step 9: Seal and Protect Your Work
After the paint is fully dry, spray or brush on a clear matte sealer. Matte finishes usually look creepier than glossy finishes because they mimic old chalk, dust, bone, and weathered porcelain. Use gloss only where you want shine, such as eyes, lips, or fake tears.
If the doll head will be displayed outdoors, keep it on a covered porch or protected entryway. Rain, strong sun, and temperature changes can damage paint, glue, fabric, and moss. A creepy doll head looks fantastic under porch lighting, but it does not need to experience a thunderstorm to prove its dedication to the season.
Design Ideas for Different Halloween Styles
Haunted Nursery Doll Head
Use pale paint, gray shadows, cracked lines, and a ribbon tied around the neck. Display it with old children’s books, blocks, or a small rocking horse. The mood is “abandoned nursery,” which is spooky without requiring fake blood.
Graveyard Planter Doll Head
Paint the head gray-green, add moss around the scalp, and insert faux succulents or black roses. Dry brush the face with brown and white to create an aged stone effect. This version looks great on a mantel, porch table, or Halloween buffet.
Possessed Porcelain Doll Head
Keep the face pale, darken the eye sockets, and add tiny red or black pupils. Use fine crack lines and glossy accents around the eyes. Place the head under a glass cloche for maximum “please do not open this” energy.
Gothic Glam Doll Head
Paint the lips black or deep burgundy, add lace, pearls, tiny rhinestones, and black florals. This style is less jump-scare and more haunted mansion dinner party. It pairs well with candles, antique mirrors, and velvet pumpkins.
Safety Tips Before You Start
DIY Halloween decor should be fun, not an emergency room origin story. Always cut away from your body, keep blades sharp enough to work cleanly, and wear protective eyewear when cutting hard plastic. Use spray paint and sealers outdoors or in a well-ventilated area. Follow the product label for drying and recoating times.
Use battery-powered candles instead of real flames around plastic doll heads, synthetic hair, moss, lace, and faux cobwebs. Many Halloween craft materials are flammable. The goal is creepy ambiance, not a living room bonfire with a doll head witness.
If kids help with the project, let them do safe steps like choosing colors, brushing on paint, or adding moss. Adults should handle cutting, spray painting, hot glue, and sealers. Pets should also be kept away from small plastic parts, glue strings, and mysterious thrift-store doll hair, because cats already believe they are supervisors.
Common Mistakes and How to Avoid Them
Using Too Much Paint at Once
Thick paint can drip, stay tacky, or hide facial details. Use thin layers and build slowly. The doll’s molded features are part of what makes it creepy, so let them show.
Skipping Cleaning and Sanding
Dust, oil, and glossy surfaces can prevent paint from sticking. Clean first, dry fully, and lightly sand shiny areas. A few extra minutes of prep can save the whole project from peeling like a sunburned vampire.
Making the Face Too Perfect
Perfectly painted creepy dolls often look store-bought. Add irregular cracks, uneven shadow, smudges, stains, and dry-brushed texture. Handmade weirdness is the charm.
Forgetting the Display
A creepy doll head sitting alone can work, but styling makes it better. Add height, lighting, fabric, moss, old books, frames, or glass jars. The setting tells the story.
Budget Breakdown
This DIY creepy Halloween doll head can be extremely affordable. A thrifted doll may cost only a few dollars, especially if it is damaged or missing accessories. Paint, glue, and moss are often already in a crafter’s supply bin. Even if you buy everything new, you can usually create several doll heads for less than the price of one large store-bought Halloween prop.
To save more money, shop your home first. Old makeup brushes can become paintbrushes. Cardboard boxes can become spray booths. Leftover black ribbon can become a gothic bow. A cracked teacup can become a doll head stand. Halloween crafting rewards people who look at junk and say, “This could be upsetting in a good way.”
of Real-World Experience: What This Project Feels Like to Make
The first thing you learn when making a DIY creepy Halloween doll head from a thrifted doll is that the doll usually does half the work. You may walk into the thrift store expecting to search for the perfect candidate, but the perfect candidate will find you. It will be on a low shelf, hair pointing in six directions, one eyelash missing, wearing a tiny dress that has absolutely been through something. You pick it up, and suddenly your shopping basket feels haunted. That is when you know the project has begun.
Cleaning the doll is the least glamorous part, but it changes everything. A dusty doll head looks neglected; a cleaned and painted doll head looks intentionally terrifying. The trick is to keep some of the original character. Do not scrub away every stain if it adds atmosphere. A faint mark on the cheek, a cloudy eye, or a worn lip can become part of the story. The best Halloween props feel like they have a past.
Cutting the head can feel strange the first time, mostly because your brain says, “This is a toy,” while your Halloween brain says, “Excellent, proceed.” Go slowly. Vinyl can be softer than expected, while older plastic can be stubborn. Once the head is separated, the project becomes easier to imagine. Suddenly it is not a doll anymore; it is a prop, a planter, a weird little art object, or the future star of your porch display.
Painting is where the personality appears. A pale base coat immediately makes the face colder. Gray under the eyes adds that sleepless haunted-house look. Brown wash in the creases makes the doll look older. The first crack line is always a little scary because it feels permanent, but after two or three cracks, you start looking for places to add more. That is the danger of this craft: you begin with “just one creepy doll head” and end by wondering whether your mantel needs a full council of them.
Display makes the final piece come alive. One doll head on a plain table is creepy. One doll head sitting on old books, wrapped in stained cheesecloth, with moss spilling from its scalp and a flickering battery candle behind it is a tiny Halloween opera. Lighting matters more than people expect. Side lighting creates shadows in the eye sockets. Backlighting makes hair and moss look wild. A glass cloche makes the whole thing feel like a cursed museum specimen.
The funniest part is watching people react. Some guests laugh. Some lean in. Some refuse to be alone with it. That range of reactions means the project worked. A thrifted doll head is not just decoration; it is a conversation starter, a budget craft, a recycling win, and a reminder that Halloween is at its best when it is handmade, slightly ridiculous, and just creepy enough to make the hallway feel longer at night.
Conclusion
A DIY creepy Halloween doll head from a thrifted doll is the perfect project for anyone who loves budget-friendly Halloween decorations with personality. It combines upcycling, simple painting techniques, eerie styling, and a sense of humor dark enough to appreciate a plastic baby head full of moss. With basic cleaning, careful cutting, light sanding, layered paint, and creative display choices, you can turn an unwanted doll into a spooky prop that looks custom, memorable, and wonderfully weird.
Whether you make a haunted planter, a gothic shelf sitter, a creepy wreath accent, or a dramatic porch decoration, this project proves that Halloween magic does not need to be expensive. Sometimes it is sitting at the thrift store for $2.99, staring at you from a bin of forgotten toys.