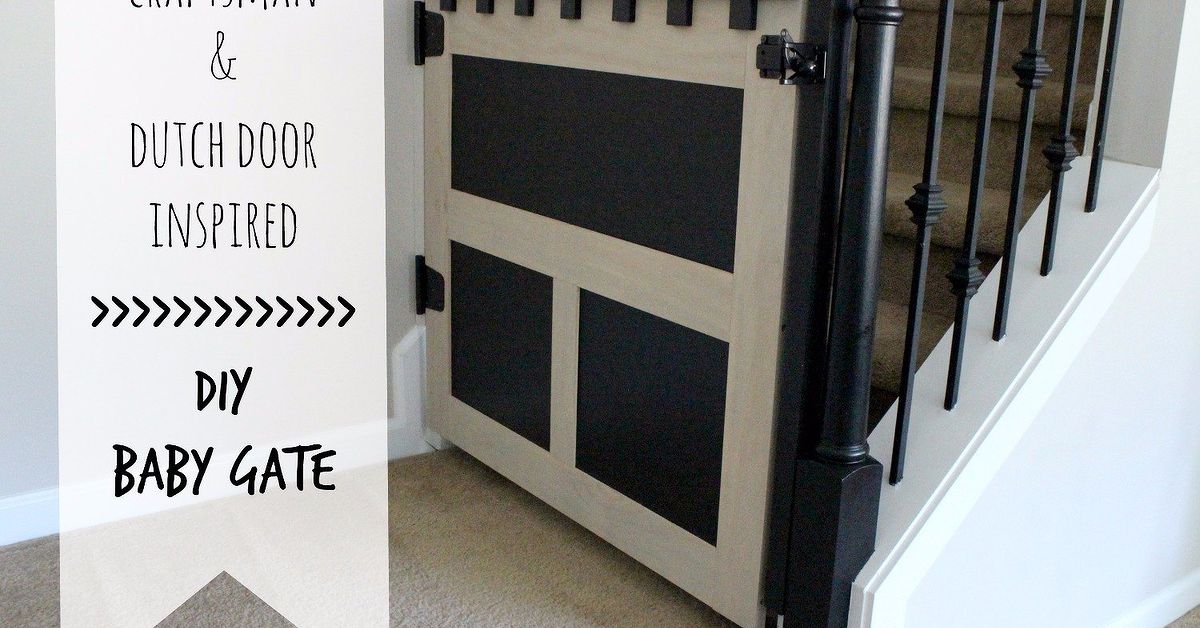
A baby gate does not have to look like a temporary plastic apology to your interior design. A pet gate does not have to scream, “We gave up and bought the first thing on the shelf.” With a little planning, a few boards, sturdy hardware, and a design inspired by Craftsman trim and Dutch door charm, you can build a DIY baby/pet gate that actually belongs in your home.
This project blends function and style: the clean lines of Craftsman woodworking, the half-door personality of a Dutch door, and the everyday usefulness of a swing gate that keeps toddlers, puppies, and curious cats from launching tiny household investigations. Think of it as a mini architectural feature with a very important job: protecting the people and pets who do not yet understand stairs, hot ovens, muddy paws, or the phrase “please stay out of there.”
Before we get romantic about wood grain and cute latches, let’s be clear: a DIY gate should be built with safety first. For the top of stairs, a hardware-mounted, safety-rated gate is the safest choice. A homemade wooden gate is best for doorways, hallways, room dividers, bottom-of-stair zones, or pet-control areas where the risk level is lower. If children will use the area, build conservatively, avoid climbable horizontal rails, use secure hardware, and test the gate like a tiny engineer with snacks is about to challenge it.
Why Choose a Craftsman & Dutch Door Inspired Gate?
The magic of this design is that it feels intentional. Craftsman style is known for simple geometry, natural materials, straight lines, and honest construction. Dutch doors bring that friendly split-door look: practical, warm, and a little nostalgic. Combine them, and you get a baby or pet gate that feels more like built-in millwork than a barrier you are counting the days to remove.
A Craftsman-inspired gate usually includes square edges, framed panels, vertical slats, thicker top and bottom rails, and a finish that matches nearby trim. A Dutch door inspired gate borrows the “half-door” idea: it is low enough to see over, talk over, and keep the room feeling open, but tall enough to block the small adventurers who believe every forbidden room contains treasure.
Best Places to Use This DIY Baby/Pet Gate
This gate works beautifully in a kitchen doorway, laundry room entrance, mudroom, home office, nursery, hallway, or between a living room and dining room. It is especially useful for dogs who need boundaries without feeling exiled from civilization. Your pet can still see you, judge your snack choices, and remain part of the household drama.
For babies and toddlers, use this style only where a custom wood gate is appropriate and secure. Do not rely on a decorative DIY gate at the top of stairs unless it has been engineered, mounted, and tested to the same seriousness as a safety-rated product. At the top of stairs, the gate should be hardware-mounted into solid framing, should not swing over the stairs, and should not have footholds that invite climbing.
Design Goals Before You Cut a Single Board
1. Match the house, not the internet trend
Rustic barn door gates are popular, but not every home wants farmhouse energy. If your home has Craftsman trim, shaker cabinets, square newel posts, or classic interior doors, a cleaner design will blend better. Use straight vertical slats, a strong rectangular frame, and a simple top cap to echo the look of traditional millwork.
2. Keep the gate simple and strong
A good DIY baby gate or pet gate is not just pretty; it resists twisting, sagging, pushing, pawing, leaning, and repeated opening. The frame should be square. The hinge side should be solid. The latch side should close cleanly without needing a motivational speech.
3. Avoid climbable details
For child safety, avoid horizontal bars or decorative crosspieces that can become a ladder. Vertical slats are usually a better option. Keep openings narrow enough that a child or pet cannot squeeze through or get stuck. Smooth every edge because toddlers and puppies both inspect furniture with their faces.
Materials You May Need
For a basic interior gate, consider using poplar, pine, maple, or another stable indoor wood. Poplar paints beautifully, pine is affordable and easy to work, and maple is stronger but less forgiving on the wallet. Use straight boards, not lumber that looks like it has personal problems.
- 1×3 or 1×4 boards for the outer frame
- 1×2 boards or square dowels for vertical slats
- Wood glue
- Pocket hole screws or trim screws
- Two or three sturdy hinges
- Child-resistant or pet-secure latch
- Wall mounting board if studs do not align perfectly
- Sandpaper in medium and fine grits
- Primer, paint, stain, or polyurethane
- Stud finder, level, drill, clamps, measuring tape, and square
If you are a beginner, do not let the materials list intimidate you. Half of woodworking is measuring, clamping, and pretending you meant to make that tiny adjustment. The other half is sanding.
Measure the Opening Correctly
Measure the doorway or opening at the top, middle, and bottom. Older houses, especially charming ones, love to surprise you with walls that are not perfectly square. Use the smallest width measurement as your guide, then leave clearance for hinges and latch hardware.
For most swing gates, you need a small gap on both sides so the gate can open and close without scraping. A common approach is to leave about 1/4 inch to 1/2 inch total clearance, depending on hinge type and latch design. If your opening is unusually wide, consider building a fixed side panel with a smaller swinging gate. A giant swinging slab of wood may look impressive, but it can sag over time and turn into a daily shoulder workout.
Recommended Height
For pets, the height depends on the animal. A small dog may need only a low gate, while a larger dog with Olympic aspirations may require something taller. For toddlers, a taller gate is generally better, but height alone is not enough. The gate must be secure, difficult to climb, and properly mounted.
A Dutch door inspired baby/pet gate often looks best between 30 and 36 inches high. This height keeps the half-door feel while remaining practical for many room transitions. If your child is already climbing furniture like a tiny mountaineer, no DIY decorative gate should be trusted as the only safety layer.
How to Build the Craftsman Frame
Step 1: Cut the outer rails and stiles
The vertical side pieces are called stiles, and the horizontal top and bottom pieces are rails. That sounds fancy, but it simply means “the boards that make the rectangle.” Cut two stiles to the full height of the gate. Then cut the top and bottom rails to fit between them, or overlap them depending on your chosen joinery.
Step 2: Dry fit everything
Lay the pieces on a flat surface and check for square. Use a carpenter’s square or measure diagonally from corner to corner. If both diagonal measurements match, your frame is square. If they do not, adjust before fastening. A crooked gate will haunt you every time it closes with a dramatic thunk.
Step 3: Join the frame
Pocket holes are beginner-friendly and strong enough for many interior gates. You can also use dowels, biscuits, half-lap joints, or traditional joinery if you enjoy making things more complicated in a satisfying way. Add wood glue at joints, clamp the frame, and drive screws carefully. Pre-drilling helps prevent splitting, especially near board ends.
Add the Dutch Door Character
The Dutch door influence comes from the gate’s half-door presence and its panel layout. To make it feel more architectural, add a slightly thicker top cap or rail. A flat top rail gives the gate a finished look and makes it feel like a miniature door rather than a fence panel that got invited indoors.
You can create a lower recessed panel effect by adding trim inside the frame or by using vertical slats spaced evenly across the opening. For a true Craftsman look, keep the shapes square and avoid overly ornate trim. The goal is warm, clean, and intentionalnot “haunted dollhouse saloon.”
Slat Spacing and Safety
Vertical slats should be evenly spaced and secure. For a child-focused gate, keep gaps small and consistent. Avoid any V-shaped openings, large decorative cutouts, or flexible areas where a child or pet could push through. If the gate is primarily for a dog, consider the size of the dog’s head, shoulders, and determination level. Some dogs are basically liquid when cheese is involved.
Attach slats with glue and screws or brad nails, depending on thickness and design. Screws provide better strength, but visible fasteners may need filling before paint. If using brad nails, do not rely on them alone for parts that may take pressure. A gate gets touched constantly, so build stronger than you think you need.
Choosing Hinges That Will Not Betray You
Use sturdy hinges rated for the weight of your gate. Small cabinet hinges may look cute, but they can sag quickly. Door hinges, strap hinges, or heavy-duty utility hinges are better choices. If the gate is wide or heavy, use three hinges instead of two.
Mount the hinge side into a stud whenever possible. If the stud location is awkward, attach a solid mounting board to the wall framing first, then attach the gate to that board. This spreads the load and gives your hardware something dependable to bite into. Drywall alone is not a structural plan; it is a decorative suggestion.
Choosing the Right Latch
For pets, a simple gate latch, slide bolt, or magnetic catch may work. For babies and toddlers, choose a child-resistant latch that adults can operate one-handed but children cannot easily open. Place the latch high enough to reduce access, but still convenient for daily use.
Test the latch from both sides if the gate needs two-way access. Also think about guests, grandparents, babysitters, and anyone carrying laundry, groceries, or a squirming toddler. A gate that requires a secret handshake will become annoying fast.
Finishing: Paint, Stain, or Clear Coat?
Paint is the easiest way to make the gate blend with trim. White, cream, black, soft gray, or the same color as interior doors all work well. If you want a Craftsman feel, stain can highlight natural wood grain, especially if nearby trim is stained. Use a durable, low-VOC finish suitable for indoor use, and allow it to cure fully before regular contact.
Sand every corner smooth before finishing. Slightly round over sharp edges with sandpaper. Babies, toddlers, and pets all have a special talent for finding the one rough spot you missed. Fill nail holes, caulk small seams if painting, then apply primer and two finish coats for a clean built-in look.
Installation Tips for a Smooth Swing
Mark hinge placement carefully. Use a level before drilling. If possible, have one person hold the gate while another marks the screw holes. If you are working alone, temporary blocks under the gate can help hold it at the right height.
Leave enough clearance at the bottom so the gate does not scrape flooring or rugs. At the same time, avoid a large gap that a small pet or child could crawl under. Once mounted, open and close the gate several times. Tighten screws, adjust latch placement, and check that the gate does not swing open by itself unless you intentionally installed self-closing hardware.
Safety Checklist Before Daily Use
- The gate is mounted into studs, trim backed by framing, or a secure mounting board.
- The latch closes fully every time.
- The gate does not sag, twist, or flex under pressure.
- There are no sharp edges, splinters, pinch points, or exposed screw tips.
- Openings are too small for a child or pet to squeeze through.
- The design does not include climbable horizontal rails.
- The gate is not used as the only safety barrier at the top of stairs unless properly engineered for that location.
Design Variations to Make It Yours
Classic white Craftsman gate
Paint the gate the same color as your baseboards and door casing. This gives the most built-in appearance and works especially well in hallways or between rooms.
Warm stained wood gate
Use oak, maple, or clear pine with a warm stain and satin polyurethane. This version looks beautiful in Craftsman, bungalow, cabin, or traditional homes.
Modern black gate
A black painted gate with simple vertical slats can look polished and modern. Pair it with matte black hinges and a clean latch for a more contemporary feel.
Pet window version
For dogs who like to monitor household operations, keep the top open and use vertical slats below. This creates visibility without letting them enter restricted rooms.
Common Mistakes to Avoid
The first mistake is building too wide without enough support. A wide wooden gate can sag, especially if made from heavy lumber. Add a diagonal brace only if the gate is for pets, not toddlers, because diagonal or horizontal pieces can become footholds. For child use, solve sagging with better joinery, stronger hinges, lighter materials, or a narrower swing section.
The second mistake is mounting into weak material. Trim, plaster, and drywall may look solid, but they are not always enough. Find framing or install a secure mounting board. The third mistake is choosing a latch that is convenient for adults but fascinating to children. Toddlers treat latches like puzzles. Unfortunately, many of them are excellent puzzle solvers.
Maintenance: Because Gates Work Hard
Check screws and hinges regularly. Wood moves with humidity, hardware loosens with use, and pets sometimes apply emotional pressure with their paws. Tighten loose screws, touch up paint chips, and make sure the latch still catches properly. If the gate begins to sag, fix it early before the latch misaligns and daily use becomes a tiny home-improvement argument.
Clean painted gates with mild soap and water. Avoid harsh cleaners that can dull the finish. If you stained and sealed the wood, wipe spills quickly and inspect for worn spots. A well-built gate can last for years, then later become a charming room divider, dog gate, or proof that you once had time to build things.
Real-Life Experience: What This Project Teaches You
Building a Craftsman & Dutch Door inspired DIY baby/pet gate is one of those projects that looks simple until you realize it lives at the intersection of design, safety, carpentry, and daily family chaos. A shelf just sits there. A gate moves, gets pushed, gets leaned on, gets opened with elbows, and gets judged by every visitor who says, “Oh wow, did you make that?”
The biggest lesson is that measuring matters more than enthusiasm. Doorways are rarely perfect. One side may be slightly out of plumb, the floor may slope, or the trim may project farther than expected. Measure more than once, then measure again after you have had coffee. A gate that fits neatly with even gaps looks custom. A gate that rubs the floor every morning becomes a personal enemy.
The second lesson is that hardware deserves respect. Many DIYers spend a long time choosing the wood and finish, then grab the cheapest hinges available. That is like wearing a tuxedo with flip-flops. Hinges and latches control how the gate feels every single day. Good hardware makes the project feel solid, quiet, and professional. Weak hardware makes even a beautiful gate feel temporary.
The third lesson is that paint hides many sins, but not all of them. If you plan to paint, you can use wood filler, caulk, and primer to create a clean finish. However, sloppy sanding will still show. Rough corners will still feel rough. Uneven gaps will still wave at you from across the room. Take the extra time before finishing, because once paint goes on, every flaw suddenly gets promoted to management.
For pet owners, this project can be surprisingly emotional. A wood gate lets your dog see the family without being underfoot. It creates boundaries without making the room feel closed off. Dogs often accept a visible barrier better than a closed door because they can still supervise important human activities, such as cooking, folding laundry, or opening a suspiciously crinkly bag.
For parents, the experience is different but equally practical. A good gate gives you a safer zone and a few extra seconds of control. It will not replace supervision, but it can reduce stress in busy moments. The best version is one that adults use consistently because it is easy to close. A gate that looks great but is annoying to latch will eventually be left open, and an open gate is just expensive wall decor.
The design also teaches restraint. It is tempting to add decorative X-braces, tiny shelves, cutout shapes, or extra rails. For a pet-only gate, some of those ideas may be fine. For a child gate, simple is safer. Vertical slats, strong framing, smooth edges, and secure mounting are more important than decorative gymnastics. The gate should be handsome, but it should not audition for a theme park.
One of the best practical tricks is to build the gate slightly lighter than you first imagine. Heavy wood feels strong in your hands, but once it is hanging from hinges, weight becomes a long-term problem. A lighter, well-joined frame can outperform a bulky gate that slowly sags. Strong does not always mean massive; it means well-designed.
Another useful lesson is to finish the gate before installation when possible. Painting around hinges and latch hardware is tedious. Finishing flat on a workbench gives cleaner results and fewer drips. After installation, you can do small touch-ups. This approach saves time and keeps you from crouching in a doorway wondering why you started a “quick weekend project” at 8 p.m.
Finally, the project proves that safety items can still have style. Families often accept ugly temporary solutions because they are busy, tired, and trying to keep everyone alive. Fair enough. But when a barrier becomes part of daily life, making it attractive can genuinely improve how the home feels. A Craftsman & Dutch Door inspired DIY baby/pet gate does its job while adding character, warmth, and a little handmade pride.
Conclusion
A Craftsman & Dutch Door inspired DIY baby/pet gate is a smart project for homeowners who want safety, function, and style in the same doorway. With strong hardware, careful measurements, smooth edges, vertical slats, and a finish that matches your home, this gate can look less like a temporary obstacle and more like a custom architectural detail.
Build it with the seriousness of a safety feature and the eye of a designer. Use hardware-mounted construction where strength matters, avoid climbable details, and choose the right location for a DIY solution. Done well, this gate keeps curious little explorers where they belong while making your home look like you planned it that way all along.
Note: This article is based on established child-safety guidance and practical home-improvement knowledge from reputable U.S. safety, parenting, woodworking, and home-design resources, including consumer safety agencies, pediatric safety organizations, and experienced DIY publishers. For stair-top installations or high-risk areas, use a certified hardware-mounted safety gate or consult a professional childproofing expert.