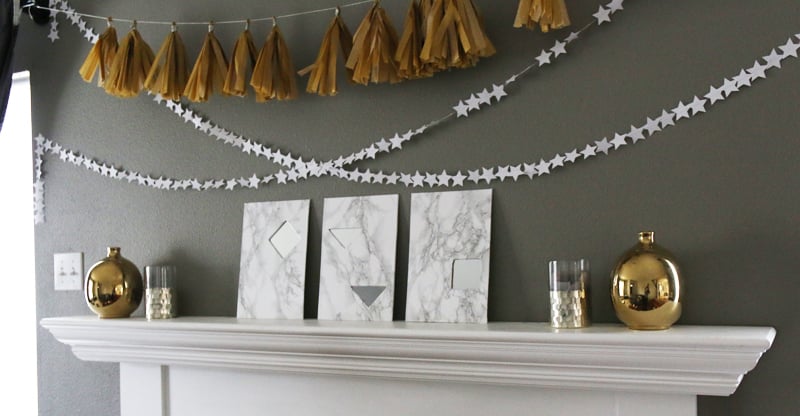
Some home upgrades politely whisper, “I have taste.” Others kick open the door wearing a silk robe and say, “Yes, this bathroom is basically a boutique hotel now.” A DIY marble mirror sits happily in the second camp. It gives a plain mirror a luxurious, stone-inspired frame without asking you to remortgage your house, hire a stone fabricator, or learn the emotional language of actual marble slabs.
The beauty of DIY marble mirrors is that they work in almost any space: bathrooms, bedrooms, entryways, powder rooms, vanity corners, dorm rooms, rental apartments, and that one hallway wall you keep pretending is “minimalist” when really it is just empty. With the right materials, you can create a marble-look mirror using peel-and-stick marble film, faux marble paint, marble tiles, resin, trim, or a combination of budget-friendly supplies.
This guide explains how to design, build, style, and troubleshoot your own marble mirror project. It blends practical home-improvement techniques with design principles used by decorators: scale, balance, contrast, finish, safety, and the sacred DIY law that says your first cut will somehow be 1/8 inch off unless you measure twice.
Why DIY Marble Mirrors Are So Popular
Marble has long been associated with luxury because it looks natural, cool, polished, and slightly dramaticlike it definitely owns a passport cover. Real marble, however, is heavy, expensive, porous, and not always practical for a lightweight wall mirror project. That is where marble-inspired DIY comes in.
A marble mirror can make a room feel brighter, cleaner, and more finished. Mirrors already reflect light and visually expand a space; adding a marble-style frame gives the mirror architectural weight. Instead of looking like a plain rectangle glued to the wall, it becomes a focal point. In a small bathroom, a marble frame can echo a marble vanity top. In an entryway, it can create a polished first impression. In a bedroom, it can soften the look of a basic dressing mirror.
The best part is flexibility. You can go classic with white Carrara-style veining, moody with black marble, warm with beige travertine tones, or bold with green, pink, or burgundy stone patterns. Your mirror can look sleek and modern, vintage and ornate, or playful and sculptural. Marble is the little black dress of surfacesexcept sometimes it is green, veiny, and stuck to plywood with adhesive.
Choosing the Right DIY Marble Mirror Method
Before buying supplies, decide what kind of marble effect you want. There are several reliable methods, and each has a different cost, skill level, and final look.
1. Peel-and-Stick Marble Film
Peel-and-stick marble contact paper or vinyl film is the easiest option for beginners. It works well on smooth wood, MDF, hardboard, laminate, or plastic trim. Many self-adhesive films are designed for furniture and decor projects, and some are water-resistant, which makes them useful for powder rooms or low-splash bathroom areas.
This method is affordable, fast, and renter-friendly when applied to a removable frame rather than directly to a wall or mirror. It is ideal if you want the marble look without paint fumes, grout, tile cutting, or a tiny existential crisis in aisle seven of the hardware store.
2. Faux Marble Spray Paint
Marble-effect spray paint creates irregular veining on frames, trays, panels, and decorative pieces. Some products are designed to imitate marble veining and are intended for interior use. The trick is to use light passes, keep the can moving, and test on cardboard first. Faux marble spray looks best over a clean base coat, such as white, cream, gray, or black.
This method is great for small mirrors, ornate thrift-store frames, and sculptural mirror projects. Use it outdoors or in a highly ventilated area, protect surrounding surfaces, and wear proper safety gear. Spray paint does not care about your favorite patio chair. It will decorate that too.
3. Real Marble Tile or Mosaic Tile
If you want genuine stone texture, use small marble tiles or marble mosaic sheets around a framed mirror. This creates a heavier, more premium result. It is also more demanding because stone requires layout planning, tile adhesive, possible cutting, spacing, sealing, and careful mounting.
This method works best for mirrors that will be supported by a sturdy backing board or installed securely into studs. It is less ideal for lightweight rental projects or mirrors hung with weak hardware. Real marble is gorgeous, but it is not known for being emotionally light.
4. Painted Faux Marble on Wood or MDF
Hand-painting a marble effect gives you maximum control. You can use acrylic paint, craft brushes, feathers, sea sponges, water mist, and clear sealer to build soft veins and cloudy depth. This method takes patience but can look surprisingly elegant if you layer thinly and avoid drawing veins that look like lightning bolts after three cups of coffee.
5. Clay, Resin, or Plaster Marble Frames
For a trendy organic mirror, build up the frame with air-dry clay, lightweight spackle, plaster, or resin, then paint or marbleize it. Wavy blob mirrors, scalloped mirrors, and irregular frames have become popular because they feel custom and artistic. A marble finish makes them look more grown-up and less like a craft table escaped supervision.
Supplies You May Need
Your exact supply list depends on the method, but most DIY marble mirror projects use a combination of the following:
- Plain mirror or old framed mirror
- Wood trim, MDF board, hardboard, or plywood backing
- Peel-and-stick marble vinyl or marble contact paper
- Mirror-safe construction adhesive
- Painter’s tape
- Measuring tape and pencil
- Level and speed square
- Miter saw, hand saw, or miter box
- Utility knife with sharp blades
- Squeegee, credit card, or smoothing tool
- Sandpaper in medium and fine grits
- Primer, paint, marble spray paint, or acrylic paints
- Clear protective sealer
- Safety glasses, gloves, and mask or respirator when painting
- Hanging hardware rated for the finished mirror weight
Planning the Design Before You Start
A successful DIY marble mirror begins before the first cut. First, measure the mirror. Write down the width, height, and thickness. Then decide whether the frame will sit on top of the mirror, around the mirror, or behind it as a support border.
For a bathroom vanity mirror, a frame mounted directly over the mirror edges is often easiest. For a decorative wall mirror, building a separate frame with a backing board may give a cleaner result. If the mirror is heavy, use mechanical hanging hardware such as a French cleat, D-rings, or a sturdy wire system rated for the weight. Adhesive can help secure trim, but it should not be the only thing standing between a heavy mirror and gravity’s bad attitude.
Also consider frame width. A narrow 1-inch marble border feels minimal and modern. A 2- to 3-inch frame looks more substantial and works well above a bathroom vanity. A 4-inch or wider frame becomes a statement piece and needs enough wall space so it does not overwhelm the room.
Step-by-Step: Easy Peel-and-Stick DIY Marble Mirror
This beginner-friendly version uses a plain mirror, lightweight trim or MDF strips, and marble contact paper. It is affordable, stylish, and achievable in a weekend.
Step 1: Clean the Mirror and Work Surface
Start with a clean, dry mirror and a dust-free work area. If you are working with an existing frame, wipe it down with a mild cleaner and let it dry completely. Adhesive vinyl sticks best to smooth surfaces free of dust, oil, old polish, and mystery bathroom residue that nobody wants to identify.
Step 2: Measure and Cut the Frame Pieces
Measure the top, bottom, and sides of the mirror. Cut your trim or MDF strips to size. You can use straight butt joints for a modern look or 45-degree miter cuts for a more traditional frame. Sand rough edges so the marble film wraps smoothly.
If your mirror has plastic clips, use thicker trim or add small notches on the back of the frame pieces so they sit flat. Another option is to replace bulky clips with low-profile mirror clips, but only do this if the mirror is still safely supported.
Step 3: Apply Marble Contact Paper
Cut marble film slightly larger than each trim piece. Peel back a small section of the backing, align the pattern, and press gradually. Use a squeegee or card to smooth bubbles as you go. Wrap the excess around the edges like you are wrapping a tiny luxury gift for your wall.
For the most realistic effect, keep the veining direction consistent across the frame. If the top piece has veins running left to right, make sure the side pieces do not suddenly look like they are fleeing the scene diagonally. Real marble has natural variation, but visual flow matters.
Step 4: Dry-Fit the Frame
Place all frame pieces around the mirror without adhesive. Check the corners, alignment, and pattern. This is the moment to fix gaps, trim edges, or reposition pieces. Once adhesive enters the chat, the project becomes less forgiving.
Step 5: Attach the Frame
Use a mirror-safe adhesive or construction adhesive suitable for the materials you are bonding. Apply it in small beads or strips to the back of the frame pieces, keeping adhesive away from visible edges. Press each piece into place, check with a level, and secure temporarily with painter’s tape while it cures.
Follow the adhesive manufacturer’s cure time. Do not rush this step. A frame that slides down overnight is not “abstract design.” It is a message from physics.
Step 6: Seal Edges if Needed
If the mirror will live in a bathroom, seal exposed seams lightly with clear silicone or a water-resistant clear sealer, depending on your materials. Avoid trapping moisture behind the frame. Good ventilation helps protect both the mirror backing and the frame finish.
Step-by-Step: Painted Faux Marble Mirror Frame
If you prefer a custom painted look, start with a wood, MDF, plastic, or thrifted frame. Remove the mirror if possible, or cover the glass carefully with painter’s tape and paper.
Step 1: Sand and Prime
Lightly sand glossy surfaces so primer can grip. Wipe away dust. Apply a primer suitable for your frame material. This is especially important for plastic, metal, or previously finished wood.
Step 2: Paint a Base Color
Choose a base color that matches your marble style. White creates a Carrara look. Cream feels warmer. Black creates a dramatic Nero Marquina effect. Soft gray is forgiving and modern.
Step 3: Add Veining
Use a fine brush, feather, sponge, or marble spray paint to create irregular veining. Real marble veins vary in thickness and direction. Keep some lines faint and others stronger. Blur edges with a damp sponge so the veins look embedded rather than drawn on top.
Step 4: Build Depth With Layers
Marble looks realistic when it has cloudy layers. Add diluted gray, beige, or taupe washes, then soften them with a sponge. Let each layer dry before adding more. The goal is depth, not chaos. If it starts looking like a thunderstorm in a cereal bowl, pause and blend.
Step 5: Seal the Finish
Finish with a clear protective topcoat. Use matte, satin, or gloss depending on your design. Gloss feels polished and stone-like, while satin looks softer and more contemporary.
Design Ideas for DIY Marble Mirrors
Classic White Marble Bathroom Mirror
Pair a white marble-look frame with chrome fixtures, white walls, and a simple vanity. This works beautifully in small bathrooms because it keeps the room bright while adding texture.
Black Marble Powder Room Mirror
A black marble frame with white veining creates instant drama. Add brass sconces or gold hardware for a bold, upscale look. This is especially effective in powder rooms, where guests can admire your DIY skills without knowing you did it while wearing pajama pants.
Green Marble Entryway Mirror
Green marble tones feel rich and unexpected. Use them with walnut furniture, woven baskets, cream walls, and warm lighting. A round mirror with a green marble border can make an entryway feel curated without needing much else.
Arched Marble Vanity Mirror
Arched mirrors soften hard bathroom lines. A marble-look arch frame can make a basic vanity feel custom. Use flexible trim, painted MDF, or a carefully cut backing board to create the shape.
Marble Tile Mosaic Mirror
For a tactile project, use small marble mosaic tiles around a square or rectangular mirror. Lay out the pattern first, especially at the corners. Herringbone, stacked, and alternating tile patterns all work, but neat spacing is what makes the project look intentional.
Common Mistakes to Avoid
The first mistake is using the wrong adhesive. Not every construction adhesive is safe for mirrors. Some formulas can damage the reflective backing. Choose a product labeled for mirrors or use adhesives recommended for glass and mirror applications.
The second mistake is ignoring weight. A marble tile frame can turn a lightweight mirror into a surprisingly heavy object. Always choose hanging hardware rated above the final weight, and anchor into studs when possible.
The third mistake is applying contact paper too quickly. Work slowly, peel the backing gradually, and smooth as you go. Most bubbles happen when enthusiasm outruns technique.
The fourth mistake is overdoing the marble pattern. Faux marble should have quiet areas and bold areas. If every inch has heavy veining, the frame may look busy rather than elegant.
The fifth mistake is forgetting the room. A DIY marble mirror should complement nearby finishes. If your vanity has strong granite, patterned tile, and busy wallpaper, choose a calmer marble frame. Design is a conversation, not everyone shouting “Look at my veins!” at once.
Safety Tips for DIY Marble Mirror Projects
Mirrors are glass, adhesives are chemicals, and spray paint is not scented air. Treat the project with respect. Wear eye protection when cutting tile, trim, or mirror-adjacent materials. Use gloves when handling sharp edges. If a mirror is cracked, replace it rather than building around a hazard.
When painting or using spray finishes, work outdoors or in a well-ventilated area. Protect nearby surfaces from overspray. Wear a mask or respirator suitable for paint fumes, and follow product labels. Keep paint, solvents, and adhesives away from flames, heaters, and children. DIY should end with a pretty mirror, not a family meeting about why the garage smells like a robot salon.
Budget Breakdown
A simple peel-and-stick marble mirror can cost as little as $20 to $60 if you already own the mirror. A painted faux marble frame may cost $30 to $90 depending on primer, paint, sealer, and tools. A real marble tile mirror may range from $75 to $250 or more depending on tile quality, frame size, adhesive, backing board, grout, and mounting hardware.
Compared with custom stone-framed mirrors or designer mirrors, DIY versions can save a significant amount of money. The tradeoff is time and patience. If you enjoy the process, that is part of the reward. If you do not enjoy the process, remind yourself that every gorgeous room has at least one project that made someone mutter into a measuring tape.
How to Style a DIY Marble Mirror
In a bathroom, pair marble mirrors with simple accessories: a ceramic soap dispenser, soft hand towels, a small vase, and warm lighting. Marble already has movement, so the surrounding decor can stay calm.
In an entryway, hang a marble mirror above a narrow console table. Add a tray for keys, a lamp, and one sculptural object. The mirror will bounce light while the marble frame adds polish.
In a bedroom, use a full-length marble-look mirror near a closet or dressing area. A white marble frame feels airy; a black marble frame feels modern; a beige marble frame feels warm and relaxed.
For a rental, build the marble frame as a removable overlay or use a lightweight framed mirror hung with approved hardware. Avoid permanent adhesives on landlord-owned fixtures unless you enjoy dramatic emails.
Real-Life Experience: What I Learned Making DIY Marble Mirrors
The first time you make a DIY marble mirror, you learn that marble contact paper is both a miracle and a tiny test of character. It looks innocent on the roll, all glossy and elegant. Then you peel back too much at once, and suddenly it has attached itself to your sleeve, the frame, and possibly your life choices. The best approach is to peel slowly, smooth constantly, and treat corners like delicate negotiations.
One practical lesson is that surface preparation matters more than people want to admit. A dusty frame will betray you. A glossy frame that has not been lightly sanded may reject paint like a cat rejecting a new bed. Cleaning, sanding, and priming feel boring, but they are the difference between “custom decor” and “craft project found in a humid garage.”
I also learned that faux marble looks better when you stop before you think you are finished. Heavy veining can turn cartoonish very quickly. Real stone has breathing room. It has quiet patches, soft clouds, and veins that wander naturally. If you are painting the marble effect by hand, step back often. Look at the frame from across the room. If it already looks good, put down the brush. The brush will try to convince you that one more line is necessary. The brush lies.
For bathroom mirrors, moisture is the sneaky villain. Even if the marble film is water-resistant, the seams and edges need attention. A tiny bead of clear sealant in vulnerable spots can help, but the bigger habit is wiping down splashes and keeping the room ventilated. A beautiful mirror deserves better than daily steam-room conditions unless it has been properly protected.
Another experience-based tip: choose your marble pattern based on the size of the frame. Large, dramatic veining looks amazing on a wide frame but can feel overwhelming on a narrow border. Small-scale veining works better for slim trim. If the pattern repeat is obvious, cut pieces strategically so the frame does not scream “I am vinyl!” from across the room.
Finally, do not underestimate lighting. A marble mirror under harsh cool bulbs may look flat or fake. Under warm, balanced lighting, the same mirror can look soft, dimensional, and expensive. Before judging your finished project, style the area, clean the glass, turn on the lights, and give it a proper reveal. Preferably with coffee. Every DIY deserves a tiny ceremony.
Conclusion
DIY marble mirrors are one of the smartest ways to add style, brightness, and a custom look to your home without paying custom-marble prices. Whether you use peel-and-stick marble film, faux marble paint, real tile, or a sculptural handmade frame, the key is planning carefully, using the right adhesive, respecting the mirror’s weight, and choosing a marble pattern that fits your room.
A marble mirror can make a basic bathroom feel polished, an entryway feel intentional, or a bedroom feel more refined. It is budget-friendly, flexible, and surprisingly satisfying. Just remember: measure twice, smooth slowly, ventilate when painting, and never challenge gravity with weak hardware. Gravity is undefeated.
Note: This article was created from practical DIY, home-improvement, decorating, adhesive, paint-safety, and interior-design guidance commonly recommended by reputable U.S. sources such as major home centers, design publications, paint manufacturers, and consumer safety resources.