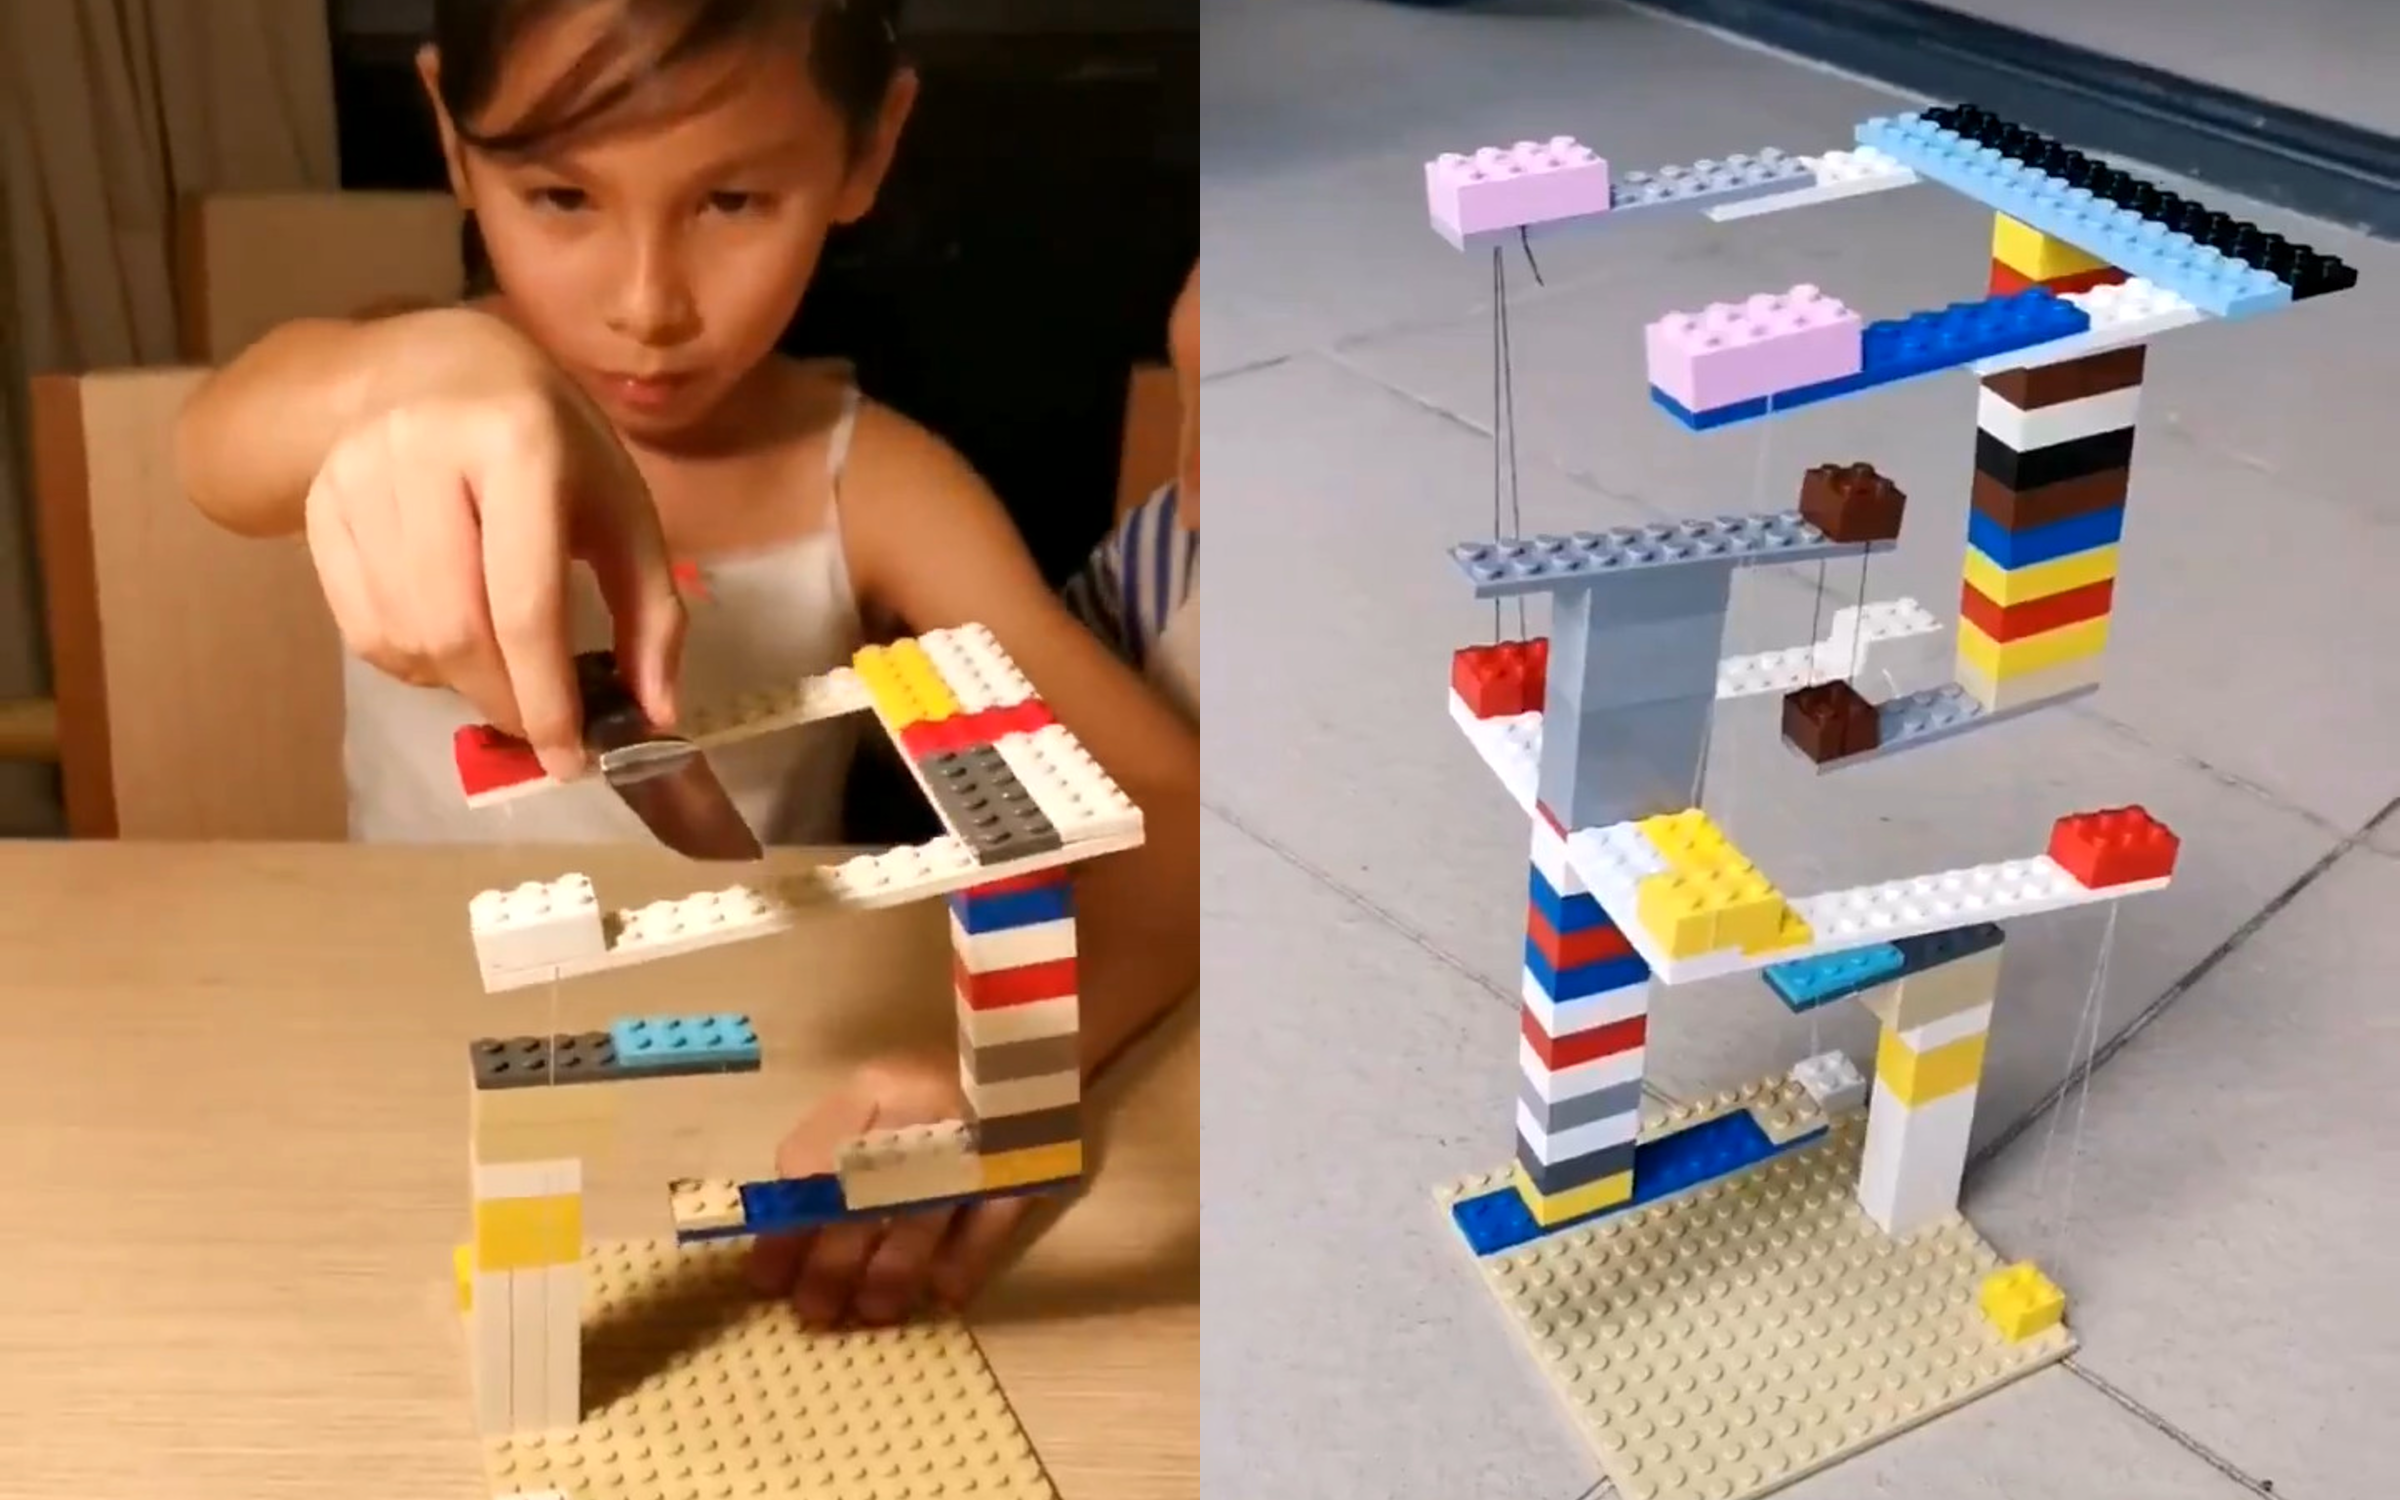
At first glance, a Lego tensegrity structure looks like the kind of thing that should make your physics teacher drop their coffee. A small platform appears to float in midair, held up by chains, strings, or rubber bands that seem far too flimsy to do the job. There are no solid legs underneath. No secret acrylic rod. No wizard hiding behind the bookshelf. Just LEGO bricks, a few flexible connectors, and a structural principle that makes your brain say, “Absolutely not,” while your eyes say, “Unfortunately, yes.”
That delightful confusion is exactly why a LEGO tensegrity structure has become such a popular STEM project. It is part engineering experiment, part optical illusion, and part humble reminder that strings are more useful than they look. Build one correctly, and the model can support a surprising amount of weight. Build one poorly, and it will collapse with the dramatic flair of a tiny plastic stage actor. Either way, you learn something.
In this guide, we will explore what a Lego tensegrity structure is, how it works, why it looks like magic, and how builders can use it to understand tension, compression, balance, torque, center of gravity, and design thinking. We will also look at practical tips, common mistakes, creative variations, and hands-on experiences that make this project more than just a neat desk toy.
What Is a Lego Tensegrity Structure?
A Lego tensegrity structure is a small model built with LEGO bricks and flexible elements such as string, chain, rubber bands, or LEGO-compatible links. The model usually has two main sections: a bottom base and a top platform. Instead of being held apart by rigid legs, the top platform is suspended and stabilized by tensioned connectors.
The word “tensegrity” comes from “tensional integrity.” In simple terms, it describes a structure that holds its shape because tension and compression are balanced. The rigid parts resist being squeezed or pushed together, while the flexible parts pull in carefully arranged directions. The result is a stable object that can appear to float.
In a LEGO version, bricks and beams act as the rigid compression elements. Chains, cords, or rubber bands act as the tension elements. When arranged properly, the top platform is pulled upward in one place and pulled downward or sideways in others. The forces balance out, and the model stands still. The science is real. The “floating” effect is just your brain being slightly dramatic.
Why Does It Look Like It Should Collapse?
Most of us expect tables, towers, shelves, and chairs to stand because solid legs push upward from the floor. A tensegrity model breaks that visual rule. The most important support is often a central hanging connection that pulls upward on the top platform. Around the edges, other strings or chains pull in opposite directions to stop the top from tipping.
This is what makes the LEGO tensegrity table so eye-catching. Your eyes see strings and assume weakness. But strings are excellent at one job: pulling. They cannot push, but they do not need to. In a tensegrity system, every flexible connector is placed so pulling is enough. The structure succeeds by assigning each part the job it is naturally good at doing.
The rigid LEGO sections keep their shape under compression. The tensioned connectors keep them positioned relative to each other. When the pulling forces are balanced correctly, the floating platform becomes stable. It may wiggle a little, especially if you poke it, but it returns to balance. That little wobble is not failure; it is part of the charm.
The Physics Behind the Floating LEGO Trick
Tension: The Pulling Force
Tension is the force carried by a stretched string, chain, cord, or rubber band. In a LEGO tensegrity structure, tension is the star of the show. The central connector usually pulls upward on the top platform, while the outer connectors pull downward or sideways to control rotation.
Think of the center chain as the model’s main support. It carries much of the weight of the top platform. The side chains are more like the responsible friends at a birthday party: they keep things from tipping, sliding, and becoming a mess.
Compression: The Pushing Force
Compression is the force that squeezes or pushes through rigid elements. In a LEGO build, the brick assemblies, Technic beams, plates, and frames handle compression. They provide shape and stiffness. Without them, you would just have a sad pile of string and optimism.
The magic of tensegrity is that the compression elements do not need to form normal vertical legs. They can be offset, angled, or separated as long as the tension network holds everything in position. This is why the model can look impossible while still obeying physics like a very polite engineering student.
Equilibrium: The Structure’s Secret Agreement
A stable LEGO tensegrity model is in equilibrium. That means the total forces and turning effects are balanced. The top platform is not accelerating upward, downward, or sideways. It is also not rotating. Every pull has a counteracting pull, and every tendency to tip is controlled by another force.
When you adjust the length of a chain or string, you change that balance. Shorten one side too much, and the platform tilts. Loosen one side too far, and the model flops. Tensegrity rewards patience, symmetry, and tiny adjustments. It also punishes “good enough” with immediate plastic embarrassment.
Basic Parts You Need
You do not need a rare collector’s set to build a LEGO tensegrity structure. A basic model can be made with common bricks, plates, Technic beams, hooks, and flexible connectors. The exact parts depend on your design, but the building principles stay the same.
| Part Type | Purpose | Helpful Tip |
|---|---|---|
| LEGO plates or bricks | Create the top and bottom platforms | Use wider bases for easier balance |
| Technic beams | Make stronger arms and frames | Great for precise connection points |
| Chains, string, or rubber bands | Provide tension | Keep lengths even and adjustable |
| Clips, hooks, or pins | Attach flexible elements | Secure connections prevent slipping |
| Small decorative bricks | Add style and theme | Do not overload the floating section too early |
How a Simple LEGO Tensegrity Model Is Usually Built
Most beginner LEGO tensegrity builds use two platforms. The lower platform has an upright arm that reaches toward the center. The upper platform has a downward arm that reaches toward the same area. These two arms do not touch. Instead, a central chain or string connects them. That central tension line helps hold the top platform up.
Then, additional chains or strings connect the outer corners of the top platform to the lower base. These side connectors pull downward and outward. Their job is to prevent the top platform from rotating around the center support. Without them, the top section would swing or flip like a tiny LEGO diving board.
The most important building rule is that the central connector and the side connectors must work together. If the center support is too long, the platform sags. If it is too short, the structure becomes hard to assemble and may pull itself apart. If the side supports are uneven, the model leans like it just heard bad news.
Why LEGO Is Perfect for Tensegrity Experiments
LEGO bricks are ideal for tensegrity because they make testing easy. You can change the height, widen the base, move connection points, swap flexible elements, or rebuild the entire model without glue, sawdust, or a long apology to the kitchen table.
LEGO also makes abstract physics visible. Tension, compression, torque, and center of gravity can sound intimidating in a textbook. In a LEGO tensegrity structure, those concepts become touchable. When one side is too loose, you see the tilt. When the center of gravity is poorly placed, you see the failure. When the strings are balanced, you see the platform float.
This makes the project especially useful for classrooms, homeschool STEM lessons, science fairs, maker clubs, and curious builders who enjoy projects that combine play with real engineering. It is not just “building a thing.” It is building a question and then solving it with plastic bricks.
Common Mistakes When Building a LEGO Tensegrity Structure
Using a Base That Is Too Small
A narrow base makes the model harder to balance. The wider the lower platform, the more forgiving the structure becomes. Beginners should start with a broad base, then try smaller or more dramatic designs after understanding the balance.
Making the Top Platform Too Heavy
Yes, it is tempting to decorate the floating platform with a dragon, a spaceship, three minifigures, and a snack stand. Resist the urge at first. Extra weight changes the forces and may pull the structure out of alignment. Start light, then add weight gradually.
Uneven String or Chain Lengths
Tensegrity structures are picky about length. A difference of even one chain link can make a small model lean. Adjustable connectors are helpful because they let you fine-tune the structure without rebuilding everything.
Weak Attachment Points
The flexible parts are constantly pulling on the LEGO frame. If the hooks or clips are not secure, the model may pop apart. Technic pieces are often useful because their holes and pins create stronger, more predictable connection points.
Design Variations for Creative Builders
Once you understand the basic LEGO tensegrity structure, you can start experimenting. A floating table is only the beginning. Builders have made tensegrity towers, platforms for minifigures, fantasy bridges, suspended spaceships, small display stands, and sculptures that look like they belong in a modern art museum where everything costs more than your bicycle.
One fun variation is the minifigure display stand. The floating platform can hold a superhero, astronaut, wizard, or tiny engineer looking very proud of themselves. Another option is a “floating island” scene with plants, rocks, and a little treasure chest. For a science fair, you can build multiple versions and compare how much weight each one supports before failing.
You can also experiment with different tension materials. LEGO chains look clean and are easy to count link by link. String gives more flexibility and can be adjusted with knots. Rubber bands add elasticity, which creates a bouncier structure but may also make the platform less steady. Each material teaches a slightly different lesson.
What Can a LEGO Tensegrity Structure Teach?
A LEGO tensegrity structure teaches more than one physics concept at a time. It shows that stability does not always come from solid supports directly underneath an object. It demonstrates how forces can balance across a system. It introduces torque because the platform must not rotate. It also encourages problem-solving because the first version rarely works perfectly.
For students, this project is a wonderful example of engineering design. You build, test, observe, revise, and test again. When it fails, the failure gives useful information. Did the top tilt? The side tension may be uneven. Did the whole model collapse? The central support may be too long or weak. Did the base lift off the table? The center of gravity may be outside the stable area.
This is the kind of learning that sticks because it is slightly annoying in the best possible way. The model does not care how confident you are. It only cares whether the forces balance. That makes it a very honest teacher.
Real-World Connections: From LEGO Bricks to Engineering
Tensegrity is not just a toy-building trick. The same general idea appears in art, architecture, robotics, biology, and space technology. Sculptors have used tensegrity to create works that seem airy and impossible. Engineers study tensegrity because it can produce lightweight structures that distribute forces efficiently.
NASA has explored tensegrity-inspired robots because flexible structures can absorb impacts and potentially move over rough terrain. In robotics, tensegrity designs are interesting because they combine rigid rods with flexible cables, creating machines that can deform without simply breaking. That is a fancy way of saying they can take a bump better than a stiff box on wheels.
There are also biological comparisons. In the human body, bones can be understood as compression elements while muscles, tendons, and connective tissues help manage tension. This does not mean your skeleton is secretly made of LEGO, although that would explain why stepping on bricks hurts so much. It does mean tensegrity is a useful way to think about how structures can be strong, flexible, and balanced at the same time.
Step-by-Step Thinking Before You Build
Before snapping bricks together, think about the structure as a force puzzle. Where will the top platform’s weight pull downward? Where will the central connector pull upward? Where will the side connectors pull to stop rotation? If you can answer those questions, your build is already halfway to success.
A good beginner plan is to create a lower base that is wider than the upper platform. Add a vertical or angled support arm on the base. Build a matching downward arm on the top section. Connect those two arms with a short chain or string. Then add three or four side connectors from the upper platform to the lower base. Adjust until the top platform rests level.
Do not expect perfection on the first try. Tensegrity models often need tiny changes. Move one attachment point outward. Shorten one chain. Add a plate to strengthen an arm. Remove extra decoration. Test again. The process is less like following a recipe and more like negotiating with gravity.
How to Make the Structure Stronger
To strengthen a LEGO tensegrity structure, start by improving the rigid frames. Use overlapping plates, Technic beams, or cross-bracing to reduce bending. A weak frame can flex too much, which changes the tension and makes the model unstable.
Next, improve the tension network. Use connectors that do not slip. Keep the side tension lines evenly spaced around the platform. Wider spacing gives better control over tipping. If the top platform twists, add another side connector or reposition the existing ones so they pull more evenly.
Finally, manage weight. Place heavier elements near the center of the top platform. If weight sits too far to one side, the center of gravity shifts and the model becomes harder to balance. A strong tensegrity model is not just about stronger parts; it is about smarter placement.
Why This Project Is So Satisfying
The best thing about a LEGO tensegrity structure is the moment it works. One minute you are holding a wobbly mess of bricks and chains. The next minute, the top platform hangs in place, hovering above the base as if it has discovered a loophole in the universe. It is a small victory, but it feels huge.
That moment is satisfying because the model reveals something surprising: stability can come from balance, not brute strength. You do not need massive supports. You need the right forces in the right places. That lesson applies far beyond LEGO. It is true in bridges, furniture, robots, classrooms, teams, and occasionally family road trips.
Hands-On Experiences With a LEGO Tensegrity Structure
Building a LEGO tensegrity structure is one of those projects that looks simple in a video and then immediately becomes personal when you try it yourself. The first experience many builders have is confusion. You copy the general shape, attach the chains, let go carefully, and the entire top platform slumps sideways like it has given up on its dreams. This is normal. In fact, it is almost a rite of passage.
The first big lesson is that symmetry matters, but perfect symmetry is not always obvious. Two chains may look the same length until the structure is under tension. Then one side tightens first, the other stays loose, and the platform tilts. Counting chain links helps. If you use string, marking equal lengths before tying knots can save time. Rubber bands are trickier because they stretch, so the structure may bounce and settle before finding balance.
The second lesson is that the center connector does more work than it appears to do. On a typical floating LEGO table, the middle chain or string carries the upward support for the top section. When that central line is too long, the model droops. When it is too short, assembling the side connectors becomes frustrating. The sweet spot is usually found through small adjustments, not heroic yanking. LEGO bricks are sturdy, but they do not appreciate being treated like gym equipment.
Another useful experience is testing load capacity. Once the structure stands, place small items on the top platform one at a time: a 2×4 brick, a minifigure, a small plate, or a lightweight toy accessory. Watch how the model reacts. If it sinks evenly, the main tension line is carrying the load. If it tilts, the weight may be off-center or the side tensions may be uneven. This turns the model into a tiny laboratory where every added brick is a data point wearing primary colors.
Group building adds another layer of learning. One person may focus on the base, another on the top platform, and another on tension connectors. When the model fails, everyone has a theory. The builder who blames “bad gravity” is usually wrong, but emotionally understandable. The best teams slow down and observe. Which connector goes slack? Which side lifts? Which beam bends? Those clues point to the fix.
Decorating the finished structure is also part of the fun. A plain tensegrity table is impressive, but a themed one becomes memorable. You can build a floating garden, a mini space station, a magical platform, or a superhero landing pad. The key is to add decorations gradually. A beautiful model that instantly collapses is still educational, but it is less fun to display.
The final experience is the proud demonstration. You call someone over, place the model on the table, and wait for the reaction. Most people lean closer. Some look underneath. A few accuse you of cheating, which is basically applause in STEM form. Then you explain tension and compression, and suddenly a pile of LEGO pieces becomes a conversation about real engineering. That is the real success of the project: it makes physics visible, playful, and surprisingly charming.
Conclusion
A Lego tensegrity structure is more than a clever floating-table trick. It is a compact, colorful demonstration of how tension and compression can work together to create stability. By using LEGO bricks for rigid elements and chains, strings, or rubber bands for tension, builders can explore real engineering principles in a playful and memorable way.
The model looks impossible because it challenges our everyday expectations about support. We expect legs. Instead, we get balanced pulling forces. We expect stiffness. Instead, we get stability through tension. We expect a toy. Instead, we get physics wearing a LEGO disguise.
Whether you are building for a classroom lesson, a science fair, a display shelf, or pure curiosity, a LEGO tensegrity structure is a rewarding project. It invites experimentation, celebrates failure as feedback, and delivers that wonderful “wait, how is that standing?” moment every good STEM activity should have. Gravity still wins in the end, of course. But with the right design, you can make it work a little harder.
Note: This article is written as original, publish-ready HTML content based on real physics, LEGO education concepts, maker-building practices, and engineering examples of tensegrity structures.