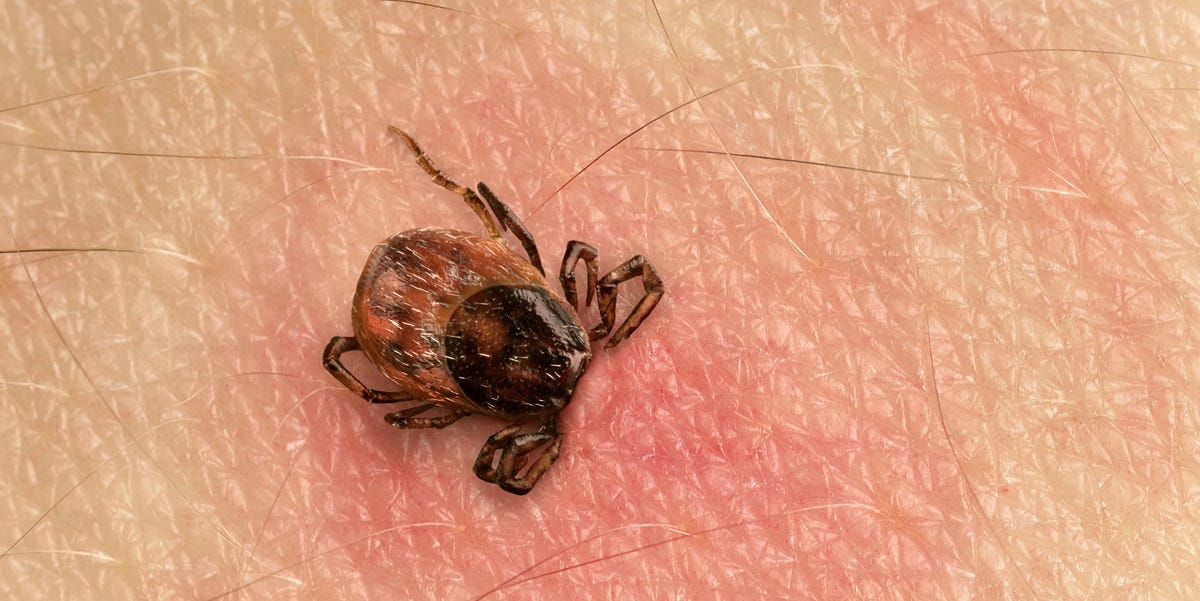
Finding a tick attached to your skin is one of those tiny outdoor surprises that instantly turns a peaceful hike into a full-body inspection worthy of airport security. The good news: removing a tick is usually simple. The not-so-good news: doing it the wrong way can increase irritation, leave parts behind, or delay the one thing that matters mostgetting the tick off your body quickly and cleanly.
Doctors and public health experts generally agree on the safest tick removal method: use fine-tipped tweezers, grasp the tick as close to the skin as possible, pull upward with steady pressure, clean the bite area, and monitor yourself for symptoms afterward. No matches, no petroleum jelly, no nail polish, no “let’s scare it out” tricks. A tick is not a raccoon in your trash can; it does not need negotiation.
This guide explains how to remove a tick the right way, what mistakes to avoid, when to call a doctor, and how to reduce your risk of tick bites in the future.
Why Proper Tick Removal Matters
Ticks are small blood-feeding parasites that can attach to people and animals after contact with grass, brush, wooded areas, leaf litter, or even backyard edges where wildlife passes through. Many tick bites are harmless, but some ticks can spread illnesses such as Lyme disease, anaplasmosis, ehrlichiosis, babesiosis, Rocky Mountain spotted fever, tularemia, and alpha-gal syndrome.
The risk depends on several factors: the type of tick, where you live or traveled, how long the tick was attached, whether it was engorged, and whether that tick species commonly carries disease in your region. Because the risk can rise the longer a tick stays attached, prompt removal is the first and most important step.
That does not mean you should panic. Panic makes people do strange things, such as grabbing a lighter or coating the tick in butter like it is a baked potato. The correct method is calmer, faster, and much less dramatic.
How to Remove a Tick the Right Way
Step 1: Get the Right Tool
Use clean, fine-tipped tweezers if you have them. These allow you to grasp the tick close to the skin without squeezing its body. If you do not have fine-tipped tweezers, regular tweezers are better than waiting for hours. A dedicated tick removal tool can also work when used according to its instructions.
Avoid using bare fingers when possible. If you must use your fingers because you are outdoors without tools, protect your hand with a tissue, paper towel, glove, or plastic bag. Then wash your hands thoroughly afterward.
Step 2: Grasp the Tick Close to the Skin
Place the tweezers as close to the skin’s surface as possible and grip the tick near its mouthparts, not around its swollen body. The goal is to remove the tick in one piece without crushing it.
Do not pinch your skin hard. You are not trying to win a wrestling match. You are trying to get a tiny, stubborn hitchhiker off your body with the least amount of fuss.
Step 3: Pull Upward With Steady, Even Pressure
Pull straight upward using slow, steady pressure. Do not twist, jerk, wiggle, or yank suddenly. Twisting may cause the mouthparts to break off and remain in the skin.
If the tick does not release immediately, keep steady pressure for a moment. Ticks can hold on firmly, but a careful upward pull usually works. Once the tick is out, place it somewhere secure until you decide whether to save it, photograph it, or dispose of it.
Step 4: Clean the Bite Area and Your Hands
After removing the tick, clean the bite area with rubbing alcohol or soap and water. Wash your hands as well. You can apply a small bandage if the spot is irritated or likely to rub against clothing.
A little redness or itching can happen after a bite and may not mean infection. However, the area should gradually calm down. If redness expands, pain increases, pus appears, or you develop fever or flu-like symptoms, contact a healthcare provider.
Step 5: Dispose of the Tick Safely
You can dispose of a tick by placing it in alcohol, sealing it in a bag or container, wrapping it tightly in tape, or flushing it. Some doctors recommend saving the tick in a sealed bag or container for a short time, especially if you are in a Lyme disease area or if symptoms appear later. A clear photo of the tick can also help with identification.
Do not crush a tick with your fingers. It is unpleasant, unnecessary, and generally a poor life choice.
What Not to Do When Removing a Tick
Tick removal has attracted a surprising number of home remedies, many of which sound like they were invented during a camping trip with no cell service. Doctors advise against these methods because they can delay removal or irritate the tick.
Do Not Use Petroleum Jelly
Smothering a tick with petroleum jelly is not recommended. It may not make the tick detach quickly, and the delay gives the tick more time attached to your skin.
Do Not Use Nail Polish
Painting a tick with nail polish is another myth. It does not reliably remove the tick and may make the situation messier. Your skin is not a craft project.
Do Not Use Heat or a Lit Match
Using a hot match or flame can burn your skin and may irritate the tick. It is also difficult to do safely, especially on children, pets, or hard-to-see areas. Skip the fire. This is first aid, not a survival show.
Do Not Twist or Squeeze the Tick
Twisting can break off the mouthparts, and squeezing the tick’s body can increase the chance of fluids entering the bite area. Use controlled upward pressure instead.
What If Part of the Tick Stays in the Skin?
Sometimes tiny mouthparts remain in the skin after removal. If you can easily remove them with clean tweezers, you may do so. If they are deeply embedded or difficult to grasp, do not dig aggressively. The skin often pushes small fragments out naturally as it heals.
Watch the area for signs of infection such as increasing redness, swelling, warmth, pain, drainage, or red streaks. If you are concerned, or if the bite is in a sensitive area such as near the eye, call a healthcare provider.
When to Call a Doctor After a Tick Bite
You should contact a doctor if you develop symptoms after a tick bite, especially within the next several days to weeks. Symptoms that deserve medical attention include fever, chills, headache, fatigue, muscle aches, joint pain, swollen lymph nodes, or a new rash.
A Lyme disease rash may appear as a bull’s-eye pattern, but it does not always look that way. It may be solid red, oval, expanding, warm, or darker than the surrounding skin. On darker skin tones, redness may be harder to see, so changes in texture, warmth, tenderness, or a spreading patch matter too.
Seek prompt medical care if you develop a spreading rash, severe headache, stiff neck, facial drooping, heart palpitations, dizziness, shortness of breath, weakness, confusion, or intense illness after a tick bite. Some tick-borne illnesses are easier to treat when caught early.
Do You Need Antibiotics After a Tick Bite?
Not every tick bite requires antibiotics. In some cases, a doctor may consider a preventive single dose of doxycycline for Lyme disease after a high-risk bite. This decision usually depends on whether the tick is likely a blacklegged tick, whether you were in an area where Lyme disease is common, whether the tick was attached long enough to be engorged, whether treatment can begin within 72 hours of removal, and whether doxycycline is safe for the person.
Do not start leftover antibiotics or borrow someone else’s medication. That can cause side effects, allergic reactions, and treatment problems. If you are worried, call your doctor, urgent care, or a local health department for guidance.
How Long Should You Watch the Bite?
Monitor the bite area and your general health for at least 30 days. Take a photo of the bite on the day you remove the tick, then compare it over time if anything changes. This is especially helpful because memory is unreliable. Yesterday’s “tiny red dot” can become today’s “Was it always the size of a pancake?” mystery.
Write down the date the tick was removed, where on your body it was attached, where you may have picked it up, and whether it looked flat or engorged. These details can help a healthcare provider assess risk if symptoms develop.
How to Check Yourself for Ticks
After spending time outdoors, do a full-body tick check. Ticks like warm, hidden areas, so inspect behind the ears, along the hairline, under the arms, around the waist, behind the knees, between the legs, inside the belly button, and around sock lines. For children, check the scalp carefully.
Showering soon after coming indoors may help wash away unattached ticks and gives you a good opportunity to inspect your skin. Also check pets, backpacks, jackets, and outdoor gear because ticks are excellent at catching a free ride indoors.
How to Prevent Tick Bites
Use EPA-Registered Repellent
When going into tick-prone areas, use an EPA-registered insect repellent according to the label. Common active ingredients include DEET, picaridin, IR3535, oil of lemon eucalyptus, PMD, and 2-undecanone. Follow age recommendations and avoid applying repellent to children’s hands, eyes, or mouths.
Treat Clothing and Gear With Permethrin
Permethrin can be used on clothing, boots, socks, tents, and gear, but not directly on skin. You can also buy pre-treated clothing. Let treated items dry fully before wearing them and follow the product instructions carefully.
Dress Like You Mean Business
Wear long sleeves, long pants, and closed-toe shoes in brushy or wooded areas. Tuck pants into socks if you are walking through tall grass. Yes, it is not a runway look. But ticks are not fashion critics, and that is the point.
Stay in the Center of Trails
Ticks often wait on grasses and shrubs for a host to brush past. Staying in the center of trails and avoiding tall grass, leaf litter, and dense brush can reduce exposure.
Make Your Yard Less Tick-Friendly
Keep grass mowed, remove leaf piles, clear brush near walkways, and create barriers of wood chips or gravel between lawns and wooded edges. Keep play equipment and patio furniture away from dense vegetation when possible.
Special Situations: Kids, Pets, and Hard-to-Reach Areas
Children may be nervous when they see a tick, so stay calm and explain what you are doing. Use steady hands, good lighting, and fine-tipped tweezers. If the tick is near the eye, inside the ear, in the genital area, or somewhere difficult to access safely, it is reasonable to seek medical help.
Pets can bring ticks indoors, even if the tick later attaches to a person. Check dogs and outdoor cats after walks or yard time, especially around the ears, collar, toes, tail, and belly. Ask a veterinarian about tick prevention products that are appropriate for your pet.
Common Tick Removal Questions
Can I Use My Fingers to Remove a Tick?
Tweezers are preferred. If fingers are your only option, use a tissue or glove and grasp as close to the skin as possible. Clean your hands and the bite area afterward.
Should I Get the Tick Tested?
Tick testing may identify what organisms are in the tick, but it does not prove that you were infected. Medical decisions are usually based on symptoms, location, tick type, attachment time, and clinical judgment. Saving the tick or taking a photo can still be useful for identification.
What Does an Engorged Tick Mean?
An engorged tick has fed and appears swollen. This can suggest it was attached longer than a flat tick. If the tick looked engorged and you are in an area where Lyme disease is common, call a healthcare provider for advice.
Is a Small Red Bump Normal?
A small bump or mild redness soon after a tick bite can be a local skin reaction. A rash that expands over days, becomes large, or appears with fever, headache, fatigue, or body aches should be evaluated.
Real-Life Experiences: What Tick Removal Teaches You
The first lesson many people learn from a tick bite is that ticks do not announce themselves. There is usually no dramatic sting, no villain music, no tiny tap on the shoulder. You may only notice one during a shower, while changing clothes, or when scratching what feels like a speck of dirt that refuses to leave.
One common experience is the post-hike bathroom inspection. You return from a beautiful trail, proud of your steps, your fresh air, and your “nature is healing” attitude. Then you spot a tiny dark dot behind your knee and suddenly become a detective, dermatologist, and amateur wildlife biologist in under ten seconds. This is exactly when knowing the right method helps. Instead of panicking, you grab tweezers, remove the tick steadily, clean the area, and write down the date. Calm beats chaos.
Parents often describe a different challenge: removing a tick from a squirming child. The child is worried, the adult is trying to look confident, and the tick is contributing nothing positive to the family atmosphere. In that moment, simple language helps: “I’m going to use tweezers, pull it straight out, clean the spot, and then we’ll keep an eye on it.” A small reward afterward does not hurt either. Tick removal may not be fun, but bravery deserves recognition.
Another familiar scenario happens with pets. A dog runs through tall grass, returns delighted with life, and later a tick appears on the human couch inspector. Many people discover that tick prevention is not just about the person who hikes; it is about everyone and everything that comes back indoors. Checking pets, shoes, socks, backpacks, and blankets can become part of the outdoor routine, like locking the door or bringing water.
People who live in tick-heavy regions often develop habits that seem intense until they work. They keep tweezers in a first-aid kit, wear light-colored socks on hikes, toss outdoor clothes into a hot dryer, shower after yardwork, and check ankles before bed. It may sound like overkill, but it is really just a rhythm. The goal is not to fear the outdoors. The goal is to enjoy it without donating blood to a sesame-seed-sized freeloader.
A tick bite can also teach humility. Many smart adults have tried old tricks passed down from relatives: petroleum jelly, nail polish, peppermint oil, or heat. Those methods stick around because they sound clever. But medical guidance is clear: remove the tick promptly with tweezers. The simplest method wins.
The biggest takeaway from real-life tick encounters is preparation. When you know what to do, a tick bite becomes manageable instead of terrifying. You remove it, clean the area, monitor your health, and call a doctor if warning signs appear. That practical confidence is worth carrying into every hike, camping trip, backyard cleanup, and summer picnic.
Conclusion
Removing a tick the right way is straightforward: use fine-tipped tweezers, grasp the tick close to the skin, pull upward with steady pressure, clean the bite area, and watch for symptoms. Avoid petroleum jelly, nail polish, heat, twisting, or squeezing. If you develop a spreading rash, fever, fatigue, headache, muscle aches, joint pain, or other concerning symptoms after a tick bite, contact a healthcare provider.
Ticks are part of outdoor life, but they do not have to ruin it. With a little prevention, a good tick check, and the correct removal technique, you can enjoy the woods, yard, trails, and parks with more confidenceand fewer tiny uninvited passengers.
Medical note: This article is for general educational purposes and is not a substitute for professional medical advice. If you are unsure about a tick bite, have symptoms, are pregnant, are caring for a young child, or have a weakened immune system, contact a qualified healthcare provider.