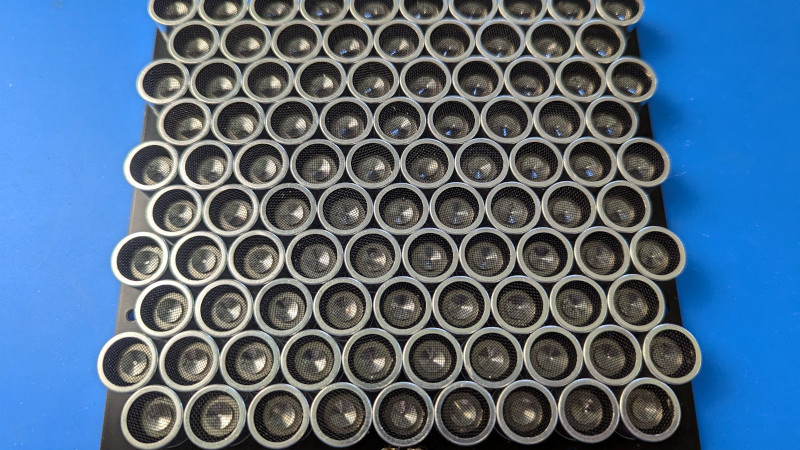
Most speakers are social butterflies. Put one on a shelf, press play, and sound immediately starts mingling with everyone in the room. It bounces off walls, sneaks under doors, annoys coworkers, wakes dogs, and somehow reaches the one person who hates your playlist most. A parametric speaker is different. It is the introvert of the audio world: focused, narrow, and oddly dramatic.
A parametric speaker, also called an ultrasonic directional speaker or parametric array loudspeaker, sends audio in a tight beam instead of spraying it everywhere. The trick is wonderfully weird. Instead of pushing audible sound directly like a normal cone speaker, it modulates audio onto an ultrasonic carrier, often around 40 kHz, then lets the nonlinear behavior of air convert part of that ultrasonic energy back into audible sound. In plain English: you shout into a frequency humans cannot hear, and the air politely translates it later.
Building one at home is possible, especially for electronics hobbyists comfortable with microcontrollers, MOSFETs, soldering, oscilloscopes, and the occasional “why is that part hot enough to toast a bagel?” moment. This guide explains how a DIY parametric speaker works, what parts you need, what design choices matter, and how to avoid the most common mistakes.
What Is a Parametric Speaker?
A parametric speaker is a highly directional audio device that uses ultrasonic transducers to create a narrow beam of sound. Unlike conventional speakers, which move air at audible frequencies, a parametric speaker uses ultrasound as the carrier. The audible information rides on that ultrasonic wave through amplitude modulation, pulse-width modulation, or more advanced signal-processing methods.
When the ultrasonic beam travels through air, tiny nonlinear effects occur. Air does not behave like a perfectly obedient medium at high sound pressure levels. The waveform changes shape as it moves, and those changes generate lower-frequency components. Those lower-frequency components are the audio you hear.
The result feels almost magical the first time you test it. Stand in the beam and you hear the sound. Step aside and it drops dramatically. Aim it at a wall and the wall may seem to become the sound source. It is not quite a laser, despite the popular nickname “audio laser,” but it is directional enough to make a normal Bluetooth speaker look like it has no boundaries and poor manners.
How Parametric Speakers Work
The Ultrasonic Carrier
Most DIY parametric speaker projects use 40 kHz ultrasonic transducers because they are cheap, available, and commonly used in distance sensors. Humans generally hear up to roughly 15–20 kHz depending on age and hearing ability, so 40 kHz sits safely above normal audibility. “Safely” here means “inaudible,” not “you can blast it into your ear like a tiny invisible trumpet.” Respect the hardware.
The carrier is a high-frequency signal. Your audio is then imposed on that signal. A simple project may use amplitude modulation, where the strength of the 40 kHz wave changes in step with the music or speech. More refined systems use DSP correction, single-sideband modulation, equalization, pre-distortion, and careful filtering to improve clarity and reduce distortion.
The Transducer Array
One ultrasonic transducer is not enough for a satisfying parametric speaker. You need an array: many transducers mounted in a flat panel, all working in phase. Common hobby builds use 39, 48, 64, 95, or even more ultrasonic emitters. More elements generally mean more output and a more useful beam, but also more current draw, more heat, more solder joints, and more opportunities to discover new vocabulary.
Phase alignment matters. If half your transducers push while the other half pull, the array fights itself. Output drops, beam shape gets messy, and the project starts sounding like a ghost trapped in a calculator. Before soldering dozens of emitters permanently, test polarity and orientation. Some transducers from the same batch may not be marked consistently, so verify them instead of trusting printed signs like they came down from Mount Engineering.
Air as the Demodulator
In a radio, an electronic detector pulls audio off a carrier wave. In a parametric speaker, the air performs part of that job. The ultrasonic wave self-demodulates as it travels. This is why the sound can seem to form at a distance rather than directly at the face of the transducer panel.
This effect also explains why parametric speakers behave differently from normal speakers. Bass response is limited, distortion can be noticeable, and output depends heavily on drive level, modulation method, array size, and room reflections. A parametric speaker is excellent for speech, alerts, museum-style narration, interactive installations, kiosks, targeted messaging, and “listen to this only if you stand right here” experiments. It is not the best choice for hosting a subwoofer party unless your party guests are ants with PhDs.
Parts You Need to Build a DIY Parametric Speaker
A basic parametric speaker can be built with a surprisingly short parts list, but quality depends on the details. Here is a practical overview:
1. Ultrasonic Transducers
Choose 40 kHz ultrasonic transmitters, preferably from the same model and supplier. Plastic-housing transducers are often easier to work with because metal housings can create grounding or shorting problems depending on the PCB design. Use enough elements to make the project worthwhile. For a first serious build, 48 to 96 transducers is a reasonable range.
2. Microcontroller or Signal Generator
You need something that can generate a stable ultrasonic carrier and modulate it with audio. An STM32, ESP32, RP2040, or similar microcontroller can work if the firmware is designed properly. Some builds use a 555 timer for the carrier and analog audio modulation, but a microcontroller gives more flexibility.
3. Audio Input Stage
The audio can come from a phone, Bluetooth receiver, DAC, computer, or small preamp board. Keep levels controlled. Clipping at the input becomes ugliness at the output. Speech is easier to reproduce clearly than full-range music, so test with spoken voice before blaming the universe for your muddy guitar solo.
4. H-Bridge or Power Driver
The transducer array needs more drive than a microcontroller pin can provide. A full-bridge or half-bridge driver switches the ultrasonic signal at useful voltage and current levels. MOSFETs must be chosen for switching speed, voltage rating, current handling, and heat performance. Gate drivers are strongly recommended for cleaner switching.
A common DIY mistake is connecting a large piezo array to an under-designed driver and assuming “it is just ultrasound, what could go wrong?” What goes wrong is heat. MOSFETs get hot, waveforms get ugly, transducers whine, and the project becomes a smoke machine with educational value.
5. Power Supply
Start conservatively. A 12 V supply is safer for early testing than jumping straight to higher voltages. Advanced builds may use 24 V, 36 V, or more, but higher voltage increases acoustic output, component stress, and safety concerns. Use current limiting during first power-up.
6. PCB or Mounting Panel
You can wire transducers by hand, but a PCB makes alignment, polarity, and reliability much better. Keep wiring short and symmetrical. The array should be physically flat, with transducers facing the same direction and mounted consistently.
7. Test Equipment
An oscilloscope is not optional if you want to understand what is happening. A multimeter, current-limited bench supply, thermal camera or infrared thermometer, and a microphone setup are also helpful. Ordinary phone microphones may not capture ultrasound accurately, but they can still help evaluate audible output.
Step-by-Step Build Plan
Step 1: Decide the Goal
Before buying parts, decide what you want the speaker to do. A desktop speech beam for a demo is different from a long-range outdoor device. For a beginner-friendly project, aim for clear speech at a few meters indoors. That goal is realistic, useful, and less likely to turn your workspace into a questionable acoustic laboratory.
Step 2: Select the Array Size
A small 16-element array is educational but weak. A 48-element array is a better starting point. A 95-element array can produce a stronger beam but requires more careful driving and thermal management. Bigger is not automatically better unless your electronics can handle it.
Step 3: Test and Match Transducers
Use a known reference transducer and receiver to verify polarity. Feed a 40 kHz signal to each transmitter and compare phase with the reference. Mark polarity clearly. This step is tedious, but skipping it is like assembling furniture by intuition and then wondering why your bookshelf has a limp.
Step 4: Build the Driver on a Small Scale
Do not connect the entire array first. Test the driver with one transducer, then four, then a small group. Watch the waveform, current draw, and MOSFET temperature. Verify that the carrier frequency is stable and that modulation changes the ultrasonic output as expected.
Step 5: Add Audio Modulation
Begin with a simple tone or speech sample. Music is harder because parametric speakers are not naturally full-range. If you start with bass-heavy music, the device may sound like a robot narrating from inside a soup can. Voice is more forgiving and reveals intelligibility quickly.
Step 6: Connect the Full Array
Once the driver behaves properly, connect the full transducer panel. Use a current-limited supply and increase voltage gradually. Check heat after short runs. If MOSFETs, regulators, or transducers become too hot, stop and redesign the driver or reduce drive level.
Step 7: Aim, Listen, and Measure
Test the beam in a quiet room. Stand directly in front of the speaker, then step sideways. Aim it at a wall and listen for reflected sound. Try different distances. Record observations. You are not just building a gadget; you are learning how sound behaves when it has been given a very narrow hallway and a tiny megaphone.
Design Tips for Better Sound
Use Speech-Friendly Equalization
Parametric speakers naturally struggle with deep bass. Instead of forcing them to reproduce everything, shape the audio for clarity. Boosting speech presence carefully can make narration more understandable. Cutting low-frequency content reduces wasted modulation and distortion.
Keep the Carrier Clean
A sloppy carrier creates sloppy output. Use stable timing, good gate drive, short traces, proper decoupling, and clean power. Switching edges should be fast enough to drive the piezo elements efficiently but controlled enough to avoid unnecessary ringing and electromagnetic noise.
Avoid Overdriving the Array
More voltage can produce more audible sound, but it also creates more distortion, heat, and potential safety concerns. If your device only sounds good when driven to the edge of destruction, the design needs improvement, not encouragement.
Consider Pre-Distortion
Because air demodulation is nonlinear, professional systems often use signal processing to compensate for predictable distortion. Hobby builds can experiment with simple filtering and modulation curves. Even modest audio shaping can make speech cleaner.
Use a Rigid Mount
A wobbly array wastes energy and may introduce mechanical noise. Mount transducers in a rigid plate or PCB. Keep the front surface clean and avoid blocking the emitters.
Safety: The Boring Section That Keeps Your Ears Attached
Ultrasound is inaudible, which makes it easy to underestimate. Do not place your ear close to the array. Do not aim high-power ultrasonic beams at people or animals. Do not use a DIY parametric speaker for pranks, harassment, crowd control, or anything that requires the phrase “technically they cannot hear it.” That phrase is how bad ideas put on a lab coat.
Also remember that ultrasonic devices can produce audible subharmonics. These lower-frequency artifacts may be annoying or harmful if loud enough. If you hear whining, buzzing, or harsh tones, reduce output and inspect the design. Use hearing-safe practices, measure sound levels when possible, and keep tests short.
For public demonstrations, lower the power, keep distance, warn participants, and avoid continuous exposure. A parametric speaker is a fascinating educational project, not a license to become a villain with a soldering iron.
Common Problems and Fixes
The Sound Is Too Quiet
Check transducer polarity first. Then verify carrier frequency, drive voltage, modulation depth, and power supply current. If the array is small, expectations may be the problem. Parametric audio is inefficient compared with conventional loudspeakers, so a tiny build will not fill a room.
The MOSFETs Get Hot
Hot MOSFETs usually point to weak gate drive, excessive switching losses, insufficient dead time, poor layout, or too much capacitive load. Use a proper gate driver, choose MOSFETs with suitable gate charge and on-resistance, and add heat sinking if needed.
The Output Has a Loud Whine
Some transducers produce audible artifacts when overdriven or mounted poorly. Mechanical resonance, subharmonics, or driver distortion can also create audible noise. Reduce voltage, improve mounting, check waveform quality, and filter the audio input.
The Beam Is Not Directional
Verify that the transducers are in phase and physically aligned. A scattered array produces a scattered beam. Also test in a less reflective room. Hard surfaces can bounce the sound and make the beam seem wider than it really is.
Music Sounds Bad
That may be normal. Parametric speakers are often better at speech than music, especially in DIY form. Use equalization, reduce bass, and test with spoken audio. For music, expect “interesting science project,” not “studio monitor with invisible wizard beam.”
Where Parametric Speakers Are Useful
Directional speakers are popular in museums, retail displays, kiosks, interactive exhibits, libraries, healthcare spaces, and digital signage. The appeal is simple: deliver audio to one location without flooding the surrounding area. A museum can play narration for one painting while the next display remains quiet. A kiosk can speak to a customer without turning the entire store into a talking appliance convention.
DIY versions are great for science demonstrations, embedded audio experiments, art installations, robotics, accessibility prototypes, and acoustic research. They also teach valuable lessons about signal processing, nonlinear acoustics, PCB design, power electronics, thermal management, and the humbling fact that “it worked in the simulation” is not the same as “it survived the bench supply.”
DIY Experience: What It Feels Like to Build One
The first surprising thing about building a parametric speaker is how ordinary it looks before it becomes weird. At the start, it is just a board full of little ultrasonic cans, each one staring forward like a tiny metal audience waiting for a concert. You solder one row, then another, then another, and somewhere around transducer number forty-three you begin questioning your hobbies, your posture, and your relationship with flux.
The second surprise is that the project rewards patience more than bravery. A beginner’s instinct is to wire everything, crank the voltage, and see whether the sound beam appears like a sci-fi movie prop. A better approach is slower. Test one transducer. Test four. Test a row. Watch the waveform. Touch nothing hot. Smell nothing smoky. Celebrate boring results, because boring results mean the circuit is not trying to become modern art.
Phase matching is the part that feels least glamorous and most important. It is not visually exciting. Nobody gathers around and says, “Wow, look at that careful polarity verification.” Yet this is where much of the final performance is won or lost. When the emitters are aligned properly, the array starts behaving like one larger source instead of a crowd of tiny ultrasonic musicians all playing in different keys.
The first listening test can be underwhelming if expectations are too cinematic. You may not hear a thunderbolt of directional audio. Instead, you hear a thin voice that becomes clearer when you stand in the right spot. Then you step sideways and it fades. Aim it at a wall and the wall talks back. That is the moment the project becomes delightful. It feels less like a speaker and more like an acoustic flashlight.
Another practical lesson is that speech is your friend. Podcasts, announcements, tones, and voice clips make better early test material than music. Bass-heavy tracks are where optimism goes to be gently corrected by physics. A parametric speaker can reproduce music, but a DIY build often makes vocals and simple sounds shine first. Once speech is clean, you can experiment with equalization and modulation improvements.
Heat management is the teacher who does not smile. MOSFETs, regulators, and transducers can become warm quickly, especially with continuous operation. Short test bursts are wise. Current limiting is wise. Heat sinks are wise. Assuming “it will probably be fine” is not wise; that sentence has personally escorted many components into the afterlife.
The most satisfying part is aiming the beam. A normal speaker fills a space. A parametric speaker asks you to think geometrically. Where is the listener? What surfaces reflect sound? How narrow is the useful zone? Can you create a private listening spot at a desk, a doorway, or a display? Suddenly audio becomes something you point, not just something you play.
Building your own parametric speaker is not the easiest audio project, but it is one of the most memorable. It combines the personality of a radio transmitter, the discipline of a power electronics project, and the showmanship of a magic trick. When it finally works, you do not just hear the result. You move through it.
Conclusion
A DIY parametric speaker is a beautiful collision of acoustics, electronics, and controlled weirdness. By modulating audio onto an ultrasonic carrier and driving an in-phase array of transducers, you can create a narrow beam of sound that behaves very differently from a traditional loudspeaker. The build is approachable, but not careless. Good results require phase matching, a capable driver, clean modulation, thermal awareness, and respect for ultrasonic output.
For makers, students, artists, and audio experimenters, building a parametric speaker is more than a weekend gadget. It is a hands-on lesson in how sound can be shaped, aimed, and transformed by the air itself. Start small, test carefully, protect your hearing, and enjoy the moment when a flat panel of tiny ultrasonic emitters makes a wall whisper back.