Water is patient. It does not kick down the front door wearing tiny rain boots. It slips behind cladding, sneaks through hairline cracks, collects at foundation walls, and waits for the perfect moment to introduce itself as a brown stain, a musty smell, or a suspiciously squishy corner of drywall. That is why better waterproofing at the Cambridge House is not just a construction detail; it is the difference between a durable home and a very expensive sponge with windows.
The Cambridge House project offers a useful lesson for homeowners, renovators, and design lovers: waterproofing is not one product, one tube of caulk, or one heroic weekend with a ladder. It is a system. A good waterproofing strategy manages water at every stageroof runoff, wall drainage, flashing, siding, foundation protection, basement moisture, and long-term maintenance. The smartest homes do not pretend water will never arrive. They assume it will, then politely show it the exit.
In this guide, we will explore how better waterproofing works, why the Cambridge House approach matters, and what practical ideas homeowners can borrow for their own renovation projects. Whether you are dealing with a historic structure, a modern remodel, or a basement that smells like it has been keeping secrets since 1978, the goal is the same: move water away before it becomes a problem.
Why Waterproofing Matters More Than Most Homeowners Think
Waterproofing is often treated like the boring part of construction. It does not sparkle like a new kitchen, photograph well like a marble bathroom, or make guests say, “Wow, look at that drainage plane.” But it quietly protects everything else. Paint, trim, insulation, flooring, framing, and indoor air quality all depend on moisture control.
When water gets behind exterior cladding or collects around a foundation, it can create several problems at once. Wood can rot. Metal fasteners can corrode. Insulation can lose performance. Masonry can show efflorescence. Basements can become damp, and damp spaces can encourage mold growth if moisture is not corrected quickly. A small leak is rarely just a small leak; it is a tiny weather-related resignation letter from your building envelope.
Better waterproofing at the Cambridge House focuses on a bigger idea: buildings need layers of defense. The roof sheds rain. Gutters capture it. Downspouts discharge it away from the foundation. Flashing redirects water at vulnerable transitions. Drainage mats or rainscreens create an air gap behind cladding. Foundation drainage relieves hydrostatic pressure. Interior systems, such as sump pumps or dehumidifiers, provide backup where needed. Each part helps the next part do less work.
The Core Principle: Drainage Beats Hope
The most important concept in waterproofing is simple: do not trap water. Many building failures happen because water is allowed to enter an assembly but not allowed to leave. That is like inviting a raccoon into the attic and then acting surprised when it starts redecorating.
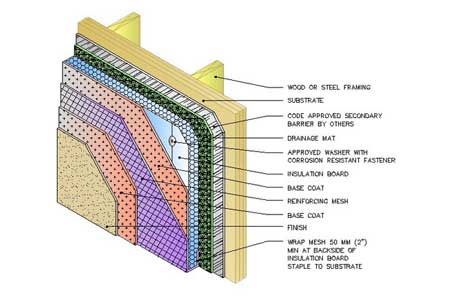
Behind exterior siding, especially in climates with wind-driven rain, water can pass through tiny gaps around joints, trim, windows, fasteners, or penetrations. This does not always mean the cladding has failed. Most exterior cladding should be understood as the first line of defense, not the only line. A properly detailed wall assembly includes a water-resistive barrier, flashing, and a drainage path so that any water that gets behind the surface can drain out safely.
That is the idea behind a rainscreen-style approach. By creating a small gap behind the exterior cladding, builders allow air movement and drainage. This helps the wall dry faster and reduces the chance that moisture will sit against sheathing. At the Cambridge House, the waterproofing lesson is not “make the wall magically waterproof forever.” It is “build the wall so accidental water has a planned escape route.” Very polite. Very practical. Very un-glamorous in the best possible way.
Exterior Waterproofing Starts at the Roofline
Many basement and wall moisture problems begin far above the basement. Roof water that is not controlled will eventually land near the house. Once it reaches the ground, it can saturate soil, increase pressure against the foundation, and find the weakest entry point. The solution begins with the most basic exterior systems: gutters and downspouts.
Gutters and Downspouts Need to Do Their Job
Clean, properly sloped gutters are not optional decoration. They are part of the waterproofing system. If gutters overflow, leak, or pull away from the fascia, roof runoff can fall directly beside the foundation. Downspouts should discharge water several feet away from the house, ideally onto sloped grade or into an approved drainage system that does not dump water back against the foundation.
For homeowners, this is one of the highest-value maintenance tasks available. Cleaning gutters at least twice a year, checking seams, confirming downspout extensions, and making sure discharge points remain clear can prevent major headaches. It is not glamorous, but neither is explaining to your insurance adjuster why your basement carpet now has tides.
Grading Should Slope Away from the House
Good grading is another quiet hero. Soil around the foundation should slope away from the house so surface water moves outward instead of inward. Over time, backfilled soil around older homes can settle. Landscaping beds, patios, walkways, and driveways may also change drainage patterns. A beautiful flower bed that sends water toward the foundation is basically a betrayal with mulch.
At a house like the Cambridge House, where renovation quality matters, grading must be considered alongside architecture. Old homes often have complicated site conditions, tight setbacks, mature landscaping, and previous repairs layered like geological history. That makes water management even more important. The goal is not just to patch symptoms but to understand where water comes from and where it should go.
Waterproofing Behind Cladding: The Hidden Work That Saves the Wall
One of the smartest waterproofing ideas is accepting that exterior cladding will not stop every drop forever. Siding, shingles, stucco, brick veneer, and trim all need proper backup systems. Behind the visible surface, builders use materials and details that direct water downward and out.
Water-Resistive Barriers
A water-resistive barrier, often called a WRB, is installed behind cladding to protect sheathing from liquid water. It must be layered correctly, with upper pieces overlapping lower pieces so water drains shingle-style. Think of it like roofing logic applied vertically. If seams are reversed, water may run behind the barrier instead of over it, which is the building-science equivalent of wearing a raincoat inside out.
Flashing at Openings and Transitions
Windows, doors, roof-wall intersections, decks, balconies, pipes, vents, and trim transitions are common leak points. Flashing must guide water out and away. Kick-out flashing, sill pans, drip caps, and properly taped penetrations all matter. A beautifully installed window with poor flashing is still a leak wearing makeup.
Rainscreen Gaps and Drainage Mats
Rainscreen assemblies provide a drainage and drying space behind cladding. This gap can be created with furring strips, drainage mats, or specialized products depending on the siding type and design. The purpose is to prevent trapped moisture and allow the wall assembly to dry. In climates with frequent rain, coastal humidity, or shaded walls, that drying potential can make a major difference.
Foundation Waterproofing: Managing Pressure Before It Pushes In
Foundation waterproofing is where homeowners often learn a new phrase: hydrostatic pressure. In plain English, this is the force created when water builds up in soil around foundation walls. Water is heavy, persistent, and deeply uninterested in your renovation budget. If enough water accumulates outside the foundation, it can push through cracks, joints, porous masonry, or weak spots.
The best foundation waterproofing strategy reduces that pressure. Exterior membranes, drainage boards, gravel backfill, footing drains, and sump systems all work together to keep water moving. The aim is not merely to seal the wall; it is to prevent water from lingering there in the first place.
Exterior Membranes
Exterior waterproofing membranes create a protective layer on the outside of below-grade foundation walls. These may include liquid-applied membranes, sheet membranes, or other approved systems. The material selection depends on the foundation type, site conditions, climate, and whether the project is new construction or a retrofit.
For existing homes, exterior waterproofing can be more disruptive because it may require excavation. However, when serious foundation water problems exist, addressing the exterior source is often the most complete solution. Interior systems can manage water after it enters, but exterior systems aim to stop or redirect it before it reaches the wall.
Drainage Boards and Free-Draining Backfill
A waterproof membrane should be protected and supported by drainage. Drainage boards or mats create a path for water to move down toward footing drains. Free-draining gravel or stone can also help water flow instead of sitting against the foundation. Soil that holds water tightly can increase pressure, while drainage layers help relieve it.
Footing Drains and Sump Pumps
Footing drains collect water near the base of the foundation and carry it away. Depending on site conditions, drains may discharge to daylight, a stormwater system, or a sump pit. A sump pump then removes collected water from the house. In areas with power outages during storms, a battery backup pump is a smart safeguard. After all, the exact moment you need a sump pump is often the exact moment the weather decides to test your electrical grid’s self-esteem.
Interior Waterproofing: Useful, But Not a Magic Wand
Interior waterproofing can be helpful, especially where exterior excavation is impossible or too expensive. Interior perimeter drains, sump pumps, vapor barriers, sealants, and dehumidifiers can improve basement conditions. But interior solutions should be chosen carefully because they may manage water rather than solve the exterior cause.
Waterproof paint, for example, may reduce minor dampness on masonry surfaces, but it will not fix poor grading, clogged gutters, missing flashing, or groundwater pressure. A dehumidifier can improve comfort and reduce indoor humidity, but it cannot drain a saturated foundation. Interior waterproofing works best as part of a larger moisture control plan.
Basement Floors and Slabs
Moisture can also move through basement slabs. Depending on the problem, homeowners may use epoxy coatings, vapor-control layers, drainage mats, or flooring systems designed for below-grade spaces. Finished basement materials should be chosen with moisture risk in mind. Carpet directly over a questionable slab is brave in the same way juggling soup is brave.
Crawl Spaces Need Moisture Control Too
Crawl spaces can contribute to whole-house moisture problems. Exposed dirt floors, poor ventilation, plumbing leaks, and exterior drainage issues can all raise humidity. A proper crawl space strategy may include ground vapor barriers, sealed penetrations, drainage, sump pumps, insulation, and conditioning when appropriate. Before sealing or insulating a crawl space, bulk water problems should be corrected first.
Common Warning Signs of Poor Waterproofing
Waterproofing problems often announce themselves quietly before they become dramatic. Homeowners should watch for musty odors, peeling paint, stained drywall, white mineral deposits on masonry, damp baseboards, rusting metal, warped flooring, recurring mold, or water lines on basement walls. Outside, look for overflowing gutters, short downspouts, soil sloping toward the house, pooling water, cracked foundation walls, and failing caulk around openings.
One of the best habits is inspecting the home during or immediately after heavy rain. This is when water reveals its route. Walk around the outside. Watch where downspouts discharge. Look for puddles near the foundation. Check basement corners. Examine window wells. A rainstorm is basically a free diagnostic test, although admittedly one with worse hair.
How the Cambridge House Lesson Applies to Renovations
Renovations are the perfect time to improve waterproofing because walls, foundations, windows, and exterior details may already be exposed. The mistake is treating waterproofing as an afterthought. Better waterproofing should be included in the design conversation early, especially when changing siding, adding insulation, replacing windows, finishing basements, or altering drainage.
At a project like the Cambridge House, the real value is in coordination. The architect, builder, siding installer, roofer, mason, landscaper, and waterproofing specialist all affect water management. A window detail can fail because of poor flashing. A basement can leak because the driveway slopes the wrong way. A wall can rot because the cladding lacks a drainage gap. Waterproofing is a team sport, and water loves it when the team does not talk.
Design Before Products
Homeowners often ask, “What is the best waterproofing product?” A better question is, “What is the best waterproofing design for this house?” Products matter, but sequencing and detailing matter more. The best membrane in the world will fail if it is punctured, poorly lapped, unprotected, or connected to nowhere. The best gutter system will disappoint if it dumps water into a low spot beside the foundation.
Old Houses Need Special Respect
Historic and older homes may have stone foundations, brick masonry, lime mortar, shallow footings, or wall assemblies that dry differently than modern construction. Applying modern materials without understanding the existing structure can trap moisture or create new problems. Better waterproofing at an older house often means balancing protection with drying potential.
For example, sealing the interior side of a damp masonry wall without addressing exterior water may hide symptoms temporarily while moisture remains in the wall. Similarly, installing impermeable materials in the wrong place can reduce drying and increase risk. Old houses are charming, but they are also very good at punishing shortcuts.
Practical Waterproofing Checklist for Homeowners
A strong waterproofing plan does not need to begin with panic or excavation. Start with observation, maintenance, and simple corrections. Then move toward larger repairs if symptoms continue.
Start Outside
Clean gutters. Repair leaks. Extend downspouts. Confirm that soil slopes away from the house. Keep mulch below siding and trim. Check window wells and drains. Look for cracks in patios, walkways, or driveways that direct water toward the foundation. These steps are inexpensive compared with foundation repairs and often solve a surprising number of moisture issues.
Inspect the Building Envelope
Look at siding, trim, flashing, and caulked joints. Pay special attention to windows, doors, roof-wall intersections, decks, and penetrations. If you are replacing siding, ask about a rainscreen gap and proper WRB installation. If you are replacing windows, ask how the sill pan and flashing will be handled. Do not accept “we caulk it real good” as a complete waterproofing strategy.
Evaluate the Basement or Crawl Space
Track when moisture appears. Does it happen after heavy rain, during humid weather, after snowmelt, or all year? Is water entering from walls, floors, window wells, plumbing, or condensation? The timing and location help identify the cause. A contractor who diagnoses the source before selling a system is more valuable than one who sells the same solution to every house.
Plan for Backup
If your home uses a sump pump, test it regularly. Consider a battery backup. Make sure the discharge line sends water away from the foundation and does not freeze or clog. Keep finished basement materials elevated or moisture-resistant where risk remains. A good backup plan is not pessimism; it is homeownership with a helmet.
Better Waterproofing Means Better Indoor Air
Moisture control is not only about protecting materials. It also affects indoor air quality. Damp basements and crawl spaces can contribute to musty odors and mold concerns. Because air often moves upward through a home, moisture problems below living areas can affect comfort above them.
Keeping bulk water out, controlling vapor movement, drying wet materials quickly, and maintaining reasonable indoor humidity all support a healthier home. Waterproofing is therefore not just a construction upgrade; it is part of a whole-house performance strategy. A dry building is easier to heat, cool, finish, clean, and enjoy.
Costly Waterproofing Mistakes to Avoid
The first mistake is assuming one visible leak is the whole problem. Water may enter in one place and appear in another. The second mistake is covering moisture damage before fixing the water source. New drywall over a damp wall is not a repair; it is a future demolition project wearing fresh paint.
The third mistake is relying only on surface sealers when drainage is the real issue. The fourth is ignoring maintenance. Even a well-designed waterproofing system needs clean gutters, working pumps, clear drains, and periodic inspections. Finally, homeowners should be cautious with high-pressure sales tactics. A trustworthy waterproofing contractor should explain the cause, show evidence, offer options, and welcome questions.
Experiences and Field Lessons from Better Waterproofing Projects
One of the most useful experiences related to better waterproofing at the Cambridge House is that water problems rarely have one dramatic villain. More often, they are caused by several small weaknesses working together. A gutter overflows slightly. A downspout ends too close to the wall. Soil has settled near the foundation. A window flashing detail is incomplete. A basement wall has a small crack. None of these issues looks catastrophic alone, but during a long storm, they join forces like a tiny, damp committee.
On renovation projects, the best results usually come from slowing down before closing walls. When sheathing, framing, or foundation surfaces are exposed, that is the moment to inspect carefully. Look for stains, rot, rusted fasteners, soft wood, insect activity, efflorescence, and past patching. These clues tell the story of how water has behaved over time. Ignoring them because the schedule is tight can be expensive later. Waterproofing rewards patience.
Another experience worth sharing is that homeowners often underestimate drying. Stopping the leak is only part of the job. Wet materials need time and airflow to dry. In some cases, damaged insulation, drywall, carpet, or trim must be removed because porous materials can hold moisture. After a leak, fans, dehumidifiers, moisture meters, and proper ventilation can help confirm that the space is actually dry before repairs begin. The wall should not be closed just because it looks less dramatic than it did yesterday.
Contractor communication also makes a major difference. Good waterproofing details cross trade boundaries. The roofer affects the wall. The siding crew affects the flashing. The mason affects the foundation. The landscaper affects drainage. The basement finisher affects vapor control. If each trade only thinks about its own task, gaps appear. A simple meeting about water flow, sequencing, and transitions can prevent confusion. It may not be thrilling, but neither is discovering that three contractors assumed someone else was installing the flashing.
In older homes, experience teaches humility. Materials that have survived for a century often did so because they could dry. Before adding modern membranes, foam insulation, vapor barriers, or sealants, it is important to understand how the assembly handles moisture. Sometimes the right repair is exterior drainage. Sometimes it is repointing masonry with compatible mortar. Sometimes it is improving ventilation or adding a capillary break. The best solution respects the building instead of bullying it.
Finally, the most practical lesson is maintenance. Waterproofing is not a one-time ceremony where everyone lights a candle and declares the house dry forever. Gutters clog. Soil settles. Pumps age. Roots grow. Sealants crack. Storms get weird. A seasonal waterproofing routine can catch problems early: clean gutters in spring and fall, test sump pumps every few months, inspect the basement after big storms, keep downspout extensions connected, and watch for new stains or odors. Better waterproofing is a habit as much as a project.
Conclusion: A Dry House Is a Smarter House
Better waterproofing at the Cambridge House shows that durable homes are built with respect for water. The goal is not to pretend rain, groundwater, vapor, and humidity do not exist. The goal is to manage them with smart design, layered protection, and regular maintenance.
From roof drainage to rainscreen gaps, from flashing details to foundation drains, every layer plays a role. A beautiful renovation should not only look good on reveal day; it should stay dry, stable, and comfortable years later. Waterproofing may never be the flashiest part of a home improvement project, but it is one of the most important. After all, the best kind of water feature is still the one outside the house.
Editorial note: This original article synthesizes widely accepted waterproofing, moisture-control, foundation-drainage, and building-envelope practices from reputable U.S. building science, government, and home-improvement resources. It is written for web publication in a natural, non-duplicated style.