If you clicked Erase All Content and Settings on your Mac and got hit with the message "Erase Assistant Is Not Supported on This Mac", congratulations: your Mac has chosen chaos at the exact moment you wanted simplicity.
The good news is that this error usually has a very clear cause, and even better, it almost always has a practical fix. In many cases, the issue is not that your Mac is broken. It is that your Mac does not meet Apple’s requirements for Erase Assistant, which is the built-in tool that wipes your data, signs you out of Apple services, removes user accounts, and prepares the machine for a clean handoff.
So let’s skip the panic, skip the dramatic sighing, and get to the part that matters: how to figure out why your Mac is showing this message, how to fix it if your Mac should support Erase Assistant, and what to do if it never supported the feature in the first place.
What This Error Really Means
The phrase Erase Assistant is not supported on this Mac sounds like a mysterious software glitch, but most of the time it is really a compatibility message wearing a fake mustache. Apple’s Erase Assistant works only on two types of Macs:
- Macs with Apple silicon, such as M1, M2, M3, or later
- Intel Macs that include the Apple T2 Security Chip
There is one more requirement: your Mac must be running macOS Monterey or later. If your Mac is older, lacks the T2 chip, or is still living in a pre-Monterey time capsule, Erase Assistant will not work. That does not mean you cannot reset or erase the Mac. It only means you must use the older manual method through macOS Recovery and Disk Utility.
That distinction matters. A lot of people waste time trying updates, reboots, and mystical keyboard combinations when the real answer is simply, “This model does not support that tool.” It is less a bug and more a velvet-rope situation.
How to Check Whether Your Mac Should Support Erase Assistant
1. Check your macOS version
Start with the easiest test. Click Apple menu > About This Mac and see which version of macOS you are running. If you are on macOS Big Sur, Catalina, Mojave, or anything older, Erase Assistant will not appear. You need macOS Monterey 12 or newer.
If your Mac is compatible with Monterey or a later version, updating the operating system may be enough to make the option appear. On a supported machine, the menu path is usually:
- macOS Ventura or later: System Settings > General > Transfer or Reset > Erase All Content and Settings
- macOS Monterey: System Preferences > Erase All Content and Settings
If you are not seeing that option and you are definitely on Monterey or newer, move to the next check.
2. Find out whether your Mac has Apple silicon or a T2 chip
Again, click About This Mac. If you see a field labeled Chip and it says something like Apple M1 or Apple M2, your Mac supports Erase Assistant. Easy win.
If your Mac is Intel-based, you need to find out whether it has the Apple T2 Security Chip. You can do that by opening System Information and checking for Controller or iBridge. If you see Apple T2 chip, your Mac qualifies.
Common Intel Macs with the T2 chip include:
- MacBook Air models from 2018 through 2020
- MacBook Pro models from 2018 through 2020
- Mac mini (2018)
- iMac 27-inch (2020)
- iMac Pro
- Mac Pro (2019)
If your Intel Mac is older than that, there is a strong chance it does not have a T2 chip. In that case, the message is expected. Your fix is not to force Erase Assistant to work. Your fix is to erase the Mac another way.
3. Know the difference between “missing” and “unsupported”
Sometimes the feature is not actually unsupported. It is just not where you expected it to be. On Monterey, people often look inside System Settings, which did not yet exist in the modern form. On Ventura and later, people look in the old System Preferences menu and wonder whether Apple has hidden the button behind a curtain for dramatic effect.
So before you declare technological betrayal, make sure you are checking the right menu for your macOS version.
How to Fix the Problem If Your Mac Should Support Erase Assistant
If your Mac has Apple silicon or a T2 chip and is running Monterey or later, try these steps.
Update macOS
If you are on an early Monterey build or an older version with weird behavior, update macOS first. A supported Mac running outdated software can behave like a grumpy houseplant: technically alive, but not especially cooperative.
Use an administrator account
Erase Assistant requires administrator credentials. If you are logged into a standard user account, switch to an admin account before trying again.
Restart the Mac and try again
Yes, this is the oldest advice in tech support, but it exists for a reason. A restart can clear temporary system weirdness, especially if the Mac has pending background processes, stuck settings panes, or update leftovers.
Check for device-management restrictions
If the Mac came from a company, school, or IT-managed environment, some erase and activation settings may be controlled by profiles or remote management. In that case, the issue may not be personal; it may be policy. If the Mac is managed, talk to the administrator before wiping anything.
Remove Boot Camp complications
If your Mac includes a Boot Camp Windows partition, Erase Assistant can sometimes stop and complain about other volumes. When that happens, remove the Windows partition through Boot Camp Assistant first, then run the erase again. Trying to bulldoze past the partition warning is usually how people end up with an unexpected side quest.
What to Do If Your Mac Does Not Support Erase Assistant
This is the path many people actually need. If your Mac is older, Intel-based, or lacks the T2 chip, the correct fix is to erase it manually through Recovery Mode.
Step 1: Back up your data first
Before erasing anything, make a backup with Time Machine or copy your files manually to an external drive. Once you wipe the startup disk, this is not the kind of mistake you undo with a polite apology.
Back up documents, photos, project files, browser exports, license keys, and anything living on your Desktop that you swore you would organize “later.” Later has arrived.
Step 2: Start in macOS Recovery
The method depends on your Mac:
- Apple silicon Mac: Shut down the Mac, then press and hold the power button until you see Loading startup options. Click Options, then Continue.
- Intel Mac: Restart or power on the Mac, then immediately press and hold Command-R until you see the Apple logo or a spinning globe.
If you cannot get Recovery to load on an Intel Mac, try the built-in keyboard if it is a laptop, make sure the keyboard is recognized at startup, and use a network connection if Internet Recovery appears. If necessary, Option-Command-R can install the latest compatible macOS, while Shift-Option-Command-R can reinstall the version that originally came with the Mac, or the closest version still available.
Step 3: Open Disk Utility and erase the startup disk
In the Recovery window, choose Disk Utility and click Continue. Select your startup disk, usually Macintosh HD. Then click Erase.
For most modern Macs, choose:
- Format: APFS
- Name: Macintosh HD, or any name you prefer
If you see the option Erase Volume Group, use that. It is usually the best choice on newer macOS setups because it erases both the system and data volumes together. If you do not see that option, use Erase.
When the erase completes, quit Disk Utility.
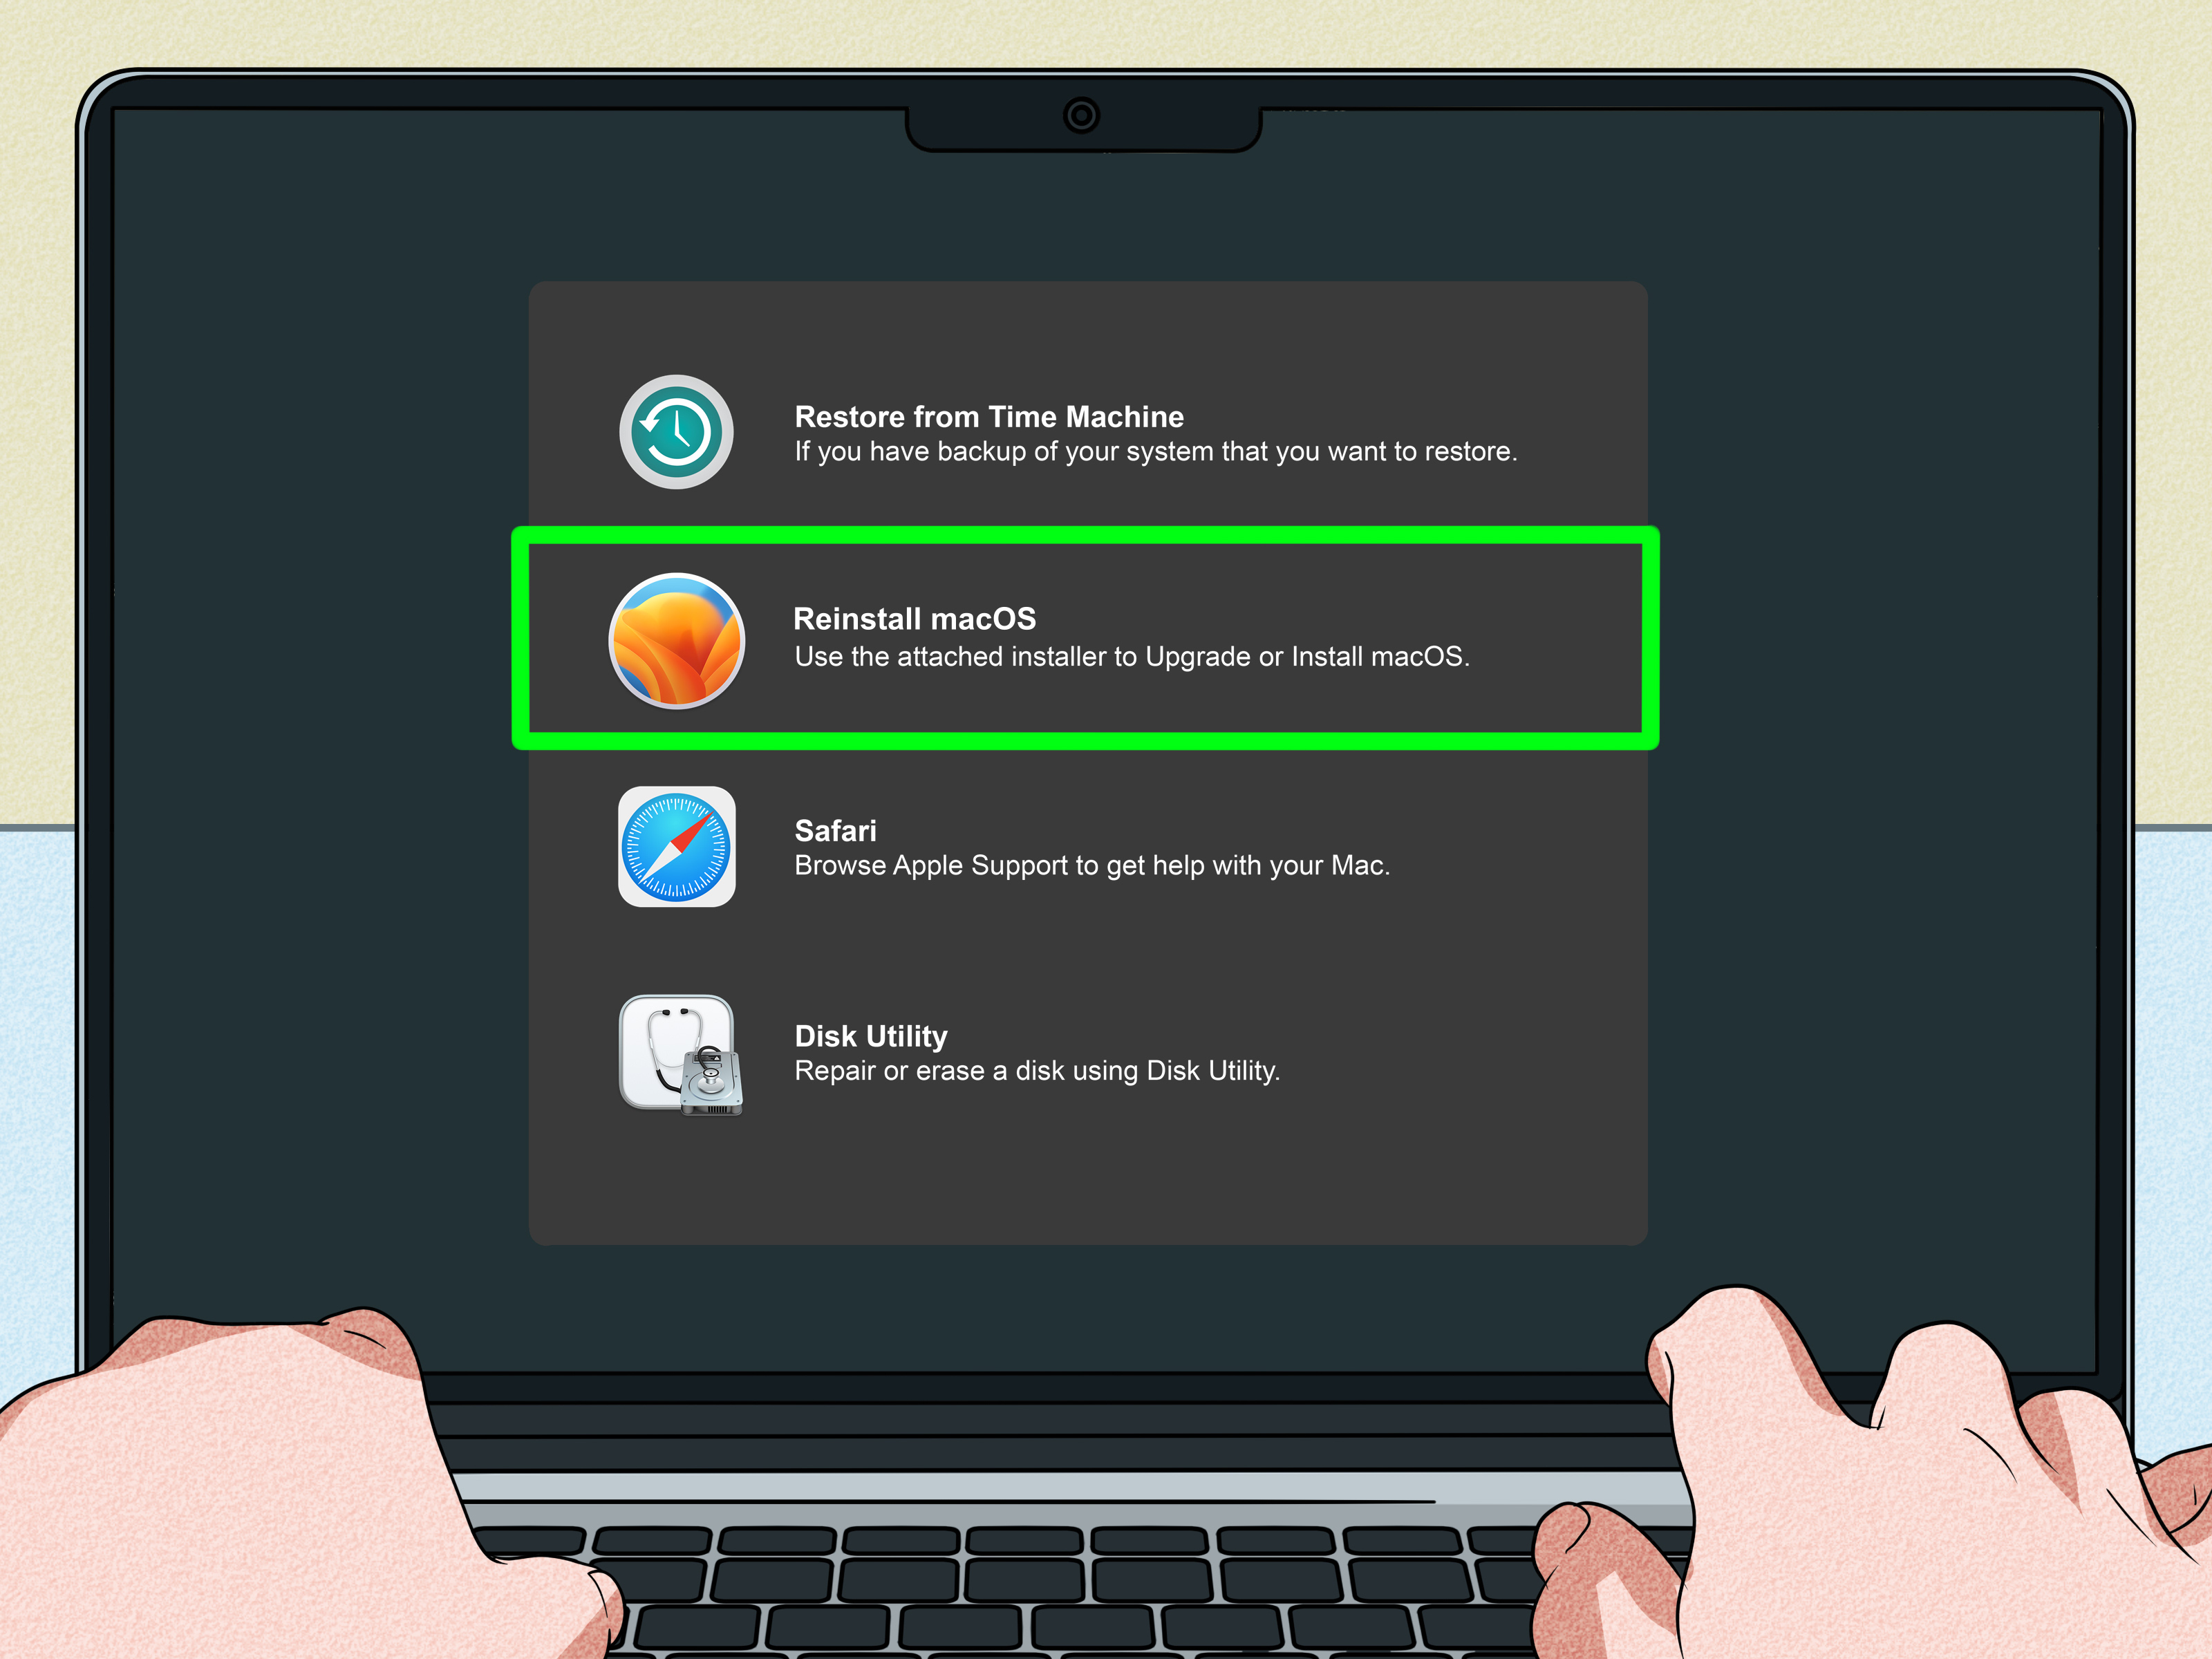
Step 4: Reinstall macOS
Back in the Recovery utilities window, choose Reinstall macOS and follow the on-screen instructions.
On Apple silicon Macs, Recovery generally installs the current version of the most recently installed macOS. On Intel Macs, the exact version can vary depending on whether you used Command-R, Option-Command-R, or Shift-Option-Command-R to enter Recovery.
If you are keeping the Mac, finish setup normally. If you are selling or giving it away, stop when the Hello or setup screen appears, then shut the Mac down. Let the next owner do the setup from scratch.
Activation Lock, Find My, and Other Sneaky Gotchas
Turn off Find My if needed
Erase Assistant normally signs you out, turns off Find My, and removes Activation Lock for you. But if you are erasing manually, double-check that the Mac is no longer tied to your Apple Account.
On your Mac, go to System Settings > your name > iCloud > Find My Mac and turn it off before handing the device to someone else. Turning off Find My removes Activation Lock.
If you no longer have access to the Mac, you can remove it from your account through iCloud’s device tools. This step matters more than many people realize. Nothing ruins a resale faster than the new owner calling to say, “Hi, your Apple ID still owns this computer.”
Do not confuse “erase” with “ready to sell”
Wiping the disk is only part of the handoff. A properly prepared Mac should also be signed out of Apple services, detached from Find My, and left at the setup screen. Think of it as staging a home for sale, except the home is made of aluminum and unresolved browser tabs.
Common Reasons People Get Stuck
Your Mac is running Ventura or Sonoma, but the error still appears
That usually means the hardware is the problem, not the operating system. A newer version of macOS does not magically add a T2 chip to an older Intel Mac. Software can do many things. Time travel is not one of them.
You are trying to erase from the wrong menu
On Monterey, the option lives under System Preferences. On Ventura and later, it moved to System Settings > General > Transfer or Reset. Apple loves moving furniture while we are still walking through the room.
You forgot to back up first
This one is not a technical issue, but it is emotionally powerful. Before any reset, check your Documents folder, Photos library, Downloads folder, Mail archives, and browser bookmarks. People remember this step at exactly the wrong moment: after the erase.
Recovery Mode will not load
If Recovery does not open, try again carefully with the correct method for your Mac type. On Intel models, use the proper startup keys. On Apple silicon, hold the power button until startup options appear. If Internet Recovery appears, make sure Wi-Fi or Ethernet is available.
Before You Sell, Trade In, or Give Away Your Mac
Here is the clean checklist:
- Back up your data
- Sign out of important services if needed
- Turn off Find My if you are erasing manually
- Erase the Mac using Erase Assistant or Recovery Mode
- Reinstall macOS if you used Disk Utility
- Stop at the setup screen and shut the Mac down
That is the version of events you want. Not the version where you hand over the Mac, then remember your tax records, your family photos, and 413 screenshots named Screen Shot Final FINAL 2 were still on the machine.
Experiences From the Mac Reset Trenches
A very common experience goes like this: someone has an older Intel Mac, updates it to a newer version of macOS, sees a tutorial for Erase All Content and Settings, and assumes the feature should now be available. Then they click around, get the Erase Assistant is not supported on this Mac message, and immediately assume something is corrupted. In reality, the Mac is behaving perfectly. It is simply telling the truth in a slightly rude way.
Another common scenario involves a user preparing a MacBook for resale on a weekend. Spirits are high. The laptop is wiped down, the charger is neatly wrapped, and the online listing is practically written. Then the erase process throws an unexpected compatibility error. Panic sets in because the buyer is supposed to arrive in two hours. This is where knowing the manual Recovery Mode method saves the day. Once people realize that Recovery Mode and Disk Utility are the official fallback path, the whole situation becomes much less dramatic.
There is also the “I thought I erased everything, but Activation Lock is still on” experience. This one is especially memorable because it tends to appear after the Mac has already changed hands. The seller feels confused, the buyer feels stuck, and everyone suddenly becomes much more interested in Apple Account passwords than they wanted to be. That is why turning off Find My, or at least confirming the Mac is removed from your account, is such a crucial final step.
Then there are users who get blocked by a Boot Camp partition and have no idea why. They try to erase the Mac, see a warning about other volumes, and wonder whether the machine has developed a second personality. Usually it is just Windows hanging around like an uninvited party guest. Remove the Boot Camp partition properly, and the erase process becomes much smoother.
One of the most relatable experiences is the backup lesson. Plenty of people believe they already copied “everything important,” only to discover after the reset that their Downloads folder was carrying half their digital life. Old invoices, client files, scanned IDs, favorite wallpapers, random ZIP archives from three jobs ago, all gone because they were not included in the backup. It is never the huge obvious files people miss. It is always the sneaky little stuff.
And finally, there is the emotional side of resetting a Mac. For a lot of users, this is not just a technical task. It is the end of an era. Maybe it is the laptop that got them through college, remote work, a side hustle, or a breakup with suspiciously heavy Spotify usage. Seeing the Hello screen after a clean erase can feel strangely satisfying, like closing a chapter and vacuuming the carpet at the same time.
The big takeaway from all these real-world experiences is simple: the error message feels scary, but the solution usually is not. Once you know whether your Mac supports Erase Assistant, the next step becomes obvious. Either use the modern one-click route, or use Recovery Mode and do it the classic way. Different roads, same destination, much less yelling.
Final Takeaway
If you are trying to fix "Erase Assistant Is Not Supported on This Mac", the most important thing to understand is that the message is usually accurate. Erase Assistant is designed for Macs with Apple silicon or an Intel T2 chip running macOS Monterey or later. If your Mac qualifies, update macOS, use an admin account, and check the correct menu path. If your Mac does not qualify, skip the frustration and erase it through macOS Recovery, Disk Utility, and Reinstall macOS.
In other words, you do not need a miracle. You just need the right reset method for your specific Mac model. Apple gave us two roads here: the easy road and the older road. Both work. One just comes with fewer clicks and less existential dread.